
Resolution file
Page 2
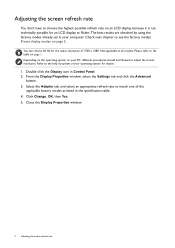
... icon in all models. Not applicable in Control Panel. 2. From the Display Properties window, select the Settings tab and click the Advanced button. 3. Select the Adapter tab, and select an appropriate refresh rate to match one of the applicable factory modes as listed in your computer. Close the Display Properties window...
... icon in all models. Not applicable in Control Panel. 2. From the Display Properties window, select the Settings tab and click the Advanced button. 3. Select the Adapter tab, and select an appropriate refresh rate to match one of the applicable factory modes as listed in your computer. Close the Display Properties window...
User Manual
Page 3
...connected to protective earth. • An approved power cord greater or equal to excess moisture. There are not sure of the type of power adapter will reduce cooling. Otherwise, scratches on the floor or a desk surface directly. DISPOSE OF USED BATTERIES ACCORDING TO THE INSTRUCTIONS. Do not use...greater or equal to H03VV-F, 3G, 0.75mm2 must be used . If you are no service parts inside a carrying case. • Connect the power adapter to a proper power source. • Do not attempt to operate the device or charge the battery. Use of another type of power available, consult...
...connected to protective earth. • An approved power cord greater or equal to excess moisture. There are not sure of the type of power adapter will reduce cooling. Otherwise, scratches on the floor or a desk surface directly. DISPOSE OF USED BATTERIES ACCORDING TO THE INSTRUCTIONS. Do not use...greater or equal to H03VV-F, 3G, 0.75mm2 must be used . If you are no service parts inside a carrying case. • Connect the power adapter to a proper power source. • Do not attempt to operate the device or charge the battery. Use of another type of power available, consult...

User Manual
Page 6
Getting started When unpacking please check you have the following items. If any are missing or damaged, please contact the place of purchase for your region.) Power Adapter 6 Getting started BenQ LCD Monitor Monitor Stand Monitor Base Quick Start Guide CD-ROM Power Cord (Picture may differ from product supplied for a replacement.
Getting started When unpacking please check you have the following items. If any are missing or damaged, please contact the place of purchase for your region.) Power Adapter 6 Getting started BenQ LCD Monitor Monitor Stand Monitor Base Quick Start Guide CD-ROM Power Cord (Picture may differ from product supplied for a replacement.

User Manual
Page 12
... the socket labelled on the rear of the monitor. 4. Pass the cable through the cable management hole on the stand arm first. Connect the power adapter to the monitor. Align the back cover with the holes on the back side of the monitor. Push from the bottom of the back cover...
... the socket labelled on the rear of the monitor. 4. Pass the cable through the cable management hole on the stand arm first. Connect the power adapter to the monitor. Align the back cover with the holes on the back side of the monitor. Push from the bottom of the back cover...

User Manual
Page 13
Carefully lift the monitor, turn -on the power. Connect the other end of the video cable to the power adapter. Picture may need to and turn it over and place it on the monitor. Consider keeping the box and packaging in storage for use in ... end of the box by pressing the power button on . You should position the monitor and angle the screen to minimize unwanted reflections from your BenQ Monitor on the monitor by holding the stand arm. Turn on page 18 to assemble your region. The fitted foam packing is ideal for your...
Carefully lift the monitor, turn -on the power. Connect the other end of the video cable to the power adapter. Picture may need to and turn it over and place it on the monitor. Consider keeping the box and packaging in storage for use in ... end of the box by pressing the power button on . You should position the monitor and angle the screen to minimize unwanted reflections from your BenQ Monitor on the monitor by holding the stand arm. Turn on page 18 to assemble your region. The fitted foam packing is ideal for your...