
Operation Manual
Page 1
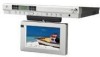
• Multi-function Remote Control • Built-in Hands Free Speaker Phone • Cable Ready 125 Channel TV Tuner • Internal Stereo Speakers • Under Cabinet / Table Top Mounting • A/V Input • AM/FM Radio Tuner - 1 -
• Multi-function Remote Control • Built-in Hands Free Speaker Phone • Cable Ready 125 Channel TV Tuner • Internal Stereo Speakers • Under Cabinet / Table Top Mounting • A/V Input • AM/FM Radio Tuner - 1 -
Operation Manual
Page 2
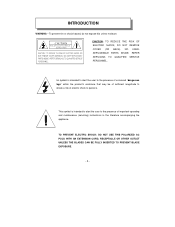
...user to the presence of uninsured "dangerous voltage" within the product's enclosure that may be of sufficient magnitude to constitute a risk of important operating and maintenance (servicing) instructions in the literature accompanying the appliance. NO USERSERVICEABLE PARTS INSIDE. REFER SERVICING TO QUALIFIED SERVICE... PERSONNEL. CAUT ION CAUTION: TO REDUCE THE RISK OF ELECTRIC SHOCK, DO NOT REMOVE COVER (...
...user to the presence of uninsured "dangerous voltage" within the product's enclosure that may be of sufficient magnitude to constitute a risk of important operating and maintenance (servicing) instructions in the literature accompanying the appliance. NO USERSERVICEABLE PARTS INSIDE. REFER SERVICING TO QUALIFIED SERVICE... PERSONNEL. CAUT ION CAUTION: TO REDUCE THE RISK OF ELECTRIC SHOCK, DO NOT REMOVE COVER (...
Operation Manual
Page 3
... technician for a Class B computing device in accordance with the specifications in a particular installation. Reorient or relocate the receiving antenna - Connect the equipment into an outlet on , the user is encouraged to try to correct the interference by one or more of Part 15 or FCC Rules, which the receiver is no guarantee that to which are designed to...
... technician for a Class B computing device in accordance with the specifications in a particular installation. Reorient or relocate the receiving antenna - Connect the equipment into an outlet on , the user is encouraged to try to correct the interference by one or more of Part 15 or FCC Rules, which the receiver is no guarantee that to which are designed to...

Operation Manual
Page 4
... on an unstable cart, stand, tripod bracket, or table. If you are provided for operation from the wall outlet before the product is provided. 11. Use a damp cloth for future reference. 3. Do not use this product on a bed, sofa, rug, or other similar surface. Power Sources - All operating and use liquid cleaners or aerosol. External Accessories - Use only with care. Quick stops, excessive force...
... on an unstable cart, stand, tripod bracket, or table. If you are provided for operation from the wall outlet before the product is provided. 11. Use a damp cloth for future reference. 3. Do not use this product on a bed, sofa, rug, or other similar surface. Power Sources - All operating and use liquid cleaners or aerosol. External Accessories - Use only with care. Quick stops, excessive force...

Operation Manual
Page 5
... qualified service personnel under the following the operating instructions. If the plug still cannot be taken to cords at plugs, convenience receptacles, and the point where they are unable to replace your outlet. Power-supply cords should be equipped with regard to proper grounding of the mast and supporting structure, grounding of the lead-in a fire or electric shock. When installing on...
... qualified service personnel under the following the operating instructions. If the plug still cannot be taken to cords at plugs, convenience receptacles, and the point where they are unable to replace your outlet. Power-supply cords should be equipped with regard to proper grounding of the mast and supporting structure, grounding of the lead-in a fire or electric shock. When installing on...
Operation Manual
Page 6
When the product exhibits a significant change in any service or repairs to this product, ask the service technician to perform safety checks to it's normal operation. Replacement Parts - Safety check - those controls that are required, be sure the service technician has used replacement parts specified by a qualified technician to restore the product to determine that the product is in proper operating condition. 23. F. Unauthorized...
When the product exhibits a significant change in any service or repairs to this product, ask the service technician to perform safety checks to it's normal operation. Replacement Parts - Safety check - those controls that are required, be sure the service technician has used replacement parts specified by a qualified technician to restore the product to determine that the product is in proper operating condition. 23. F. Unauthorized...

Operation Manual
Page 7
... the does not operate normally when following conditions: a) If the unit has been exposed to dangerous voltage or other hazards. Use a damp cloth for cleaning. 2) Use only Audiovox approved accessories. 3) Do not install the product where it is provided to call the CATV (CABLE-TV) system installer's attention to qualified service personnel. 8) Unplug the VE700 from overheating. Refer all...
... the does not operate normally when following conditions: a) If the unit has been exposed to dangerous voltage or other hazards. Use a damp cloth for cleaning. 2) Use only Audiovox approved accessories. 3) Do not install the product where it is provided to call the CATV (CABLE-TV) system installer's attention to qualified service personnel. 8) Unplug the VE700 from overheating. Refer all...

Operation Manual
Page 8
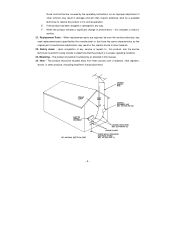
Hardware bag A. 3/4" Mounting screws (4) B. 1-1/4" Mounting screws (4) C. 1-1/2"Mounting screws (4) D. Remote Control Unit - 8 - 4. FM Dipole Antenna 8. Battery 6. Foot (4) E. Angle Coaxial 9. Mounting Hole Template 12. Hole cap (4) 3. FM Antenna Jack 10. Telephone Jack 7. CONTENTS OF PACKAGE PWR TEL TV VOL MUTE CH ENT CH VOL SEEK A/V F M /A M 1 2 3 ERASE 4 5 6 ADD 7 8 9 0 1. AM Antenna 11. Manual VE700TVPhone 2. F. 1/4" Spacer (4) G. 1/2" Spacer (4) H. 3/4" Spacer (4) 5.
Hardware bag A. 3/4" Mounting screws (4) B. 1-1/4" Mounting screws (4) C. 1-1/2"Mounting screws (4) D. Remote Control Unit - 8 - 4. FM Dipole Antenna 8. Battery 6. Foot (4) E. Angle Coaxial 9. Mounting Hole Template 12. Hole cap (4) 3. FM Antenna Jack 10. Telephone Jack 7. CONTENTS OF PACKAGE PWR TEL TV VOL MUTE CH ENT CH VOL SEEK A/V F M /A M 1 2 3 ERASE 4 5 6 ADD 7 8 9 0 1. AM Antenna 11. Manual VE700TVPhone 2. F. 1/4" Spacer (4) G. 1/2" Spacer (4) H. 3/4" Spacer (4) 5.
Operation Manual
Page 9
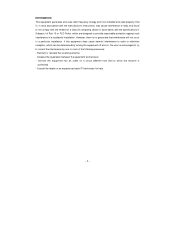
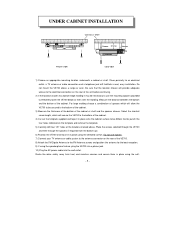
...access to the electrical connection on the rear of the unit before continuing. 2) If the location chosen has bottom edge molding it in place using the speakerphone feature, plug the VE700 into a phone jack. 10) Plug the AC power cable into the wall...VE700. 8) Attach the FM Dipole Antenna to the antenna connector on the template and remove the template. 5) Carefully drill four 1/8″ holes at the locations marked above a range or oven. Close proximity to an electrical outlet, a TV antenna or cable connection and a telephone jack will allow the VE700 to be necessary to use the mounting...
...access to the electrical connection on the rear of the unit before continuing. 2) If the location chosen has bottom edge molding it in place using the speakerphone feature, plug the VE700 into a phone jack. 10) Plug the AC power cable into the wall...VE700. 8) Attach the FM Dipole Antenna to the antenna connector on the template and remove the template. 5) Carefully drill four 1/8″ holes at the locations marked above a range or oven. Close proximity to an electrical outlet, a TV antenna or cable connection and a telephone jack will allow the VE700 to be necessary to use the mounting...
Operation Manual
Page 10
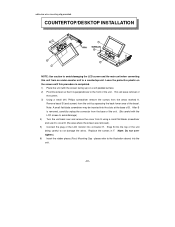
...) 4) Turn the unit back over and remove the cover from an under-counter unit to cover D (the area where the screen was removed). 5) Connect the plug of the unit. (Be careful with the screen facing up) on the screen until this unit from E using a small flat blade screwdriver and use it is removed, carefully unplug the connector from the base of the LCD monitor into...
...) 4) Turn the unit back over and remove the cover from an under-counter unit to cover D (the area where the screen was removed). 5) Connect the plug of the unit. (Be careful with the screen facing up) on the screen until this unit from E using a small flat blade screwdriver and use it is removed, carefully unplug the connector from the base of the LCD monitor into...
Operation Manual
Page 11
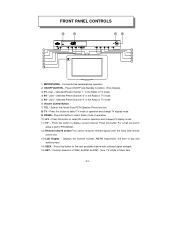
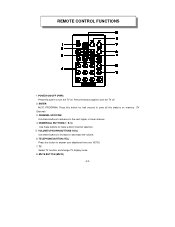
... remote control unit. 13) LCD Display - Press this button For a half second to select TV mode of operation and change TV display mode. 9) FM/AM - For hands-free speakerphone operation. 2) ON/OFF BUTTON - User - Press this button for the next available channel with sufficient signal strength. 15) SET - User - User - Mode or Menu item. - 11 - Power ON/OFF and Standby Condition. (Time Display). 3) P1- Press this button to select AV mode of operation and change A/V display mode. 11) T/F - Press this button to display current channel...
... remote control unit. 13) LCD Display - Press this button For a half second to select TV mode of operation and change TV display mode. 9) FM/AM - For hands-free speakerphone operation. 2) ON/OFF BUTTON - User - Press this button for the next available channel with sufficient signal strength. 15) SET - User - User - Mode or Menu item. - 11 - Power ON/OFF and Standby Condition. (Time Display). 3) P1- Press this button to select AV mode of operation and change A/V display mode. 11) T/F - Press this button to display current channel...
Operation Manual
Page 12
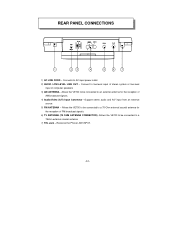
... speakers 3) AM ANTENNA - Receives the Phone LINE INPUT. - 12 - Allows the VE700 to be connected to a 75-Ohm external coaxial antenna for the reception of FM broadcast signals. 6) TV ANTENNA (75 OHM ANTENNA CONNECTOR) -Allows the VE700 to be connected to a 75ohm external coaxial antenna 7) TEL Jack - Allows the VE700 to be connected to an external antenna for the reception of AM broadcast signals. 4) Audio/Video (A/V) Input Connector -Support stereo audio and A/V input from an external source. 5) FM ANTENNA - Connect...
... speakers 3) AM ANTENNA - Receives the Phone LINE INPUT. - 12 - Allows the VE700 to be connected to a 75-Ohm external coaxial antenna for the reception of FM broadcast signals. 6) TV ANTENNA (75 OHM ANTENNA CONNECTOR) -Allows the VE700 to be connected to a 75ohm external coaxial antenna 7) TEL Jack - Allows the VE700 to be connected to an external antenna for the reception of AM broadcast signals. 4) Audio/Video (A/V) Input Connector -Support stereo audio and A/V input from an external source. 5) FM ANTENNA - Connect...

Operation Manual
Page 13
Place a fingernail, or coin in the open slot, slide battery holder out. 2) Install the CR2025 battery into its proper slot. 3) Slide the cover back until it clicks. - 13 - BATTERY INSTALLATION 1) Turn the Remote Control face down.
Place a fingernail, or coin in the open slot, slide battery holder out. 2) Install the CR2025 battery into its proper slot. 3) Slide the cover back until it clicks. - 13 - BATTERY INSTALLATION 1) Turn the Remote Control face down.
Operation Manual
Page 14
... answer your telephone from your VE700. 7. CHANNEL UP/DOWN Use these buttons to turn the TV on memory. (TV Channel) 3. TELEPHONE BUTTON (TEL) Press this button to make a direct channel selection. 5. POWER ON/OFF (PWR) Press this button to save all the stations on . MUTE BUTTON (MUTE) - 14 - REMOTE CONTROL FUNCTIONS 1. NUMERICAL BUTTONS (1~9, 0) Use these buttons to turn the TV off. 2. TV Select TV function and change TV display mode. 8. ENTER AUTO PROGRAM.
... answer your telephone from your VE700. 7. CHANNEL UP/DOWN Use these buttons to turn the TV on memory. (TV Channel) 3. TELEPHONE BUTTON (TEL) Press this button to make a direct channel selection. 5. POWER ON/OFF (PWR) Press this button to save all the stations on . MUTE BUTTON (MUTE) - 14 - REMOTE CONTROL FUNCTIONS 1. NUMERICAL BUTTONS (1~9, 0) Use these buttons to turn the TV off. 2. TV Select TV function and change TV display mode. 8. ENTER AUTO PROGRAM.

Operation Manual
Page 15
FM/AM Each time this button to the next higher or lower station. 10. REMOTE CONTROL FUNCTIONS (Cont) 9. ADD (ERASE) Saving or erasing the current station (TV channel). - 15 - Press this button is pressed, the VE700 will alternate between AM and FM. 11. SEEK BUTTONS (SEEK) Use these buttons to advance to remove all sound (Indicators blinks on display window).
FM/AM Each time this button to the next higher or lower station. 10. REMOTE CONTROL FUNCTIONS (Cont) 9. ADD (ERASE) Saving or erasing the current station (TV channel). - 15 - Press this button is pressed, the VE700 will alternate between AM and FM. 11. SEEK BUTTONS (SEEK) Use these buttons to advance to remove all sound (Indicators blinks on display window).
Operation Manual
Page 16
... THE SCREEN Pivot the screen forward until a comfortable viewing angle is capable of receiving many unscrambled Cable channels without the use of the CATV modes (STD, HRC, or IRC) it will detect the cable system and auto-program the TV tuner to any button at all . Pressing the PWR button on the TV or the remote will turn the unit off and pivot the screen to the time display...
... THE SCREEN Pivot the screen forward until a comfortable viewing angle is capable of receiving many unscrambled Cable channels without the use of the CATV modes (STD, HRC, or IRC) it will detect the cable system and auto-program the TV tuner to any button at all . Pressing the PWR button on the TV or the remote will turn the unit off and pivot the screen to the time display...
Operation Manual
Page 17
... flashing LED's. The alarm is now deactivated. The alarm is now set and activated. SETTING THE CABLE TV MODE 1) Press the SET button three times to enter the cable configuration mode. 2) CABL appears on ). DEACTIVATING ALARM 1) Press the SET button twice to toggle between the hours and minutes. 4) Press the ON/OFF button or T/F button. SETTING THE ALARM TONES 1) Press the SET button twice (power off ). 3) Press the ON/OFF button...
... flashing LED's. The alarm is now deactivated. The alarm is now set and activated. SETTING THE CABLE TV MODE 1) Press the SET button three times to enter the cable configuration mode. 2) CABL appears on ). DEACTIVATING ALARM 1) Press the SET button twice to toggle between the hours and minutes. 4) Press the ON/OFF button or T/F button. SETTING THE ALARM TONES 1) Press the SET button twice (power off ). 3) Press the ON/OFF button...
Operation Manual
Page 18
SETTING THE PRESETS (FOR AM AND FM RADIO OR TV MODES) 1) Tune the desired channel 2) Press the SET button and the display flashes. 3) Selected desired Preset (P1, 2,3) and the LED adjacent to the preset will illuminate to confirm. SETTING THE AIR TV MODE 1) Press the SET button three times to enter the cable configuration mode 2) Press the SEEK button to select the AIR mode AIR appears on the display (switched from broadcast TV (VHF or UHF) to cable TV). 3) When the desired mode is reached, press the PWR button or T/F button to Confirm selection. - 18 -
SETTING THE PRESETS (FOR AM AND FM RADIO OR TV MODES) 1) Tune the desired channel 2) Press the SET button and the display flashes. 3) Selected desired Preset (P1, 2,3) and the LED adjacent to the preset will illuminate to confirm. SETTING THE AIR TV MODE 1) Press the SET button three times to enter the cable configuration mode 2) Press the SEEK button to select the AIR mode AIR appears on the display (switched from broadcast TV (VHF or UHF) to cable TV). 3) When the desired mode is reached, press the PWR button or T/F button to Confirm selection. - 18 -
Operation Manual
Page 20
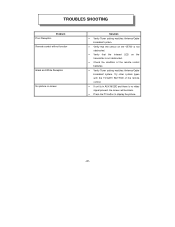
TROUBLES SHOOTING Poor Reception Problem Remote control will not function Black and White Reception No picture on screen Solution • Verify Tuner setting matches Antenna/Cable broadcast system. • Verify that the sensor on the VE700 is not obstructed. • Verify that the infrared LED on the transmitter is no video signal present, the screen will be blank. • Press the TV button to display the picture. - 20 - Try other system types with...
TROUBLES SHOOTING Poor Reception Problem Remote control will not function Black and White Reception No picture on screen Solution • Verify Tuner setting matches Antenna/Cable broadcast system. • Verify that the sensor on the VE700 is not obstructed. • Verify that the infrared LED on the transmitter is no video signal present, the screen will be blank. • Press the TV button to display the picture. - 20 - Try other system types with...


