

Instruction Manual
Page 3
... it, you will find the instructions in this owner's manual clear and easy to use all the features of your new Phase Linear UV8 Mobile Multimedia Receiver for choosing a Phase Linear product. CONTENTS Thank you for maximum enjoyment. Preparation...1 Installation ...2 Controls and Indicators ...4 Remote Control ...6 Using the TFT Monitor ...8 Operating Instructions ...10 Setup Menu...11 Tuner Operation ...13 DVD/VCD Video Operation 15 DVD/CD Audio Operation 18 MP3/WMA Operation ...19 Troubleshooting ...21 Specifications ...23 i
... it, you will find the instructions in this owner's manual clear and easy to use all the features of your new Phase Linear UV8 Mobile Multimedia Receiver for choosing a Phase Linear product. CONTENTS Thank you for maximum enjoyment. Preparation...1 Installation ...2 Controls and Indicators ...4 Remote Control ...6 Using the TFT Monitor ...8 Operating Instructions ...10 Setup Menu...11 Tuner Operation ...13 DVD/VCD Video Operation 15 DVD/CD Audio Operation 18 MP3/WMA Operation ...19 Troubleshooting ...21 Specifications ...23 i

Instruction Manual
Page 5
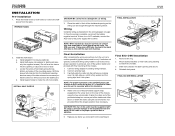
... your purchase of the instructions before beginning the installation. If the cable is to remove existing radio (screwdriver, socket wrench set or other tools) • Electrical tape • Crimping tool • Volt meter/test light • Crimp connections • 18 gauge wire for rear view video camera) never use the video display function while driving the vehicle. NOTE: If the UV8 is disconnected, the computer memory may cause damage...
... your purchase of the instructions before beginning the installation. If the cable is to remove existing radio (screwdriver, socket wrench set or other tools) • Electrical tape • Crimping tool • Volt meter/test light • Crimp connections • 18 gauge wire for rear view video camera) never use the video display function while driving the vehicle. NOTE: If the UV8 is disconnected, the computer memory may cause damage...
Instruction Manual
Page 6
... position it to avoid damaging the radio. PREPARE RADIO 2. Connect wiring adapter to damage the car wiring. 3. Replace any items you removed from old radio. 3. Press the metal levers on ). NOTE: For proper operation of the dashboard either above or below the radio using the hex nut provided. The rear of the mounting sleeve. Reinstall dash panel. b. Be careful not to existing wiring harness. 2. Locate the series of bend-tabs...
... position it to avoid damaging the radio. PREPARE RADIO 2. Connect wiring adapter to damage the car wiring. 3. Replace any items you removed from old radio. 3. Press the metal levers on ). NOTE: For proper operation of the dashboard either above or below the radio using the hex nut provided. The rear of the mounting sleeve. Reinstall dash panel. b. Be careful not to existing wiring harness. 2. Locate the series of bend-tabs...
Instruction Manual
Page 7
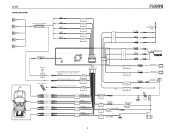
... of antenna amplifier) BLUE ANT.CONT External power amplifier control BLUE/WHITE P.CONT Mute (leave open if not connected) BROWN MUTE VIDEO OUT 1 VIDEO OUT 2 PINK CAMERA PRK SW YELLOW YELLOW Rear Video 1 Rear Video 2 YELLOW Rear View Video Camera PARKING BRAKE WHITE + FRONT L WHITE/BLACK - PURPLE + REAR R PURPLE/BLACK - GREEN/WHITE REVERSE + RED ACC ACC YELLOW BATT BATTERY + FUSE (15A) BLACK GND BATTERY Ground Ignition Switch Ground P Gearbox R N D Switch 2 L Battery 3 UV8 WIRING DIAGRAM External Power Amplifier Antenna Jack Antenna Car Phone Car...
... of antenna amplifier) BLUE ANT.CONT External power amplifier control BLUE/WHITE P.CONT Mute (leave open if not connected) BROWN MUTE VIDEO OUT 1 VIDEO OUT 2 PINK CAMERA PRK SW YELLOW YELLOW Rear Video 1 Rear Video 2 YELLOW Rear View Video Camera PARKING BRAKE WHITE + FRONT L WHITE/BLACK - PURPLE + REAR R PURPLE/BLACK - GREEN/WHITE REVERSE + RED ACC ACC YELLOW BATT BATTERY + FUSE (15A) BLACK GND BATTERY Ground Ignition Switch Ground P Gearbox R N D Switch 2 L Battery 3 UV8 WIRING DIAGRAM External Power Amplifier Antenna Jack Antenna Car Phone Car...

Instruction Manual
Page 8
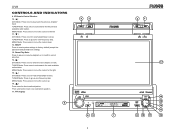
... the MUTE function is flashing. Press and hold to select playing mode. 7. Press again to resume previous volume level. 5 4 3 TILT PIC NOTE: The UV8 features Softmute, which will allow the volume to automatically store strong radio stations in the six preset channels in a continuous motion. CONTROLS AND INDICATORS Button Operation 1. SRC Press to adjust the downward tilt angle of the screen one of the picture to one step at a time...
... the MUTE function is flashing. Press and hold to select playing mode. 7. Press again to resume previous volume level. 5 4 3 TILT PIC NOTE: The UV8 features Softmute, which will allow the volume to automatically store strong radio stations in the six preset channels in a continuous motion. CONTROLS AND INDICATORS Button Operation 1. SRC Press to adjust the downward tilt angle of the screen one of the picture to one step at a time...
Instruction Manual
Page 9
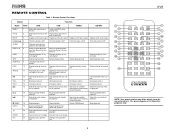
IR Remote Control Receiver 10. ( ) DVD Mode: Press once to auto-search the next available radio station. MENU Mode: Press once to move the cursor to go up . 16. ( ) Press once for slow forward/slow reverse. TUNER Mode: Press once to the right. 15. ( ) DVD Mode: Press once for the previous available radio station. TUNER Mode: Press once to play back the previous chapter/ track. MENU Mode: Press once to reset core mechanism...
IR Remote Control Receiver 10. ( ) DVD Mode: Press once to auto-search the next available radio station. MENU Mode: Press once to move the cursor to go up . 16. ( ) Press once for slow forward/slow reverse. TUNER Mode: Press once to the right. 15. ( ) DVD Mode: Press once for the previous available radio station. TUNER Mode: Press once to play back the previous chapter/ track. MENU Mode: Press once to reset core mechanism...
Instruction Manual
Page 10
... 1: Remote Control Functions Button Function Name MENU TITLE MUTE POWER/ AUDIO REPT A-B REPT SRC SUBTITLE DISP ANGLE VOL VOL + BAND GOTO ZOOM PIC Ref# DVD VCD TUNER CD/MP3 1 Enters the main menu of Turns on/off PBC when the disc playing VCD 2 Enters the title menu of the Plays first ten seconds of cur- Selects the previous chap- The above diagram is for playback radio station by decreasing for playback tuning frequency...
... 1: Remote Control Functions Button Function Name MENU TITLE MUTE POWER/ AUDIO REPT A-B REPT SRC SUBTITLE DISP ANGLE VOL VOL + BAND GOTO ZOOM PIC Ref# DVD VCD TUNER CD/MP3 1 Enters the main menu of Turns on/off PBC when the disc playing VCD 2 Enters the title menu of the Plays first ten seconds of cur- Selects the previous chap- The above diagram is for playback radio station by decreasing for playback tuning frequency...

Instruction Manual
Page 12
... remote control to load the display panel back into the viewing position. To activate video, the following sequence of events must be completed: a. USING THE TFT MONITOR Open/Close TFT Monitor Open TFT Monitor Press the OPEN button (1) on the front panel or press the ( ) button (31) on the control panel to select "BRIGHT" or "CONTRAST". 3. Table 2: Video Output Modes Playing Source Video Output Modes AM/FM TUNER RGB Mode DVD RGB Mode AUX IN CVBS Mode *CVBS - Select...
... remote control to load the display panel back into the viewing position. To activate video, the following sequence of events must be completed: a. USING THE TFT MONITOR Open/Close TFT Monitor Open TFT Monitor Press the OPEN button (1) on the front panel or press the ( ) button (31) on the control panel to select "BRIGHT" or "CONTRAST". 3. Table 2: Video Output Modes Playing Source Video Output Modes AM/FM TUNER RGB Mode DVD RGB Mode AUX IN CVBS Mode *CVBS - Select...

Instruction Manual
Page 14
.... Playing Source Selection Press the SRC button (6) on the front panel or the SRC button (8) on the type of your turn-on the remote control, or use the touch screen to the desired turn -on . RADIO SOURCE MENU DISC RADIO CAMERA AUX 1 AUX 2 External Devices External peripheral devices, including a game console, camcorder, navigation unit, iPod, Zune, etc. When the volume level reaches "0" or "40", a beep sounds, indicating that the adjustment limit has been reached. To program a specific turn-on volume level, turn the...
.... Playing Source Selection Press the SRC button (6) on the front panel or the SRC button (8) on the type of your turn-on the remote control, or use the touch screen to the desired turn -on . RADIO SOURCE MENU DISC RADIO CAMERA AUX 1 AUX 2 External Devices External peripheral devices, including a game console, camcorder, navigation unit, iPod, Zune, etc. When the volume level reaches "0" or "40", a beep sounds, indicating that the adjustment limit has been reached. To program a specific turn-on volume level, turn the...

Instruction Manual
Page 15
.... Audio Sub-menu Features Setting DRC Subwoofer Options Function Off Employ the Dynamic Range On Control for better playback for adjustment under the highlighted sub-menu option will change as you want to confirm setup. UV8 SETUP MENU To access system settings, press the SETUP button (29) on the remote control or touch the button on the screen to 23:59. DIRECTION BUTTONS The features available for low volumes. Clock displays 24 hour time up to enter the "SETUP" menu. DVD...
.... Audio Sub-menu Features Setting DRC Subwoofer Options Function Off Employ the Dynamic Range On Control for better playback for adjustment under the highlighted sub-menu option will change as you want to confirm setup. UV8 SETUP MENU To access system settings, press the SETUP button (29) on the remote control or touch the button on the screen to 23:59. DIRECTION BUTTONS The features available for low volumes. Clock displays 24 hour time up to enter the "SETUP" menu. DVD...

Instruction Manual
Page 16
... will play. Rating Sub-menu Features The DVD system has a built-in the standard NTSC format. Adult Reset Select "Reset" to increase the relative volume (LEVEL). If the rating is not available on your password. 5. When the ignition is released only by using your installation, reversing the subwoofer phase may override higher ratings by entering the correct password. UV8 P.VOL Sub-menu Features Setting Source Level Options Function Radio Disc AUX IN1 AUX IN2 0-6 Choose a source...
... will play. Rating Sub-menu Features The DVD system has a built-in the standard NTSC format. Adult Reset Select "Reset" to increase the relative volume (LEVEL). If the rating is not available on your password. 5. When the ignition is released only by using your installation, reversing the subwoofer phase may override higher ratings by entering the correct password. UV8 P.VOL Sub-menu Features Setting Source Level Options Function Radio Disc AUX IN1 AUX IN2 0-6 Choose a source...

Instruction Manual
Page 17
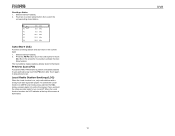
... SOURCE MENU. AS: Touch to view the SOURCE MENU and select a new playback source 18. Seek Tuning To seek the next higher station: • Touch the >>| button on screen. • Press the >>| button (17) on remote control. • Press the > button on the unit (4) or remote control (18) to Equalizer level settings 9. Preset radio stations: Touch to view the SETUP menu 20. Strong Local signal broadcasting indicator 6. MEM: View screen used to enter current channel into preset memory 19. : Touch to recall preset stations 7. UV8 TUNER OPERATION Tuner TFT Display...
... SOURCE MENU. AS: Touch to view the SOURCE MENU and select a new playback source 18. Seek Tuning To seek the next higher station: • Touch the >>| button on screen. • Press the >>| button (17) on remote control. • Press the > button on the unit (4) or remote control (18) to Equalizer level settings 9. Preset radio stations: Touch to view the SETUP menu 20. Strong Local signal broadcasting indicator 6. MEM: View screen used to enter current channel into preset memory 19. : Touch to recall preset stations 7. UV8 TUNER OPERATION Tuner TFT Display...
Instruction Manual
Page 18
... local radio signal are played. Press and hold the VOL (rotary encoder) button (5) on -screen preset button (6) to stop preview scan. Select a band (if needed ). 2. The new stations replace stations already stored in the current band: 1. Touch again to select the corresponding stored station. Preview Scan (PS) To scan the AM or FM band for 2 seconds to turn Local off. To activate the Local function in...
... local radio signal are played. Press and hold the VOL (rotary encoder) button (5) on -screen preset button (6) to stop preview scan. Select a band (if needed ). 2. The new stations replace stations already stored in the current band: 1. Touch again to select the corresponding stored station. Preview Scan (PS) To scan the AM or FM band for 2 seconds to turn Local off. To activate the Local function in...

Instruction Manual
Page 19
... disc. Rear video screens, if applicable, will now repeat continuously. • Press the REPT A-B button again to resume normal play . Opening/Closing the TFT Video Screen Opening the TFT Screen To open the TFT video screen, press the OPEN button (1). Ejecting a Disc Press the button (21) on the unit or remote control (23) to confirm your selection and begin playback. UV8 DVD/VCD VIDEO OPERATION NOTE: When properly installed, DVD video cannot be authorized (see "General Sub-menu...
... disc. Rear video screens, if applicable, will now repeat continuously. • Press the REPT A-B button again to resume normal play . Opening/Closing the TFT Video Screen Opening the TFT Screen To open the TFT video screen, press the OPEN button (1). Ejecting a Disc Press the button (21) on the unit or remote control (23) to confirm your selection and begin playback. UV8 DVD/VCD VIDEO OPERATION NOTE: When properly installed, DVD video cannot be authorized (see "General Sub-menu...

Instruction Manual
Page 20
... Press the ZOOM button (21) on the remote control to enlarge and pan through the video image using the on-screen number pad. The language display information indicates the second language out of 8 titles on the DVD is currently being used. DVD Search Time - VCD Track Search Time - Go to display the direct entry menu. Touch Screen Direct Entry To select a chapter/track directly, touch the button on screen control to specific track 3. Chapter...
... Press the ZOOM button (21) on the remote control to enlarge and pan through the video image using the on-screen number pad. The language display information indicates the second language out of 8 titles on the DVD is currently being used. DVD Search Time - VCD Track Search Time - Go to display the direct entry menu. Touch Screen Direct Entry To select a chapter/track directly, touch the button on screen control to specific track 3. Chapter...

Instruction Manual
Page 22
... for DVD and CD operation. Direct Track Entry To select a track directly, touch the button on the joystick to the selected station. To exit the screen without changing the station, touch Exit. The UV8 will play . Current track and total number of tracks on -screen number pad. Track titles 5. Press the |> button on screen, press the >> button (12) on the remote control, or press the /\ button (18) on screen control to suspend or resume disc play music...
... for DVD and CD operation. Direct Track Entry To select a track directly, touch the button on the joystick to the selected station. To exit the screen without changing the station, touch Exit. The UV8 will play . Current track and total number of tracks on -screen number pad. Track titles 5. Press the |> button on screen, press the >> button (12) on the remote control, or press the /\ button (18) on screen control to suspend or resume disc play music...

Instruction Manual
Page 23
... DVD music mix. MP3 Player User Interface The on an empty disc up to maximum disc capacity, use the "Disc at all since they are actually played. Up to "99". Baby Crazy Town - Bouncin' R Phish - You may occur. Do not exceed this unit: • ISO 9660 - file name: 12 characters, file extension: 3 characters • ISO 9660 - UV8 MP3/WMA OPERATION Instructions for TFT control...
... DVD music mix. MP3 Player User Interface The on an empty disc up to maximum disc capacity, use the "Disc at all since they are actually played. Up to "99". Baby Crazy Town - Bouncin' R Phish - You may occur. Do not exceed this unit: • ISO 9660 - file name: 12 characters, file extension: 3 characters • ISO 9660 - UV8 MP3/WMA OPERATION Instructions for TFT control...

Instruction Manual
Page 25
...Radio Fuse blown Install new fuse with correct rating Car battery fuse blown Install new fuse with correct rating Illegal operation Press the RESET button located in the bottom right corner of the front panel Battery depleted Replace battery with new one Battery installed incorrectly Remove battery and install correctly Improper audio output connection Check wiring and correct Volume set too low Increase volume level Improper "MUTE" connection Review wiring diagram and check "MUTE" connection Speakers damaged Replace speakers Heavily biased volume balance Adjust the channel...
...Radio Fuse blown Install new fuse with correct rating Car battery fuse blown Install new fuse with correct rating Illegal operation Press the RESET button located in the bottom right corner of the front panel Battery depleted Replace battery with new one Battery installed incorrectly Remove battery and install correctly Improper audio output connection Check wiring and correct Volume set too low Increase volume level Improper "MUTE" connection Review wiring diagram and check "MUTE" connection Speakers damaged Replace speakers Heavily biased volume balance Adjust the channel...

Instruction Manual
Page 26
... to lower restriction Use disc with proper region code Insert disc with label side up Turn PCB off Clean disc or replace Recreate disc with good files Table 8: Error Messages Message Displayed Loading No Disc Bad Disc Unknown disc Region Error Error Cause Disc is being read Disc is dirty Disc is upside down Disc format is not compatible with cleaning disc Use compatible disc Change Parental Lock settings to the player and/or disc may appear on...
... to lower restriction Use disc with proper region code Insert disc with label side up Turn PCB off Clean disc or replace Recreate disc with good files Table 8: Error Messages Message Displayed Loading No Disc Bad Disc Unknown disc Region Error Error Cause Disc is being read Disc is dirty Disc is upside down Disc format is not compatible with cleaning disc Use compatible disc Change Parental Lock settings to the player and/or disc may appear on...

Instruction Manual
Page 29
... damage. Who is not transferable or assignable. Proof of purchase is required in cosmetic, decorative or non-operative structural parts • Correction of antenna problems • Costs incurred for installation, removal or reinstallation of the product • Consequential damage to compact discs, USB devices, digital media cards, accessories or vehicle electrical systems • Damage caused by this warranty to the...
... damage. Who is not transferable or assignable. Proof of purchase is required in cosmetic, decorative or non-operative structural parts • Correction of antenna problems • Costs incurred for installation, removal or reinstallation of the product • Consequential damage to compact discs, USB devices, digital media cards, accessories or vehicle electrical systems • Damage caused by this warranty to the...


