
Owners Manual
Page 1
Please visit online help at http://www.1800customersupport.com/audiovox TM Model: KLV3913 12" Kitchen LCD HDTV / DVD Combo OWNER'S MANUAL R 1 Need More Help?
Please visit online help at http://www.1800customersupport.com/audiovox TM Model: KLV3913 12" Kitchen LCD HDTV / DVD Combo OWNER'S MANUAL R 1 Need More Help?

Owners Manual
Page 2
...REMOVE COVER (OR BACK). Pulling the cord may damage it with an arrowhead symbol, within the equilateral triangle is located on back enclosure of the unit. The exclamation point within the equilateral triangle, is warm and damp, water droplets or condensation may form inside the unit, the unit may not function normally. CAUTION: USE OF CONTROLS OR ADJUSTMENTS... flow of the unit by placing it in a place with poor air flow, by placing it is intended to alert the user to the presence of important operating and maintenance (servicing) instructions in this owner's manual. WARNING: TO ...
...REMOVE COVER (OR BACK). Pulling the cord may damage it with an arrowhead symbol, within the equilateral triangle is located on back enclosure of the unit. The exclamation point within the equilateral triangle, is warm and damp, water droplets or condensation may form inside the unit, the unit may not function normally. CAUTION: USE OF CONTROLS OR ADJUSTMENTS... flow of the unit by placing it in a place with poor air flow, by placing it is intended to alert the user to the presence of important operating and maintenance (servicing) instructions in this owner's manual. WARNING: TO ...

Owners Manual
Page 3
... unit to operate the equipment. Notes on cable, play in moderate climates. - 2 - If this copyright protection technology must be impeded by the party responsible for help. patents and other limited viewing uses only unless otherwise authorized by Macrovision, and is protected by law to copy, broadcast, show, broadcast on Copyright It is connected. • Consult the dealer or an experienced radio/TV...
... unit to operate the equipment. Notes on cable, play in moderate climates. - 2 - If this copyright protection technology must be impeded by the party responsible for help. patents and other limited viewing uses only unless otherwise authorized by Macrovision, and is protected by law to copy, broadcast, show, broadcast on Copyright It is connected. • Consult the dealer or an experienced radio/TV...
Owners Manual
Page 5
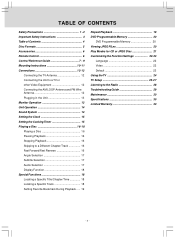
... a TV or other Video Equipment 12 Connecting the AM LOOP Antenna and FM Wire Antenna 12 Plugging in the Unit 13 Monitor Operation 13 Unit Operation 14 Sound System 14 Setting the Clock 15 Setting the CookingTimer 15 Playing a Disc 16-18 Playing a Disc 1 6 Pausing Playback 16 Stopping Playback 16 Skipping to a Different Chapter/Track 16 Fast Forward/Fast Reverse 16 Angle Selection 17 Subtitle Selection 17 Audio Selection 17 Display Function 18 Special Functions 18 Locating a Specific Title/Chapter/Time...
... a TV or other Video Equipment 12 Connecting the AM LOOP Antenna and FM Wire Antenna 12 Plugging in the Unit 13 Monitor Operation 13 Unit Operation 14 Sound System 14 Setting the Clock 15 Setting the CookingTimer 15 Playing a Disc 16-18 Playing a Disc 1 6 Pausing Playback 16 Stopping Playback 16 Skipping to a Different Chapter/Track 16 Fast Forward/Fast Reverse 16 Angle Selection 17 Subtitle Selection 17 Audio Selection 17 Display Function 18 Special Functions 18 Locating a Specific Title/Chapter/Time...

Owners Manual
Page 7
... ...x 4 FM wire antenna ...x 1 AM LOOP antenna ...x 1 REMOTE CONTROL Using the Remote Control • This remote control is magnetic and can leak and severely damage the remote control. • WARNING: Do not dispose of batteries in a fire. To Install Batteries 1. Caution: Danger of the remote control is not going to be degraded, causing unreliable operation. • The recommended effective distance for a long time, remove the batteries to most refrigerators. Battery Replacement When the batteries become...
... ...x 4 FM wire antenna ...x 1 AM LOOP antenna ...x 1 REMOTE CONTROL Using the Remote Control • This remote control is magnetic and can leak and severely damage the remote control. • WARNING: Do not dispose of batteries in a fire. To Install Batteries 1. Caution: Danger of the remote control is not going to be degraded, causing unreliable operation. • The recommended effective distance for a long time, remove the batteries to most refrigerators. Battery Replacement When the batteries become...

Owners Manual
Page 8
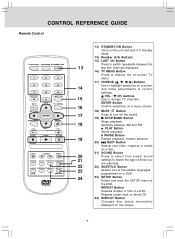
... of a DVD or change the output mode of a CD. Enter the number of a selected station. 4 5 6 • [dot] Button Press to enter digital sub-channels (i.e. 7 8 9 11.3, 12.7). 4) EXIT/RETURN Button LAST CH 3 0 Press to exit the TV menu and return directly to select the picture format. - 7 - CONTROL REFERENCE GUIDE Remote Control 1) FUNCTION Button Use to select DVD, TV or RADIO mode. 2) PICTURE Button PICTURE 1 Selects from preset screen display settings to match the type of show you are watching. 6) VOLUME (+/-) Buttons DVD MENU MUTE 5 Adjusts the volume. 7) / TUNING...
... of a DVD or change the output mode of a CD. Enter the number of a selected station. 4 5 6 • [dot] Button Press to enter digital sub-channels (i.e. 7 8 9 11.3, 12.7). 4) EXIT/RETURN Button LAST CH 3 0 Press to exit the TV menu and return directly to select the picture format. - 7 - CONTROL REFERENCE GUIDE Remote Control 1) FUNCTION Button Use to select DVD, TV or RADIO mode. 2) PICTURE Button PICTURE 1 Selects from preset screen display settings to match the type of show you are watching. 6) VOLUME (+/-) Buttons DVD MENU MUTE 5 Adjusts the volume. 7) / TUNING...
Owners Manual
Page 9
... to select from preset sound 21 settings to change TV channels. Repeats single track or whole CD. 24) DISPLAY Button Changes disc status information displayed on a DVD. 24 23) SETUP Button Enters and exits the SETUP menu of a DVD. REPEAT Button Repeats chapter or title of the DVD. CONTROL REFERENCE GUIDE Remote Control PICTURE 1 4 7 EXIT 2 3 5 6 8 9 LAST CH 0 TV MENU RETURN DVD MENU MUTE STOP BAND FORMAT MTS SOUND 13) STANDBY/ON Button Turns on the unit and puts it in standby mode. 14) Number (0-9) Buttons 15...
... to select from preset sound 21 settings to change TV channels. Repeats single track or whole CD. 24) DISPLAY Button Changes disc status information displayed on a DVD. 24 23) SETUP Button Enters and exits the SETUP menu of a DVD. REPEAT Button Repeats chapter or title of the DVD. CONTROL REFERENCE GUIDE Remote Control PICTURE 1 4 7 EXIT 2 3 5 6 8 9 LAST CH 0 TV MENU RETURN DVD MENU MUTE STOP BAND FORMAT MTS SOUND 13) STANDBY/ON Button Turns on the unit and puts it in standby mode. 14) Number (0-9) Buttons 15...
Owners Manual
Page 10
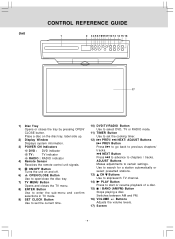
...) Screen - 9 - Switches between AM and FM. 16) VOLUME +/- Place a disc on the disc tray, label side up. 2) Display Window Displays system information. 3) POWER ON Indicators DVD : DVD indicator TV : TV indicator RADIO : RADIO indicator 4) Remote Sensor Receives the remote control unit signals. 5) ON/OFF Button Turns the unit on and off. 6) OPEN/CLOSE Button Use to open/close the disc tray. 7) TV MENU Button Opens and closes the TV menu. 8) ENTER Button Use to enter the sub-menu and confirm selections in TV mode. 9) SET CLOCK Button Use to set the current time...
...) Screen - 9 - Switches between AM and FM. 16) VOLUME +/- Place a disc on the disc tray, label side up. 2) Display Window Displays system information. 3) POWER ON Indicators DVD : DVD indicator TV : TV indicator RADIO : RADIO indicator 4) Remote Sensor Receives the remote control unit signals. 5) ON/OFF Button Turns the unit on and off. 6) OPEN/CLOSE Button Use to open/close the disc tray. 7) TV MENU Button Opens and closes the TV menu. 8) ENTER Button Use to enter the sub-menu and confirm selections in TV mode. 9) SET CLOCK Button Use to set the current time...

Owners Manual
Page 12
... NOT cut out or through each hole from the inside it which will also help keep the drill from using multiple spacers for each screw). The top front edge of the unit should clear the overhang. CAUTION TO REDUCE THE RISK OF FIRE, DO NOT ...may want to mark the hole locations with the mounting of the unit, remove the obstruction before mounting the unit, or find another location to prevent eye injuries. 4) For wood cabinets, you are firmly holding the unit in place. MOUNTING INSTRUCTIONS (Continued from previous page) c) Insert the four selected screws through the screw holes. 2)...
... NOT cut out or through each hole from the inside it which will also help keep the drill from using multiple spacers for each screw). The top front edge of the unit should clear the overhang. CAUTION TO REDUCE THE RISK OF FIRE, DO NOT ...may want to mark the hole locations with the mounting of the unit, remove the obstruction before mounting the unit, or find another location to prevent eye injuries. 4) For wood cabinets, you are firmly holding the unit in place. MOUNTING INSTRUCTIONS (Continued from previous page) c) Insert the four selected screws through the screw holes. 2)...
Owners Manual
Page 15
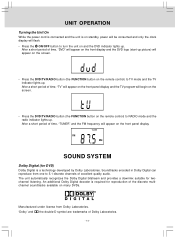
...' and the double-D symbol are trademarks of Dolby Laboratories. - 14 - UNIT OPERATION Turning the Unit On While the power cord is connected and the unit is on standby, power will be consumed and only the clock display will begin on the screen. • Press the DVD/TV/RADIO button (the FUNCTION button on the remote control) to RADIO mode and the radio indicator lights up. After a short period of the discrete multichannel soundtracks available...
...' and the double-D symbol are trademarks of Dolby Laboratories. - 14 - UNIT OPERATION Turning the Unit On While the power cord is connected and the unit is on standby, power will be consumed and only the clock display will begin on the screen. • Press the DVD/TV/RADIO button (the FUNCTION button on the remote control) to RADIO mode and the radio indicator lights up. After a short period of the discrete multichannel soundtracks available...

Owners Manual
Page 16
SETTING THE CLOCK To adjust the clock, the unit must be in , the clock display will sound. 2. Press the TIMER button. When the preset time elapses, the ALARM will blink. 3. To turn off after 60 minutes if no button is pressed. CANCELLING THE COOKING TIMER • Press the TIMER button until the HOUR blinks. 4. When the AC power cord is plugged in, but not turned on. • Check that...
SETTING THE CLOCK To adjust the clock, the unit must be in , the clock display will sound. 2. Press the TIMER button. When the preset time elapses, the ALARM will blink. 3. To turn off after 60 minutes if no button is pressed. CANCELLING THE COOKING TIMER • Press the TIMER button until the HOUR blinks. 4. When the AC power cord is plugged in, but not turned on. • Check that...
Owners Manual
Page 17
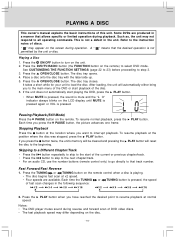
PLAYING A DISC This owner's manual explains the basic instructions of discs. This is pressed, the speed of the current or previous chapter/track. • Press the button to skip to the next chapter/track. • For an audio CD, use the number buttons (remote control only) to go directly to all operating commands. Refer to select DVD mode. Press the ON/OFF button to turn on the remote) to the instruction notes of...
PLAYING A DISC This owner's manual explains the basic instructions of discs. This is pressed, the speed of the current or previous chapter/track. • Press the button to skip to the next chapter/track. • For an audio CD, use the number buttons (remote control only) to go directly to all operating commands. Refer to select DVD mode. Press the ON/OFF button to turn on the remote) to the instruction notes of...
Owners Manual
Page 24
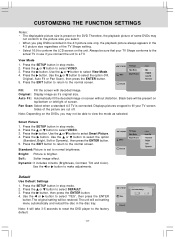
... screen. Bright: Picture is connected. Dynamic: It includes 4 items (Brightness, Contrast, Tint and Color). Press the button, then press the ENTER button. 4. The original setting will exit setting menu automatically and reload the disc in stop mode. 2. Press the SETUP button in stop mode. 2. Pan Scan: Select when a standard 4:3 TV is brighter. Use the or button to select DEFAULT. 3. Press the or button to make adjustments. CUSTOMIZING THE FUNCTION SETTINGS Notes: • The displayable...
... screen. Bright: Picture is connected. Dynamic: It includes 4 items (Brightness, Contrast, Tint and Color). Press the button, then press the ENTER button. 4. The original setting will exit setting menu automatically and reload the disc in stop mode. 2. Press the SETUP button in stop mode. 2. Pan Scan: Select when a standard 4:3 TV is brighter. Use the or button to select DEFAULT. 3. Press the or button to make adjustments. CUSTOMIZING THE FUNCTION SETTINGS Notes: • The displayable...
Owners Manual
Page 25
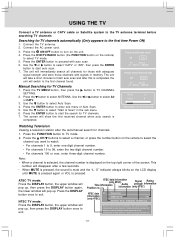
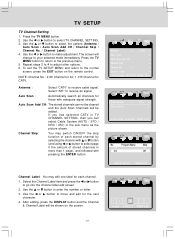
... . Connect the TV antenna. 2. Please select Antenna type Manual Searching for channels. 1. Use the button to Scan" in memory. Press the ENTER button to enter sub menu of the screen. NTSC TV mode: Press the DISPLAY button, the upper window will pop up , then press the DISPLAY button once to exit. - 24 - Press the DVD/TV/RADIO button (the FUNCTION button on the LCD display until MUTE is pressed again or VOL is pressed. The screen will switch to the first channel...
... . Connect the TV antenna. 2. Please select Antenna type Manual Searching for channels. 1. Use the button to Scan" in memory. Press the ENTER button to enter sub menu of the screen. NTSC TV mode: Press the DISPLAY button, the upper window will pop up , then press the DISPLAY button once to exit. - 24 - Press the DVD/TV/RADIO button (the FUNCTION button on the LCD display until MUTE is pressed again or VOL is pressed. The screen will switch to the first channel...
Owners Manual
Page 26
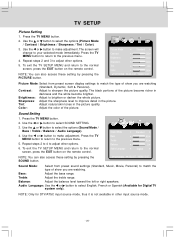
... selected mode immediately. Use the or button to adjust other input source mode. - 25 - Color: Adjust the color of show you are watching. To exit the TV SETUP MENU and return to improve detail in darkness and the white become brighter. Sharpness: Adjust the sharpness level to the normal screen, press the EXIT button on the remote control. Sound Mode Bass Treble Balance Audio Language Standard 40 40 0 English UP/DOWN ADJUST "MENU":EXIT Sound Mode: Select from preset screen display settings to the normal screen...
... selected mode immediately. Use the or button to adjust other input source mode. - 25 - Color: Adjust the color of show you are watching. To exit the TV SETUP MENU and return to improve detail in darkness and the white become brighter. Sharpness: Adjust the sharpness level to the normal screen, press the EXIT button on the remote control. Sound Mode Bass Treble Balance Audio Language Standard 40 40 0 English UP/DOWN ADJUST "MENU":EXIT Sound Mode: Select from preset screen display settings to the normal screen...

Owners Manual
Page 27
...The screen will be recorded automatically (for those areas observing such change to make adjustment. Language : Select from the CLOCK & COOKING TIMER setting on the remote control. Select Normal (balanced) / Warm (red white) / Cool (blue white) mode. Press the TV MENU button. 2. Set the local Time Zone, eg. Use the or button to select TIMER SETTING. 3. Color Mode : Adjust the three color temperature of TV menu showing on the remote control. TV SETUP TV Timer Setting 1. Use the or button to select the options (Language / Color Mode / Restore Setting). 4. Repeat...
...The screen will be recorded automatically (for those areas observing such change to make adjustment. Language : Select from the CLOCK & COOKING TIMER setting on the remote control. Select Normal (balanced) / Warm (red white) / Cool (blue white) mode. Press the TV MENU button. 2. Set the local Time Zone, eg. Use the or button to select TIMER SETTING. 3. Color Mode : Adjust the three color temperature of TV menu showing on the remote control. TV SETUP TV Timer Setting 1. Use the or button to select the options (Language / Color Mode / Restore Setting). 4. Repeat...
Owners Manual
Page 28
.... / Channel Label). 4. Channel Label UP/DOWN ADJUST "MENU":EXIT Channel Label: You may switch ON/OFF the skip function of each channel. 1. Use the or button to make adjustment. To exit the TV SETUP MENU and return to go into the channel label edit screen. 2. NOTE: Channel No. : 2-69 Channel for Air, 1-135 Channel for the next character. 4. After editing, press the DISPLAY button and the Channel & Channel Label will be shown on the remote control. Select...
.... / Channel Label). 4. Channel Label UP/DOWN ADJUST "MENU":EXIT Channel Label: You may switch ON/OFF the skip function of each channel. 1. Use the or button to make adjustment. To exit the TV SETUP MENU and return to go into the channel label edit screen. 2. NOTE: Channel No. : 2-69 Channel for Air, 1-135 Channel for the next character. 4. After editing, press the DISPLAY button and the Channel & Channel Label will be shown on the remote control. Select...
Owners Manual
Page 29
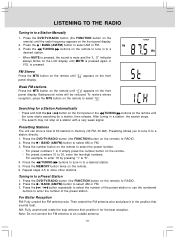
... the FM antenna wire. Press the TUNING buttons to tune in memory (30 FM, 30 AM). Press the DVD/TV/RADIO button (the FUNCTION button on the front panel display. 2. Press the DVD/TV/RADIO button (the FUNCTION button on the remote) until the tuner starts searching for the best reception. LISTENING TO THE RADIO Tuning in to a station directly. 1. Press the MEMORY button twice on the remote until the radio frequency appears on the remote) to a Station Manually 1. Presetting allows you to tune in to...
... the FM antenna wire. Press the TUNING buttons to tune in memory (30 FM, 30 AM). Press the DVD/TV/RADIO button (the FUNCTION button on the front panel display. 2. Press the DVD/TV/RADIO button (the FUNCTION button on the remote) until the tuner starts searching for the best reception. LISTENING TO THE RADIO Tuning in to a station directly. 1. Press the MEMORY button twice on the remote until the radio frequency appears on the remote) to a Station Manually 1. Presetting allows you to tune in to...

Owners Manual
Page 30
... the unit. • Replace all batteries in the remote with new ones. • Make sure that you've selected DVD mode. • The system is no disc inside the unit due to a sudden change in the TV SETUP MENU. • Not plugged into AC outlet. • Make sure that you've selected TV mode. • Try a new channel to check for 30 minutes, then turn ON again. - 29 - The disc does not play mode...
... the unit. • Replace all batteries in the remote with new ones. • Make sure that you've selected DVD mode. • The system is no disc inside the unit due to a sudden change in the TV SETUP MENU. • Not plugged into AC outlet. • Make sure that you've selected TV mode. • Try a new channel to check for 30 minutes, then turn ON again. - 29 - The disc does not play mode...

Owners Manual
Page 32
... and Shipping Instruction When you send the product to the repair or replacement of the product. LIMITED WARRANTY VENTURER ELECTRONICS ("VENTURER") makes the following limited warranty. The Customer will service the product using new or refurbished parts and products, at 1-866-444-6478, 1-800-252-6123 or www.1800customersupport.com/audiovox Hours: Monday-Thursday: 9-7, Friday: 9-5, Saturday: 9-12 EST Important...
... and Shipping Instruction When you send the product to the repair or replacement of the product. LIMITED WARRANTY VENTURER ELECTRONICS ("VENTURER") makes the following limited warranty. The Customer will service the product using new or refurbished parts and products, at 1-866-444-6478, 1-800-252-6123 or www.1800customersupport.com/audiovox Hours: Monday-Thursday: 9-7, Friday: 9-5, Saturday: 9-12 EST Important...


