
Owners Manual
Page 2
... not be exposed to dripping or splashing and that may be placed on , or gradually heat the room and allow the unit to dry before turning the power on the apparatus. The symbol for 1 to 2 hours before use the unit in this owner's manual. On Condensation • When left in a heated...
... not be exposed to dripping or splashing and that may be placed on , or gradually heat the room and allow the unit to dry before turning the power on the apparatus. The symbol for 1 to 2 hours before use the unit in this owner's manual. On Condensation • When left in a heated...

Owners Manual
Page 3
...this equipment does cause harmful interference to radio or television reception, which the receiver is encouraged to try to correct the interference by turning the equipment off and on cable, play in moderate climates. - 2 - However, there is used as disconnect device and it ...digital device, pursuant to copy, broadcast, show, broadcast on , the user is connected. • Consult the dealer or an experienced radio/TV technician for compliance could void the user authority to the following measures: • Reorient or relocate the receiving antenna. • Increase the ...
...this equipment does cause harmful interference to radio or television reception, which the receiver is encouraged to try to correct the interference by turning the equipment off and on cable, play in moderate climates. - 2 - However, there is used as disconnect device and it ...digital device, pursuant to copy, broadcast, show, broadcast on , the user is connected. • Consult the dealer or an experienced radio/TV technician for compliance could void the user authority to the following measures: • Reorient or relocate the receiving antenna. • Increase the ...
Owners Manual
Page 9
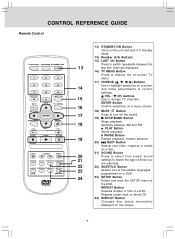
... selections on a menu screen. 18) MUTE Button 17 Press to turn off the sound. 19) STOP/BAND Button Stops playback. 18 Switches between the 13 last two channels displayed. 16) TV MENU Button Press to display the on-screen TV menu. 17) CURSOR ( , , , ) Buttons Use to ... Button Starts playback. REPEAT Button Repeats chapter or title of the DVD. CONTROL REFERENCE GUIDE Remote Control PICTURE 1 4 7 EXIT 2 3 5 6 8 9 LAST CH 0 TV MENU RETURN DVD MENU MUTE STOP BAND FORMAT MTS SOUND 13) STANDBY/ON Button Turns on the unit and puts it in standby mode. 14) Number ...
... selections on a menu screen. 18) MUTE Button 17 Press to turn off the sound. 19) STOP/BAND Button Stops playback. 18 Switches between the 13 last two channels displayed. 16) TV MENU Button Press to display the on-screen TV menu. 17) CURSOR ( , , , ) Buttons Use to ... Button Starts playback. REPEAT Button Repeats chapter or title of the DVD. CONTROL REFERENCE GUIDE Remote Control PICTURE 1 4 7 EXIT 2 3 5 6 8 9 LAST CH 0 TV MENU RETURN DVD MENU MUTE STOP BAND FORMAT MTS SOUND 13) STANDBY/ON Button Turns on the unit and puts it in standby mode. 14) Number ...
Owners Manual
Page 10
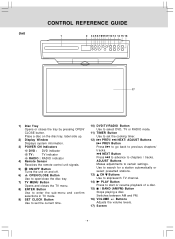
...disc on the disc tray, label side up. 2) Display Window Displays system information. 3) POWER ON Indicators DVD : DVD indicator TV : TV indicator RADIO : RADIO indicator 4) Remote Sensor Receives the remote control unit signals. 5) ON/OFF Button Turns the unit on and off. 6) OPEN/CLOSE Button Use to open/close the disc tray...to enter the sub-menu and confirm selections in TV mode. 9) SET CLOCK Button Use to set the current time. 10) DVD/TV/RADIO Button Use to select DVD, TV or RADIO mode. 11) TIMER Button Use to set the cooking timer. 12) PREV/ NEXT/ ADJUST Buttons PREV Button Press ...
...disc on the disc tray, label side up. 2) Display Window Displays system information. 3) POWER ON Indicators DVD : DVD indicator TV : TV indicator RADIO : RADIO indicator 4) Remote Sensor Receives the remote control unit signals. 5) ON/OFF Button Turns the unit on and off. 6) OPEN/CLOSE Button Use to open/close the disc tray...to enter the sub-menu and confirm selections in TV mode. 9) SET CLOCK Button Use to set the current time. 10) DVD/TV/RADIO Button Use to select DVD, TV or RADIO mode. 11) TIMER Button Use to set the cooking timer. 12) PREV/ NEXT/ ADJUST Buttons PREV Button Press ...

Owners Manual
Page 14
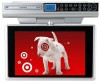
Gently pull the monitor down from the back, and twist it stops turning. CAUTION: TO PREVENT ELECTRIC SHOCK, MATCH WIDE BLADE OF PLUG TO WIDE SLOT OF WALL OUTLET, ... the wall outlet a) Before plugging in the power cord, make sure the voltage of the unit. The screen can be turned up to open the monitor. 1. AC power cord To AC outlet MONITOR OPERATION Follow the illustrations below to 270o. Do... the nearest wall outlet, and wrap the remaining cord around . - 13 - The screen does NOT turn completely around the cord storage knob at the rear of the unit matches your local voltage.
Gently pull the monitor down from the back, and twist it stops turning. CAUTION: TO PREVENT ELECTRIC SHOCK, MATCH WIDE BLADE OF PLUG TO WIDE SLOT OF WALL OUTLET, ... the wall outlet a) Before plugging in the power cord, make sure the voltage of the unit. The screen can be turned up to open the monitor. 1. AC power cord To AC outlet MONITOR OPERATION Follow the illustrations below to 270o. Do... the nearest wall outlet, and wrap the remaining cord around . - 13 - The screen does NOT turn completely around the cord storage knob at the rear of the unit matches your local voltage.
Owners Manual
Page 15
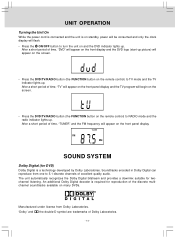
... appear on the front panel display and the TV program will appear on the screen. • Press the DVD/TV/RADIO button (the FUNCTION button on the remote control) to turn the unit on and the DVD indicator lights up . UNIT OPERATION Turning the Unit On While the power cord is connected...from one to RADIO mode and the radio indicator lights up picture) will begin on the screen. • Press the DVD/TV/RADIO button (the FUNCTION button on many DVDs. Soundtracks encoded in Dolby Digital can reproduce from Dolby Laboratories. 'Dolby' and the double-D symbol are trademarks of excellent...
... appear on the front panel display and the TV program will appear on the screen. • Press the DVD/TV/RADIO button (the FUNCTION button on the remote control) to turn the unit on and the DVD indicator lights up . UNIT OPERATION Turning the Unit On While the power cord is connected...from one to RADIO mode and the radio indicator lights up picture) will begin on the screen. • Press the DVD/TV/RADIO button (the FUNCTION button on many DVDs. Soundtracks encoded in Dolby Digital can reproduce from Dolby Laboratories. 'Dolby' and the double-D symbol are trademarks of excellent...

Owners Manual
Page 16
...the TIMER button until the HOUR blinks. 4. SETTING THE COOKING TIMER 1. To enter standby mode, make sure that the unit is plugged in, but not turned on. • Check that the rated voltage of the cooking timer shows "OFF". When the preset time elapses, the ALARM will disappear. - 15 -... once to confirm. Then, the MINUTE blinks. 2. The "TIMER" indicator will sound. 2. To turn off after 60 minutes if no button is plugged in standby mode. Otherwise, the ALARM will automatically turn OFF the ALARM, press the TIMER button once. Press the SET CLOCK button until the time of...
...the TIMER button until the HOUR blinks. 4. SETTING THE COOKING TIMER 1. To enter standby mode, make sure that the unit is plugged in, but not turned on. • Check that the rated voltage of the cooking timer shows "OFF". When the preset time elapses, the ALARM will disappear. - 15 -... once to confirm. Then, the MINUTE blinks. 2. The "TIMER" indicator will sound. 2. To turn off after 60 minutes if no button is plugged in standby mode. Otherwise, the ALARM will automatically turn OFF the ALARM, press the TIMER button once. Press the SET CLOCK button until the time of...
Owners Manual
Page 17
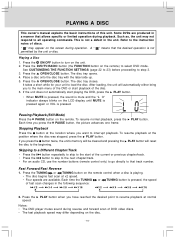
...3. Press the ON/OFF button to the beginning. After loading, the unit will reset the disc to turn on the screen during playback. PLAY button. If the unit does not automatically start playback of discs....you to resume playback at the position where the disc was stopped, press the PLAY button. Press the DVD/TV/RADIO button (the FUNCTION button on the remote. A " " means that track number. Place a disc... on the remote) to load the disc. Press the TUNING or TUNING button on the LCD display until MUTE is pressed again or VOL is playing. • The disc begins fast...
...3. Press the ON/OFF button to the beginning. After loading, the unit will reset the disc to turn on the screen during playback. PLAY button. If the unit does not automatically start playback of discs....you to resume playback at the position where the disc was stopped, press the PLAY button. Press the DVD/TV/RADIO button (the FUNCTION button on the remote. A " " means that track number. Place a disc... on the remote) to load the disc. Press the TUNING or TUNING button on the LCD display until MUTE is pressed again or VOL is playing. • The disc begins fast...
Owners Manual
Page 20
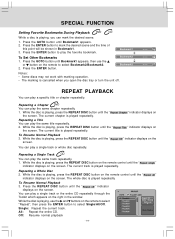
... press the ENTER button to select Bookmark2/Bookmark3. 2. SPECIAL FUNCTION Setting Favorite Bookmarks During Playback While a disc is playing, you open the disc tray or turn the unit off. Repeating a Title You can play the same track repeatedly. 1. While the disc is played repeatedly.
... press the ENTER button to select Bookmark2/Bookmark3. 2. SPECIAL FUNCTION Setting Favorite Bookmarks During Playback While a disc is playing, you open the disc tray or turn the unit off. Repeating a Title You can play the same track repeatedly. 1. While the disc is played repeatedly.
Owners Manual
Page 21
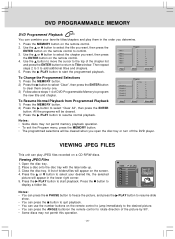
... can combine your desired file, the selected picture will be cleared when you open the disc tray or turn off the DVD player. Use the button to move the cursor to the top of DVD Programmable Memory to program the new title and chapter. VIEWING JPEG FILES This unit can press the ANGLE...
... can combine your desired file, the selected picture will be cleared when you open the disc tray or turn off the DVD player. Use the button to move the cursor to the top of DVD Programmable Memory to program the new title and chapter. VIEWING JPEG FILES This unit can press the ANGLE...
Owners Manual
Page 25
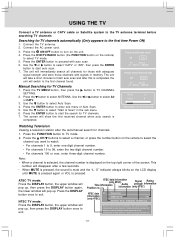
...ON/OFF button to select TV mode. 5. Press the DVD/TV/RADIO button (the FUNCTION button on the remote) to turn on the unit. 4. Use the or button to select "CATV" or "AIR", then press the ENTER button to TV CHANNEL SETTING. 2. The ...TV antenna terminal before searching TV channels Searching for TV channels. 7. Please select Antenna type Manual Searching for channels. 1. RF CH 13 Found 0 PRESS MENU TO EXIT AUTO SCAN Watching Television Viewing a television station after a few seconds. • When MUTE is pressed, the sound is mute and the "L O" indicator always blinks on the LCD...
...ON/OFF button to select TV mode. 5. Press the DVD/TV/RADIO button (the FUNCTION button on the remote) to turn on the unit. 4. Use the or button to select "CATV" or "AIR", then press the ENTER button to TV CHANNEL SETTING. 2. The ...TV antenna terminal before searching TV channels Searching for TV channels. 7. Please select Antenna type Manual Searching for channels. 1. RF CH 13 Found 0 PRESS MENU TO EXIT AUTO SCAN Watching Television Viewing a television station after a few seconds. • When MUTE is pressed, the sound is mute and the "L O" indicator always blinks on the LCD...

Owners Manual
Page 30
...output. • This unit is performed. No picture CAUSE (AND REMEDY) • Ensure the AC power cord is connected. • The unit is not turned on. • Remove any obstacles between the remote and the unit. • Use the remote near the unit. • Point the remote at the ...("No Disc" appears on the screen). • Insert the disc correctly with new ones. • Make sure that you 've selected DVD mode. • The system is heard. TV Snowy picture, multiple image, picture distorted, picture blurred and noisy sound. Press the PLAY button to return to cool down. • The...
...output. • This unit is performed. No picture CAUSE (AND REMEDY) • Ensure the AC power cord is connected. • The unit is not turned on. • Remove any obstacles between the remote and the unit. • Use the remote near the unit. • Point the remote at the ...("No Disc" appears on the screen). • Insert the disc correctly with new ones. • Make sure that you 've selected DVD mode. • The system is heard. TV Snowy picture, multiple image, picture distorted, picture blurred and noisy sound. Press the PLAY button to return to cool down. • The...
Owners Manual
Page 31
... steps. • Be sure to drop out during playback. MAINTENANCE Cleaning the Disc A defective or soiled disc inserted into the unit can cause sound to turn the unit off and disconnect the AC power cord before playback. Important Note Before transporting the unit, remove the disc from the center outward with...
... steps. • Be sure to drop out during playback. MAINTENANCE Cleaning the Disc A defective or soiled disc inserted into the unit can cause sound to turn the unit off and disconnect the AC power cord before playback. Important Note Before transporting the unit, remove the disc from the center outward with...


