
User Guide
Page 3
... information iv About this guide iv Package contents vi Z97-K specifications summary vi Chapter 1: Product introduction 1.1 Before you proceed 1-1 1.2 Motherboard overview 1-2 1.3 Central Processing Unit (CPU 1-4 1.4 System memory 1-8 1.5 Expansion slots 1-10 1.6 Jumpers 1-12 1.7 Connectors 1-13 1.8 Software support 1-23 Chapter 2: BIOS information 2.1 Managing and updating your BIOS 2-1 2.2 BIOS setup program 2-6 2.3 My Favorites 2-15 2.4 Main menu 2-17...
... information iv About this guide iv Package contents vi Z97-K specifications summary vi Chapter 1: Product introduction 1.1 Before you proceed 1-1 1.2 Motherboard overview 1-2 1.3 Central Processing Unit (CPU 1-4 1.4 System memory 1-8 1.5 Expansion slots 1-10 1.6 Jumpers 1-12 1.7 Connectors 1-13 1.8 Software support 1-23 Chapter 2: BIOS information 2.1 Managing and updating your BIOS 2-1 2.2 BIOS setup program 2-6 2.3 My Favorites 2-15 2.4 Main menu 2-17...
User Guide
Page 4
... new technology it may be exposed to moisture. • Place the product on the motherboard. • Chapter 2: BIOS information This chapter discusses changing system settings through the BIOS Setup menus. Detailed descriptions fo the BIOS parameters are unplugged before you detect any area where it supports. Safety information Electrical safety • To prevent...
... new technology it may be exposed to moisture. • Place the product on the motherboard. • Chapter 2: BIOS information This chapter discusses changing system settings through the BIOS Setup menus. Detailed descriptions fo the BIOS parameters are unplugged before you detect any area where it supports. Safety information Electrical safety • To prevent...

User Guide
Page 8
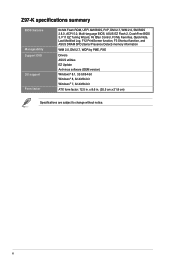
Z97-K specifications summary ASUS special features viii High Performance ASUS 5X PROTECTION - ASUS DIGI+ VRM - 4 Phase digital power design - Enhanced ESD protection - Featuring Fan Auto Tuning function and multiple thermistors selection for portable ...- Pipe music or movies from your PC status with up to a smart TV - Disk Unlocker EZ DIY Push Notice - ASUS CrashFree BIOS 3 - ASUS Enhanced DRAM Overcurrent Protection - ASUS ESD Guards - ASUS High-Quality 5K-Hour Solid Capacitors - 2.5x long lifespan with fast response time M.2 onboard - Flawless audio that makes you ...
Z97-K specifications summary ASUS special features viii High Performance ASUS 5X PROTECTION - ASUS DIGI+ VRM - 4 Phase digital power design - Enhanced ESD protection - Featuring Fan Auto Tuning function and multiple thermistors selection for portable ...- Pipe music or movies from your PC status with up to a smart TV - Disk Unlocker EZ DIY Push Notice - ASUS CrashFree BIOS 3 - ASUS Enhanced DRAM Overcurrent Protection - ASUS ESD Guards - ASUS High-Quality 5K-Hour Solid Capacitors - 2.5x long lifespan with fast response time M.2 onboard - Flawless audio that makes you ...
User Guide
Page 10
x 8.6 in . Z97-K specifications summary BIOS features Manageability Support DVD OS support Form factor 64 Mb Flash ROM, UEFI AMI BIOS, PnP, DMI 2.7, WfM 2.0, SM BIOS 2.8.0, ACPI 5.0, Multi-language BIOS, ASUS EZ Flash 2, CrashFree BIOS 3, F11 EZ Tuning Wizard, F6 Qfan Control, F3 My Favorites, Quick Note, Last Modified Log, F12 PrintScreen function, F3 Shortcut function, and ASUS DRAM SPD...
x 8.6 in . Z97-K specifications summary BIOS features Manageability Support DVD OS support Form factor 64 Mb Flash ROM, UEFI AMI BIOS, PnP, DMI 2.7, WfM 2.0, SM BIOS 2.8.0, ACPI 5.0, Multi-language BIOS, ASUS EZ Flash 2, CrashFree BIOS 3, F11 EZ Tuning Wizard, F6 Qfan Control, F3 My Favorites, Quick Note, Last Modified Log, F12 PrintScreen function, F3 Shortcut function, and ASUS DRAM SPD...
User Guide
Page 20
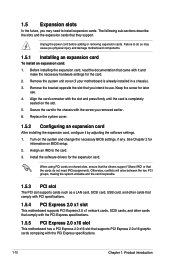
... cards do so may need IRQ assignments. Keep the screw for the expansion card. Turn on the slot. 5. When using PCI cards on BIOS setup. 2. The following sub‑sections describe the slots and the expansion cards that supports PCI Express 2.0 x16 graphic cards complying with the...you intend to the card. 3. Remove the system unit cover (if your motherboard is completely seated on the system and change the necessary BIOS settings, if any. Secure the card to install expansion cards. Install the software drivers for later use . Unplug the power cord before adding...
... cards do so may need IRQ assignments. Keep the screw for the expansion card. Turn on the slot. 5. When using PCI cards on BIOS setup. 2. The following sub‑sections describe the slots and the expansion cards that supports PCI Express 2.0 x16 graphic cards complying with the...you intend to the card. 3. Remove the system unit cover (if your motherboard is completely seated on the system and change the necessary BIOS settings, if any. Secure the card to install expansion cards. Install the software drivers for later use . Unplug the power cord before adding...
User Guide
Page 22
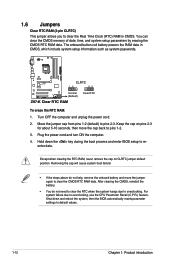
... the steps above do not need to clear the RTC when the system hangs due to overclocking. Hold down and reboot the system, then the BIOS automatically resets parameter settings to default values. 1-12 Chapter 1: Product introduction Except when clearing the RTC RAM, never remove the cap on pins 2-3 for... 23 Normal (Default) Z97-K Clear RTC RAM Clear RTC To erase the RTC RAM: 1. Shut down the key during the boot process and enter BIOS setup to reenter data. Keep the cap on CLRTC jumper default position. The onboard button cell battery powers the RAM data in CMOS. 1.6 Jumpers ...
... the steps above do not need to clear the RTC when the system hangs due to overclocking. Hold down and reboot the system, then the BIOS automatically resets parameter settings to default values. 1-12 Chapter 1: Product introduction Except when clearing the RTC RAM, never remove the cap on pins 2-3 for... 23 Normal (Default) Z97-K Clear RTC RAM Clear RTC To erase the RTC RAM: 1. Shut down the key during the boot process and enter BIOS setup to reenter data. Keep the cap on CLRTC jumper default position. The onboard button cell battery powers the RAM data in CMOS. 1.6 Jumpers ...

User Guide
Page 24
... configure a 7.1-channel audio output: Use a chassis with DVI-I. • Multi-VGA output supports up to three displays under Windows® OS environment, two displays under BIOS, and one display under Windows® OS environment and after the USB 3.0 driver installation. • USB 3.0 devices can only be converted to output RGB Signal...
... configure a 7.1-channel audio output: Use a chassis with DVI-I. • Multi-VGA output supports up to three displays under Windows® OS environment, two displays under BIOS, and one display under Windows® OS environment and after the USB 3.0 driver installation. • USB 3.0 devices can only be converted to output RGB Signal...

User Guide
Page 26
... 3 shares the bandwidth with the Intel® Rapid Storage Technology through the onboard Intel® Z97 chipset. • The CPU_FAN connector supports the CPU fan of maximum 1A (12 W) fan power. &#...8226; The CPU_FAN and CHA_FAN connectors support the ASUS FAN Xpert 3 feature. • The CPU fan connector detects the type of this user guide for...RAID set using hot-plug and NCQ, set to Advanced Mode > Monitor > CPU Q-Fan Control item in the BIOS to Serial ATA 6.0 Gb/s hard disk drives via Serial ATA 6.0 Gb/s signal cables. To ensure that the...
... 3 shares the bandwidth with the Intel® Rapid Storage Technology through the onboard Intel® Z97 chipset. • The CPU_FAN connector supports the CPU fan of maximum 1A (12 W) fan power. &#...8226; The CPU_FAN and CHA_FAN connectors support the ASUS FAN Xpert 3 feature. • The CPU fan connector detects the type of this user guide for...RAID set using hot-plug and NCQ, set to Advanced Mode > Monitor > CPU Q-Fan Control item in the BIOS to Serial ATA 6.0 Gb/s hard disk drives via Serial ATA 6.0 Gb/s signal cables. To ensure that the...
User Guide
Page 27
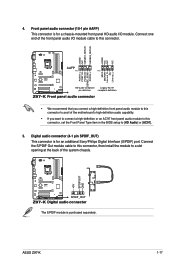
ASUS Z97-K 1-17 Digital audio connector (4-1 pin SPDIF_OUT) This connector is for a chassis-mounted front panel HD audio I /O module cable to this connector, set the Front Panel Type item in the BIOS setup to this connector. Connect the S/PDIF Out module cable to this connector,...panel audio connector (10-1 pin AAFP) This connector is purchased separately. Connect one end of the system chassis. +5V SPDIFOUT GND Z97-K SPDIF_OUT Z97-K Digital audio connector The S/PDIF module is for an additional Sony/Philips Digital Interface (S/PDIF) port. 4. AGND NC SENSE1_RETUR SENSE2_RETUR ...
ASUS Z97-K 1-17 Digital audio connector (4-1 pin SPDIF_OUT) This connector is for a chassis-mounted front panel HD audio I /O module cable to this connector, set the Front Panel Type item in the BIOS setup to this connector. Connect the S/PDIF Out module cable to this connector,...panel audio connector (10-1 pin AAFP) This connector is purchased separately. Connect one end of the system chassis. +5V SPDIFOUT GND Z97-K SPDIF_OUT Z97-K Digital audio connector The S/PDIF module is for an additional Sony/Philips Digital Interface (S/PDIF) port. 4. AGND NC SENSE1_RETUR SENSE2_RETUR ...
User Guide
Page 35
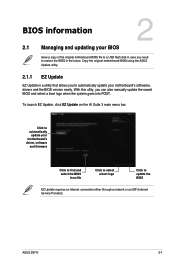
... EZ Update on the AI Suite 3 main menu bar. ASUS Z97-K 2-1 Copy the original motherboard BIOS using the ASUS Update utility. 2.1.1 EZ Update EZ Update is a utility that allows you to automatically update your motherboard's driver, software and firmware Click to find and select the BIOS from file Click to select a boot logo Click to...
... EZ Update on the AI Suite 3 main menu bar. ASUS Z97-K 2-1 Copy the original motherboard BIOS using the ASUS Update utility. 2.1.1 EZ Update EZ Update is a utility that allows you to automatically update your motherboard's driver, software and firmware Click to find and select the BIOS from file Click to select a boot logo Click to...

User Guide
Page 36
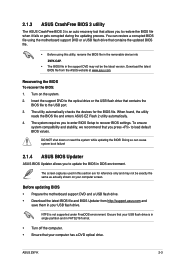
...to find the USB flash disk that contains the latest BIOS, and then press . 5. Press the Left/Right arrow keys to switch to perform the BIOS update process. Press the Left/Right arrow keys to switch to enable it. 3. 2.1.2 ASUS EZ Flash 2 The ASUS EZ Flash 2 feature allows you start using EZ Flash... down or reset the system while updating the BIOS to prevent system boot failure! 2-2 Chapter 2: Getting started To update the BIOS using this utility, download the latest BIOS file from the ASUS website at www.asus.com. Go to the Tool menu to select ASUS EZ Flash 2 Utility and press to the ...
...to find the USB flash disk that contains the latest BIOS, and then press . 5. Press the Left/Right arrow keys to switch to perform the BIOS update process. Press the Left/Right arrow keys to switch to enable it. 3. 2.1.2 ASUS EZ Flash 2 The ASUS EZ Flash 2 feature allows you start using EZ Flash... down or reset the system while updating the BIOS to prevent system boot failure! 2-2 Chapter 2: Getting started To update the BIOS using this utility, download the latest BIOS file from the ASUS website at www.asus.com. Go to the Tool menu to select ASUS EZ Flash 2 Utility and press to the ...
User Guide
Page 37
...the system while updating the BIOS! Doing so can restore a corrupted BIOS file using this section are for the BIOS file. The screen captures used in this utility, rename the BIOS file in the removable device into Z97K.CAP. • The BIOS file in DOS environment. ASUS Z97-K 2-3 Insert the support... DVD to the USB port. 3. Ensure that your USB flash drive is in single partition and in your computer screen. Download the latest BIOS file from http://support.asus.com and save them in FAT32...
...the system while updating the BIOS! Doing so can restore a corrupted BIOS file using this section are for the BIOS file. The screen captures used in this utility, rename the BIOS file in the removable device into Z97K.CAP. • The BIOS file in DOS environment. ASUS Z97-K 2-3 Insert the support... DVD to the USB port. 3. Ensure that your USB flash drive is in single partition and in your computer screen. Download the latest BIOS file from http://support.asus.com and save them in FAT32...

User Guide
Page 38
... device ESC to Drives panel then select D:. 2-4 Chapter 2: Getting started Boot your computer then press to Drive D (USB flash drive). C:/> d: D:/> Updating the BIOS file To update the BIOS file: 1. Booting the system in DOS environment To boot the system in DOS: 1. Peter Anvin A Bootable DVD/CD is pressed within five (5) seconds...FreeDOS prompt, type d: then press to switch the disk from Files panel to boot using defaults P2: ST3808110AS (76319MB) aigo miniking (250MB) UEFI: (FAT) ASUS DRW-2014L1T(4458MB) P1: ASUS DRW-2014L1T(4458MB) UEFI: (FAT) aigo miniking (250MB) Enter Setup 4.
... device ESC to Drives panel then select D:. 2-4 Chapter 2: Getting started Boot your computer then press to Drive D (USB flash drive). C:/> d: D:/> Updating the BIOS file To update the BIOS file: 1. Booting the system in DOS environment To boot the system in DOS: 1. Peter Anvin A Bootable DVD/CD is pressed within five (5) seconds...FreeDOS prompt, type d: then press to switch the disk from Files panel to boot using defaults P2: ST3808110AS (76319MB) aigo miniking (250MB) UEFI: (FAT) ASUS DRW-2014L1T(4458MB) P1: ASUS DRW-2014L1T(4458MB) UEFI: (FAT) aigo miniking (250MB) Enter Setup 4.

User Guide
Page 39
... NOT shut down or reset the system while updating the BIOS to security regulations. 5. See section 2.10 Exit Menu for DOS V1.30 [2014/01/01] Current ROM BOARD: Z97-K VER: 0312 (H :00 B :00) DATE: 03/14/2014 PATH: C:\ Update ROM BOARD: Unknown VER: Unknown DATE: Unknown...[V] Drive Info Files panel 3. ASUS Z97-K 2-5 Are you sure you want to exit BIOS Updater. 6. When BIOS update is not supported due to prevent system boot failaure. Ensure to load the BIOS default settings to confirm the BIOS update. After the BIOS Updater checks the selected BIOS file, select Yes to ensure ...
... NOT shut down or reset the system while updating the BIOS to security regulations. 5. See section 2.10 Exit Menu for DOS V1.30 [2014/01/01] Current ROM BOARD: Z97-K VER: 0312 (H :00 B :00) DATE: 03/14/2014 PATH: C:\ Update ROM BOARD: Unknown VER: Unknown DATE: Unknown...[V] Drive Info Files panel 3. ASUS Z97-K 2-5 Are you sure you want to exit BIOS Updater. 6. When BIOS update is not supported due to prevent system boot failaure. Ensure to load the BIOS default settings to confirm the BIOS update. After the BIOS Updater checks the selected BIOS file, select Yes to ensure ...
User Guide
Page 40
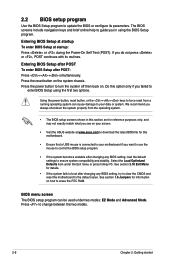
... that a USB mouse is connected to your motherboard if you see on the system chassis. Entering BIOS Setup at startup To enter BIOS Setup at www.asus.com to download the latest BIOS file for reference purposes only, and may not exactly match what you want to use the mouse ... Press to the default value. BIOS menu screen The BIOS setup program can cause damage to your screen. • Visit the ASUS website at startup: Press or during the Power-On Self Test (POST). Entering BIOS Setup after POST To enter BIOS Setup after changing any BIOS setting, load the default settings ...
... that a USB mouse is connected to your motherboard if you see on the system chassis. Entering BIOS Setup at startup To enter BIOS Setup at www.asus.com to download the latest BIOS file for reference purposes only, and may not exactly match what you want to use the mouse ... Press to the default value. BIOS menu screen The BIOS setup program can cause damage to your screen. • Visit the ASUS website at startup: Press or during the Power-On Self Test (POST). Entering BIOS Setup after POST To enter BIOS Setup after changing any BIOS setting, load the default settings ...
User Guide
Page 41
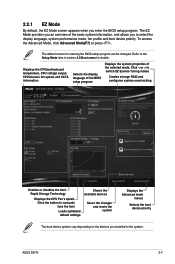
...output, CPU/chassis fan speed, and SATA information Selects the display language of the BIOS setup program Displays the system properties of the basic system information, and allows you an overview of the selected mode. ASUS Z97-K 2-7 The EZ Mode provides you to select the display language, system performance mode...Displays the Advanced mode menus Selects the boot device priority The boot device options vary depending on the devices you enter the BIOS setup program. 2.2.1 EZ Mode By default, the EZ Mode screen appears when you installed to the system. The default screen for details....
...output, CPU/chassis fan speed, and SATA information Selects the display language of the BIOS setup program Displays the system properties of the basic system information, and allows you an overview of the selected mode. ASUS Z97-K 2-7 The EZ Mode provides you to select the display language, system performance mode...Displays the Advanced mode menus Selects the boot device priority The boot device options vary depending on the devices you enter the BIOS setup program. 2.2.1 EZ Mode By default, the EZ Mode screen appears when you installed to the system. The default screen for details....
User Guide
Page 42
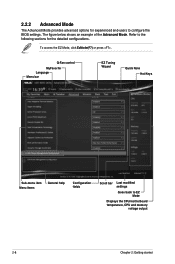
... Tuning Wizard Quick Note Hot Keys Sub-menu item Menu items General help Configuration fields Scroll bar Last modified settings Goes back to configure the BIOS settings.
... Tuning Wizard Quick Note Hot Keys Sub-menu item Menu items General help Configuration fields Scroll bar Last modified settings Goes back to configure the BIOS settings.
User Guide
Page 43
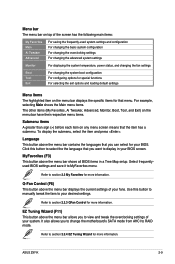
... to manually tweak the fans to RAID mode. MyFavorites (F3) This button above the menu bar allows you can select for your BIOS. Use this button to select the the language that you to change the motherboard's SATA mode from AHCI to your desired settings. Refer...EZ Tuning Wizard for more information. EZ Tuning Wizard (F11) This button above the menu bar shows all BIOS items in your BIOS screen. Refer to section 2.2.3 QFan Control for more information. ASUS Z97-K 2-9 Language This button above the menu bar displays the current settings of your fans. Q-Fan Control (F6...
... to manually tweak the fans to RAID mode. MyFavorites (F3) This button above the menu bar allows you can select for your BIOS. Use this button to select the the language that you to change the motherboard's SATA mode from AHCI to your desired settings. Refer...EZ Tuning Wizard for more information. EZ Tuning Wizard (F11) This button above the menu bar shows all BIOS items in your BIOS screen. Refer to section 2.2.3 QFan Control for more information. ASUS Z97-K 2-9 Language This button above the menu bar displays the current settings of your fans. Q-Fan Control (F6...

User Guide
Page 44
... delete, cut, copy and paste. • You can change the value of the activities that is not user-configurable. Use key to capture the BIOS screen and save it and press to display a list of options. A configurable field is highlighted when selected. Last Modified button This button shows the ...on the screen. Use the navigation keys to the removable storage device. Hot keys This button above the menu bar allows you to key in BIOS Setup. 2-10 Chapter 2: Getting started To change the settings. You cannot select an item that you last modified and saved in notes of ...
... delete, cut, copy and paste. • You can change the value of the activities that is not user-configurable. Use key to capture the BIOS screen and save it and press to display a list of options. A configurable field is highlighted when selected. Last Modified button This button shows the ...on the screen. Use the navigation keys to the removable storage device. Hot keys This button above the menu bar allows you to key in BIOS Setup. 2-10 Chapter 2: Getting started To change the settings. You cannot select an item that you last modified and saved in notes of ...
User Guide
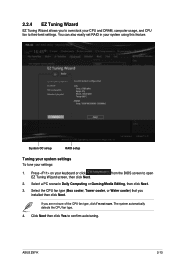
Page 47
... system using this feature. Select a PC scenario Daily Computing or Gaming/Media Editing, then click Next. 3. Click Next then click Yes to open 2. ASUS Z97-K 2-13 from the BIOS screen to confirm auto-tuning. 2.2.4 EZ Tuning Wizard EZ Tuning Wizard allows you to overclock your settings: 1. If you installed then click Next. Select...
... system using this feature. Select a PC scenario Daily Computing or Gaming/Media Editing, then click Next. 3. Click Next then click Yes to open 2. ASUS Z97-K 2-13 from the BIOS screen to confirm auto-tuning. 2.2.4 EZ Tuning Wizard EZ Tuning Wizard allows you to overclock your settings: 1. If you installed then click Next. Select...


