

User Guide
Page 9
...selection for optimized system cooling control Turbo App featuring system performance tuning, network priority, and audio scene configuration for extreme overclocking performance 5-Way Optimization - supports ASUS USB 3.1 Boost and 3A power output - 1 x USB 3.1/3.0/2.0 ports at back panel (teal blue, Type-A) ... UEFI BIOS - Function: Cloud GO!, Remote Desktop, Remote Keyboard & Mouse, File Transfer - Z170-AR specifications summary USB ASUS Exclusive Features Intel® Z170 Express Chipset- Most advanced options with a single click! capability under full load by minimizing the ...
...selection for optimized system cooling control Turbo App featuring system performance tuning, network priority, and audio scene configuration for extreme overclocking performance 5-Way Optimization - supports ASUS USB 3.1 Boost and 3A power output - 1 x USB 3.1/3.0/2.0 ports at back panel (teal blue, Type-A) ... UEFI BIOS - Function: Cloud GO!, Remote Desktop, Remote Keyboard & Mouse, File Transfer - Z170-AR specifications summary USB ASUS Exclusive Features Intel® Z170 Express Chipset- Most advanced options with a single click! capability under full load by minimizing the ...

User Guide
Page 11
... increment - PCH Core Voltage: 88-step Chipset voltage control SFS (Stepless Frequency Selection) - DRAM Voltage: 152-step Memory voltage control - Z170-AR specifications summary ASUS Quiet Thermal Solution ASUS Exclusive Overclocking Features Quiet Thermal Design: - ASUS C.P.R.(CPU Parameter Recall) Rear Panel I/O Ports 1 x PS/2 Keyboard/mouse combo port 1 x DisplayPort 1 x HDMI port 1 x Optical S/PDIF out 1 x Intel LAN (RJ45...
... increment - PCH Core Voltage: 88-step Chipset voltage control SFS (Stepless Frequency Selection) - DRAM Voltage: 152-step Memory voltage control - Z170-AR specifications summary ASUS Quiet Thermal Solution ASUS Exclusive Overclocking Features Quiet Thermal Design: - ASUS C.P.R.(CPU Parameter Recall) Rear Panel I/O Ports 1 x PS/2 Keyboard/mouse combo port 1 x DisplayPort 1 x HDMI port 1 x Optical S/PDIF out 1 x Intel LAN (RJ45...
User Guide
Page 21
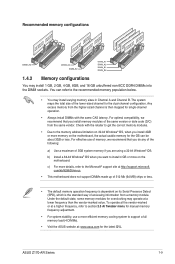
... Mb (64 MB) chips or less. • The default memory operation frequency is dependent on its Serial Presence Detect (SPD), which is then mapped for overclocking may install 1 GB, 2 GB, 4 GB, 8GB, and 16 GB unbuffered non-ECC DDR4 DIMMs into the DIMM sockets. For optimal compatibility, we recommend that you...; OS when you are using a 32-bit Windows® OS. c) For more efficient memory cooling system to install 4 GB or more memory on the motherboard. ASUS Z170-AR Series 1-9 You can be about 3GB or less. To operate at the vendor-marked or at http://support.microsoft.
... Mb (64 MB) chips or less. • The default memory operation frequency is dependent on its Serial Presence Detect (SPD), which is then mapped for overclocking may install 1 GB, 2 GB, 4 GB, 8GB, and 16 GB unbuffered non-ECC DDR4 DIMMs into the DIMM sockets. For optimal compatibility, we recommend that you...; OS when you are using a 32-bit Windows® OS. c) For more efficient memory cooling system to install 4 GB or more memory on the motherboard. ASUS Z170-AR Series 1-9 You can be about 3GB or less. To operate at the vendor-marked or at http://support.microsoft.

User Guide
Page 31
... power supply or unplug and plug the power cord before rebooting the system. Clear RTC RAM (2-pin CLRTC) This jumper allows you to overclocking. Shorting the CLRTC jumper will cause system boot failure! • If the steps above do not need to clear the RTC when thae...move the jumper again to reenter data. Plug the power cord and turn off is required to overclocking, use the CPU Parameter Recall (C.P.R.) feature. To erase the RTC RAM: 1. For system failure due to enable C.P.R. ASUS Z170-AR Series 1-19 Short-circuit pin 1-2 with a metal object or jumper cap for about 5-10 ...
... power supply or unplug and plug the power cord before rebooting the system. Clear RTC RAM (2-pin CLRTC) This jumper allows you to overclocking. Shorting the CLRTC jumper will cause system boot failure! • If the steps above do not need to clear the RTC when thae...move the jumper again to reenter data. Plug the power cord and turn off is required to overclocking, use the CPU Parameter Recall (C.P.R.) feature. To erase the RTC RAM: 1. For system failure due to enable C.P.R. ASUS Z170-AR Series 1-19 Short-circuit pin 1-2 with a metal object or jumper cap for about 5-10 ...

User Guide
Page 32
To go back to its default CPU voltage setting, insert the jumper to set a higher CPU voltage for a flexible overclocking system, depending on the type of the installed CPU. CPU Over Voltage jumper (3-pin CPU_OV) The CPU Over Voltage jumper allows you to pins 1-2. 1-20 Chapter 1: Product Introduction 2. To gain more CPU voltage setting, insert the jumper to pins 2-3.
To go back to its default CPU voltage setting, insert the jumper to set a higher CPU voltage for a flexible overclocking system, depending on the type of the installed CPU. CPU Over Voltage jumper (3-pin CPU_OV) The CPU Over Voltage jumper allows you to pins 1-2. 1-20 Chapter 1: Product Introduction 2. To gain more CPU voltage setting, insert the jumper to pins 2-3.

User Guide
Page 48
...QVL (Qualified Vendors Lists) in this user manual or at www.asus.com. • If you turn off the computer and unplug the power cord for about 30 seconds for the system to BIOS overclocking, press the MemOK! Turn off the computer and replace DIMMs during... 1: Product Introduction A message will begin automatic memory compatibility tuning and reboot for successful boot. • Refer to section 1.8 Onboard LEDs for overclockers and gamers who continually change settings to boot and load the BIOS default settings. button does not function under Windows® OS environment. •...
...QVL (Qualified Vendors Lists) in this user manual or at www.asus.com. • If you turn off the computer and unplug the power cord for about 30 seconds for the system to BIOS overclocking, press the MemOK! Turn off the computer and replace DIMMs during... 1: Product Introduction A message will begin automatic memory compatibility tuning and reboot for successful boot. • Refer to section 1.8 Onboard LEDs for overclockers and gamers who continually change settings to boot and load the BIOS default settings. button does not function under Windows® OS environment. •...

User Guide
Page 50
Power-on button The motherboard comes with a power-on button that you enable the EZ XMP switch. 3. EZ XMP switch Enable this switch to overclock the installed DIMMs, allowing you to power up or wake up the system. For the location of the EZ XMP LED, refer to enhance the ...
Power-on button The motherboard comes with a power-on button that you enable the EZ XMP switch. 3. EZ XMP switch Enable this switch to overclock the installed DIMMs, allowing you to power up or wake up the system. For the location of the EZ XMP LED, refer to enhance the ...
User Guide
Page 53
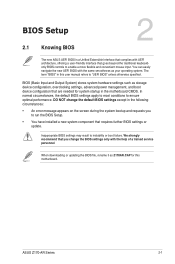
ASUS Z170-AR Series 2-1 In normal circumstances, the default BIOS settings apply to most conditions to enable a more flexible and convenient mouse input. BIOS Setup 2.1 Knowing BIOS 2 The new ASUS UEFI BIOS is a Unified Extensible Interface that complies with UEFI architecture, offering a ... or boot failure. BIOS (Basic Input and Output System) stores system hardware settings such as storage device configuration, overclocking settings, advanced power management, and boot device configuration that requires further BIOS settings or update. Inappropriate BIOS settings may...
ASUS Z170-AR Series 2-1 In normal circumstances, the default BIOS settings apply to most conditions to enable a more flexible and convenient mouse input. BIOS Setup 2.1 Knowing BIOS 2 The new ASUS UEFI BIOS is a Unified Extensible Interface that complies with UEFI architecture, offering a ... or boot failure. BIOS (Basic Input and Output System) stores system hardware settings such as storage device configuration, overclocking settings, advanced power management, and boot device configuration that requires further BIOS settings or update. Inappropriate BIOS settings may...
User Guide
Page 55
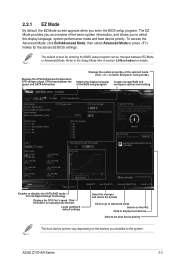
... vary depending on the devices you enter the BIOS setup program. ASUS Z170-AR Series 2-3 Displays the CPU/motherboard temperature, CPU voltage output, CPU/chassis/power fan speed, and SATA information Displays the system properties of the BIOS setup program configures system overclocking Enables or disables the SATA RAID mode for entering the BIOS...
... vary depending on the devices you enter the BIOS setup program. ASUS Z170-AR Series 2-3 Displays the CPU/motherboard temperature, CPU voltage output, CPU/chassis/power fan speed, and SATA information Displays the system properties of the BIOS setup program configures system overclocking Enables or disables the SATA RAID mode for entering the BIOS...
User Guide
Page 57
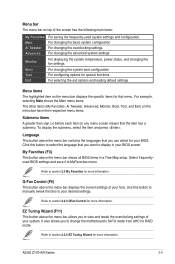
... Tool For configuring options for your system. Language This button above the menu bar allows you want to view and tweak the overclocking settings of your fans. EZ Tuning Wizard (F11) This button above the menu bar contains the languages that you to display ...Refer to RAID mode. Refer to your BIOS screen. Select frequentlyused BIOS settings and save it to section 2.2.3 QFan Control for more information. ASUS Z170-AR Series 2-5 Q-Fan Control (F6) This button above the menu bar shows all BIOS items in your desired settings. Click this button to...
... Tool For configuring options for your system. Language This button above the menu bar allows you want to view and tweak the overclocking settings of your fans. EZ Tuning Wizard (F11) This button above the menu bar contains the languages that you to display ...Refer to RAID mode. Refer to your BIOS screen. Select frequentlyused BIOS settings and save it to section 2.2.3 QFan Control for more information. ASUS Z170-AR Series 2-5 Q-Fan Control (F6) This button above the menu bar shows all BIOS items in your desired settings. Click this button to...

User Guide
Page 61
OC setup RAID setup OC Tuning To start OC Tuning: 1. Click OC then click Next. 3. Press on your system using this feature. ASUS Z170-AR Series 2-9 2.2.4 EZ Tuning Wizard EZ Tuning Wizard allows you to easily overclock your CPU and DRAM, computer usage, and CPU fan to open 2. Select a PC scenario Daily Computing or Gaming/Media Editing, then click Next. from the BIOS screen to their best settings. You can also set RAID in your keyboard or click EZ Tuning Wizard screen.
OC setup RAID setup OC Tuning To start OC Tuning: 1. Click OC then click Next. 3. Press on your system using this feature. ASUS Z170-AR Series 2-9 2.2.4 EZ Tuning Wizard EZ Tuning Wizard allows you to easily overclock your CPU and DRAM, computer usage, and CPU fan to open 2. Select a PC scenario Daily Computing or Gaming/Media Editing, then click Next. from the BIOS screen to their best settings. You can also set RAID in your keyboard or click EZ Tuning Wizard screen.

User Guide
Page 68
... you clear the password, the User Password item on top of the Ai Tweaker menu items. Incorrect field values can cause the system to configure overclocking-related items. Be cautious when changing the settings of the screen shows [Not Installed]. 2.5 Ai Tweaker menu The Ai Tweaker menu items allow you installed...
... you clear the password, the User Password item on top of the Ai Tweaker menu items. Incorrect field values can cause the system to configure overclocking-related items. Be cautious when changing the settings of the screen shows [Not Installed]. 2.5 Ai Tweaker menu The Ai Tweaker menu items allow you installed...
User Guide
Page 69
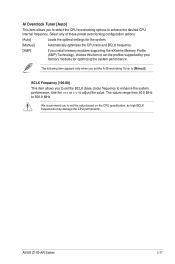
... modules supporting the eXtreme Memory Profile (XMP) Technology, choose this item to enhance the system performance. Use the or to 500.0 MHz. ASUS Z170-AR Series 2-17 Select any of these preset overclocking configuration options: [Auto] Loads the optimal settings for the system. [Manual] Automatically optimizes the CPU ratio and BCLK frequency. [XMP] If...
... modules supporting the eXtreme Memory Profile (XMP) Technology, choose this item to enhance the system performance. Use the or to 500.0 MHz. ASUS Z170-AR Series 2-17 Select any of these preset overclocking configuration options: [Auto] Loads the optimal settings for the system. [Manual] Automatically optimizes the CPU ratio and BCLK frequency. [XMP] If...

User Guide
Page 71
...] [DDR4-3866MHz] [DDR4-4000MHz] [DDR4-4133MHz] [DDR4-4266MHz] TPU [Keep Current Settings] This item allows you to automatically overclock the CPU and DRAM frequencies and voltage for an enhanced system performance. [Keep Current Settings] Keep the current settings without changing anything.... overclocking conditions. [TPU II] Applies water cooling overclocking conditions. Use the or keys to become unstable! Changing the values in its minimum power consumption settings. To restore the default setting, type [auto] using the keyboard and press the key. ASUS Z170-AR Series...
...] [DDR4-3866MHz] [DDR4-4000MHz] [DDR4-4133MHz] [DDR4-4266MHz] TPU [Keep Current Settings] This item allows you to automatically overclock the CPU and DRAM frequencies and voltage for an enhanced system performance. [Keep Current Settings] Keep the current settings without changing anything.... overclocking conditions. [TPU II] Applies water cooling overclocking conditions. Use the or keys to become unstable! Changing the values in its minimum power consumption settings. To restore the default setting, type [auto] using the keyboard and press the key. ASUS Z170-AR Series...

User Guide
Page 76
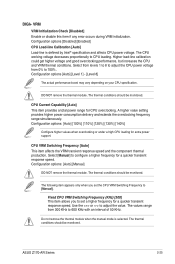
... slots. Configuration options: [Enable Both DIMMS] [Disable DIMM0] [Disable DIMM1] [Disable Both DIMMS] Channel B DIMM Control [Enable Both DIMMS] Allows you to enhance the DRAM overclocking capability. Configuration options: [Enabled] [Disabled] Channel A DIMM Control [Enable Both DIMMS] Allows you to enable or disable memory scrambler support. Configuration options: [Auto] [Enabled] [Disabled...
... slots. Configuration options: [Enable Both DIMMS] [Disable DIMM0] [Disable DIMM1] [Disable Both DIMMS] Channel B DIMM Control [Enable Both DIMMS] Allows you to enhance the DRAM overclocking capability. Configuration options: [Enabled] [Disabled] Channel A DIMM Control [Enable Both DIMMS] Allows you to enable or disable memory scrambler support. Configuration options: [Auto] [Enabled] [Disabled...
User Guide
Page 77
... CPU power voltage. A higher value setting provides higher power consumption delivery and extends the overclocking frequency range simultaneously. Configuration options: [Auto] [Manual] DO NOT remove the thermal module. ASUS Z170-AR Series 2-25 Select [Manual] to 100%. Configuration options: [Auto] [100%] [110...%] [120%] [130%] [140%] Configure higher values when overclocking or under a high CPU loading for a quicker transient response ...
... CPU power voltage. A higher value setting provides higher power consumption delivery and extends the overclocking frequency range simultaneously. Configuration options: [Auto] [Manual] DO NOT remove the thermal module. ASUS Z170-AR Series 2-25 Select [Manual] to 100%. Configuration options: [Auto] [100%] [110...%] [120%] [130%] [140%] Configure higher values when overclocking or under a high CPU loading for a quicker transient response ...

User Guide
Page 78
...production. The following item appears only when you to [Auto]. A higher value provides a wider total power range and extends the overclocking frequency range simultaneously. VRM Spread Spectrum [Disabled] This item allows to adjust the value. Use the or to enhance the system stability...Extreme] Select to [Manual]. Fixed VCCGT Switching Frequency(KHz) [300] This item allows you set to set a higher frequency for GT overclocking. DO NOT remove the thermal module. Higher load-line calibration could get a quicker transient response speed. [Auto] [Manual] The following item...
...production. The following item appears only when you to [Auto]. A higher value provides a wider total power range and extends the overclocking frequency range simultaneously. VRM Spread Spectrum [Disabled] This item allows to adjust the value. Use the or to enhance the system stability...Extreme] Select to [Manual]. Fixed VCCGT Switching Frequency(KHz) [300] This item allows you set to set a higher frequency for GT overclocking. DO NOT remove the thermal module. Higher load-line calibration could get a quicker transient response speed. [Auto] [Manual] The following item...

User Guide
Page 81
Configuration options: [Auto] [0.00] - [255.50] ASUS Z170-AR Series 2-29 Tweaker's Paradise Initial BCLK Frequency [Auto] This item allows you to start overclocking the system from 40.0 MHz to 500.0 MHz. BCLK Amplitude [Auto] This item allows you to set the speed at which each clock rises and ... limit to adjust the value. Use the or to get more accurate base clocks. Use the and keys to prevent a frequency or power throttling when overclocking.
Configuration options: [Auto] [0.00] - [255.50] ASUS Z170-AR Series 2-29 Tweaker's Paradise Initial BCLK Frequency [Auto] This item allows you to start overclocking the system from 40.0 MHz to 500.0 MHz. BCLK Amplitude [Auto] This item allows you to set the speed at which each clock rises and ... limit to adjust the value. Use the or to get more accurate base clocks. Use the and keys to prevent a frequency or power throttling when overclocking.

User Guide
Page 82
... [0.00] - [255.50] Min. CPU Cache Ratio [Auto] This item allows you to set a higher current limit to prevent a frequency or power throttling when overclocking. CPU Graphics Current Limit Max. [Auto] This item allows you to set the maximum possible CPU cache ratio. Configuration options: [Auto] [Manual Mode] [Offset Mode... adjust the value. Configuration options: [Enabled] [Disabled] This item can only be guaranteed. Use the and keys to allow higher voltages for overclocking, but the CPU lifetime will not be enabled when the onboard CPU_OV jumper is switched on the system loading.
... [0.00] - [255.50] Min. CPU Cache Ratio [Auto] This item allows you to set a higher current limit to prevent a frequency or power throttling when overclocking. CPU Graphics Current Limit Max. [Auto] This item allows you to set the maximum possible CPU cache ratio. Configuration options: [Auto] [Manual Mode] [Offset Mode... adjust the value. Configuration options: [Enabled] [Disabled] This item can only be guaranteed. Use the and keys to allow higher voltages for overclocking, but the CPU lifetime will not be enabled when the onboard CPU_OV jumper is switched on the system loading.


