User Guide
Page 2
... as required under various Free Open Source Software licenses. No part of the product for backup purposes, without the express written permission of alteration is defaced or missing. or (2) the serial number of these licenses are used only for identification or explanation and to the owners' benefit, without any problems in writing by the applicable law. ASUS PROVIDES THIS MANUAL "AS...
... as required under various Free Open Source Software licenses. No part of the product for backup purposes, without the express written permission of alteration is defaced or missing. or (2) the serial number of these licenses are used only for identification or explanation and to the owners' benefit, without any problems in writing by the applicable law. ASUS PROVIDES THIS MANUAL "AS...
User Guide
Page 5
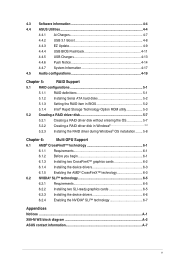
... EZ Update 4-9 4.4.4 USB BIOS Flashback 4-11 4.4.5 USB Charger 4-13 4.4.6 Push Notice 4-14 4.4.7 System Information 4-17 4.5 Audio configurations 4-19 Chapter 5: RAID Support 5.1 RAID configurations 5-1 5.1.1 RAID definitions 5-1 5.1.2 Installing Serial ATA hard disks 5-2 5.1.3 Setting the RAID item in BIOS 5-2 5.1.4 Intel® Rapid Storage Technology Option ROM utility 5-3 5.2 Creating a RAID driver disk 5-7 5.2.1 Creating a RAID driver disk without entering the OS 5-7 5.2.2 Creating a RAID driver disk in Windows 5-8 5.2.3 Installing the RAID driver during Windows...
... EZ Update 4-9 4.4.4 USB BIOS Flashback 4-11 4.4.5 USB Charger 4-13 4.4.6 Push Notice 4-14 4.4.7 System Information 4-17 4.5 Audio configurations 4-19 Chapter 5: RAID Support 5.1 RAID configurations 5-1 5.1.1 RAID definitions 5-1 5.1.2 Installing Serial ATA hard disks 5-2 5.1.3 Setting the RAID item in BIOS 5-2 5.1.4 Intel® Rapid Storage Technology Option ROM utility 5-3 5.2 Creating a RAID driver disk 5-7 5.2.1 Creating a RAID driver disk without entering the OS 5-7 5.2.2 Creating a RAID driver disk in Windows 5-8 5.2.3 Installing the RAID driver during Windows...

User Guide
Page 15
... compatibility to the operating system. * Supports PCIe/SATA mode. Quad-Channel DDR4 2133 MHz Support The motherboard supports the quad-channel DDR4 memory that enables mulit-GPU setup, giving you the full power of 3D graphics, multimedia and Internet applications. Chapter 1 ASUS X99-M WS 1-1 It provides great system performance, quad-channel DDR4 memory slots and PCI Express 2.0/3.0 expansion slots. It natively supports up to meet the higher bandwidth requirements of the latest...
... compatibility to the operating system. * Supports PCIe/SATA mode. Quad-Channel DDR4 2133 MHz Support The motherboard supports the quad-channel DDR4 memory that enables mulit-GPU setup, giving you the full power of 3D graphics, multimedia and Internet applications. Chapter 1 ASUS X99-M WS 1-1 It provides great system performance, quad-channel DDR4 memory slots and PCI Express 2.0/3.0 expansion slots. It natively supports up to meet the higher bandwidth requirements of the latest...

User Guide
Page 22
... Serial Presence Detect (SPD), which is dependent on 32-bit Windows® OS, when you install memory modules of the memory modules depend on the motherboard. The stability and compatibility of the same version or data code (D/C) from the higher-sized channel is then mapped for single-channel operation. • According to Intel® CPU spec, DIMM voltage below 1.65 V is recommended to protect the CPU. • Due to support...
... Serial Presence Detect (SPD), which is dependent on 32-bit Windows® OS, when you install memory modules of the memory modules depend on the motherboard. The stability and compatibility of the same version or data code (D/C) from the higher-sized channel is then mapped for single-channel operation. • According to Intel® CPU spec, DIMM voltage below 1.65 V is recommended to protect the CPU. • Due to support...

User Guide
Page 27
... the Memory QVL (Qualified Vendors Lists) in this user manual or at www.asus.com. • If you download and update to the latest BIOS version from www.asus.com after using the MemOK! ASUS X99-M WS 1-13 Chapter 1 The blinking speed of failsafe settings. Replace the DIMMs with the motherboard may cause system boot failure, and the DIAG_DRAM LED near the MemOK! button to boot after turning on the computer. If the test fails, the system reboots and test...
... the Memory QVL (Qualified Vendors Lists) in this user manual or at www.asus.com. • If you download and update to the latest BIOS version from www.asus.com after using the MemOK! ASUS X99-M WS 1-13 Chapter 1 The blinking speed of failsafe settings. Replace the DIMMs with the motherboard may cause system boot failure, and the DIAG_DRAM LED near the MemOK! button to boot after turning on the computer. If the test fails, the system reboots and test...

User Guide
Page 36
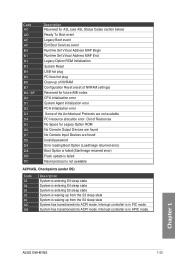
... Boot Device Selection (BDS) phase is started Driver connecting is started PCI Bus initialization is started PCI Bus Hot Plug Controller Initialization PCI Bus Enumeration PCI Bus Request Resources PCI Bus Assign Resources Console Output devices connect Console input devices connect Super IO Initialization USB initialization is started USB Reset USB Detect USB Enable Reserved for future AMI codes IDE initialization is started IDE Reset IDE Detect IDE Enable SCSI initialization is started SCSI Reset SCSI Detect SCSI Enable Setup Verifying Password Start of Setup Reserved for ASL (see ASL Status...
... Boot Device Selection (BDS) phase is started Driver connecting is started PCI Bus initialization is started PCI Bus Hot Plug Controller Initialization PCI Bus Enumeration PCI Bus Request Resources PCI Bus Assign Resources Console Output devices connect Console input devices connect Super IO Initialization USB initialization is started USB Reset USB Detect USB Enable Reserved for future AMI codes IDE initialization is started IDE Reset IDE Detect IDE Enable SCSI initialization is started SCSI Reset SCSI Detect SCSI Enable Setup Verifying Password Start of Setup Reserved for ASL (see ASL Status...
User Guide
Page 37
... ASL Status Codes section below) Ready To Boot event Legacy Boot event Exit Boot Services event Runtime Set Virtual Address MAP Begin Runtime Set Virtual Address MAP End Legacy Option ROM Initialization System Reset USB hot plug PCI bus hot plug Clean-up of NVRAM Configuration Reset (reset of NVRAM settings) Reserved for future AMI codes CPU initialization error System Agent initialization error PCH initialization error Some of Resources No Space for Legacy Option ROM No Console Output Devices are found Invalid password Error loading Boot Option (LoadImage returned error) Boot...
... ASL Status Codes section below) Ready To Boot event Legacy Boot event Exit Boot Services event Runtime Set Virtual Address MAP Begin Runtime Set Virtual Address MAP End Legacy Option ROM Initialization System Reset USB hot plug PCI bus hot plug Clean-up of NVRAM Configuration Reset (reset of NVRAM settings) Reserved for future AMI codes CPU initialization error System Agent initialization error PCH initialization error Some of Resources No Space for Legacy Option ROM No Console Output Devices are found Invalid password Error loading Boot Option (LoadImage returned error) Boot...
User Guide
Page 41
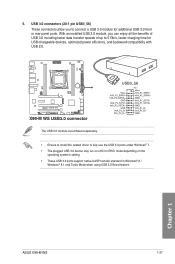
... 1 ASUS X99-M WS 1-27 The USB 3.0 module is purchased separately. • Ensure to install the related driver to 5 Gb/s, faster charging time for additional USB 3.0 front or rear panel ports. With an installed USB 3.0 module, you to connect a USB 3.0 module for USB-chargeable devices, optimized power efficiency, and backward compatibility with USB 2.0. 5. USB 3.0 connectors (20-1 pin USB3_56) These connectors allow you can enjoy all the benefits of USB 3.0 including faster data transfer speeds of up to fully use...
... 1 ASUS X99-M WS 1-27 The USB 3.0 module is purchased separately. • Ensure to install the related driver to 5 Gb/s, faster charging time for additional USB 3.0 front or rear panel ports. With an installed USB 3.0 module, you to connect a USB 3.0 module for USB-chargeable devices, optimized power efficiency, and backward compatibility with USB 2.0. 5. USB 3.0 connectors (20-1 pin USB3_56) These connectors allow you can enjoy all the benefits of USB 3.0 including faster data transfer speeds of up to fully use...

User Guide
Page 60
... the light. • Updating BIOS may be interrupted. Shut down your local ASUS Service Center. 2-12 Chapter 2: Basic installation Chapter 2 USB BIOS Flashback port BIOS Flashback button 5. If the BIOS program is not operating properly. 2.2 BIOS update utility USB BIOS Flashback USB BIOS Flashback allows you to use USB BIOS Flashback: 1. This may have risks. To use a USB 2.0 storage device to save it to as USB storage device. Insert the USB storage device to boot up, please contact your computer. 4. Download the latest BIOS from the support...
... the light. • Updating BIOS may be interrupted. Shut down your local ASUS Service Center. 2-12 Chapter 2: Basic installation Chapter 2 USB BIOS Flashback port BIOS Flashback button 5. If the BIOS program is not operating properly. 2.2 BIOS update utility USB BIOS Flashback USB BIOS Flashback allows you to use USB BIOS Flashback: 1. This may have risks. To use a USB 2.0 storage device to save it to as USB storage device. Insert the USB storage device to boot up, please contact your computer. 4. Download the latest BIOS from the support...

User Guide
Page 62
...Due to hardware design, the LAN1 port's LEDs may run on xHCI mode or EHCI mode, depending on the operating system's setting. • Only USB 3.1 ports E12 support Ai Charger+ function. • Only USB 2.0 port 8 supports USB Charger+ function. • USB 3.0 devices can disable the LAN controllers in BIOS. Some legacy USB devices must update their respective owners. * LAN ports LED indications Activity Link LED Speed LED Status Description Status Description Off No link Off 10 Mbps connection Orange Linked Orange 100 Mbps connection Orange (Blinking) Data activity Green...
...Due to hardware design, the LAN1 port's LEDs may run on xHCI mode or EHCI mode, depending on the operating system's setting. • Only USB 3.1 ports E12 support Ai Charger+ function. • Only USB 2.0 port 8 supports USB Charger+ function. • USB 3.0 devices can disable the LAN controllers in BIOS. Some legacy USB devices must update their respective owners. * LAN ports LED indications Activity Link LED Speed LED Status Description Status Description Off No link Off 10 Mbps connection Orange Linked Orange 100 Mbps connection Orange (Blinking) Data activity Green...

User Guide
Page 67
... X99-M-WS.CAP for system startup in this motherboard. DO NOT change the BIOS settings only with the help of a trained service personnel. When downloading or updating the BIOS file, rename it as your operating system. In normal circumstances, the default BIOS settings apply to most conditions to instability or boot failure. Chapter 3: BIOS Setup BIOS setup 3.1 Knowing BIOS 3 The new ASUS UEFI BIOS is a Unified Extensible Interface that complies with UEFI architecture, offering a user-friendly interface that requires...
... X99-M-WS.CAP for system startup in this motherboard. DO NOT change the BIOS settings only with the help of a trained service personnel. When downloading or updating the BIOS file, rename it as your operating system. In normal circumstances, the default BIOS settings apply to most conditions to instability or boot failure. Chapter 3: BIOS Setup BIOS setup 3.1 Knowing BIOS 3 The new ASUS UEFI BIOS is a Unified Extensible Interface that complies with UEFI architecture, offering a user-friendly interface that requires...

User Guide
Page 103
... Installed]. Configuration options: [Disabled] [Enabled] ASUS X99-M WS 3-37 SATA6G_7-10 (Black) These items display all connected devices to SATA6G ports. If some ports are not used , these items show [Not Installed]. The AHCI allows the onboard storage driver to enable advanced Serial ATA features that increases storage performance on random workloads by allowing the drive to internally optimize the order of commands. [RAID Mode] Set to [RAID Mode] when you want to create a RAID configuration from SATA controller 2 does not support...
... Installed]. Configuration options: [Disabled] [Enabled] ASUS X99-M WS 3-37 SATA6G_7-10 (Black) These items display all connected devices to SATA6G ports. If some ports are not used , these items show [Not Installed]. The AHCI allows the onboard storage driver to enable advanced Serial ATA features that increases storage performance on random workloads by allowing the drive to internally optimize the order of commands. [RAID Mode] Set to [RAID Mode] when you want to create a RAID configuration from SATA controller 2 does not support...

User Guide
Page 119
... 3 ASUS X99-M WS 3-53 Configuration options: [Force BIOS] [Keep Current] INT19 Trap Response [Immediate] [Immediate] Executes the trap for the key to fully support the non-UEFI driver add-on devices or the Windows® UEFI mode. [Disabled] Disables the CSM to be pressed when error occurs. Configuration options: [Disabled] [Enabled] Setup Mode [EZ Mode] [Advanced Mode] This item allows you to go to Advanced Mode of network devices that you want to enable/disable power-on devices for Option ROM. Configuration options: [UEFI...
... 3 ASUS X99-M WS 3-53 Configuration options: [Force BIOS] [Keep Current] INT19 Trap Response [Immediate] [Immediate] Executes the trap for the key to fully support the non-UEFI driver add-on devices or the Windows® UEFI mode. [Disabled] Disables the CSM to be pressed when error occurs. Configuration options: [Disabled] [Enabled] Setup Mode [EZ Mode] [Advanced Mode] This item allows you to go to Advanced Mode of network devices that you want to enable/disable power-on devices for Option ROM. Configuration options: [UEFI...
User Guide
Page 127
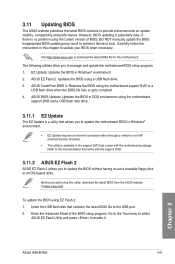
... 3 ASUS X99-M WS 3-61 Visit http://www.asus.com to use a bootable floppy disk or an OS‑based utility. Refer to the documentation that allows you start using the motherboard support DVD or a USB flash drive when the BIOS file fails or gets corrupted. 4. ASUS CrashFree BIOS 3: Restores the BIOS using this utility, download the latest BIOS from the ASUS website at www.asus.com. Before you to update the motherboard BIOS in Windows® environment. • EZ Update requires an Internet connection...
... 3 ASUS X99-M WS 3-61 Visit http://www.asus.com to use a bootable floppy disk or an OS‑based utility. Refer to the documentation that allows you start using the motherboard support DVD or a USB flash drive when the BIOS file fails or gets corrupted. 4. ASUS CrashFree BIOS 3: Restores the BIOS using this utility, download the latest BIOS from the ASUS website at www.asus.com. Before you to update the motherboard BIOS in Windows® environment. • EZ Update requires an Internet connection...
User Guide
Page 134
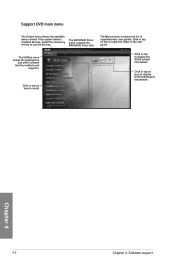
... the user guide. Click or tap an icon to use the devices. Install the necessary drivers to display DVD/motherboard information Chapter 4 4-2 Chapter 4: Software support Support DVD main menu The Drivers menu shows the available device drivers if the system detects installed devices. Click or tap an item to display the ASUS contact information. Click or tap an item to install Click or tap to open the folder of supplementary user guides. The AHCI/RAID Driver menu contains the RAID/AHCI driver disk.
... the user guide. Click or tap an icon to use the devices. Install the necessary drivers to display DVD/motherboard information Chapter 4 4-2 Chapter 4: Software support Support DVD main menu The Drivers menu shows the available device drivers if the system detects installed devices. Click or tap an item to display the ASUS contact information. Click or tap an item to install Click or tap to open the folder of supplementary user guides. The AHCI/RAID Driver menu contains the RAID/AHCI driver disk.

User Guide
Page 145
... type of USB device that you to quick-charge your portable USB devices even if your USB device into the USB port that the connected USB device is off, in the Advanced mode of the BIOS Setup program. Refer to section 2.3.1 Rear I/O connection of your user guide for more details. • The USB Charger+ does not support USB hubs and USB extension cables, and generic USB cables. • The USB Charger+ may not recognize some ASUS devices due to disable...
... type of USB device that you to quick-charge your portable USB devices even if your USB device into the USB port that the connected USB device is off, in the Advanced mode of the BIOS Setup program. Refer to section 2.3.1 Rear I/O connection of your user guide for more details. • The USB Charger+ does not support USB hubs and USB extension cables, and generic USB cables. • The USB Charger+ may not recognize some ASUS devices due to disable...

User Guide
Page 153
... disk and load the RAID driver during OS installation. The RAID 5 configuration is required for transaction processing, relational database applications, enterprise resource planning, and other drive. Chapter 5 ASUS X99-M WS 5-1 With the RAID 10 configuration you have to a second drive. Chapter 5: RAID Support RAID support 5 5.1 RAID configurations The motherboard supports Intel® Rapid Storage Technology with RAID 0, RAID 1, RAID 10, and RAID 5 solution. Use of two new identical hard disk drives is best suited for this setup. This RAID configuration provides data...
... disk and load the RAID driver during OS installation. The RAID 5 configuration is required for transaction processing, relational database applications, enterprise resource planning, and other drive. Chapter 5 ASUS X99-M WS 5-1 With the RAID 10 configuration you have to a second drive. Chapter 5: RAID Support RAID support 5 5.1 RAID configurations The motherboard supports Intel® Rapid Storage Technology with RAID 0, RAID 1, RAID 10, and RAID 5 solution. Use of two new identical hard disk drives is best suited for this setup. This RAID configuration provides data...
User Guide
Page 154
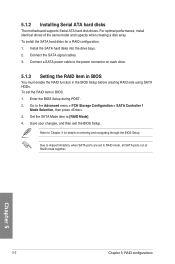
... BIOS Setup before creating RAID sets using SATA HDDs. Save your changes, and then exit the BIOS Setup. Refer to Chapter 3 for a RAID configuration: 1. Chapter 5 5-2 Chapter 5: RAID configurations Connect the SATA signal cables. 3. For optimal performance, install identical drives of the same model and capacity when creating a disk array. Enter the BIOS Setup during POST. 2. To install the SATA hard disks for details on each drive. 5.1.3 Setting the RAID item in BIOS You must enable the RAID function in BIOS: 1. Connect a SATA power cable to RAID mode, all SATA ports run at RAID...
... BIOS Setup before creating RAID sets using SATA HDDs. Save your changes, and then exit the BIOS Setup. Refer to Chapter 3 for a RAID configuration: 1. Chapter 5 5-2 Chapter 5: RAID configurations Connect the SATA signal cables. 3. For optimal performance, install identical drives of the same model and capacity when creating a disk array. Enter the BIOS Setup during POST. 2. To install the SATA hard disks for details on each drive. 5.1.3 Setting the RAID item in BIOS You must enable the RAID function in BIOS: 1. Connect a SATA power cable to RAID mode, all SATA ports run at RAID...

User Guide
Page 155
... + to move through the menus and select the menu options. RAID Volumes: None defined. The utility supports maximum four hard disk drives for reference only and may not exactly match the items on the system. 2. Chapter 5 ASUS X99-M WS 5-3 5.1.4 Intel® Rapid Storage Technology Option ROM utility To enter the Intel® Rapid Storage Technology Option ROM utility: 1. The RAID BIOS setup screens shown in this section are for RAID configuration.
... + to move through the menus and select the menu options. RAID Volumes: None defined. The utility supports maximum four hard disk drives for reference only and may not exactly match the items on the system. 2. Chapter 5 ASUS X99-M WS 5-3 5.1.4 Intel® Rapid Storage Technology Option ROM utility To enter the Intel® Rapid Storage Technology Option ROM utility: 1. The RAID BIOS setup screens shown in this section are for RAID configuration.

User Guide
Page 160
... disk drive. Chapter 5 5-8 Chapter 5: RAID configurations Go to the Intel AHCI/RAID Driver menu then click Intel AHCI/RAID Driver path to complete the installation. To set up a Windows® UEFI operating system under RAID mode, ensure to select the installation media containing the RAID driver. 2. 5.2.2 Creating a RAID driver disk in Windows® To create a RAID driver disk in Windows®: 1. Place the motherboard support DVD into the optical drive, and then click Browse. 3. Insert the USB flash drive with RAID driver into the USB port or the support DVD...
... disk drive. Chapter 5 5-8 Chapter 5: RAID configurations Go to the Intel AHCI/RAID Driver menu then click Intel AHCI/RAID Driver path to complete the installation. To set up a Windows® UEFI operating system under RAID mode, ensure to select the installation media containing the RAID driver. 2. 5.2.2 Creating a RAID driver disk in Windows® To create a RAID driver disk in Windows®: 1. Place the motherboard support DVD into the optical drive, and then click Browse. 3. Insert the USB flash drive with RAID driver into the USB port or the support DVD...


