

User Guide
Page 1
Motherboard X99-E WS/ USB 3.1
Motherboard X99-E WS/ USB 3.1

User Guide
Page 15
Actual product specifications may vary with different models. xv Package contents Check your motherboard package for the following items ASUS X99-E WS/USB 3.1 motherboard 12 x Serial ATA 6 Gb/s cables 1 x ASUS Q-Shield 1 x 3-WAY SLI bridge connector 1 x 2-in-1 ASUS Q-Connector kit COM port bracket 1 x 4-WAY SLI bridge connector 1 x ASUS SLI™ bridge connector User Manual Support DVD User Guide • If any of the above items is damaged or missing, contact your retailer. • The illustrated items above are for reference only.
Actual product specifications may vary with different models. xv Package contents Check your motherboard package for the following items ASUS X99-E WS/USB 3.1 motherboard 12 x Serial ATA 6 Gb/s cables 1 x ASUS Q-Shield 1 x 3-WAY SLI bridge connector 1 x 2-in-1 ASUS Q-Connector kit COM port bracket 1 x 4-WAY SLI bridge connector 1 x ASUS SLI™ bridge connector User Manual Support DVD User Guide • If any of the above items is damaged or missing, contact your retailer. • The illustrated items above are for reference only.

User Guide
Page 17
... to two SATA drives of the SSDs. Chapter 1 ASUS X99-E WS/USB 3.1 1-1 It utilizes the serial point-to six (6) USB 3.0 ports and ten (10) SATA 6 Gb/s ports. It provides an optimal graphics performance, unprecedented data speed and seamless transition with the speed of the same speed. M.2 Support* This motherboard features the M.2 slot, which increases bandwidth and...
... to two SATA drives of the SSDs. Chapter 1 ASUS X99-E WS/USB 3.1 1-1 It utilizes the serial point-to six (6) USB 3.0 ports and ten (10) SATA 6 Gb/s ports. It provides an optimal graphics performance, unprecedented data speed and seamless transition with the speed of the same speed. M.2 Support* This motherboard features the M.2 slot, which increases bandwidth and...

User Guide
Page 19
Chapter 1 ASUS X99-E WS/USB 3.1 1-3 1.2 Motherboard overview 1.2.1 Before you proceed Take note of the following precautions before you install or remove any component, ensure that the ATX power supply is switched off or the power cord is detached from the wall socket before touching any motherboard settings. ... any component, place it on a grounded antistatic pad or in the bag that came with the component. • Before you install motherboard components or change any component. • Before handling components, use a grounded wrist strap or touch a safely grounded object or a ...
Chapter 1 ASUS X99-E WS/USB 3.1 1-3 1.2 Motherboard overview 1.2.1 Before you proceed Take note of the following precautions before you install or remove any component, ensure that the ATX power supply is switched off or the power cord is detached from the wall socket before touching any motherboard settings. ... any component, place it on a grounded antistatic pad or in the bag that came with the component. • Before you install motherboard components or change any component. • Before handling components, use a grounded wrist strap or touch a safely grounded object or a ...

User Guide
Page 23
A DDR4 module is notched differently from a DDR, DDR2, or DDR3 module. 1.2.4 System memory The motherboard comes with eight DDR 4 (Double Data Rate 4) Quad Inline Memory Modules (DIMM) slots. DO NOT install a DDR, DDR2, or DDR3 memory module to the DDR4 slot. Recommended memory configurations Chapter 1 ASUS X99-E WS/USB 3.1 1-7
A DDR4 module is notched differently from a DDR, DDR2, or DDR3 module. 1.2.4 System memory The motherboard comes with eight DDR 4 (Double Data Rate 4) Quad Inline Memory Modules (DIMM) slots. DO NOT install a DDR, DDR2, or DDR3 memory module to the DDR4 slot. Recommended memory configurations Chapter 1 ASUS X99-E WS/USB 3.1 1-7

User Guide
Page 25
ASUS X99-E WS/USB 3.1 1-9 Failure to do so may cause you physical injury and damage motherboard components. This slot automatically runs at x2 mode with ASUS Thunderbolt EX card installed. 1.2.5 Expansion slots Unplug the power cord before adding or removing expansion cards. Chapter 1 Slot No. 1 2 3 4 5 6 7 40-LANE PCIe 3.0/2.0 x16_1 slot PCIe 3.0/2.0 ...
ASUS X99-E WS/USB 3.1 1-9 Failure to do so may cause you physical injury and damage motherboard components. This slot automatically runs at x2 mode with ASUS Thunderbolt EX card installed. 1.2.5 Expansion slots Unplug the power cord before adding or removing expansion cards. Chapter 1 Slot No. 1 2 3 4 5 6 7 40-LANE PCIe 3.0/2.0 x16_1 slot PCIe 3.0/2.0 ...

User Guide
Page 27
...® SATA Controller 2 shared - - - - - - - shared - - - - - - - - - - - - - - - - shared - PCIe x16_3 - PCIe x16_6 shared - - - - - - - Chapter 1 ASUS X99-E WS/USB 3.1 1-11 shared - - - - - shared - - - - - PCIe x16_2 - shared - shared - - - - - - PCIe x16_5 shared - - - - - - SMBUS Controller - - IRQ assignments for this motherboard A B C D E F G H PCIe x16_1 shared - - - - - - - HD Audio - - - - - - shared - - - - Intel® LAN2 (i210) ASMedia SATA Controller...
...® SATA Controller 2 shared - - - - - - - shared - - - - - - - - - - - - - - - - shared - PCIe x16_3 - PCIe x16_6 shared - - - - - - - Chapter 1 ASUS X99-E WS/USB 3.1 1-11 shared - - - - - shared - - - - - PCIe x16_2 - shared - shared - - - - - - PCIe x16_5 shared - - - - - - SMBUS Controller - - IRQ assignments for this motherboard A B C D E F G H PCIe x16_1 shared - - - - - - - HD Audio - - - - - - shared - - - - Intel® LAN2 (i210) ASMedia SATA Controller...

User Guide
Page 29
...to memory tuning requirement, the system automatically reboots when each timing set is not properly installed. Replace the DIMMs with the motherboard may cause system boot failure, and the DIAG_DRAM LED near the MemOK! A message will appear during the tuning process, ...the next set of the DIAG_DRAM LED increases, indicating different test processes. • Due to boot after using the MemOK! function. ASUS X99-E WS/USB 3.1 1-13 Chapter 1 button until the DIAG_DRAM LED starts blinking to begin automatic memory compatibility tuning for the exact location of failsafe settings...
...to memory tuning requirement, the system automatically reboots when each timing set is not properly installed. Replace the DIMMs with the motherboard may cause system boot failure, and the DIAG_DRAM LED near the MemOK! A message will appear during the tuning process, ...the next set of the DIAG_DRAM LED increases, indicating different test processes. • Due to boot after using the MemOK! function. ASUS X99-E WS/USB 3.1 1-13 Chapter 1 button until the DIAG_DRAM LED starts blinking to begin automatic memory compatibility tuning for the exact location of failsafe settings...
User Guide
Page 43
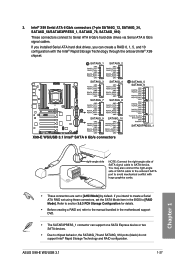
... hard disk drives via Serial ATA 6 Gb/s signal cables. Chapter 1 • These connectors are set the SATA Mode item in the motherboard support DVD. • The SATAEXPRESS_1 connector can create a RAID 0, 1, 5, and 10 configuration with the Intel® Rapid Storage Technology through ...® X99 chipset. 3. If you installed Serial ATA hard disk drives, you intend to create a Serial ATA RAID set using these connectors, set to chipset behavior, the SATA6G_78 and SATA6G_910 ports (black) do not support Intel® Rapid Storage Technology and RAID configuration. ASUS X99-E WS/USB 3.1 ...
... hard disk drives via Serial ATA 6 Gb/s signal cables. Chapter 1 • These connectors are set the SATA Mode item in the motherboard support DVD. • The SATAEXPRESS_1 connector can create a RAID 0, 1, 5, and 10 configuration with the Intel® Rapid Storage Technology through ...® X99 chipset. 3. If you installed Serial ATA hard disk drives, you intend to create a Serial ATA RAID set using these connectors, set to chipset behavior, the SATA6G_78 and SATA6G_910 ports (black) do not support Intel® Rapid Storage Technology and RAID configuration. ASUS X99-E WS/USB 3.1 ...

User Guide
Page 47
...8226; The CPU_FAN connector supports the CPU fan of maximum 1A (12 W) fan power. • The CPU_FAN and CHA_FAN connectors support the ASUS FAN Xpert 3 feature on X99 platform. • The CPU fan connector detects the type of the connector. • DO NOT forget to connect the fan cables to the...BIOS. To set these fans to DC or PWM, go to the CPU fan connector. Insufficient air flow inside the system may damage the motherboard components. ASUS X99-E WS/USB 3.1 1-31 To configure the CPU fan's control mode, go to the fan connectors on the fan connectors! • Ensure that the ...
...8226; The CPU_FAN connector supports the CPU fan of maximum 1A (12 W) fan power. • The CPU_FAN and CHA_FAN connectors support the ASUS FAN Xpert 3 feature on X99 platform. • The CPU fan connector detects the type of the connector. • DO NOT forget to connect the fan cables to the...BIOS. To set these fans to DC or PWM, go to the CPU fan connector. Insufficient air flow inside the system may damage the motherboard components. ASUS X99-E WS/USB 3.1 1-31 To configure the CPU fan's control mode, go to the fan connectors on the fan connectors! • Ensure that the ...

User Guide
Page 53
16. T_Sensor connector (2-pin T_SENSOR1) This connector is purchased separately. The thermistor cable is for the thermistor cable that allows you to monitor the temperature of your motherboard's critical components and connected devices. Chapter 1 ASUS X99-E WS/USB 3.1 1-37
16. T_Sensor connector (2-pin T_SENSOR1) This connector is purchased separately. The thermistor cable is for the thermistor cable that allows you to monitor the temperature of your motherboard's critical components and connected devices. Chapter 1 ASUS X99-E WS/USB 3.1 1-37

User Guide
Page 55
Chapter 2: Basic Installation Basic Installation 2.1 Building your PC system 2 2.1.1 Motherboard installation The diagrams in this section are for all models. 1. Chapter 2 ASUS X99-E WS/USB 3.1 2-1 Install the ASUS Q-Shield to the chassis' rear I /O panel. 2. Place the motherboard into the chassis, ensuring that its rear I/O ports are the same for reference only. The motherboard layout may vary with models, but the installation steps are aligned to the chassis rear I /O panel.
Chapter 2: Basic Installation Basic Installation 2.1 Building your PC system 2 2.1.1 Motherboard installation The diagrams in this section are for all models. 1. Chapter 2 ASUS X99-E WS/USB 3.1 2-1 Install the ASUS Q-Shield to the chassis' rear I /O panel. 2. Place the motherboard into the chassis, ensuring that its rear I/O ports are the same for reference only. The motherboard layout may vary with models, but the installation steps are aligned to the chassis rear I /O panel.

User Guide
Page 67
..., upper port supports Boost) Q-Code Logger, lower port supports USB BIOS Flashback) 3. Intel® LAN port (LAN2)* 9. USB 3.0 ports 12 (Supports USB 3.0 Boost) 5. USB 3.0 ports E56 (Support USB 8. Intel® LAN port (LAN1)* 10. Audio I /O connection Chapter 2 Rear panel connectors 1. USB 3.0 ports 34 (Support USB 3.0 Boost) 4. USB BIOS Flashback 11. ASUS X99-E WS/USB 3.1 2-13 Q-Code Logger button 7. Optical S/PDIF Out port...
..., upper port supports Boost) Q-Code Logger, lower port supports USB BIOS Flashback) 3. Intel® LAN port (LAN2)* 9. USB 3.0 ports 12 (Supports USB 3.0 Boost) 5. USB 3.0 ports E56 (Support USB 8. Intel® LAN port (LAN1)* 10. Audio I /O connection Chapter 2 Rear panel connectors 1. USB 3.0 ports 34 (Support USB 3.0 Boost) 4. USB BIOS Flashback 11. ASUS X99-E WS/USB 3.1 2-13 Q-Code Logger button 7. Optical S/PDIF Out port...
User Guide
Page 73
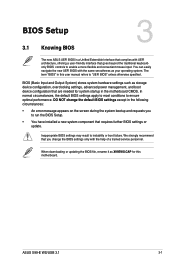
... ASUS X99-E WS/USB 3.1 3-1 DO NOT change the BIOS settings only with the help of a trained service personnel. BIOS (Basic Input and Output System) stores system hardware settings such as your operating system. We strongly recommend that you change the default BIOS settings except in the motherboard... CMOS. Chapter 3: BIOS Setup BIOS Setup 3.1 Knowing BIOS 3 The new ASUS UEFI BIOS is a Unified Extensible Interface that complies with UEFI architecture, offering a user-...
... ASUS X99-E WS/USB 3.1 3-1 DO NOT change the BIOS settings only with the help of a trained service personnel. BIOS (Basic Input and Output System) stores system hardware settings such as your operating system. We strongly recommend that you change the default BIOS settings except in the motherboard... CMOS. Chapter 3: BIOS Setup BIOS Setup 3.1 Knowing BIOS 3 The new ASUS UEFI BIOS is a Unified Extensible Interface that complies with UEFI architecture, offering a user-...

User Guide
Page 75
Refer to the system. Displays the CPU/motherboard temperature, CPU voltage output, CPU/chassis/power fan speed, and SATA information Displays the system properties of the basic system information, and allows you enter ... to the Setup Mode item in section 3.8 Boot menu for details. Click < or > to select the display language, system performance mode and boot device priority. ASUS X99-E WS/USB 3.1 3-3 3.2.1 EZ Mode By default, the EZ Mode screen appears when you to switch EZ System Tuning modes Selects the display language Creates storage RAID and...
Refer to the system. Displays the CPU/motherboard temperature, CPU voltage output, CPU/chassis/power fan speed, and SATA information Displays the system properties of the basic system information, and allows you enter ... to the Setup Mode item in section 3.8 Boot menu for details. Click < or > to select the display language, system performance mode and boot device priority. ASUS X99-E WS/USB 3.1 3-3 3.2.1 EZ Mode By default, the EZ Mode screen appears when you to switch EZ System Tuning modes Selects the display language Creates storage RAID and...

User Guide
Page 77
...Language This button above the menu bar shows all BIOS items in your desired settings. Refer to display in a Tree Map setup. Chapter 3 ASUS X99-E WS/USB 3.1 3-5 Select frequentlyused BIOS settings and save it to your BIOS screen. Use this button to select the the language that you can select for...bar contains the languages that the item has a submenu. Q-Fan Control (F6) This button above the menu bar allows you to change the motherboard's SATA mode from AHCI to section 3.2.4 EZ Tuning Wizard for more information. EZ Tuning Wizard (F11) This button above the menu bar ...
...Language This button above the menu bar shows all BIOS items in your desired settings. Refer to display in a Tree Map setup. Chapter 3 ASUS X99-E WS/USB 3.1 3-5 Select frequentlyused BIOS settings and save it to your BIOS screen. Use this button to select the the language that you can select for...bar contains the languages that the item has a submenu. Q-Fan Control (F6) This button above the menu bar allows you to change the motherboard's SATA mode from AHCI to section 3.2.4 EZ Tuning Wizard for more information. EZ Tuning Wizard (F11) This button above the menu bar ...

User Guide
Page 87
.... Configuration options: [Auto] [100MHz] [125MHz] [166MHz] [250MHz] ASUS X99-E WS/USB 3.1 3-15 Scroll down to display other BIOS items. Chapter 3 Ai Overclock Tuner [Auto] This item allows you to select the CPU overclocking options to [Manual]. The following item appears only when you installed on the motherboard. CPU Strap [Auto] This item allows you to...
.... Configuration options: [Auto] [100MHz] [125MHz] [166MHz] [250MHz] ASUS X99-E WS/USB 3.1 3-15 Scroll down to display other BIOS items. Chapter 3 Ai Overclock Tuner [Auto] This item allows you to select the CPU overclocking options to [Manual]. The following item appears only when you installed on the motherboard. CPU Strap [Auto] This item allows you to...

User Guide
Page 113
Chapter 3 ASUS X99-E WS/USB 3.1 3-41 EHCI Hand-off [Disabled] [Enabled] Enables the support for the location of the USB ports. Refer to enable or disable the individual USB ports. xHCI Hand-off [Disabled] [Enabled] Enables the support for operating systems without an EHCI hand‑off feature. [Disabled] Disables the EHCI Hand-off support. USB Single Port Control This item allows you to section 1.2.2 Motherboard layout for operating systems without an xHCI hand‑off feature. [Disabled] Disables the xHCI Hand-off support.
Chapter 3 ASUS X99-E WS/USB 3.1 3-41 EHCI Hand-off [Disabled] [Enabled] Enables the support for the location of the USB ports. Refer to enable or disable the individual USB ports. xHCI Hand-off [Disabled] [Enabled] Enables the support for operating systems without an EHCI hand‑off feature. [Disabled] Disables the EHCI Hand-off support. USB Single Port Control This item allows you to section 1.2.2 Motherboard layout for operating systems without an xHCI hand‑off feature. [Disabled] Disables the xHCI Hand-off support.

User Guide
Page 125
The values may differ via Qfan tuning. Configuration options: [ON] [OFF] Chapter 3 ASUS X99-E WS/USB 3.1 3-53 Duty Cycle(%) [60] Use the or keys to automatically shut down when the voltage exceeds the safe range that protects the motherboard's components. This causes the system to adjust the minimum chassis fan duty cycle. The values may differ...
The values may differ via Qfan tuning. Configuration options: [ON] [OFF] Chapter 3 ASUS X99-E WS/USB 3.1 3-53 Duty Cycle(%) [60] Use the or keys to automatically shut down when the voltage exceeds the safe range that protects the motherboard's components. This causes the system to adjust the minimum chassis fan duty cycle. The values may differ...

User Guide
Page 141
... support DVD and double-click or tap \\bin\ASSETUP.EXE to change at www.asus.com for reference only. Visit the ASUS website at any time without notice. ASUS X99-E WS/USB 3.1 4-1 Chapter 4: Software Support Software Support 4.1 Installing an operating system 4 • This motherboard supports 32-bit/64-bit Windows® 7, 32-bit/64-bit Windows®...
... support DVD and double-click or tap \\bin\ASSETUP.EXE to change at www.asus.com for reference only. Visit the ASUS website at any time without notice. ASUS X99-E WS/USB 3.1 4-1 Chapter 4: Software Support Software Support 4.1 Installing an operating system 4 • This motherboard supports 32-bit/64-bit Windows® 7, 32-bit/64-bit Windows®...


