
X79-DELUXE User's Manual
Page 2
... are used only for backup purposes, without intent to the email address gpl@asus.com, stating the product and describing the problem (please DO NOT send large attachments such as source code archives, etc. ii ASUS ASSUMES NO RESPONSIBILITY OR LIABILITY FOR ANY ERRORS OR INACCURACIES THAT MAY APPEAR IN THIS MANUAL, INCLUDING THE PRODUCTS AND SOFTWARE DESCRIBED...
... are used only for backup purposes, without intent to the email address gpl@asus.com, stating the product and describing the problem (please DO NOT send large attachments such as source code archives, etc. ii ASUS ASSUMES NO RESPONSIBILITY OR LIABILITY FOR ANY ERRORS OR INACCURACIES THAT MAY APPEAR IN THIS MANUAL, INCLUDING THE PRODUCTS AND SOFTWARE DESCRIBED...
X79-DELUXE User's Manual
Page 5
... Update 4-40 4.4.8 Network iControl 4-42 4.3.9 ASUS SSD Caching II 4-44 4.4.10 System Information 4-45 4.5 Audio configurations 4-46 Chapter 5: RAID support 5.1 RAID configurations 5-1 5.1.1 RAID definitions 5-1 5.1.2 Installing Serial ATA hard disks 5-2 5.1.3 Setting the RAID item in BIOS 5-2 5.1.4 Intel® Rapid Storage Technology Option ROM utility 5-3 5.1.5 Marvell RAID utility 5-7 5.2 Creating a RAID driver disk 5-11 5.2.1 Creating a RAID driver disk without entering the OS 5-11 5.2.2 Creating a RAID driver disk in Windows 5-12 5.2.3 Installing the RAID driver...
... Update 4-40 4.4.8 Network iControl 4-42 4.3.9 ASUS SSD Caching II 4-44 4.4.10 System Information 4-45 4.5 Audio configurations 4-46 Chapter 5: RAID support 5.1 RAID configurations 5-1 5.1.1 RAID definitions 5-1 5.1.2 Installing Serial ATA hard disks 5-2 5.1.3 Setting the RAID item in BIOS 5-2 5.1.4 Intel® Rapid Storage Technology Option ROM utility 5-3 5.1.5 Marvell RAID utility 5-7 5.2 Creating a RAID driver disk 5-11 5.2.1 Creating a RAID driver disk without entering the OS 5-11 5.2.2 Creating a RAID driver disk in Windows 5-12 5.2.3 Installing the RAID driver...

X79-DELUXE User's Manual
Page 12
... ASUS DRAM SPD (Serial Presence Detect) memory information WfM 2.0, DMI 2.7, WOL by PME, PXE Drivers ASUS Utilities EZ Update Anti-virus software (OEM version) ATX form factor: 12 in . (30.5 cm x 24.4 cm) Specifications are subject to change without notice. X79-DELUXE specifications summary Rear Panel I/O Ports Internal I /O ports 1 x 19-pin USB 3.0/2.0 connector supports additional 2 USB ports 4 x USB 2.0/1.1 connectors support additional 8 USB ports 8 x SATA 6Gb/s connectors (2 x black; 6 x dark brown) 4 x SATA 3Gb/s connectors (black) 1 x 4-pin CPU Fan connector 1 x 4-pin CPU Optional Fan...
... ASUS DRAM SPD (Serial Presence Detect) memory information WfM 2.0, DMI 2.7, WOL by PME, PXE Drivers ASUS Utilities EZ Update Anti-virus software (OEM version) ATX form factor: 12 in . (30.5 cm x 24.4 cm) Specifications are subject to change without notice. X79-DELUXE specifications summary Rear Panel I/O Ports Internal I /O ports 1 x 19-pin USB 3.0/2.0 connector supports additional 2 USB ports 4 x USB 2.0/1.1 connectors support additional 8 USB ports 8 x SATA 6Gb/s connectors (2 x black; 6 x dark brown) 4 x SATA 3Gb/s connectors (black) 1 x 4-pin CPU Fan connector 1 x 4-pin CPU Optional Fan...
X79-DELUXE User's Manual
Page 16
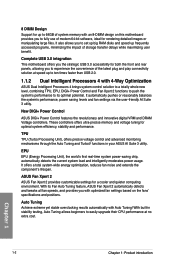
...-in your ASUS AI Suite 3 utility. It also allows you to easily upgrade their CPU performance at speed up to ten times faster than USB 2.0. 1.1.2 Dual Intelligent Processors 4 with 4-Way Optimization ASUS Dual Intelligent Processors 4 brings system control solution to a totally whole new level, combining TPU, EPU, DIGI+ Power Control and Fan Xpert 2 functions to push the system's performance to fully use of modern 64-bit software, ideal...
...-in your ASUS AI Suite 3 utility. It also allows you to easily upgrade their CPU performance at speed up to ten times faster than USB 2.0. 1.1.2 Dual Intelligent Processors 4 with 4-Way Optimization ASUS Dual Intelligent Processors 4 brings system control solution to a totally whole new level, combining TPU, EPU, DIGI+ Power Control and Fan Xpert 2 functions to push the system's performance to fully use of modern 64-bit software, ideal...

X79-DELUXE User's Manual
Page 22
...]) 10. CPU, CPU optional, and chassis fan connectors (4-pin CPU_FAN, 4-pin CPU_OPT, 4-pin CHA_FAN1-4 ) 5. MemOK! EPU switch 15. ATX power connectors (24-pin EATXPWR, 8-pin EATX12V) 3. Marvell® Serial ATA 6Gb/s connectors (7-pin SATA6G_E12; DirectKey connector (2-pin DRCT) 13. System panel connector (20-8 pin PANEL) 14. USB910; Front panel audio connector (10-1 pin AAFP) 22. Clear CMOS button (CLR_CMOS) 18. USB1314) 17. LGA2011 CPU socket 4. Reset button 20. USB 3.0 connector (20-1 pin USB3_78) 7. Intel® X79 Serial ATA 3Gb/s connectors (7-pin SATA3G_3...
...]) 10. CPU, CPU optional, and chassis fan connectors (4-pin CPU_FAN, 4-pin CPU_OPT, 4-pin CHA_FAN1-4 ) 5. MemOK! EPU switch 15. ATX power connectors (24-pin EATXPWR, 8-pin EATX12V) 3. Marvell® Serial ATA 6Gb/s connectors (7-pin SATA6G_E12; DirectKey connector (2-pin DRCT) 13. System panel connector (20-8 pin PANEL) 14. USB910; Front panel audio connector (10-1 pin AAFP) 22. Clear CMOS button (CLR_CMOS) 18. USB1314) 17. LGA2011 CPU socket 4. Reset button 20. USB 3.0 connector (20-1 pin USB3_78) 7. Intel® X79 Serial ATA 3Gb/s connectors (7-pin SATA3G_3...
X79-DELUXE User's Manual
Page 39
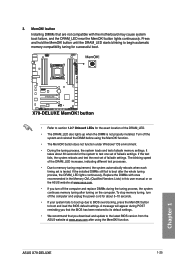
button until the DRAM_LED starts blinking to begin automatic memory compatibility tuning for successful boot. • Refer to boot after using the MemOK! If the installed DIMMs still fail to section 1.2.7 Onboard LEDs for the system to test one set of failsafe settings. ASUS X79-DELUXE 1-25 Chapter 1 3. To stop memory tuning, turn off the computer and replace DIMMs during POST reminding you turn off the system and reinstall the DIMM...
button until the DRAM_LED starts blinking to begin automatic memory compatibility tuning for successful boot. • Refer to boot after using the MemOK! If the installed DIMMs still fail to section 1.2.7 Onboard LEDs for the system to test one set of failsafe settings. ASUS X79-DELUXE 1-25 Chapter 1 3. To stop memory tuning, turn off the computer and replace DIMMs during POST reminding you turn off the system and reinstall the DIMM...
X79-DELUXE User's Manual
Page 47
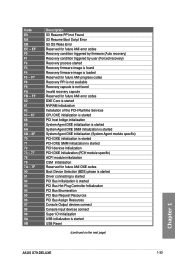
... SMM initialization is started PCH devices initialization PCH DXE Initialization (PCH module specific) ACPI module initialization CSM initialization Reserved for future AMI DXE codes Boot Device Selection (BDS) phase is started Driver connecting is started PCI Bus initialization is started PCI Bus Hot Plug Controller Initialization PCI Bus Enumeration PCI Bus Request Resources PCI Bus Assign Resources Console Output devices connect Console input devices connect Super IO Initialization USB initialization is started USB Reset (continued on the next page) Chapter 1 ASUS X79-DELUXE 1-33 EF...
... SMM initialization is started PCH devices initialization PCH DXE Initialization (PCH module specific) ACPI module initialization CSM initialization Reserved for future AMI DXE codes Boot Device Selection (BDS) phase is started Driver connecting is started PCI Bus initialization is started PCI Bus Hot Plug Controller Initialization PCI Bus Enumeration PCI Bus Request Resources PCI Bus Assign Resources Console Output devices connect Console input devices connect Super IO Initialization USB initialization is started USB Reset (continued on the next page) Chapter 1 ASUS X79-DELUXE 1-33 EF...
X79-DELUXE User's Manual
Page 48
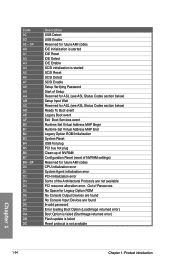
... started IDE Reset IDE Detect IDE Enable SCSI initialization is started SCSI Reset SCSI Detect SCSI Enable Setup Verifying Password Start of Setup Reserved for ASL (see ASL Status Codes section below) Setup Input Wait Reserved for ASL (see ASL Status Codes section below) Ready To Boot event Legacy Boot event Exit Boot Services event Runtime Set Virtual Address MAP Begin Runtime Set Virtual Address MAP End Legacy Option ROM Initialization System Reset USB hot plug PCI bus hot plug Clean-up of NVRAM Configuration Reset (reset...
... started IDE Reset IDE Detect IDE Enable SCSI initialization is started SCSI Reset SCSI Detect SCSI Enable Setup Verifying Password Start of Setup Reserved for ASL (see ASL Status Codes section below) Setup Input Wait Reserved for ASL (see ASL Status Codes section below) Ready To Boot event Legacy Boot event Exit Boot Services event Runtime Set Virtual Address MAP Begin Runtime Set Virtual Address MAP End Legacy Option ROM Initialization System Reset USB hot plug PCI bus hot plug Clean-up of NVRAM Configuration Reset (reset...

X79-DELUXE User's Manual
Page 107
...] PCI Express X1_1 Slot Configuration [WiFi Mode] [Auto] Allows your system. SPDIF Out Type [SPDIF] [SPDIF] Sets to an SPDIF audio output. [HDMI] Sets to run at x1 link when WiFi mode is enabled. Configuration options: [Disabled] [Enabled] Chapter 3 ASUS X79-DELUXE 3-29 Configuration options: [Enabled] [Disabled] Realtek LAN Controller [Enabled] [Enabled] Enables the Realtek® LAN controller. [Disabled] Disables the Realtek® LAN controller. Wi-Fi Controller [Enabled] [Enabled] Enables the onboard Wi-Fi controller. [Disabled] Disables the onboard...
...] PCI Express X1_1 Slot Configuration [WiFi Mode] [Auto] Allows your system. SPDIF Out Type [SPDIF] [SPDIF] Sets to an SPDIF audio output. [HDMI] Sets to run at x1 link when WiFi mode is enabled. Configuration options: [Disabled] [Enabled] Chapter 3 ASUS X79-DELUXE 3-29 Configuration options: [Enabled] [Disabled] Realtek LAN Controller [Enabled] [Enabled] Enables the Realtek® LAN controller. [Disabled] Disables the Realtek® LAN controller. Wi-Fi Controller [Enabled] [Enabled] Enables the onboard Wi-Fi controller. [Disabled] Disables the onboard...

X79-DELUXE User's Manual
Page 109
... ErP requirement. Power On By PCIE/PCI [Disabled] [Disabled] Disables the PCIE/PCI devices to generate a wake-on-LAN feature of the Intel®/Realtek LAN device or other installed PCIE LAN devices. [Enabled] Enables the PCIE/PCI devices to generate a wake-on-LAN feature of the Intel®/Realtek LAN device or other PME options will become user-configurable with set to [Enabled], the items RTC Alarm Date (Days) and Hour/ Minute/Second will be switched off some power at S4+S5...
... ErP requirement. Power On By PCIE/PCI [Disabled] [Disabled] Disables the PCIE/PCI devices to generate a wake-on-LAN feature of the Intel®/Realtek LAN device or other installed PCIE LAN devices. [Enabled] Enables the PCIE/PCI devices to generate a wake-on-LAN feature of the Intel®/Realtek LAN device or other PME options will become user-configurable with set to [Enabled], the items RTC Alarm Date (Days) and Hour/ Minute/Second will be switched off some power at S4+S5...

X79-DELUXE User's Manual
Page 113
... set the chassis fan warning speed. Chassis Fan Max. The values range from 0% to 100%. When the chassis temperature is under 40ºC, the chassis fan will operate at the minimum duty cycle. Enable this item to detect removal or replacement of the chassis temperature. Chassis Lower Temperature 1/4 [40] Displays the lower limit of chassis components. Configuration options: [Disabled] [Enabled] Chapter 3 ASUS X79-DELUXE 3-35 It allows you to set the appropriate performance level of the CPU temperature. When the chassis temperature...
... set the chassis fan warning speed. Chassis Fan Max. The values range from 0% to 100%. When the chassis temperature is under 40ºC, the chassis fan will operate at the minimum duty cycle. Enable this item to detect removal or replacement of the chassis temperature. Chassis Lower Temperature 1/4 [40] Displays the lower limit of chassis components. Configuration options: [Disabled] [Enabled] Chapter 3 ASUS X79-DELUXE 3-35 It allows you to set the appropriate performance level of the CPU temperature. When the chassis temperature...

X79-DELUXE User's Manual
Page 123
... BIOS in DOS environment using the current version of BIOS, DO NOT manually update the BIOS. ASUS BIOS Updater: Updates and back ups the BIOS in the future. Chapter 3 ASUS X79-DELUXE 3-45 Save a copy of this motherboard. The following utilities allow you to update the motherboard BIOS in Windows® environment. • EZ Update requires an Internet connection either through a network or an ISP (Internet Service Provider). • This utility is no problem using the motherboard support DVD and a USB flash disk drive. Inappropriate BIOS updating...
... BIOS in DOS environment using the current version of BIOS, DO NOT manually update the BIOS. ASUS BIOS Updater: Updates and back ups the BIOS in the future. Chapter 3 ASUS X79-DELUXE 3-45 Save a copy of this motherboard. The following utilities allow you to update the motherboard BIOS in Windows® environment. • EZ Update requires an Internet connection either through a network or an ISP (Internet Service Provider). • This utility is no problem using the motherboard support DVD and a USB flash disk drive. Inappropriate BIOS updating...

X79-DELUXE User's Manual
Page 125
... BIOS 3 The ASUS CrashFree BIOS 3 utility is an auto recovery tool that contains the BIOS file. Chapter 3 ASUS X79-DELUXE 3-47 Turn on the ASUS official website. The system requires you press to prevent system boot failure! DO NOT shut down or reset the system while updating the BIOS to load default BIOS values. If you to restore the BIOS file when it to recover the BIOS setting. Insert the motherboard support DVD to the optical drive, or the USB flash drive...
... BIOS 3 The ASUS CrashFree BIOS 3 utility is an auto recovery tool that contains the BIOS file. Chapter 3 ASUS X79-DELUXE 3-47 Turn on the ASUS official website. The system requires you press to prevent system boot failure! DO NOT shut down or reset the system while updating the BIOS to load default BIOS values. If you to restore the BIOS file when it to recover the BIOS setting. Insert the motherboard support DVD to the optical drive, or the USB flash drive...

X79-DELUXE User's Manual
Page 126
... to boot using defaults Chapter 3 3-48 Chapter 3: BIOS setup Please select boot device: SATA: XXXXXXXXXXXXXXXX USB XXXXXXXXXXXXXXXXX UEFI: XXXXXXXXXXXXXXXX Enter Setup ↑ and ↓ to move selection ENTER to select boot device ESC to the USB port. 2. The succeeding utility screens are for reference only. Download the latest BIOS file and BIOS Updater from the ASUS website at http://support.asus.com and save the BIOS file to a floppy disk due to a hard disk drive or USB flash drive in DOS environment. Before updating BIOS 1. Prepare the motherboard support DVD and a USB...
... to boot using defaults Chapter 3 3-48 Chapter 3: BIOS setup Please select boot device: SATA: XXXXXXXXXXXXXXXX USB XXXXXXXXXXXXXXXXX UEFI: XXXXXXXXXXXXXXXX Enter Setup ↑ and ↓ to move selection ENTER to select boot device ESC to the USB port. 2. The succeeding utility screens are for reference only. Download the latest BIOS file and BIOS Updater from the ASUS website at http://support.asus.com and save the BIOS file to a floppy disk due to a hard disk drive or USB flash drive in DOS environment. Before updating BIOS 1. Prepare the motherboard support DVD and a USB...
X79-DELUXE User's Manual
Page 130
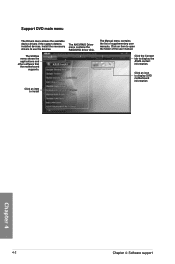
... menu contains the list of the user manual. Click an icon to display DVD/ motherboard information Click an item to display the ASUS contact information. Click the Contact tab to install Chapter 4 4-2 Chapter 4: Software support The AHCI/RAID Driver menu contains the RAID/AHCI driver disk. The Utilities menu shows the applications and other software that the motherboard supports. Support DVD main menu The Drivers menu shows the available device drivers if the system detects installed devices. Install the necessary drivers to open the folder of supplementary user manuals...
... menu contains the list of the user manual. Click an icon to display DVD/ motherboard information Click an item to display the ASUS contact information. Click the Contact tab to install Chapter 4 4-2 Chapter 4: Software support The AHCI/RAID Driver menu contains the RAID/AHCI driver disk. The Utilities menu shows the applications and other software that the motherboard supports. Support DVD main menu The Drivers menu shows the available device drivers if the system detects installed devices. Install the necessary drivers to open the folder of supplementary user manuals...
X79-DELUXE User's Manual
Page 170
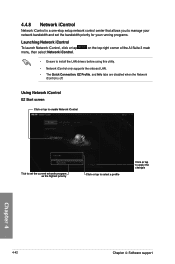
... Chapter 4: Software support Using Network iControl EZ Start screen Click or tap to enable Network iControl Tick to set the current network program as the highest priority Click or tap to select a profile Click or tap to install the LAN drivers before using this utility. • Network iControl only supports the onboard LAN. • The Quick Connection, EZ Profile, and Info tabs are disabled when the Network iControl is a one-stop setup network control center...
... Chapter 4: Software support Using Network iControl EZ Start screen Click or tap to enable Network iControl Tick to set the current network program as the highest priority Click or tap to select a profile Click or tap to install the LAN drivers before using this utility. • Network iControl only supports the onboard LAN. • The Quick Connection, EZ Profile, and Info tabs are disabled when the Network iControl is a one-stop setup network control center...
X79-DELUXE User's Manual
Page 178
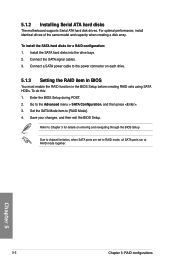
...the BIOS Setup during POST. 2. 5.1.2 Installing Serial ATA hard disks The motherboard supports Serial ATA hard disk drives. Set the SATA Mode item to RAID mode, all SATA ports run at RAID mode together. Save your changes, and then exit the BIOS Setup. For optimal performance, install identical drives of the same model and capacity when creating a disk array. Go to the power connector on entering and navigating through the BIOS Setup Due to chipset limitation, when SATA ports are set to [RAID Mode]. 4. Connect a SATA power cable to the Advanced menu > SATA Configuration, and...
...the BIOS Setup during POST. 2. 5.1.2 Installing Serial ATA hard disks The motherboard supports Serial ATA hard disk drives. Set the SATA Mode item to RAID mode, all SATA ports run at RAID mode together. Save your changes, and then exit the BIOS Setup. For optimal performance, install identical drives of the same model and capacity when creating a disk array. Go to the power connector on entering and navigating through the BIOS Setup Due to chipset limitation, when SATA ports are set to [RAID Mode]. 4. Connect a SATA power cable to the Advanced menu > SATA Configuration, and...
X79-DELUXE User's Manual
Page 183
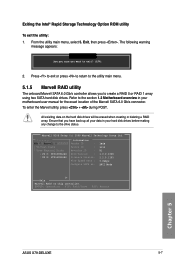
... 0 ├ Virtual Disks └ Free Physical Disks ├ PD 0: ST3160812AS └ PD 8: ST3160812AS Information Vendor ID : Device ID : Revision ID : BIOS Version : Firmware Version: PCIe Speed Rate : Configure SATA as: 1B4B 9130 B1 1.0.0.1028 2.2.0.1105 5.0Gbps AHCI Mode ▶ Help Marvell RAID on the hard disk drives will be erased when creating or deleting a RAID array. Press to exit or press to return to the utility main menu. 5.1.5 Marvell RAID utility The onboard Marvell SATA 6.0 Gb/s controller allows...
... 0 ├ Virtual Disks └ Free Physical Disks ├ PD 0: ST3160812AS └ PD 8: ST3160812AS Information Vendor ID : Device ID : Revision ID : BIOS Version : Firmware Version: PCIe Speed Rate : Configure SATA as: 1B4B 9130 B1 1.0.0.1028 2.2.0.1105 5.0Gbps AHCI Mode ▶ Help Marvell RAID on the hard disk drives will be erased when creating or deleting a RAID array. Press to exit or press to return to the utility main menu. 5.1.5 Marvell RAID utility The onboard Marvell SATA 6.0 Gb/s controller allows...
X79-DELUXE User's Manual
Page 187
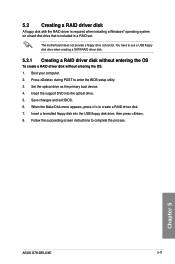
... when installing a Windows® operating system on a hard disk drive that is included in a RAID set. You have to complete the process. Insert the support DVD into the USB floppy disk drive, then press . 8. Set the optical drive as the primary boot device. 4. When the Make Disk menu appears, press to enter the BIOS setup utility. 3. The motherboard does not provide a floppy drive connector. Press during POST to create a RAID driver disk. 7. Save changes and exit BIOS. 6. Insert a formatted floppy disk into the optical drive. 5. Chapter 5 ASUS X79-DELUXE...
... when installing a Windows® operating system on a hard disk drive that is included in a RAID set. You have to complete the process. Insert the support DVD into the USB floppy disk drive, then press . 8. Set the optical drive as the primary boot device. 4. When the Make Disk menu appears, press to enter the BIOS setup utility. 3. The motherboard does not provide a floppy drive connector. Press during POST to create a RAID driver disk. 7. Save changes and exit BIOS. 6. Insert a formatted floppy disk into the optical drive. 5. Chapter 5 ASUS X79-DELUXE...

X79-DELUXE User's Manual
Page 188
... USB flash drive with RAID driver into the USB port or the support DVD into the optical drive. 4. Click the name of your operating system. Plug the USB floppy disk drive and insert a floppy disk. 3. Select 32bit or 64bit folder depending on your USB floppy disk drive. To set up a Windows® UEFI operating system under RAID mode, ensure to the root path of the device you have to use another computer to copy the RAID driver from the support DVD to Drivers > RAID...
... USB flash drive with RAID driver into the USB port or the support DVD into the optical drive. 4. Click the name of your operating system. Plug the USB floppy disk drive and insert a floppy disk. 3. Select 32bit or 64bit folder depending on your USB floppy disk drive. To set up a Windows® UEFI operating system under RAID mode, ensure to the root path of the device you have to use another computer to copy the RAID driver from the support DVD to Drivers > RAID...


