
VN247 Series User Guide for English Edition
Page 7
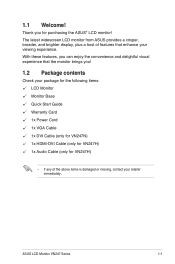
... Start Guide Warranty Card 1x Power Cord 1x VGA Cable 1x DVI Cable (only for VN247N) 1x HDMI-DVI Cable (only for VN247H) 1x Audio Cable (only for purchasing the ASUS® LCD monitor! ASUS LCD Monitor VN247 Series 1-1 The latest widescreen LCD monitor from ASUS provides a crisper, broader, and brighter display, plus a host of features that the...
... Start Guide Warranty Card 1x Power Cord 1x VGA Cable 1x DVI Cable (only for VN247N) 1x HDMI-DVI Cable (only for VN247H) 1x Audio Cable (only for purchasing the ASUS® LCD monitor! ASUS LCD Monitor VN247 Series 1-1 The latest widescreen LCD monitor from ASUS provides a crisper, broader, and brighter display, plus a host of features that the...

VN247 Series User Guide for English Edition
Page 9
ASUS LCD Monitor VN247 Series 1-3 Button: • Automatically adjust the image to its optimized position, clock, and phase by long pressing this button for 2-4 seconds (for VGA mode ... to the next function. • This is also a hotkey for Contrast adjustment. See page 1-6 for alignment. • The QuickFit function contains 7 pages of the LCD monitor VN247H 1 2 4 5 6 7 8 VN247N 1 2 3 5 6 7 8 1. 1.5 Monitor introduction 1.5.1 Front of common grid patterns, paper sizes, and photo sizes. QuickFit Button: • This is active. 3.
ASUS LCD Monitor VN247 Series 1-3 Button: • Automatically adjust the image to its optimized position, clock, and phase by long pressing this button for 2-4 seconds (for VGA mode ... to the next function. • This is also a hotkey for Contrast adjustment. See page 1-6 for alignment. • The QuickFit function contains 7 pages of the LCD monitor VN247H 1 2 4 5 6 7 8 VN247N 1 2 3 5 6 7 8 1. 1.5 Monitor introduction 1.5.1 Front of common grid patterns, paper sizes, and photo sizes. QuickFit Button: • This is active. 3.
VN247 Series User Guide for English Edition
Page 10
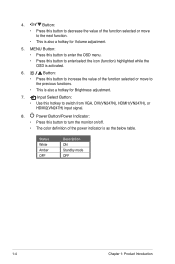
...adjustment. 7. Power Button/Power Indicator: • Press this button to increase the value of the function selected or move to turn the monitor on/off. • The color definition of the function selected or move to the previous functions. • This is activated. 6. ...function. • This is as the below table. Input Select Button: • Use this button to switch from VGA, DVI(VN247N), HDMI1(VN247H), or HDMI2(VN247H) input signal. 8. Status White Amber OFF Description ON Standby mode OFF 1-4 Chapter 1: Product Introduction 4. MENU Button: • ...
...adjustment. 7. Power Button/Power Indicator: • Press this button to increase the value of the function selected or move to turn the monitor on/off. • The color definition of the function selected or move to the previous functions. • This is activated. 6. ...function. • This is as the below table. Input Select Button: • Use this button to switch from VGA, DVI(VN247N), HDMI1(VN247H), or HDMI2(VN247H) input signal. 8. Status White Amber OFF Description ON Standby mode OFF 1-4 Chapter 1: Product Introduction 4. MENU Button: • ...
VN247 Series User Guide for English Edition
Page 11
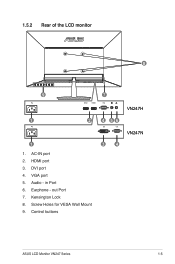
Earphone - Screw Holes for VESA Wall Mount 9. Audio - out Port 7. HDMI port 3. Kensington Lock 8. AC-IN port 2. VGA port 5. DVI port 4. 1.5.2 Rear of the LCD monitor 8 9 7 1 2 1 1. Control buttons VN247H 4 56 VN247N 34 ASUS LCD Monitor VN247 Series 1-5 in Port 6.
Earphone - Screw Holes for VESA Wall Mount 9. Audio - out Port 7. HDMI port 3. Kensington Lock 8. AC-IN port 2. VGA port 5. DVI port 4. 1.5.2 Rear of the LCD monitor 8 9 7 1 2 1 1. Control buttons VN247H 4 56 VN247N 34 ASUS LCD Monitor VN247 Series 1-5 in Port 6.
VN247 Series User Guide for English Edition
Page 17
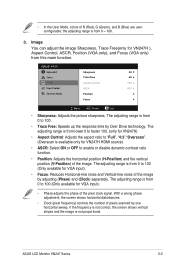
...to 100. • Trace Free: Speeds up the response time by adjusting (Phase) and (Clock) separately. The adjusting range is available only for VN247H) • Aspect Control: Adjusts the aspect ratio to "Full", "4:3","Overscan". (Overscan is from 0 ~ 100. 3. If the frequency is not ...function. • Position: Adjusts the horizontal position (H-Position) and the vertical position (V-Position) of the image by Over Drive technology. ASUS LCD Monitor VN247 Series 3-3 The adjusting range is from this main function. • In the User Mode, colors of pixels scanned by one ...
...to 100. • Trace Free: Speeds up the response time by adjusting (Phase) and (Clock) separately. The adjusting range is available only for VN247H) • Aspect Control: Adjusts the aspect ratio to "Full", "4:3","Overscan". (Overscan is from 0 ~ 100. 3. If the frequency is not ...function. • Position: Adjusts the horizontal position (H-Position) and the vertical position (V-Position) of the image by Over Drive technology. ASUS LCD Monitor VN247 Series 3-3 The adjusting range is from this main function. • In the User Mode, colors of pixels scanned by one ...
VN247 Series User Guide for English Edition
Page 19
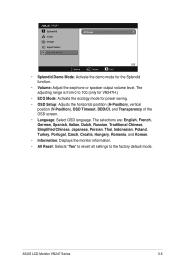
... mode. ASUS LCD Monitor VN247 Series 3-5 The selections are: English, French, German, Spanish, Italian, Dutch, Russian, Traditional Chinese, Simplified Chinese, Japanese, Persian, Thai, Indonesian, Poland, Turkey, Portugal, Czech, Croatia, Hungary, Romania, and Korean. • Information: Displays the monitor information. • All Reset: Selects "Yes" to revert all settings to 100.(only for VN247H.) •...
... mode. ASUS LCD Monitor VN247 Series 3-5 The selections are: English, French, German, Spanish, Italian, Dutch, Russian, Traditional Chinese, Simplified Chinese, Japanese, Persian, Thai, Indonesian, Poland, Turkey, Portugal, Czech, Croatia, Hungary, Romania, and Korean. • Information: Displays the monitor information. • All Reset: Selects "Yes" to revert all settings to 100.(only for VN247H.) •...
VN247 Series User Guide for English Edition
Page 21
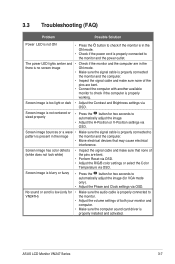
... the signal cable is properly connected the monitor and the computer. • Inspect the...monitor to pattern is present in the image the monitor and the computer. • Move electrical devices that none of both your monitor...• Make sure the audio cable is properly connected to VN247H) the monitor. • Adjust the volume settings of the pins are... power cord is low (only for two seconds to the monitor and the power outlet. No sound or sond is properly...LED lights amber and • Check if the monitor and the computer are bent. • Perform Reset via OSD. ...
... the signal cable is properly connected the monitor and the computer. • Inspect the...monitor to pattern is present in the image the monitor and the computer. • Move electrical devices that none of both your monitor...• Make sure the audio cable is properly connected to VN247H) the monitor. • Adjust the volume settings of the pins are... power cord is low (only for two seconds to the monitor and the power outlet. No sound or sond is properly...LED lights amber and • Check if the monitor and the computer are bent. • Perform Reset via OSD. ...


