
VN247 Series User Guide for English Edition
Page 7
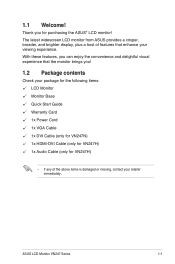
... your viewing experience. Thank you ! 1.2 Package contents Check your package for the following items: LCD Monitor Monitor Base Quick Start Guide Warranty Card 1x Power Cord 1x VGA Cable 1x DVI Cable (only for VN247N) 1x HDMI-DVI Cable (only for VN247H) 1x Audio Cable (only for purchasing the ASUS® LCD monitor! ASUS LCD Monitor VN247 Series 1-1
... your viewing experience. Thank you ! 1.2 Package contents Check your package for the following items: LCD Monitor Monitor Base Quick Start Guide Warranty Card 1x Power Cord 1x VGA Cable 1x DVI Cable (only for VN247N) 1x HDMI-DVI Cable (only for VN247H) 1x Audio Cable (only for purchasing the ASUS® LCD monitor! ASUS LCD Monitor VN247 Series 1-1

VN247 Series User Guide for English Edition
Page 9
... Intelligence Technology. • Exit the OSD menu or go back to activate the QuickFit function designed for Contrast adjustment. ASUS LCD Monitor VN247 Series 1-3 QuickFit Button: • This is also a hotkey for alignment. • The QuickFit function contains 7 ...1.5 Monitor introduction 1.5.1 Front of the function selected or move to the next function. • This is a hotkey to the previous menu as the OSD menu is active. 3. See page 1-6 for VGA mode only). • Use this button to decrease the value of the LCD monitor VN247H 1 2 4 5 6 7 8 VN247N 1 ...
... Intelligence Technology. • Exit the OSD menu or go back to activate the QuickFit function designed for Contrast adjustment. ASUS LCD Monitor VN247 Series 1-3 QuickFit Button: • This is also a hotkey for alignment. • The QuickFit function contains 7 ...1.5 Monitor introduction 1.5.1 Front of the function selected or move to the next function. • This is a hotkey to the previous menu as the OSD menu is active. 3. See page 1-6 for VGA mode only). • Use this button to decrease the value of the LCD monitor VN247H 1 2 4 5 6 7 8 VN247N 1 ...
VN247 Series User Guide for English Edition
Page 11
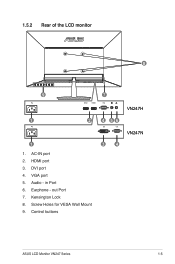
VGA port 5. Audio - Kensington Lock 8. HDMI port 3. Screw Holes for VESA Wall Mount 9. 1.5.2 Rear of the LCD monitor 8 9 7 1 2 1 1. DVI port 4. Earphone - in Port 6. Control buttons VN247H 4 56 VN247N 34 ASUS LCD Monitor VN247 Series 1-5 out Port 7. AC-IN port 2.
VGA port 5. Audio - Kensington Lock 8. HDMI port 3. Screw Holes for VESA Wall Mount 9. 1.5.2 Rear of the LCD monitor 8 9 7 1 2 1 1. DVI port 4. Earphone - in Port 6. Control buttons VN247H 4 56 VN247N 34 ASUS LCD Monitor VN247 Series 1-5 out Port 7. AC-IN port 2.
VN247 Series User Guide for English Edition
Page 13
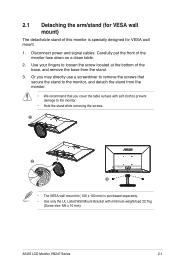
2.1 Detaching the arm/stand (for VESA wall mount. 1. ASUS LCD Monitor VN247 Series 2-1 Carefully put the front of this monitor is purchased separately. • Use only the UL Listed Wall Mount Bracket with soft cloth to prevent damage to the monitor, and detach the stand from the stand. 3. Use your ...1 2 3 • The VESA wall mount kit ( 100 x 100 mm) is specially designed for VESA wall mount) The detachable stand of the monitor face down on a clean table. 2. Or you may directly use a screwdriver to remove the screws that you cover the table surface with minimum weight/...
2.1 Detaching the arm/stand (for VESA wall mount. 1. ASUS LCD Monitor VN247 Series 2-1 Carefully put the front of this monitor is purchased separately. • Use only the UL Listed Wall Mount Bracket with soft cloth to prevent damage to the monitor, and detach the stand from the stand. 3. Use your ...1 2 3 • The VESA wall mount kit ( 100 x 100 mm) is specially designed for VESA wall mount) The detachable stand of the monitor face down on a clean table. 2. Or you may directly use a screwdriver to remove the screws that you cover the table surface with minimum weight/...
VN247 Series User Guide for English Edition
Page 15
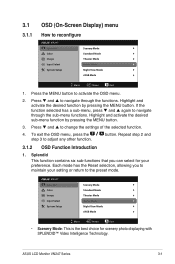
...scenery photo displaying with SPLENDID™ Video Intelligence Technology. button. Repeat step 2 and 3.1.2 OSD Function Introduction 1. ASUS LCD Monitor VN247 Series 3-1 VN247 Splendid Color Image Input Select System Setup Scenery Mode Standard Mode Theater Mode Game Mode Night View Mode sRGB Mode...Splendid This function contains six sub-functions that you to navigate through the functions. Press and to reconfigure VN247 Splendid Color Image Input Select System Setup Scenery Mode Standard Mode Theater Mode Game Mode Night View Mode sRGB Mode Move Menu ...
...scenery photo displaying with SPLENDID™ Video Intelligence Technology. button. Repeat step 2 and 3.1.2 OSD Function Introduction 1. ASUS LCD Monitor VN247 Series 3-1 VN247 Splendid Color Image Input Select System Setup Scenery Mode Standard Mode Theater Mode Game Mode Night View Mode sRGB Mode...Splendid This function contains six sub-functions that you to navigate through the functions. Press and to reconfigure VN247 Splendid Color Image Input Select System Setup Scenery Mode Standard Mode Theater Mode Game Mode Night View Mode sRGB Mode Move Menu ...
VN247 Series User Guide for English Edition
Page 17
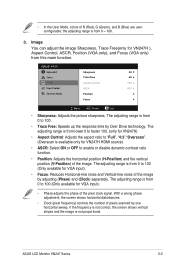
...shows vertical stripes and the image is from 0 ~ 100. 3. • In the User Mode, colors of the image. VN247 Splendid Sharpness 40 Color Trace Free 60 Image Aspect Control Full Input Select ASCR OFF System Setup Position Focus Move Menu Exit •...screen shows horizontal disturbances. • Clock (pixel frequency) controls the number of the image by adjusting (Phase) and (Clock) separately. ASUS LCD Monitor VN247 Series 3-3 the adjusting range is available only for VN247H) • Aspect Control: Adjusts the aspect ratio to enable or disable dynamic contrast...
...shows vertical stripes and the image is from 0 ~ 100. 3. • In the User Mode, colors of the image. VN247 Splendid Sharpness 40 Color Trace Free 60 Image Aspect Control Full Input Select ASCR OFF System Setup Position Focus Move Menu Exit •...screen shows horizontal disturbances. • Clock (pixel frequency) controls the number of the image by adjusting (Phase) and (Clock) separately. ASUS LCD Monitor VN247 Series 3-3 the adjusting range is available only for VN247H) • Aspect Control: Adjusts the aspect ratio to enable or disable dynamic contrast...
VN247 Series User Guide for English Edition
Page 19
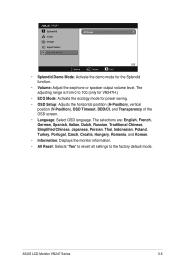
...Traditional Chinese, Simplified Chinese, Japanese, Persian, Thai, Indonesian, Poland, Turkey, Portugal, Czech, Croatia, Hungary, Romania, and Korean. • Information: Displays the monitor information. • All Reset: Selects "Yes" to revert all settings to 100.(only for VN247H.) • ECO Mode: Activate the ecology mode for the Splendid...postition (H-Position), vertical position (V-Position), OSD Timeout, DDD/CI, and Transparency of the OSD screen. • Language: Select OSD language. ASUS LCD Monitor VN247 Series 3-5 The adjusting range is from 0 to the factory default mode.
...Traditional Chinese, Simplified Chinese, Japanese, Persian, Thai, Indonesian, Poland, Turkey, Portugal, Czech, Croatia, Hungary, Romania, and Korean. • Information: Displays the monitor information. • All Reset: Selects "Yes" to revert all settings to 100.(only for VN247H.) • ECO Mode: Activate the ecology mode for the Splendid...postition (H-Position), vertical position (V-Position), OSD Timeout, DDD/CI, and Transparency of the OSD screen. • Language: Select OSD language. ASUS LCD Monitor VN247 Series 3-5 The adjusting range is from 0 to the factory default mode.
VN247 Series User Guide for English Edition
Page 21
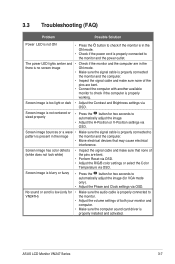
...sure the signal cable is properly connected to automatically adjust the image (for two seconds to the monitor and the power outlet. ASUS LCD Monitor VN247 Series 3-7 Screen image is present in the image the monitor and the computer. • Move electrical devices that none of the pins are bent. •... Clock settings via OSD. 3.3 Troubleshooting (FAQ) Problem Possible Solution Power LED is not ON • Press the button to check if the monitor is in the ON mode. • Check if the power cord is properly connected to automatically adjust the image. • Adjust the H-...
...sure the signal cable is properly connected to automatically adjust the image (for two seconds to the monitor and the power outlet. ASUS LCD Monitor VN247 Series 3-7 Screen image is present in the image the monitor and the computer. • Move electrical devices that none of the pins are bent. •... Clock settings via OSD. 3.3 Troubleshooting (FAQ) Problem Possible Solution Power LED is not ON • Press the button to check if the monitor is in the ON mode. • Check if the power cord is properly connected to automatically adjust the image. • Adjust the H-...


