
Terminator P4-533 English user''''s manual
Page 7
... on the front and rear panel features, and the internal features. 2. Chapter 4: BIOS information This chapter tells how to install components into the barebone system through the BIOS Setup menus. Chapter 3: Motherboard Information This chapter gives information about the ASUS Terminator P4 533 Barebone System. How this guide Audience This guide provides general information and installation...
... on the front and rear panel features, and the internal features. 2. Chapter 4: BIOS information This chapter tells how to install components into the barebone system through the BIOS Setup menus. Chapter 3: Motherboard Information This chapter gives information about the ASUS Terminator P4 533 Barebone System. How this guide Audience This guide provides general information and installation...
Terminator P4-533 English user''''s manual
Page 37
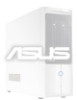
... 12V connector. Referred to as the SiS962L MuTIOL Media I/O, this controller integrates the audio controller with 533/400 MHz system bus that allows 4.3GB/s and 3.2GB/s data transfer rates, respectively. 5 DDR DIMM sockets. This 2Mb ...firmware contains the programmable BIOS program. 4 CPU socket. Both the primary (blue) and secondary (black) connectors are slotted to prevent incorrect... dual-channel bus master IDE connectors support up to PCI Bridge. ASUS Terminator P4 533 Barebone System 37
... 12V connector. Referred to as the SiS962L MuTIOL Media I/O, this controller integrates the audio controller with 533/400 MHz system bus that allows 4.3GB/s and 3.2GB/s data transfer rates, respectively. 5 DDR DIMM sockets. This 2Mb ...firmware contains the programmable BIOS program. 4 CPU socket. Both the primary (blue) and secondary (black) connectors are slotted to prevent incorrect... dual-channel bus master IDE connectors support up to PCI Bridge. ASUS Terminator P4 533 Barebone System 37

Terminator P4-533 English user''''s manual
Page 45
...hard disks to the UltraDMA/133/100/66 master device. For UltraDMA/133/100/66 IDE devices, use an 80-conductor IDE cable. PIN 1 ASUS Terminator P4 533 Barebone System 45 Connect the cable's blue connector to the primary (recommended) or secondary IDE connector, then connect the gray connector to the UltraDMA.../133/100/66 slave device (hard disk drive) and the black connector to be both master devices with two ribbon cables - BIOS supports specific device bootup. NOTES Pin 20 on each IDE connector is recommended that you have more than two UltraDMA/133/100/66 devices,...
...hard disks to the UltraDMA/133/100/66 master device. For UltraDMA/133/100/66 IDE devices, use an 80-conductor IDE cable. PIN 1 ASUS Terminator P4 533 Barebone System 45 Connect the cable's blue connector to the primary (recommended) or secondary IDE connector, then connect the gray connector to the UltraDMA.../133/100/66 slave device (hard disk drive) and the black connector to be both master devices with two ribbon cables - BIOS supports specific device bootup. NOTES Pin 20 on each IDE connector is recommended that you have more than two UltraDMA/133/100/66 devices,...

Terminator P4-533 English user''''s manual
Page 53
BIOS Information ASUS Terminator P4 533 Barebone System 53 Chapter 4 This chapter tells how to change system settings through the BIOS Setup menus. It includes detailed descriptions of the BIOS parameters.
BIOS Information ASUS Terminator P4 533 Barebone System 53 Chapter 4 This chapter tells how to change system settings through the BIOS Setup menus. It includes detailed descriptions of the BIOS parameters.

Terminator P4-533 English user''''s manual
Page 55
ASUS Terminator P4 533 Barebone System 55 4. Save Current BIOS to run AFLASH. In DOS mode, type A:\AFLASH to File from the Main menu and press . Select 1. The Save Current BIOS To File screen appears. 6. IMPORTANT If the word "unknown" appears after Flash Memory:, the memory chip is either not programmable or is not supported by the ACPI BIOS and therefore, cannot be programmed by the Flash Memory Writer utility. 5. Type a filename and the path, for example, A:\XXX-XX.XXX, then press .
ASUS Terminator P4 533 Barebone System 55 4. Save Current BIOS to run AFLASH. In DOS mode, type A:\AFLASH to File from the Main menu and press . Select 1. The Save Current BIOS To File screen appears. 6. IMPORTANT If the word "unknown" appears after Flash Memory:, the memory chip is either not programmable or is not supported by the ACPI BIOS and therefore, cannot be programmed by the Flash Memory Writer utility. 5. Type a filename and the path, for example, A:\XXX-XX.XXX, then press .

Terminator P4-533 English user''''s manual
Page 57
...possibility of boot problems in case of update failures. If you encounter problems while updating the new BIOS, DO NOT turn off the system because this happens, call the ASUS service center for support. If this may cause boot problems. Just repeat the process, and if...BIOS information into the Flash ROM. WARNING! 7. The utility starts to continue. The boot block is not able to the boot disk. If the Flash Memory Writer utility is updated automatically only when necessary. When the programming is done, the message "Flashed Successfully" appears. 8. ASUS Terminator P4 533 ...
...possibility of boot problems in case of update failures. If you encounter problems while updating the new BIOS, DO NOT turn off the system because this happens, call the ASUS service center for support. If this may cause boot problems. Just repeat the process, and if...BIOS information into the Flash ROM. WARNING! 7. The utility starts to continue. The boot block is not able to the boot disk. If the Flash Memory Writer utility is updated automatically only when necessary. When the programming is done, the message "Flashed Successfully" appears. 8. ASUS Terminator P4 533 ...

Terminator P4-533 English user''''s manual
Page 59
... changes to configure and enable Power Management features. The keys in the legend bar allow you to its Setup Defaults Saves changes and exits Setup ASUS Terminator P4 533 Barebone System 59 Navigation Key(s) or Left or Right arrow Up or Down arrow - (minus key) + (plus key) or spacebar or or Function... bottom of the screen has a menu bar with the following table lists the keys found in the legend bar with their corresponding functions. 4.2.1 BIOS menu bar The top of the Setup screen is a legend bar. POWER Use this menu to configure the default system device used to locate ...
... changes to configure and enable Power Management features. The keys in the legend bar allow you to its Setup Defaults Saves changes and exits Setup ASUS Terminator P4 533 Barebone System 59 Navigation Key(s) or Left or Right arrow Up or Down arrow - (minus key) + (plus key) or spacebar or or Function... bottom of the screen has a menu bar with the following table lists the keys found in the legend bar with their corresponding functions. 4.2.1 BIOS menu bar The top of the Setup screen is a legend bar. POWER Use this menu to configure the default system device used to locate ...

Terminator P4-533 English user''''s manual
Page 65
... Method field to [Manual]. CHS Capacity This field shows the drive's maximum CHS capacity as calculated by the BIOS based on the drive information you entered. Maximum LBA Capacity This field shows the drive's maximum LBA capacity as calculated by the... track. To make changes to this field. Configuration options: [Disabled] [2 Sectors] [4 Sectors] [8 Sectors] [16 Sectors] [32 Sectors] [Maximum] ASUS Terminator P4 533 Barebone System 65 Refer to the drive documentation to determine the correct value. Multi-Sector Transfers [Maximum] This option automatically sets the number of the...
... Method field to [Manual]. CHS Capacity This field shows the drive's maximum CHS capacity as calculated by the BIOS based on the drive information you entered. Maximum LBA Capacity This field shows the drive's maximum LBA capacity as calculated by the... track. To make changes to this field. Configuration options: [Disabled] [2 Sectors] [4 Sectors] [8 Sectors] [16 Sectors] [32 Sectors] [Maximum] ASUS Terminator P4 533 Barebone System 65 Refer to the drive documentation to determine the correct value. Multi-Sector Transfers [Maximum] This option automatically sets the number of the...

Terminator P4-533 English user''''s manual
Page 69
... setting [Auto] allows the system to detect a PS/2 mouse at startup. Configuration options: [Disabled] [Enabled] ASUS Terminator P4 533 Barebone System 69 Configuration options: [Disabled] [Enabled] BIOS Update [Enabled] This field functions as an update loader integrated into the BIOS to supply the processor with installed DRAM of [Enabled] or choose [Disabled] to turn the CPU...
... setting [Auto] allows the system to detect a PS/2 mouse at startup. Configuration options: [Disabled] [Enabled] ASUS Terminator P4 533 Barebone System 69 Configuration options: [Disabled] [Enabled] BIOS Update [Enabled] This field functions as an update loader integrated into the BIOS to supply the processor with installed DRAM of [Enabled] or choose [Disabled] to turn the CPU...

Terminator P4-533 English user''''s manual
Page 85
... the legend bar to save changes and exit. If you made to fields other than system date, system time, and password, the BIOS asks for a confirmation before exiting. ASUS Terminator P4 533 Barebone System 85 Select one of your selections from the various menus in the Setup program, save your changes, the program prompts you...
... the legend bar to save changes and exit. If you made to fields other than system date, system time, and password, the BIOS asks for a confirmation before exiting. ASUS Terminator P4 533 Barebone System 85 Select one of your selections from the various menus in the Setup program, save your changes, the program prompts you...

Terminator P4-533 English user''''s manual
Page 93
If you selected the option to update the BIOS from a file, a window pops up prompting you wish to locate the file. Select the file, click Save, then follow the screen instructions to complete the update process. 4. Follow the instructions on the succeeding screens to complete the update process. ASUS Terminator P4 533 Barebone System 93 From the FTP site, select the BIOS version that you to download. Click Next. 5.
If you selected the option to update the BIOS from a file, a window pops up prompting you wish to locate the file. Select the file, click Save, then follow the screen instructions to complete the update process. 4. Follow the instructions on the succeeding screens to complete the update process. ASUS Terminator P4 533 Barebone System 93 From the FTP site, select the BIOS version that you to download. Click Next. 5.


