

User Guide
Page 14
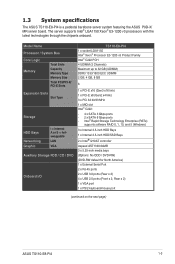
... package contents Check your system package for the following items. Model Name TS110-E8-PI4 Chassis ASUS T11 Pedestal Chassis Motherboard ASUS P9D-X/MR Server Board Component 1 x 300W Single Power Supply 1 x 120 mm x 120 mm System fan 4 x SATA Cables 1 x Front I/O Board Accessories 1 x TS110-E8-PI4 User's Guide 1 x TS110-E8-PI4 Support CD 1 x Bag of Screws 1 x AC Power Cable Optional Items CPU Heatsink...
... package contents Check your system package for the following items. Model Name TS110-E8-PI4 Chassis ASUS T11 Pedestal Chassis Motherboard ASUS P9D-X/MR Server Board Component 1 x 300W Single Power Supply 1 x 120 mm x 120 mm System fan 4 x SATA Cables 1 x Front I/O Board Accessories 1 x TS110-E8-PI4 User's Guide 1 x TS110-E8-PI4 Support CD 1 x Bag of Screws 1 x AC Power Cable Optional Items CPU Heatsink...
User Guide
Page 15
... America) 1 x External Serial Port 2 x RJ-45 ports 2 x USB 3.0 ports (Rear x 2) 4 x USB 2.0 ports (Front x 2, Rear x 2) 1 x VGA port 1 x PS/2 keyboard/mouse port (continued on the next page) ASUS TS110-E8-PI4 1-3 The server supports Intel® LGA1150 Xeon® E3-1200 v3 processors with the latest technologies through the chipsets onboard.
... America) 1 x External Serial Port 2 x RJ-45 ports 2 x USB 3.0 ports (Rear x 2) 4 x USB 2.0 ports (Front x 2, Rear x 2) 1 x VGA port 1 x PS/2 keyboard/mouse port (continued on the next page) ASUS TS110-E8-PI4 1-3 The server supports Intel® LGA1150 Xeon® E3-1200 v3 processors with the latest technologies through the chipsets onboard.
User Guide
Page 17
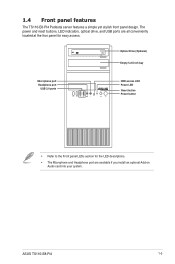
..., LED indicators, optical drive, and USB ports are available if you install an optional Add-on Audio card into your system. 1.4 Front panel features The TS110-E8-PI4 Pedestal server features a simple yet stylish front panel design. ASUS TS110-E8-PI4 1-5
..., LED indicators, optical drive, and USB ports are available if you install an optional Add-on Audio card into your system. 1.4 Front panel features The TS110-E8-PI4 Pedestal server features a simple yet stylish front panel design. ASUS TS110-E8-PI4 1-5

User Guide
Page 19
... not include a floppy disk drive. Power supply unit 2. 120 mm x 120 mm system fan 3. ASUS P9D-X/MR Server Board 4. If you need to use a floppy disk, connect the USB floppy disk drive to any system component. Optical drive (Optional) 6. 1 x 5.25-inch drive bay 7. ... removing or replacing any of the USB ports on the front or rear panel. *WARNING HAZARDOUS MOVING PARTS KEEP FINGERS AND OTHER BODY PARTS AWAY ASUS TS110-E8-PI4 1-7 1.6 Internal features The TS110-E8-PI4 Pedestal server sytem includes the basic components as shown: 1.
... not include a floppy disk drive. Power supply unit 2. 120 mm x 120 mm system fan 3. ASUS P9D-X/MR Server Board 4. If you need to use a floppy disk, connect the USB floppy disk drive to any system component. Optical drive (Optional) 6. 1 x 5.25-inch drive bay 7. ... removing or replacing any of the USB ports on the front or rear panel. *WARNING HAZARDOUS MOVING PARTS KEEP FINGERS AND OTHER BODY PARTS AWAY ASUS TS110-E8-PI4 1-7 1.6 Internal features The TS110-E8-PI4 Pedestal server sytem includes the basic components as shown: 1.
User Guide
Page 83
... remote management of rows and columns supported on Putty. Configuration options: [COM1] [COM2] Terminal Type [VT-UTF8] Allows you to set the number of a Windows Server OS through a serial port. Configuration options: [80x24] [80x25] Putty Keypad [VT100] This allows you to select the FunctionKey and Keypad on the Legacy OS. The... the extended terminal resolution. When sending data, if the receiving buffers are empty, a "start the flow. Configuration options: [None] [Hardware RTS/CTS] [Software Xon/Xoff] ASUS TS110-E8-PI4 4-27
... remote management of rows and columns supported on Putty. Configuration options: [COM1] [COM2] Terminal Type [VT-UTF8] Allows you to set the number of a Windows Server OS through a serial port. Configuration options: [80x24] [80x25] Putty Keypad [VT100] This allows you to select the FunctionKey and Keypad on the Legacy OS. The... the extended terminal resolution. When sending data, if the receiving buffers are empty, a "start the flow. Configuration options: [None] [Hardware RTS/CTS] [Software Xon/Xoff] ASUS TS110-E8-PI4 4-27
User Guide
Page 111
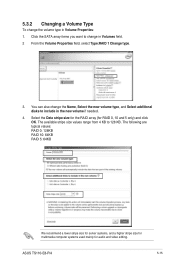
... type in Volume Properties: 1. The following are typical values: RAID 0: 128KB RAID 10: 64KB RAID 5: 64KB We recommend a lower stripe size for server systems, and a higher stripe size for multimedia computer systems used mainly for RAID 0, 10 and 5 only) and click OK. Select the Data stripe ...new volume type, and Select additional disks to include in Volumes field. 2 From the Volume Properties field, select Type:RAID 1 Change type. 3. ASUS TS110-E8-PI4 5-15 Click the SATA array items you want to 128 KB. 5.3.2 Changing a Volume Type To change in the new volume if needed. 4.
... type in Volume Properties: 1. The following are typical values: RAID 0: 128KB RAID 10: 64KB RAID 5: 64KB We recommend a lower stripe size for server systems, and a higher stripe size for multimedia computer systems used mainly for RAID 0, 10 and 5 only) and click OK. Select the Data stripe ...new volume type, and Select additional disks to include in Volumes field. 2 From the Volume Properties field, select Type:RAID 1 Change type. 3. ASUS TS110-E8-PI4 5-15 Click the SATA array items you want to 128 KB. 5.3.2 Changing a Volume Type To change in the new volume if needed. 4.

User Guide
Page 119
Follow succeeding screen instructions to continue. 5. If you have only one optical drive installed in the corresponding folder of the RAID controller driver. ASUS TS110-E8-PI4 6-5 4. When the system finishes loading the RAID driver, replace the motherboard Support DVD with the motherboard Support DVD into the optical drive. Click Browse to ... you need from the list and click Next. 7. Locate the driver in your system, eject the Windows OS installation disc and replace with the Windows Server installation disc.
Follow succeeding screen instructions to continue. 5. If you have only one optical drive installed in the corresponding folder of the RAID controller driver. ASUS TS110-E8-PI4 6-5 4. When the system finishes loading the RAID driver, replace the motherboard Support DVD with the motherboard Support DVD into the optical drive. Click Browse to ... you need from the list and click Next. 7. Locate the driver in your system, eject the Windows OS installation disc and replace with the Windows Server installation disc.
User Guide
Page 123
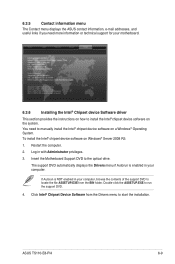
...in your computer, browse the contents of the support DVD to manually install the Intel® chipset device software on Windows® Server 2008 R2: 1. The support DVD automatically displays the Drivers menu if Autorun is NOT enabled in your computer. If Autorun is ... drive. Insert the Motherboard Support DVD to install the Intel® chipset device software on the system. ASUS TS110-E8-PI4 6-9 6.3.5 Contact information menu The Contact menu displays the ASUS contact information, e-mail addresses, and useful links if you need to locate the file ASSETUP.EXE from ...
...in your computer, browse the contents of the support DVD to manually install the Intel® chipset device software on Windows® Server 2008 R2: 1. The support DVD automatically displays the Drivers menu if Autorun is NOT enabled in your computer. If Autorun is ... drive. Insert the Motherboard Support DVD to install the Intel® chipset device software on the system. ASUS TS110-E8-PI4 6-9 6.3.5 Contact information menu The Contact menu displays the ASUS contact information, e-mail addresses, and useful links if you need to locate the file ASSETUP.EXE from ...
User Guide
Page 133
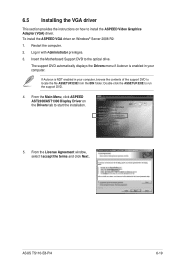
Log in your computer. ASUS TS110-E8-PI4 6-19 Double-click the ASSETUP.EXE to start the installation. 5. If Autorun is enabled in your computer, browse the contents of the support DVD to ... privileges. 3. 6.5 Installing the VGA driver This section provides the instructions on how to the optical drive. To install the ASPEED VGA driver on Windows® Server 2008 R2: 1.
Log in your computer. ASUS TS110-E8-PI4 6-19 Double-click the ASSETUP.EXE to start the installation. 5. If Autorun is enabled in your computer, browse the contents of the support DVD to ... privileges. 3. 6.5 Installing the VGA driver This section provides the instructions on how to the optical drive. To install the ASPEED VGA driver on Windows® Server 2008 R2: 1.
User Guide
Page 135
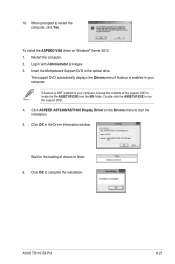
.... Insert the Motherboard Support DVD to restart the computer, click Yes. Click ASPEED AST2300/AST1300 Display Driver on Windows® Server 2012: 1. Click OK in with Administrator privileges. 3. When prompted to the optical drive. Restart the computer. 2. Click OK to locate the file ASSETUP.EXE from the BIN folder. 10. ASUS TS110-E8-PI4 6-21
.... Insert the Motherboard Support DVD to restart the computer, click Yes. Click ASPEED AST2300/AST1300 Display Driver on Windows® Server 2012: 1. Click OK in with Administrator privileges. 3. When prompted to the optical drive. Restart the computer. 2. Click OK to locate the file ASSETUP.EXE from the BIN folder. 10. ASUS TS110-E8-PI4 6-21
