Asus TS100-E9-PI4 Support and Manuals
Get Help and Manuals for this Asus item
View All Support Options Below
Free Asus TS100-E9-PI4 manuals!
Problems with Asus TS100-E9-PI4?
Ask a Question
Free Asus TS100-E9-PI4 manuals!
Problems with Asus TS100-E9-PI4?
Ask a Question
Asus TS100-E9-PI4 Videos

UNBOXING Asus SERVER TS100-E9-P14 Budget Server for Small Office And Mid School Server
Duration: 6:25
Total Views: 36
Duration: 6:25
Total Views: 36
How to Boot From USB on ASUS TS100-E9/PI4 SERVER to Install WIndows or Linux
Duration: 7:21
Total Views: 374
Duration: 7:21
Total Views: 374
Popular Asus TS100-E9-PI4 Manual Pages
User Guide - Page 13
... MIO slot Intel® C232: - 6 * SATA 6Gb/s ports Intel® RSTe (Windows & Linux)
(Support software RAID 0, 1, 10 & 5)
3 x Internal 3.5-inch HDD Bays 1 x Internal 2.5-inch HDD/SSD Bays
2 x... x PS/2 keyboard/mouse port
(continued on the next page)
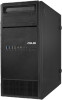
ASUS TS100-E9-PI4
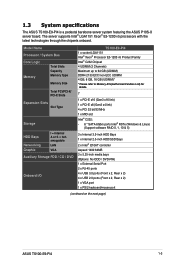
1-3 1.3 System specifications
The ASUS TS100-E9-PI4 is a pedestal barebone server system featuring the ASUS P10S-X server board.
User Guide - Page 17
... the power supply before removing or replacing any of the USB ports on the front or rear panel.
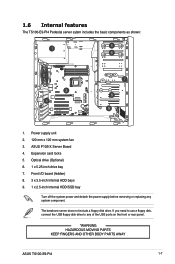
*WARNING HAZARDOUS MOVING PARTS KEEP FINGERS AND OTHER BODY PARTS AWAY
ASUS TS100-E9-PI4
1-7 Expansion card locks 5. The barebone server does not include a floppy disk drive. ASUS P10S-X Server Board 4. 1.6 Internal features
The TS100-E9-PI4 Pedestal server sytem includes the basic components as...
User Guide - Page 29

Locate the front panel assembly lock then slide it aside. front panel assembly
ASUS TS100-E9-PI4
2-11 Failure to do so may cause damage to unplug the power cable before installing or removing any system components. 2.4 Front panel cover
Before you can install a 5.25-inch drive, you should first remove the front panel cover. Ensure to...
User Guide - Page 31
bay locks
7.
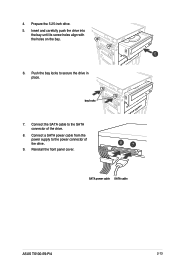
SATA power cable SATA cable
ASUS TS100-E9-PI4
2-13 Insert and carefully push the drive into
the bay until its screw holes align with the holes on the bay.
6. Prepare the 5.25-inch ...
User Guide - Page 33

Connect the SATA cable and SATA power cable to the HDD cage using the bundled set of screws.
6. ASUS TS100-E9-PI4
2-15 Swing the HDD cage inwards until it clicks back into place.
7. 5.
Secure the 3.5-inch HDD to the 3.5-inch HDD.
User Guide - Page 35

6. Secure the 2.5-inch HDD/SSD to the 2.5-inch HDD/SSD. Connect a SATA cable and a SATA power cable to the HDD cage using the bundled set of screws.
7.
Swing the HDD cage inwards until it clicks back into place.
8. ASUS TS100-E9-PI4
2-17
User Guide - Page 37
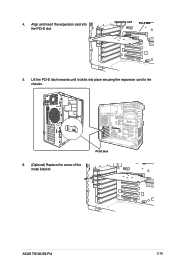
Align and insert the expansion card into place securing the expansion card to the chassis.
6. (Optional) Replace the screw of the metal bracket.
expansion card
PCI-E slot
5. Lift the PCI-E latch inwards until it clicks into the PCI-E slot. 4.
PCI-E latch
ASUS TS100-E9-PI4
2-19
User Guide - Page 39

... 1. Follow the previous instructions in the event that you want to be replaced because it was damaged ...or became defective. 2.8 System fan
This section describes how to remove the system fan in reverse order if you need to install or remove previously installed or new system components, or when the system fan needs to reinstall the system fan. ASUS TS100-E9-PI4...
User Guide - Page 43
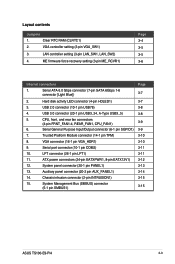
...controller setting (3-pin VGA_SW1)
3. ME firmware force recovery setting (3-pin...setting (3-pin LAN_SW1, LAN_SW2)
4. Serial General Purpose Input/Output connector (6-1 pin SGPIO1) 3-9
7.
ATX power connectors (24-pin EATXPWR1, 8-pin EATX12V1) 3-12
12. Chassis intrusion connector (2-pin INTRUSION1)
3-15
15. System Management Bus (SMBUS) connector (5-1 pin SMBUS1)
3-15
ASUS TS100-E9-PI4...
User Guide - Page 45
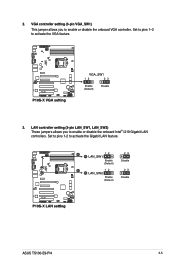
LAN controller setting (3-pin LAN_SW1, LAN_SW2) These jumpers allows you to activate the Gigabit LAN feature. ASUS TS100-E9-PI4
3-5
Set to pins 1-2 to enable or disable the onboard Intel® I210 Gigabit LAN controllers. Set to pins 1-2 to enable or disable the onboard VGA controller. VGA controller setting (3-pin VGA_SW1) This jumper allows you to activate the VGA...
User Guide - Page 75

... [Disabled]
This item is set to detect the presence of USB devices at startup. Support XHCI by XHCI drivers for operating systems without XHCI support. If no USB device is detected, the legacy USB support is enabled.
It cannot be used only for USB devices on legacy operating systems (OS). ASUS TS100-E9-PI4
4-19
Allows the system to...
User Guide - Page 121
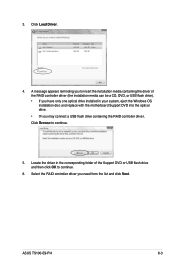
... of the RAID controller driver (the installation media can be a CD, DVD, or USB flash drive). • If you have only one optical drive installed in your system, eject the Windows OS installation disc and replace with the motherboard Support DVD into the optical drive. • Or you need from the list and click Next. Click Load Driver.
4. ASUS TS100-E9-PI4
6-3
3.
User Guide - Page 123
...ASUS TS100-E9-PI4
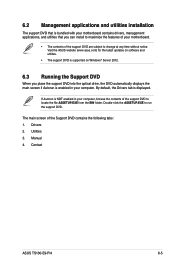
6-5 The main screen of the support DVD are subject to locate the file ASSETUP.EXE from the BIN folder. 6.2 Management applications and utilities installation
The support DVD that is displayed. Visit the ASUS website (www.asus.com) for the latest updates on software and utilities.
• The support DVD is supported on Windows® Server 2012.
6.3 Running the Support...
User Guide - Page 125
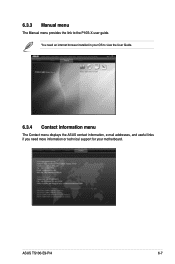
6.3.3 Manual menu
The Manual menu provides the link to view the User Guide.
6.3.4 Contact information menu
The Contact menu displays the ASUS contact information, e-mail addresses, and useful links if you need an internet browser installed in your OS to the P10S-X user guide. ASUS TS100-E9-PI4
6-7 You need more information or technical support for your motherboard.
User Guide - Page 131
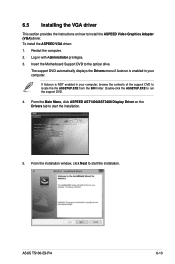
... the ASPEED VGA driver: 1. ASUS TS100-E9-PI4
6-13 Insert the Motherboard Support DVD to run the support DVD. 4. Double-click the ASSETUP.EXE to the optical drive.
From the installation window, click Next to start the installation. If Autorun is enabled in your computer. The support DVD automatically displays the Drivers menu if Autorun is NOT enabled in your computer...
Asus TS100-E9-PI4 Reviews
We have not received any reviews for Asus yet.