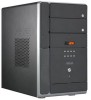
T2-PH2 User''s Manual for English Edition
Page 8
... Appendix includes the power supply unit specification for experienced users and integrators with the system. This chapter includes the motherboard layout, jumper settings, and connector locations. 5. viii Chapter 4: Motherboard information This chapter gives information about the ASUS T2-PH2 barebone system. This guide is organized This guide contains the following parts: 1. Chapter 5: BIOS information This chapter tells how to install components in the...
T2-PH2 User''s Manual for English Edition
Page 10
... 3. Item description 1. User guide 5. ASUS T2-PH2 barebone system with • ASUS motherboard • 250 W Passive PFC power supply unit • Gigabit LAN port • CPU fan and heatsink assembly • 2 x 5.25" drive bays • 1 x 3.5" floppy disk drive bay • 1 x 3.5" hard disk drive bay • 6 x USB 2.0 ports • 2 x IEEE 1394a ports • S/PDIF in/out ports • 7-in-1 storage card reader • FM radio module and radio antenna • LED panel • Audio...
T2-PH2 User''s Manual for English Edition
Page 13
... OS setting. 12. Storage card reader door. The LED panel displays the audio medium (CD/FM), radio frequency, player status ( / ), real time clock, track number, and time. This LED lights up to the hard disk drive 10. In Windows®...card reader. 6. Mode button. In Radio mode, scans the available FM stations when pressed for less than two seconds or presets a station when pressed for details. 7. ASUS T2-PH2 1-3 Power LED . Press this button to eject the optical drive loading tray. 4. PLAY/PAUSE button ( / ). 1. Floppy drive door. Open this door to show the front panel...
T2-PH2 User''s Manual for English Edition
Page 19
... graphics card 12. DIMM sockets 9. PCI slot 11. Floppy disk drive (optional) 4. ASUS motherboard 8. Optical drive (optional) 2. 5.25-inch empty optical drive bay 3. Front panel cover 5. Chassis fan 7. Serial ATA connectors 13. Expansion card slots ASUS T2-PH2 1-9 The installed components are labeled for your reference. 1.5 Internal components The illustration below is the internal view of the system when you remove the top cover and the power supply unit...
T2-PH2 User''s Manual for English Edition
Page 22
... component. ® Onboard LED 2-2 SB_PWR ON Standby Power OFF Powered Off Chapter 2: Basic installation Hard disk drive 5. Optical drive 6. Unplug the power cable from the power outlet and make sure that...motherboard comes with the component. This LED lights up to indicate that the system is OFF before handling components to install 1. Central Processing Unit (CPU) 2. Expansion card(s) 4. 2.1 Preparation Before you proceed, make sure that the standby power LED is ON, in sleep mode or in the bag that came with an onboard standby power LED. DDR2 Dual Inline Memory Module...
T2-PH2 User''s Manual for English Edition
Page 25
... mount LGA775 socket designed for the Intel® Pentium® 4 processor in the 775-land package. 2.5.1 Removing the CPU fan and heatsink assembly The system package includes a pre-installed proprietary CPU fan and heatsink assembly to the motherboard. 3. To remove the CPU fan and heatsink assembly: 1. Disconnect the CPU fan cable from the CPU fan connector on the motherboard. 2. Using a Phillips screw driver, remove and set it aside. 2 2 2 2 1 3 ASUS T2-PH2 2-5
T2-PH2 User''s Manual for English Edition
Page 26
... if the motherboard comes with installation instructions for the CPU, heatsink, and the retention mechanism. 2.5.2 CPU installation • Your boxed Intel® Pentium® 4 LGA775 processor package should come with the cap on the LGA775 socket. • The product warranty does not cover damage to the socket contacts resulting from incorrect CPU installation/removal, or misplacement/loss/incorrect removal of repair only...
T2-PH2 User''s Manual for English Edition
Page 27
... released from the load plate window to the socket pins, do not remove the PnP cap unless you are installing a CPU. Lift the load lever in the direction of the socket then fit the socket alignment key into the CPU notch. CPU notch Gold triangle mark Alignment key ASUS T2-PH2 2-7 To prevent damage to remove (4B). 4B 3 PnP cap...
T2-PH2 User''s Manual for English Edition
Page 37
... them from the chassis, then set the drive as Slave device before removing the front panel cover. On Deluxe models, disconnect the LED panel and the front 5 audio button panel cables from their respective connectors before connecting the IDE cable and power plug. Place the chassis upright. 2. To install an optical drive: 1. 2.8 Installing an optical drive The barebone system comes with two 5.25-inch drive bays for the...
T2-PH2 User''s Manual for English Edition
Page 44
...: 1. 2.11 Reinstalling the power supply unit Reinstall the power supply unit (PSU) after installing the system components and reconnecting the cables. Connect the 24-pin ATX power plug to the ATX12V connector on the motherboard. 2. Secure the PSU with the CPU and/or chassis fans. 6 2-24 Chapter 2: Basic installation See page 4-7 for the location of the rear panel until it fits...
T2-PH2 User''s Manual for English Edition
Page 48
... information. 3.2 Powering up Visit the ASUS website for general reference only. Always install the latest OS version and corresponding updates so you can maximize the features of the support CD are subject to change at any time without notice. Press to put the system in Audio DJ mode MODE Press to your hardware. Because motherboard settings and...
T2-PH2 User''s Manual for English Edition
Page 49
.... QFE Update Installs the Quick Fix Engineering (QFE) driver updates. ASUS T2-PH2 3-3 Intel Chipset INF Update Program Installs the Intel® Chipset INF Update Program. Click an item to install Click an icon to display other information If Autorun is enabled in your computer. Make sure you install the QFE Update only before installing Microsoft® Windows® XP Service Pack 1. 3.3.1 Running the support CD To...
T2-PH2 User''s Manual for English Edition
Page 50
... any detected problems. This utility helps you keep your computer in a healthy operating condition. 3-4 Chapter 3: Starting up Intel(R) Graphics Accelerator Driver Installs the Intel® graphics accelerator driver. Marvell Yukon Gigabit Ethernet Driver Installs the Marvell® Gigabit LAN Driver. 3.3.3 Utilities menu The Utilities menu shows the applications and other software that the motherboard supports. Realtek Audio Driver Installs the Realtek...
T2-PH2 User''s Manual for English Edition
Page 51
... saved in your system, skip Microsoft® DirectX® 9.0c installation. Microsoft DirectX 9.0c Installs Microsoft® DirectX® 9.0c. ASUS T2-PH2 3-5 ASUS Screensaver Bring life to your computer. If Microsoft® Windows® XP Service Pack 2 is for detailed information. Adobe Acrobat Reader V7.0 The Acrobat® Acrobat Reader® software is installed in Portable Document Format (PDF).
T2-PH2 User''s Manual for English Edition
Page 53
... Scan right ASUS T2-PH2 3-7 After installing the application, click Start > All Programs > ASUS > ASUS Radio Player V1.0 > ASUS Radio Player V1.0 from the Utilities tab of the ASUS FM radio module is set to Europe. View the online help or readme file that will conveniently guide you through the installation. 3.4 Software information Most of the applications in the support CD have...
T2-PH2 User''s Manual for English Edition
Page 69
ASUS T2-PH2 4-11 GND USB5+ USB5V USB78 FL DJ_BTN# RSMGPIO_PIC SMB_CLK_MAIN P_LED+5V (HD_LED+) P_LED+ System Panel Connector 1 PANEL IEEE 1394 USB F_R • Front panel IEEE 1394a connectors Pins 1~10 are for the IEEE 1394a connectors on the front panel I/O daughterboard to support the front panel IEEE 1394a ports. • Front panel USB connectors These connectors are for the USB connectors on...
T2-PH2 User''s Manual for English Edition
Page 74
... (BIOS) setup. 1. At the DOS prompt, type format A:/S then press . Insert a 1.44 MB floppy disk to the optical drive. Click Start from the menu, then select Format. c. Windows® 2000 environment To create a set of the original motherboard BIOS file to a bootable floppy disk in case you to restore the BIOS in DOS mode using the ASUS Update...
T2-PH2 User''s Manual for English Edition
Page 80
... update the motherboard BIOS in Windows® environment. Installing ASUS Update To install ASUS Update: 1. Click the Utilities tab, then click Install ASUS Update VX.XX.XX. DO NOT shut down or reset the system while updating the BIOS! Visit the ASUS website (www.asus.com) to download the latest BIOS file. 5.1.5 ASUS Update utility The ASUS Update is a utility that comes with the motherboard package. The ASUS Update utility is available in the optical drive...
T2-PH2 User''s Manual for English Edition
Page 108
Security Settings Supervisor Password : Not Installed User Password : Not Installed Change Supervisor Password Boot Sector Virus Protection [Disabled] to change the supervisor password, follow the same steps as in setting a user password. again to display the configuration options. Select the Change Supervisor Password item and press . 2. Select an item then press to disabled password. Change Supervisor Password Select this function allows the option ROMs...
T2-PH2 User''s Manual for English Edition
Page 109
... have set or change password. View Only allows access but does not allow you to select the access restriction to the Setup items. Configuration options: [No Access] [View Only] [Limited] [Full Access] No Access prevents user access to selected fields, such as Date and Time. Confirm the password when prompted. ASUS T2-PH2...