T2-PH2 User''s Manual for English Edition
Page 2
... corporate names appearing in this manual, including the products and software described in any form or by any means, except documentation kept by ASUS; SPECIFICATIONS AND INFORMATION CONTAINED IN THIS MANUAL ARE FURNISHED FOR INFORMATIONAL USE ONLY, AND ARE SUBJECT TO CHANGE AT ANY TIME WITHOUT NOTICE..., AND SHOULD NOT BE CONSTRUED AS A COMMITMENT BY ASUS. ASUS ASSUMES NO RESPONSIBILITY OR LIABILITY FOR ANY ERRORS OR INACCURACIES THAT MAY APPEAR IN THIS MANUAL, INCLUDING THE PRODUCTS AND SOFTWARE DESCRIBED IN ...
... corporate names appearing in this manual, including the products and software described in any form or by any means, except documentation kept by ASUS; SPECIFICATIONS AND INFORMATION CONTAINED IN THIS MANUAL ARE FURNISHED FOR INFORMATIONAL USE ONLY, AND ARE SUBJECT TO CHANGE AT ANY TIME WITHOUT NOTICE..., AND SHOULD NOT BE CONSTRUED AS A COMMITMENT BY ASUS. ASUS ASSUMES NO RESPONSIBILITY OR LIABILITY FOR ANY ERRORS OR INACCURACIES THAT MAY APPEAR IN THIS MANUAL, INCLUDING THE PRODUCTS AND SOFTWARE DESCRIBED IN ...
T2-PH2 User''s Manual for English Edition
Page 3
Table of contents Notices vi Safety information vii About this guide viii System package contents x Chapter 1: System Introduction 1.1 Welcome 1-2 1.2 Front panel (external 1-2 1.3 Front panel (internal 1-5 1.4 Rear panel 1-7 1.5 Internal components 1-9 1.6 LED panel 1-10 Chapter 2: Basic Installation 2.1 Preparation 2-2 2.2 Before you proceed 2-2 2.3 Removing the cover 2-3 2.4 Removing the power supply 2-4 2.5 Installing a CPU 2-5 2.5.1 Removing the CPU fan and heatsink assembly ....... 2-5 2.5.2 CPU installation 2-6 2.5.3 Reinstalling the CPU fan and heatsink assembly ..... ...
Table of contents Notices vi Safety information vii About this guide viii System package contents x Chapter 1: System Introduction 1.1 Welcome 1-2 1.2 Front panel (external 1-2 1.3 Front panel (internal 1-5 1.4 Rear panel 1-7 1.5 Internal components 1-9 1.6 LED panel 1-10 Chapter 2: Basic Installation 2.1 Preparation 2-2 2.2 Before you proceed 2-2 2.3 Removing the cover 2-3 2.4 Removing the power supply 2-4 2.5 Installing a CPU 2-5 2.5.1 Removing the CPU fan and heatsink assembly ....... 2-5 2.5.2 CPU installation 2-6 2.5.3 Reinstalling the CPU fan and heatsink assembly ..... ...

T2-PH2 User''s Manual for English Edition
Page 4
...3-2 3.3.1 Running the support CD 3-3 3.3.2 Drivers menu 3-3 3.3.3 Utilities menu 3-4 3.3.4 ASUS contact information 3-6 3.3.5 Other information 3-6 3.4 Software information 3-7 3.4.1 ASUS Radio Player 3-7 3.4.2 ASUS Instant Music 3-9 3.5 Audio DJ 3-11 3.5.1 Playing an audio CD/DVD 3-11 ... 5.1 Managing and updating your BIOS 5-2 5.1.1 Creating a bootable floppy disk 5-2 5.1.2 ASUS EZ Flash utility 5-3 5.1.3 AFUDOS utility 5-4 5.1.4 ASUS CrashFree BIOS 2 utility 5-6 5.1.5 ASUS Update utility 5-8 5.2 BIOS setup program 5-11 5.2.1 BIOS menu screen 5-12 5.2.2 Menu bar...
...3-2 3.3.1 Running the support CD 3-3 3.3.2 Drivers menu 3-3 3.3.3 Utilities menu 3-4 3.3.4 ASUS contact information 3-6 3.3.5 Other information 3-6 3.4 Software information 3-7 3.4.1 ASUS Radio Player 3-7 3.4.2 ASUS Instant Music 3-9 3.5 Audio DJ 3-11 3.5.1 Playing an audio CD/DVD 3-11 ... 5.1 Managing and updating your BIOS 5-2 5.1.1 Creating a bootable floppy disk 5-2 5.1.2 ASUS EZ Flash utility 5-3 5.1.3 AFUDOS utility 5-4 5.1.4 ASUS CrashFree BIOS 2 utility 5-6 5.1.5 ASUS Update utility 5-8 5.2 BIOS setup program 5-11 5.2.1 BIOS menu screen 5-12 5.2.2 Menu bar...
T2-PH2 User''s Manual for English Edition
Page 5
Table of contents 5.2.4 Menu items 5-13 5.2.5 Sub-menu items 5-13 5.2.6 Configuration fields 5-13 5.2.7 Pop-up window 5-13 5.2.8 Scroll bar 5-13 5.2.9 General help 5-13 5.3 Main menu 5-14 5.3.1 System Time 5-14 5.3.2 System Date 5-14 5.3.3 Legacy Diskette A 5-14 5.3.4 Primary, Third, and Fourth IDE Master/Slave ........ 5-15 5.3.5 IDE Configuration 5-16 5.3.6 System Information 5-18 5.4 Advanced menu 5-19 5.4.1 Instant Music Configuration 5-19 5.4.2 LAN Cable Status 5-20 5.4.3 USB Configuration 5-21 5.4.4 CPU Configuration 5-22 5.4.5 Chipset...
Table of contents 5.2.4 Menu items 5-13 5.2.5 Sub-menu items 5-13 5.2.6 Configuration fields 5-13 5.2.7 Pop-up window 5-13 5.2.8 Scroll bar 5-13 5.2.9 General help 5-13 5.3 Main menu 5-14 5.3.1 System Time 5-14 5.3.2 System Date 5-14 5.3.3 Legacy Diskette A 5-14 5.3.4 Primary, Third, and Fourth IDE Master/Slave ........ 5-15 5.3.5 IDE Configuration 5-16 5.3.6 System Information 5-18 5.4 Advanced menu 5-19 5.4.1 Instant Music Configuration 5-19 5.4.2 LAN Cable Status 5-20 5.4.3 USB Configuration 5-21 5.4.4 CPU Configuration 5-22 5.4.5 Chipset...
T2-PH2 User''s Manual for English Edition
Page 6
vi This equipment has been tested and found to Part 15 of the FCC Rules. This equipment generates, uses and can be determined by turning the equipment off and on a circuit different from digital apparatus set out in a residential installation. WARNING! Notices Federal Communications Commission Statement This device complies with Canadian ICES-003. If this equipment does cause harmful interference to this equipment. Changes or modifications to radio or television reception, which can radiate radio frequency energy and, if not installed and used in a particular ...
vi This equipment has been tested and found to Part 15 of the FCC Rules. This equipment generates, uses and can be determined by turning the equipment off and on a circuit different from digital apparatus set out in a residential installation. WARNING! Notices Federal Communications Commission Statement This device complies with Canadian ICES-003. If this equipment does cause harmful interference to this equipment. Changes or modifications to radio or television reception, which can radiate radio frequency energy and, if not installed and used in a particular ...

T2-PH2 User''s Manual for English Edition
Page 7
Do not place the product in any damage, contact your dealer immediately. • To avoid short circuits, keep paper clips, screws, and staples away from the system, ensure that came with the package. • Before using the product, make sure all cables are correctly connected and the power cables are connected. • If the power supply is incorrectly replaced. Place the product on a stable surface. • If you detect any area where it by the manufacturer. Ersatz nur durch denselben oder einem vom Hersteller empfohlenem ähnljchen Typ. LASER PRODUCT WARNING CLASS 1 LASER...
Do not place the product in any damage, contact your dealer immediately. • To avoid short circuits, keep paper clips, screws, and staples away from the system, ensure that came with the package. • Before using the product, make sure all cables are correctly connected and the power cables are connected. • If the power supply is incorrectly replaced. Place the product on a stable surface. • If you detect any area where it by the manufacturer. Ersatz nur durch denselben oder einem vom Hersteller empfohlenem ähnljchen Typ. LASER PRODUCT WARNING CLASS 1 LASER...
T2-PH2 User''s Manual for English Edition
Page 8
... guide is intended for this guide Audience This guide provides general information and installation instructions about the motherboard that comes with hardware knowledge of the ASUS T2-PH1. Chapter 5: BIOS information This chapter tells how to install components in the system. 3. Chapter 2: Basic installation This chapter provides step-by-step ... with the system. Chapter 1: System introduction This chapter gives a general description of personal computers. viii Chapter 4: Motherboard information This chapter gives information about the ASUS T2-PH2 barebone system.
... guide is intended for this guide Audience This guide provides general information and installation instructions about the motherboard that comes with hardware knowledge of the ASUS T2-PH1. Chapter 5: BIOS information This chapter tells how to install components in the system. 3. Chapter 2: Basic installation This chapter provides step-by-step ... with the system. Chapter 1: System introduction This chapter gives a general description of personal computers. viii Chapter 4: Motherboard information This chapter gives information about the ASUS T2-PH2 barebone system.

T2-PH2 User''s Manual for English Edition
Page 9
..., that you MUST follow to complete a task. Where to find more information Refer to the ASUS contact information. 2. These documents are not part of the standard package. ASUS Websites The ASUS websites worldwide provide updated information on ASUS hardware and software products. Refer to the following sources for additional information and for product and...
..., that you MUST follow to complete a task. Where to find more information Refer to the ASUS contact information. 2. These documents are not part of the standard package. ASUS Websites The ASUS websites worldwide provide updated information on ASUS hardware and software products. Refer to the following sources for additional information and for product and...
T2-PH2 User''s Manual for English Edition
Page 10
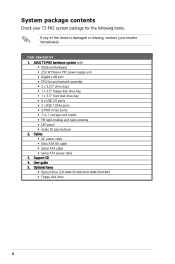
ASUS T2-PH2 barebone system with • ASUS motherboard • 250 W Passive PFC power supply unit • Gigabit LAN port • CPU fan and heatsink assembly • 2 x 5.25" drive bays • 1 x 3.5" floppy ... cable 3. Optional items • Optical drive (CD-ROM/CD-RW/DVD-ROM/DVD-RW) • Floppy disk drive x User guide 5. System package contents Check your T2-PH2 system package for the following items. If any of the items is damaged or missing, contact your retailer immediately. Item description 1.
ASUS T2-PH2 barebone system with • ASUS motherboard • 250 W Passive PFC power supply unit • Gigabit LAN port • CPU fan and heatsink assembly • 2 x 5.25" drive bays • 1 x 3.5" floppy ... cable 3. Optional items • Optical drive (CD-ROM/CD-RW/DVD-ROM/DVD-RW) • Floppy disk drive x User guide 5. System package contents Check your T2-PH2 system package for the following items. If any of the items is damaged or missing, contact your retailer immediately. Item description 1.
T2-PH2 User''s Manual for English Edition
Page 11
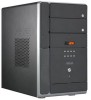
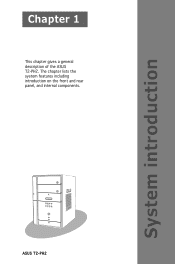
System introduction Chapter 1 This chapter gives a general description of the ASUS T2-PH2. The chapter lists the system features including introduction on the front and rear panel, and internal components. MODE ASUS T2-PH2
System introduction Chapter 1 This chapter gives a general description of the ASUS T2-PH2. The chapter lists the system features including introduction on the front and rear panel, and internal components. MODE ASUS T2-PH2
T2-PH2 User''s Manual for English Edition
Page 12
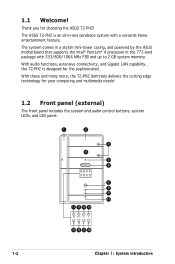
... barebone system with 533/800/1066 MHz FSB and up to 2 GB system memory. With these and many more, the T2-PH2 definitely delivers the cutting edge technology for choosing the ASUS T2-PH2! Thank you for your computing and multimedia needs! 1.2 Front panel (external) The front panel includes the system and audio...
... barebone system with 533/800/1066 MHz FSB and up to 2 GB system memory. With these and many more, the T2-PH2 definitely delivers the cutting edge technology for choosing the ASUS T2-PH2! Thank you for your computing and multimedia needs! 1.2 Front panel (external) The front panel includes the system and audio...
T2-PH2 User''s Manual for English Edition
Page 13
... panel I/O door. PLAY/PAUSE button ( / ). Press this button to switch from or written to an FM radio station without entering the operating system. Power LED . ASUS T2-PH2 1-3 Mode button. Eject button. Open this button to indicate that the system is in different modes. See page 1-10 for more than two seconds or...
... panel I/O door. PLAY/PAUSE button ( / ). Press this button to switch from or written to an FM radio station without entering the operating system. Power LED . ASUS T2-PH2 1-3 Mode button. Eject button. Open this button to indicate that the system is in different modes. See page 1-10 for more than two seconds or...
T2-PH2 User''s Manual for English Edition
Page 14
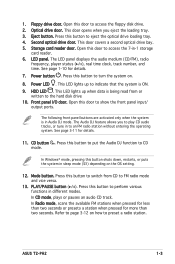
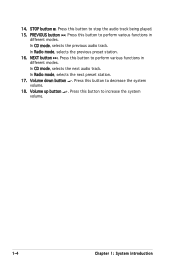
PREVIOUS button . In Radio mode, selects the previous preset station. 16. Volume up button +. Press this button to increase the system volume. 1-4 Chapter 1: System introduction Press this button to decrease the system volume. 18. STOP button . Press this button to stop the audio track being played. 15. In CD mode, selects the next audio track. NEXT button . Press this button to perform various functions in different modes. In Radio mode, selects the next preset station. 17. Volume down button -. Press this button to perform various functions in different ...
PREVIOUS button . In Radio mode, selects the previous preset station. 16. Volume up button +. Press this button to increase the system volume. 1-4 Chapter 1: System introduction Press this button to decrease the system volume. 18. STOP button . Press this button to stop the audio track being played. 15. In CD mode, selects the next audio track. NEXT button . Press this button to perform various functions in different modes. In Radio mode, selects the next preset station. 17. Volume down button -. Press this button to perform various functions in different ...
T2-PH2 User''s Manual for English Edition
Page 15
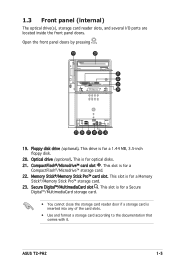
...;/Memory Stick Pro™ storage card. 23. This slot is for a CompactFlash®/Microdrive™ storage card. 22. This slot is for optical disks. 21. ASUS T2-PH2 1-5 1.3 Front panel (internal) The optical drive(s), storage card reader slots, and several I/O ports are located inside the front panel doors. Floppy disk drive (optional). This...
...;/Memory Stick Pro™ storage card. 23. This slot is for a CompactFlash®/Microdrive™ storage card. 22. This slot is for optical disks. 21. ASUS T2-PH2 1-5 1.3 Front panel (internal) The optical drive(s), storage card reader slots, and several I/O ports are located inside the front panel doors. Floppy disk drive (optional). This...

T2-PH2 User''s Manual for English Edition
Page 16
These Universal Serial Bus 2.0 (USB 2.0) ports are available for 5.1-channel surround sound and enhanced 3D audio. 1-6 Chapter 1: System introduction S/PDIF In port. 25. Microphone port . This port provides high-speed connectivity for IEEE 1394a-compliant audio/video devices, storage peripherals, and other PC devices. 30. This port connects your audio system for connecting USB 2.0 devices such as a mouse, printer, scanner, camera, PDA, and others. 28. 4-pin IEEE 1394a port . This port connects a headphone with a stereo mini-plug. 26. This Mic (pink) port connects a ...
These Universal Serial Bus 2.0 (USB 2.0) ports are available for 5.1-channel surround sound and enhanced 3D audio. 1-6 Chapter 1: System introduction S/PDIF In port. 25. Microphone port . This port provides high-speed connectivity for IEEE 1394a-compliant audio/video devices, storage peripherals, and other PC devices. 30. This port connects your audio system for connecting USB 2.0 devices such as a mouse, printer, scanner, camera, PDA, and others. 28. 4-pin IEEE 1394a port . This port connects a headphone with a stereo mini-plug. 26. This Mic (pink) port connects a ...
T2-PH2 User''s Manual for English Edition
Page 17
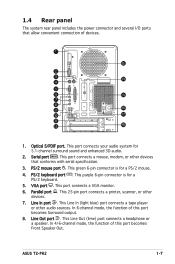
... . This Line Out (lime) port connects a headphone or a speaker. This purple 6-pin connector is for 5.1-channel surround sound and enhanced 3D audio. 2. Line In port . ASUS T2-PH2 1-7 PS/2 mouse port . Line Out port . This port connects a mouse, modem, or other devices that allow convenient connection of devices. 1 13 2 3 14 4 5 6 15 7 8 9 16 10...
... . This Line Out (lime) port connects a headphone or a speaker. This purple 6-pin connector is for 5.1-channel surround sound and enhanced 3D audio. 2. Line In port . ASUS T2-PH2 1-7 PS/2 mouse port . Line Out port . This port connects a mouse, modem, or other devices that allow convenient connection of devices. 1 13 2 3 14 4 5 6 15 7 8 9 16 10...
T2-PH2 User''s Manual for English Edition
Page 18
In 4/6-channel mode, the function of the Line Out, Line In, and Microphone ports change when you to adjust the system input voltage according to a Local Area Network (LAN) through a network hub. 12. This port allows Gigabit connection to the voltage supply in your area. This vent is for connecting USB 2.0 devices such as a mouse, printer, scanner, camera, PDA, and others. 11. USB 2.0 ports 2.0. Voltage selector. Expansion card lock. These Universal Serial Bus 2.0 (USB 2.0) ports are available for the fan that provides ventilation inside the system chassis. ...
In 4/6-channel mode, the function of the Line Out, Line In, and Microphone ports change when you to adjust the system input voltage according to a Local Area Network (LAN) through a network hub. 12. This port allows Gigabit connection to the voltage supply in your area. This vent is for connecting USB 2.0 devices such as a mouse, printer, scanner, camera, PDA, and others. 11. USB 2.0 ports 2.0. Voltage selector. Expansion card lock. These Universal Serial Bus 2.0 (USB 2.0) ports are available for the fan that provides ventilation inside the system chassis. ...
T2-PH2 User''s Manual for English Edition
Page 19
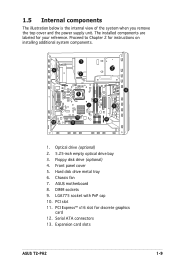
...PCI Express™ x16 slot for instructions on installing additional system components. 1 6 3 2 9 8 7 4 5 10 12 13 11 1. Expansion card slots ASUS T2-PH2 1-9 1.5 Internal components The illustration below is the internal view of the system when you remove the top cover and the power supply unit. Floppy disk... drive (optional) 4. ASUS motherboard 8. LGA775 socket with PnP cap 10. Hard disk drive metal tray 6. Serial ATA connectors 13. The installed components are labeled...
...PCI Express™ x16 slot for instructions on installing additional system components. 1 6 3 2 9 8 7 4 5 10 12 13 11 1. Expansion card slots ASUS T2-PH2 1-9 1.5 Internal components The illustration below is the internal view of the system when you remove the top cover and the power supply unit. Floppy disk... drive (optional) 4. ASUS motherboard 8. LGA775 socket with PnP cap 10. Hard disk drive metal tray 6. Serial ATA connectors 13. The installed components are labeled...

T2-PH2 User''s Manual for English Edition
Page 20
Audio DJ mode Refer to page 5-20 for details on setting the radio region. 1-10 Chapter 1: System introduction Enter the BIOS setup or the operating system to -Disk) state. FM radio mode Refer to page 3-11 for details on the Audio DJ feature. 1.6 LED panel The LED panel displays various system information depending on the system mode. CD mode, play /pause icon, number, and duration of the audio CD track being played. The LED panel displays the system time in 24-hour format when the system is in soft-off or stand-by mode, S3 (Suspend-to-RAM), or S4 (Suspend-to adjust ...
Audio DJ mode Refer to page 5-20 for details on setting the radio region. 1-10 Chapter 1: System introduction Enter the BIOS setup or the operating system to -Disk) state. FM radio mode Refer to page 3-11 for details on the Audio DJ feature. 1.6 LED panel The LED panel displays various system information depending on the system mode. CD mode, play /pause icon, number, and duration of the audio CD track being played. The LED panel displays the system time in 24-hour format when the system is in soft-off or stand-by mode, S3 (Suspend-to-RAM), or S4 (Suspend-to adjust ...
T2-PH2 User''s Manual for English Edition
Page 21
MODE ASUS T2-PH2 Basic installation Chapter 2 This chapter provides step-by-step instructions on how to install components in the system.
MODE ASUS T2-PH2 Basic installation Chapter 2 This chapter provides step-by-step instructions on how to install components in the system.