Asus VENTO 3600 Support Question
Asus VENTO 3600 Support Question
Find answers below for this question about Asus VENTO 3600.Need a Asus VENTO 3600 manual? We have 1 online manual for this item!
Question posted by philfree61 on July 4th, 2012
Broken Front Panel,
Hi can i buy a repair part for my case the front movable panel have broken and come off?
Current Answers
Answer #1: Posted by cljeffrey on July 20th, 2012 4:57 PM
cljeffrey

Member since:
July 17th, 2012 Points: 1,054,453

Member since:
July 17th, 2012 Points: 1,054,453
Hello my name is Jeffrey and I work for ASUS Customer Loyalty Team
I apologize we do not sell individual parts to our customer that you will have to send the unit in for service. What country are you located and what city.
You can email me the information and I will forward you the customer service hotline we you can get support. Can you also give me the serial number of the desktop to make sure that it's still under warranty.
ASUS strives to meet and exceeds our customer expectations within our warranty policy.
Regards,
Jeffrey ASUS Customer Loyalty
Related Asus VENTO 3600 Manual Pages
Vento3600 User''''s Manual for English Edition - Page 1
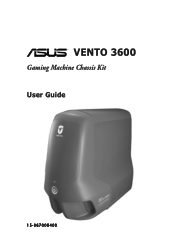
VENTO 3600
Gaming Machine Chassis Kit
User Guide
15-067008400
Vento3600 User''''s Manual for English Edition - Page 3
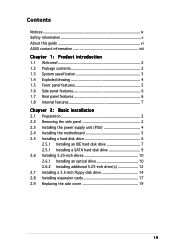
... Product introduction
1.1 Welcome 2 1.2 Package contents 2 1.3 System specification 3 1.4 Exploded drawing 4 1.5 Front panel features 5 1.6 Side panel features 6 1.7 Rear panel features 6 1.8 Internal features 7
Chapter 2: Basic installation
2.1 Preparation 2 2.2 Removing the side panel 2 2.3 Installing the power supply unit (PSU 4 2.4 Installing the motherboard 5 2.5 Installing a hard...
Vento3600 User''''s Manual for English Edition - Page 5
... you detect any area where it may become wet.
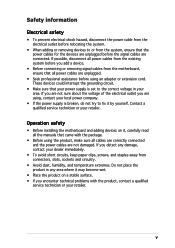
• Place the product on it, carefully read all the manuals that your power supply is broken, do not try to fix it by yourself. Safety information
Electrical safety
• To prevent electrical shock hazard, disconnect the power cable from the electrical...
Vento3600 User''''s Manual for English Edition - Page 6
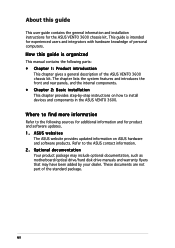
... software updates. 1. How this guide
This user guide contains the general information and installation instructions for the ASUS VENTO 3600 chassis kit. The chapter lists the system features and introduces the front and rear panels, and the internal components. • Chapter 2: Basic installation This chapter provides step-by your dealer. Where to find...
Vento3600 User''''s Manual for English Edition - Page 9
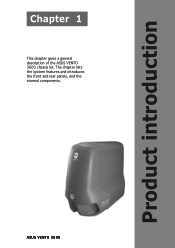
The chapter lists the system features and introduces the front and rear panels, and the internal components. Product introduction
Chapter 1
This chapter gives a general description of the ASUS VENTO 3600 chassis kit.
ASUS VENTO 3600
Vento3600 User''''s Manual for English Edition - Page 10
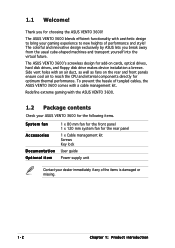
... the virtual future. The colorful and innovative design exclusively by ASUS lets you for add-on the rear and front panels ensure cool air to new heights of tangled cables, the ASUS VENTO 3600 comes with an air duct, as well as fans on cards, optical drives, hard disk drives, and floppy disk drive...
Vento3600 User''''s Manual for English Edition - Page 11
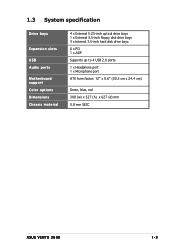
... to 4 USB 2.0 ports
1 x Headphone port 1 x Microphone port
ATX form factor: 12" x 9.6" (30.5 cm x 24.4 cm)
Green, blue, red
308 (w) x 527 (h) x 627 (d) mm
0.8 mm SECC
ASUS VENTO 3600
1-3
Vento3600 User''''s Manual for English Edition - Page 13
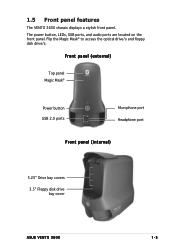
... access the optical drive/s and floppy disk drive/s. 1.5 Front panel features
The VENTO 3600 chassis displays a stylish front panel. Front panel (external)
Top panel Magic Mask®
Power button USB 2.0 ports
Microphone port Headphone port
Front panel (internal)
5.25" Drive bay covers
3.5" Floppy disk drive bay cover
ASUS VENTO 3600
1-5 The power button, LEDs, USB ports, and audio ports...
Vento3600 User''''s Manual for English Edition - Page 15
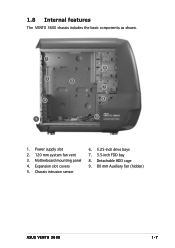
Motherboard mounting panel 4. Power supply slot 2. 120 mm system fan vent 3. Chassis intrusion sensor
6. 5.25-inch drive bays 7. 3.5-inch FDD bay 8. Expansion slot covers 5. Detachable HDD cage 9. 80 mm Auxiliary fan (hidden)
ASUS VENTO 3600
1-7 1.8 Internal features
The VENTO 3600 chassis includes the basic components as shown.
1 6
2
3
7
4
8
5
9
1.
Vento3600 User''''s Manual for English Edition - Page 17
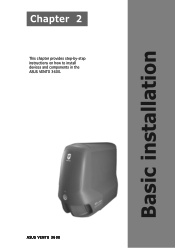
Basic installation
Chapter 2
This chapter provides step-by-step instructions on how to install devices and components in the ASUS VENTO 3600. ASUS VENTO 3600
Vento3600 User''''s Manual for English Edition - Page 18
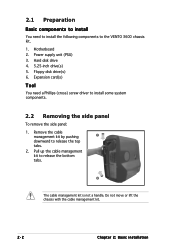
... cable management kit to install some system components.
2.2 Removing the side panel
To remove the side panel:
1. Do not move or lift the chassis with the cable management kit.
2-2
Chapter 2: Basic installation Remove the cable
management kit by pushing
1
downward to the VENTO 3600 chassis kit.
1. Motherboard 2. 2.1 Preparation
Basic components to install
You need...
Vento3600 User''''s Manual for English Edition - Page 19
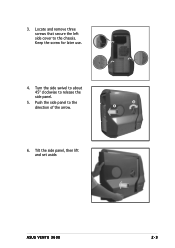
Tilt the side panel, then lift and set aside. 3.
ASUS VENTO 3600
2-3 Keep the screw for later use.
4. Turn the side swivel to about 45º clockwise to the chassis. Locate and remove three screws that secure the left side cover to release the side panel.
5. Push the side panel to the direction of the arrow.
4 5
6.
Vento3600 User''''s Manual for English Edition - Page 21
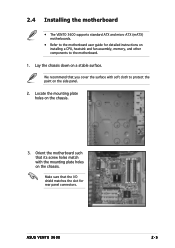
... plate holes on a stable surface. Orient the motherboard such that the I/O shield matches the slot for detailed instructions on the side panel.
2. Lay the chassis down on the chassis. ASUS VENTO 3600
2-5 Locate the mounting plate holes on the chassis.
3.
Make sure that its screw holes match with soft cloth to protect the...
Vento3600 User''''s Manual for English Edition - Page 23
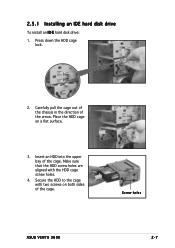
Press down the HDD cage lock.
2. Carefully pull the cage out of the chassis in the direction of the cage.
Screw holes
ASUS VENTO 3600
2-7 Insert an HDD into the upper bay of the arrow. Secure the HDD to the cage with the HDD cage screw holes.
4. Place the HDD ...
Vento3600 User''''s Manual for English Edition - Page 25
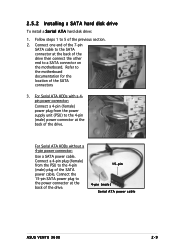
... the 15-pin SATA power plug to the power connector at the back of the drive.
15-pin
4-pin (male) Serial ATA power cable
ASUS VENTO 3600
2-9 Follow steps 1 to the motherboard documentation for the location of the previous section. 2. 2.5.2 Installing a SATA hard disk drive
To install a S e r i a l A T A hard disk drive:
1. Refer to...
Vento3600 User''''s Manual for English Edition - Page 27
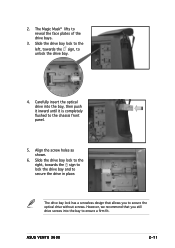
... the face plates of the drive bays.
3. Slide the drive bay lock to the right, towards the sign, to secure the drive in place. ASUS VENTO 3600
2-11 The drive bay lock has a screwless design that you to ensure a firm fit. Carefully insert the optical drive into the bay to secure the...
Vento3600 User''''s Manual for English Edition - Page 29
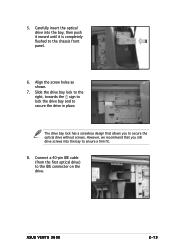
Align the screw holes as shown.
7.
ASUS VENTO 3600
2-13 The drive bay lock has a screwless design that you to secure the drive in place. 5. Carefully ... the IDE connector on the drive. Connect a 40-pin IDE cable (from the first optical drive) to the chassis front panel.
6.
Slide the drive bay lock to the right, towards the sign to lock the drive bay and to secure the optical drive...
Vento3600 User''''s Manual for English Edition - Page 31
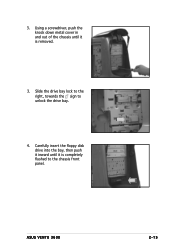
Slide the drive bay lock to the right, towards the sign to the chassis front panel. ASUS VENTO 3600
2-15 Using a screwdriver, push the knock down metal cover in and out of the chassis until it is completely flushed to unlock the drive bay.
4. 3. Carefully insert the floppy disk drive into the bay, then push it inward until it is removed.
3.
Vento3600 User''''s Manual for English Edition - Page 33
Failure to do so may cause severe damage to use . 3.
ASUS VENTO 3600
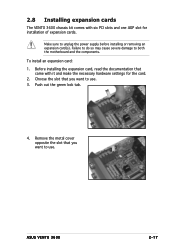
2-17 2.8 Installing expansion cards
The VENTO 3600 chassis kit comes with it and make the necessary hardware settings for installation of expansion cards. To install an expansion card: 1. Remove the metal cover opposite the slot ...
Vento3600 User''''s Manual for English Edition - Page 35
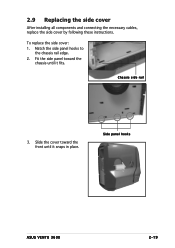
To replace the side cover: 1. Fit the side panel toward the front until it snaps in place. Slide the cover toward the
chassis until it fits. Chassis side rail...
After installing all components and connecting the necessary cables, replace the side cover by following these instructions. Match the side panel hooks to
the chassis rail edge. 2.
Side panel hooks
ASUS VENTO 3600
2-19
Similar Questions

How To Connect The Pwr Sw And Pwr Led To Front Panel
pleas show diagram where pwr led, pwr sw, hdd led, but no reset pins on asus p5dl2-vm dh with an xp ...
pleas show diagram where pwr led, pwr sw, hdd led, but no reset pins on asus p5dl2-vm dh with an xp ...
(Posted by rollycoaster 8 years ago)

Asus M2n-vm/s Rev 2.01 Panel Connectors.
Hello,Please send me a picture with panel connector for Asus M2N-VM/S Rev 2.01
Hello,Please send me a picture with panel connector for Asus M2N-VM/S Rev 2.01
(Posted by Ewigwumpscut 9 years ago)

How Setup F Control Panel Please Help
Can you help me please for f control panel for setup power on case
Can you help me please for f control panel for setup power on case
(Posted by shahrammortazavi 10 years ago)

Screen Crack And Screen Holding Metal Is Broken Too
Dear sir, my ASUS U46E laptop's screen is crack and almunium metal which holds that scrren is broken...
Dear sir, my ASUS U46E laptop's screen is crack and almunium metal which holds that scrren is broken...
(Posted by helloprem1993 11 years ago)
H.d. Out Backdrop Picture Only! Control Panel Display No Help! Covered By War?
H.D. out to projector shows only backdrop picture only! control panel display no help! this covere...
H.D. out to projector shows only backdrop picture only! control panel display no help! this covere...
(Posted by Anonymous-49759 12 years ago)