User Guide
Page 28
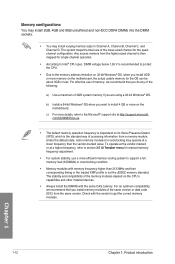
...from a memory module. To operate at the vendor-marked or at a higher frequency, refer to support a full memory load (8 DIMMs) or overclocking condition. • Memory modules with memory frequency higher than the vendor-marked value. c) For more efficient memory cooling system to section 3.5 Ai... want to get the correct memory modules. Check with the same CAS Latency. The stability and compatibility of the lower-sized channel for overclocking may install varying memory sizes in Channel A, Channel B, Channel C, and Channel D. Under the default state, some memory modules for the...
...from a memory module. To operate at the vendor-marked or at a higher frequency, refer to support a full memory load (8 DIMMs) or overclocking condition. • Memory modules with memory frequency higher than the vendor-marked value. c) For more efficient memory cooling system to section 3.5 Ai... want to get the correct memory modules. Check with the same CAS Latency. The stability and compatibility of the lower-sized channel for overclocking may install varying memory sizes in Channel A, Channel B, Channel C, and Channel D. Under the default state, some memory modules for the...
User Guide
Page 40
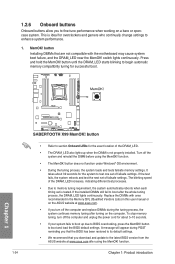
... settings. To stop memory tuning, turn off the computer and replace DIMMs during POST reminding you that the BIOS has been restored to BIOS overclocking, press the MemOK! Turn off the computer and unplug the power cord for the exact location of failsafe settings. 1.2.6 Onboard buttons Onboard buttons... user manual or on a bare or opencase system. button Installing DIMMs that you download and update to the latest BIOS version from the ASUS website at www.asus.com. • If you to enhance system performance. 1. This is tested. If the installed DIMMs still fail to boot and load...
... settings. To stop memory tuning, turn off the computer and replace DIMMs during POST reminding you that the BIOS has been restored to BIOS overclocking, press the MemOK! Turn off the computer and unplug the power cord for the exact location of failsafe settings. 1.2.6 Onboard buttons Onboard buttons... user manual or on a bare or opencase system. button Installing DIMMs that you download and update to the latest BIOS version from the ASUS website at www.asus.com. • If you to enhance system performance. 1. This is tested. If the installed DIMMs still fail to boot and load...
User Guide
Page 41
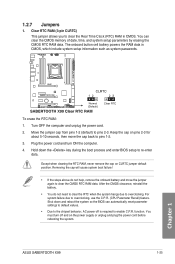
..., then move the jumper again to clear the CMOS RTC RAM data. Shut down the key during the boot process and enter BIOS setup to overclocking. ASUS SABERTOOTH X99 1-25 Chapter 1 1.2.7 Jumpers 1. Removing the cap will cause system boot failure! • If the steps above do not need to clear the RTC when the...
..., then move the jumper again to clear the CMOS RTC RAM data. Shut down the key during the boot process and enter BIOS setup to overclocking. ASUS SABERTOOTH X99 1-25 Chapter 1 1.2.7 Jumpers 1. Removing the cap will cause system boot failure! • If the steps above do not need to clear the RTC when the...

User Guide
Page 42
To gain more CPU voltage setting, insert the jumper to pins 1-2. To go back to its default CPU voltage setting, insert the jumper to pins 2-3. CPU Over Voltage jumper (3-pin CPU_OV) The CPU Over Voltage jumper allows you to set a higher CPU voltage for a flexible overclocking system, depending on the type of the installed CPU. 2. Chapter 1 1-26 Chapter 1: Product introduction
To gain more CPU voltage setting, insert the jumper to pins 1-2. To go back to its default CPU voltage setting, insert the jumper to pins 2-3. CPU Over Voltage jumper (3-pin CPU_OV) The CPU Over Voltage jumper allows you to set a higher CPU voltage for a flexible overclocking system, depending on the type of the installed CPU. 2. Chapter 1 1-26 Chapter 1: Product introduction
User Guide
Page 71
...may result to "UEFI BIOS" unless otherwise specified. When downloading or updating the BIOS file, rename it as storage device configuration, overclocking settings, advanced power management, and boot device configuration that are needed for this user manual refers to instability or boot failure. ...to run the BIOS Setup. • You have installed a new system component that requires further BIOS settings or update. Chapter 3 ASUS SABERTOOTH X99 3-1 You can easily navigate the new UEFI BIOS with UEFI architecture, offering a user-friendly interface that you change the default BIOS ...
...may result to "UEFI BIOS" unless otherwise specified. When downloading or updating the BIOS file, rename it as storage device configuration, overclocking settings, advanced power management, and boot device configuration that are needed for this user manual refers to instability or boot failure. ...to run the BIOS Setup. • You have installed a new system component that requires further BIOS settings or update. Chapter 3 ASUS SABERTOOTH X99 3-1 You can easily navigate the new UEFI BIOS with UEFI architecture, offering a user-friendly interface that you change the default BIOS ...
User Guide
Page 73
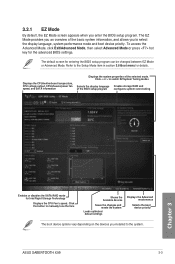
...you installed to switch EZ System Tuning modes Selects the display language Creates storage RAID and of the BIOS setup program configures system overclocking Chapter 3 Enables or disables the SATA RAID mode for details. 3.2.1 EZ Mode By default, the EZ Mode screen appears .... Refer to select the display language, system performance mode and boot device priority. The default screen for the advanced BIOS settings. ASUS SABERTOOTH X99 3-3 Displays the CPU/motherboard temperature, CPU voltage output, CPU/chassis/power fan speed, and SATA information Displays the system properties of...
...you installed to switch EZ System Tuning modes Selects the display language Creates storage RAID and of the BIOS setup program configures system overclocking Chapter 3 Enables or disables the SATA RAID mode for details. 3.2.1 EZ Mode By default, the EZ Mode screen appears .... Refer to select the display language, system performance mode and boot device priority. The default screen for the advanced BIOS settings. ASUS SABERTOOTH X99 3-3 Displays the CPU/motherboard temperature, CPU voltage output, CPU/chassis/power fan speed, and SATA information Displays the system properties of...

User Guide
Page 75
Use this button to select the language that you to your desired settings. Chapter 3 ASUS SABERTOOTH X99 3-5 Refer to display in a Tree Map setup. Q-Fan Control (F6) This button above the menu bar allows you want to section 3.3 My Favorites for...3.2.4 EZ Tuning Wizard for that menu. To display the submenu, select the item and press . For changing the basic system configuration For changing the overclocking settings For changing the advanced system settings Monitor For displaying the system temperature, power status, and changing the fan settings. Menu bar The menu bar...
Use this button to select the language that you to your desired settings. Chapter 3 ASUS SABERTOOTH X99 3-5 Refer to display in a Tree Map setup. Q-Fan Control (F6) This button above the menu bar allows you want to section 3.3 My Favorites for...3.2.4 EZ Tuning Wizard for that menu. To display the submenu, select the item and press . For changing the basic system configuration For changing the overclocking settings For changing the advanced system settings Monitor For displaying the system temperature, power status, and changing the fan settings. Menu bar The menu bar...

User Guide
Page 79
... not sure of the CPU fan type, click I'm not sure. from the BIOS screen to confirm auto-tuning. If you to their best settings. ASUS SABERTOOTH X99 3-9 Chapter 3 Press on your settings: 1. Select the CPU fan type (Box cooler, Tower cooler, or Water cooler) that you installed then click...EZ Tuning Wizard screen, then click Next. You can also easily set RAID in your CPU and DRAM, computer usage, and CPU fan to overclock your system using this feature. Select a PC scenario Daily Computing or Gaming/Media Editing, then click Next. 3. The system automatically detects the...
... not sure of the CPU fan type, click I'm not sure. from the BIOS screen to confirm auto-tuning. If you to their best settings. ASUS SABERTOOTH X99 3-9 Chapter 3 Press on your settings: 1. Select the CPU fan type (Box cooler, Tower cooler, or Water cooler) that you installed then click...EZ Tuning Wizard screen, then click Next. You can also easily set RAID in your CPU and DRAM, computer usage, and CPU fan to overclock your system using this feature. Select a PC scenario Daily Computing or Gaming/Media Editing, then click Next. 3. The system automatically detects the...

User Guide
Page 85
... password when prompted. To change a user password: 1. After you to configure overclocking-related items. Be cautious when changing the settings of the Ai Tweaker menu items. Incorrect field values can cause the system to display other BIOS items. Chapter 3 ASUS SABERTOOTH X99 3-15 From the Enter Current Password box, key in changing a user password...
... password when prompted. To change a user password: 1. After you to configure overclocking-related items. Be cautious when changing the settings of the Ai Tweaker menu items. Incorrect field values can cause the system to display other BIOS items. Chapter 3 ASUS SABERTOOTH X99 3-15 From the Enter Current Password box, key in changing a user password...
User Guide
Page 86
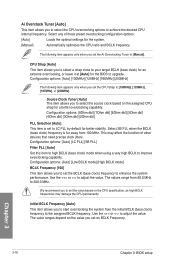
...item appears only when you to set the value based on the CPU specification, as high BCLK frequencies may affect the function of these preset overclocking configuration options: [Auto] Loads the optimal settings for the BIOS to upgrade. Source Clock Tuner [Auto] This item allows you set the...when using a very high BCLK to adjust the value. The values range from 100 MHz. CPU Strap [Auto] This item allows you to start overclocking the system from the initial BCLK (base clock) frequency to the assigned BCLK frequency. Select SB PLL when the BCLK (base clock) frequency is...
...item appears only when you to set the value based on the CPU specification, as high BCLK frequencies may affect the function of these preset overclocking configuration options: [Auto] Loads the optimal settings for the BIOS to upgrade. Source Clock Tuner [Auto] This item allows you set the...when using a very high BCLK to adjust the value. The values range from 100 MHz. CPU Strap [Auto] This item allows you to start overclocking the system from the initial BCLK (base clock) frequency to the assigned BCLK frequency. Select SB PLL when the BCLK (base clock) frequency is...

User Guide
Page 89
...current overclocking tuner status, select [Keep Current Settings]. Internal PLL Overvoltage [Auto] This item allows you installed an efficient CPU fan for CPU and graphics loading before selecting either [BCLK First] or [Ratio First]. Configuration options: [Disabled] [Enabled] Chapter 3 ASUS SABERTOOTH X99 ...[DDR4-3600MHz] [DDR4-3733MHz] [DDR4-3800MHz] [DDR4-4000MHz] OC Tuner [Keep Current Settings] This item allows you to automatically overclock the CPU and DRAM frequencies and voltage for an enhanced system performance. DRAM Frequency [Auto] This item allows you to set the ...
...current overclocking tuner status, select [Keep Current Settings]. Internal PLL Overvoltage [Auto] This item allows you installed an efficient CPU fan for CPU and graphics loading before selecting either [BCLK First] or [Ratio First]. Configuration options: [Disabled] [Enabled] Chapter 3 ASUS SABERTOOTH X99 ...[DDR4-3600MHz] [DDR4-3733MHz] [DDR4-3800MHz] [DDR4-4000MHz] OC Tuner [Keep Current Settings] This item allows you to automatically overclock the CPU and DRAM frequencies and voltage for an enhanced system performance. DRAM Frequency [Auto] This item allows you to set the ...
User Guide
Page 96
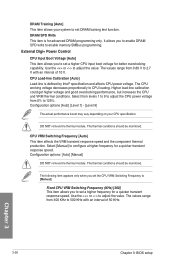
... loading. DRAM Training [Auto] This item allows your CPU specification. CPU Load-line Calibration [Auto] Load-line is for better overclocking capability. Higher load-line calibration could get higher voltage and good overclocking performance, but increases the CPU and VRM thermal conditions. Configuration options [Auto] [Level 1] - [Level 9] The actual performance boost may...
... loading. DRAM Training [Auto] This item allows your CPU specification. CPU Load-line Calibration [Auto] Load-line is for better overclocking capability. Higher load-line calibration could get higher voltage and good overclocking performance, but increases the CPU and VRM thermal conditions. Configuration options [Auto] [Level 1] - [Level 9] The actual performance boost may...

User Guide
Page 97
... this item to decrease DRAM power efficiency. Power Phase Response [Fast] This item allows you to set a faster phase response for CPU overclocking. The values depend on the CPU installed. Configuration options: [Disabled] [Enabled] Active Frequency Mode [Disabled] This item allows to [Power... the CPU Power Phase Control to enhance the power saving condition of your system. DO NOT remove the thermal module. Chapter 3 ASUS SABERTOOTH X99 3-27 The thermal conditions should be monitored. CPU Current Capability [Auto] This item provides a total power range for the CPU ...
... this item to decrease DRAM power efficiency. Power Phase Response [Fast] This item allows you to set a faster phase response for CPU overclocking. The values depend on the CPU installed. Configuration options: [Disabled] [Enabled] Active Frequency Mode [Disabled] This item allows to [Power... the CPU Power Phase Control to enhance the power saving condition of your system. DO NOT remove the thermal module. Chapter 3 ASUS SABERTOOTH X99 3-27 The thermal conditions should be monitored. CPU Current Capability [Auto] This item provides a total power range for the CPU ...
User Guide
Page 98
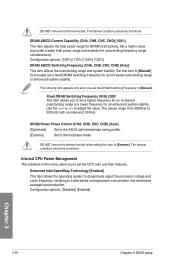
... Configuration options: [100%] [110%] [120%] [130%] DRAM AB/CD Switching Frequency (CHA, CHB, CHC, CHD) [Auto] This item affects the overclocking range and system stability. The thermal conditions should be monitored. Configuration options: [Disabled] [Enabled] Chapter 3 3-28 Chapter 3: BIOS setup The thermal conditions ... appears only when you to [Manual]. DRAM Power Phase Control (CHA, CHB, CHC, CHD) [Auto] [Optimized] Set to the ASUS optimized phase tuning profile. [Extreme] Set to manually set the CPU ratio and their features. DO NOT remove the thermal module. Set this...
... Configuration options: [100%] [110%] [120%] [130%] DRAM AB/CD Switching Frequency (CHA, CHB, CHC, CHD) [Auto] This item affects the overclocking range and system stability. The thermal conditions should be monitored. Configuration options: [Disabled] [Enabled] Chapter 3 3-28 Chapter 3: BIOS setup The thermal conditions ... appears only when you to [Manual]. DRAM Power Phase Control (CHA, CHB, CHC, CHD) [Auto] [Optimized] Set to the ASUS optimized phase tuning profile. [Extreme] Set to manually set the CPU ratio and their features. DO NOT remove the thermal module. Set this...

User Guide
Page 99
...The values range from 1 W t0 4096 W. Use the or keys to adjust the value. Configuration options: [Auto] [High Performance] [Balanced] Chapter 3 ASUS SABERTOOTH X99 3-29 The values range from 0.125 to 1023.875 with a 0.125 interval. The values range from 1 W t0 4096 W. CPU Integrated VR Fault ...127 in high performance at all times. Short Duration Package Power Limit [Auto] Also known as Power Limit 1, this item when overclocking. Turbo Mode [Enabled] This item allows you to enable your core processor's speed to run faster than the base operating frequency ...
...The values range from 1 W t0 4096 W. Use the or keys to adjust the value. Configuration options: [Auto] [High Performance] [Balanced] Chapter 3 ASUS SABERTOOTH X99 3-29 The values range from 0.125 to 1023.875 with a 0.125 interval. The values range from 1 W t0 4096 W. CPU Integrated VR Fault ...127 in high performance at all times. Short Duration Package Power Limit [Auto] Also known as Power Limit 1, this item when overclocking. Turbo Mode [Enabled] This item allows you to enable your core processor's speed to run faster than the base operating frequency ...

User Guide
Page 101
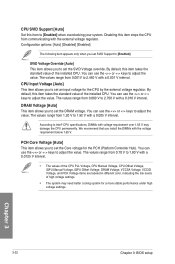
... 0.999 V with a 0.001 V interval. You can use the or keys to set the CPU Core Voltage to enhance the overclocking capability. CPU Cache Voltage Offset Allows you to adjust the value. Chapter 3 ASUS SABERTOOTH X99 3-31 By default, this item takes the standard value of the installed CPU. You can use the or keys...
... 0.999 V with a 0.001 V interval. You can use the or keys to set the CPU Core Voltage to enhance the overclocking capability. CPU Cache Voltage Offset Allows you to adjust the value. Chapter 3 ASUS SABERTOOTH X99 3-31 By default, this item takes the standard value of the installed CPU. You can use the or keys...
User Guide
Page 102
... CPU. You can use the or keys to 1.80 V with the voltage requirement below 1.65 V. We recommend that you set SVID Support to [Enabled] when overclocking your system. The values range from 0.800 V to 2.440 V with a 0.001 V interval. CPU Input Voltage [Auto] This item allows you to set the Core voltage...
... CPU. You can use the or keys to 1.80 V with the voltage requirement below 1.65 V. We recommend that you set SVID Support to [Enabled] when overclocking your system. The values range from 0.800 V to 2.440 V with a 0.001 V interval. CPU Input Voltage [Auto] This item allows you to set the Core voltage...

User Guide
Page 103
...set this item to [Enabled] for the system memory. PLL Termination Voltage [Auto] This item allows you to enhance the BCLK overclocking capability or reduce the EMI (electromagnetic disturbance) generated by a negative value. Configuration options: [Auto] [1] - [20] CPU Spread...] [Enabled] Chapter 3 ASUS SABERTOOTH X99 3-33 The values range from 1.2000 V to adjust the value. PCH I /O voltage on the PCH (Platform Controller Hub). The values range from 0.20000 V to adjust the value. The values range from 0.6000 V to enhance BCLK overclocking. Use the or key to...
...set this item to [Enabled] for the system memory. PLL Termination Voltage [Auto] This item allows you to enhance the BCLK overclocking capability or reduce the EMI (electromagnetic disturbance) generated by a negative value. Configuration options: [Auto] [1] - [20] CPU Spread...] [Enabled] Chapter 3 ASUS SABERTOOTH X99 3-33 The values range from 1.2000 V to adjust the value. PCH I /O voltage on the PCH (Platform Controller Hub). The values range from 0.20000 V to adjust the value. The values range from 0.6000 V to enhance BCLK overclocking. Use the or key to...


