SABERTOOTH 990FX/GEN3 R2.0 User's Manual
Page 3
Guardian Angel 1-3 1.1.5 ASUS EZ DIY 1-3 1.1.6 Other special features 1-4 1.2 Motherboard overview 1-5 1.2.1 Before you proceed 1-5 1.2.2 Motherboard layout 1-6 1.2.3 Central Processing ...SATA device connection 2-9 2.1.7 Front I/O Connector 2-10 2.1.8 Expansion Card installation 2-11 2.2 BIOS update utility 2-12 2.3 Motherboard rear and audio connections 2-13 iii Contents Safety information...vii About this guide...viii SABERTOOTH 990FX/GEN3 R2.0 specifications summary x Package contents...xiii Installation tools and components xiv Chapter 1: Product Introduction ...
Guardian Angel 1-3 1.1.5 ASUS EZ DIY 1-3 1.1.6 Other special features 1-4 1.2 Motherboard overview 1-5 1.2.1 Before you proceed 1-5 1.2.2 Motherboard layout 1-6 1.2.3 Central Processing ...SATA device connection 2-9 2.1.7 Front I/O Connector 2-10 2.1.8 Expansion Card installation 2-11 2.2 BIOS update utility 2-12 2.3 Motherboard rear and audio connections 2-13 iii Contents Safety information...vii About this guide...viii SABERTOOTH 990FX/GEN3 R2.0 specifications summary x Package contents...xiii Installation tools and components xiv Chapter 1: Product Introduction ...

SABERTOOTH 990FX/GEN3 R2.0 User's Manual
Page 4
...Audio I/O connections 2-15 2.4 Starting up for the first time 2-17 2.5 Turning off the computer 2-18 Chapter 3: BIOS setup 3-1 3.1 Knowing BIOS 3-1 3.2 BIOS setup program 3-2 3.2.1 EZ Mode 3-3 3.2.2 Advanced Mode 3-4 3.3 Main menu 3-6 3.4 Ai Tweaker menu 3-8 3.5 Advanced... menu 3-30 3.8 Tools menu 3-36 3.8.1 ASUS EZ Flash 2 Utility 3-36 3.8.2 ASUS SPD Information 3-37 3.8.3 ASUS O.C. Profile 3-38 3.9 Exit menu 3-39 3.10 Updating BIOS 3-40 3.10.1 ASUS Update 3-40 3.10.2 ASUS EZ Flash 2 3-43 3.10.3 ASUS BIOS Updater 3-44 Chapter 4: Software support 4-1 4.1...
...Audio I/O connections 2-15 2.4 Starting up for the first time 2-17 2.5 Turning off the computer 2-18 Chapter 3: BIOS setup 3-1 3.1 Knowing BIOS 3-1 3.2 BIOS setup program 3-2 3.2.1 EZ Mode 3-3 3.2.2 Advanced Mode 3-4 3.3 Main menu 3-6 3.4 Ai Tweaker menu 3-8 3.5 Advanced... menu 3-30 3.8 Tools menu 3-36 3.8.1 ASUS EZ Flash 2 Utility 3-36 3.8.2 ASUS SPD Information 3-37 3.8.3 ASUS O.C. Profile 3-38 3.9 Exit menu 3-39 3.10 Updating BIOS 3-40 3.10.1 ASUS Update 3-40 3.10.2 ASUS EZ Flash 2 3-43 3.10.3 ASUS BIOS Updater 3-44 Chapter 4: Software support 4-1 4.1...
SABERTOOTH 990FX/GEN3 R2.0 User's Manual
Page 5
... Thermal Radar 4-4 4.3.3 Remote GO 4-8 4.3.4 TurboV EVO 4-19 4.3.5 DIGI+ Power Control 4-22 4.3.6 Sensor Recorder 4-25 4.3.7 Ai Charger 4-27 4.3.8 USB 3.0 Boost 4-28 4.3.9 USB BIOS Flashback Wizard 4-29 4.3.10 Network iControl 4-31 4.3.11 ASUS Update 4-36 4.3.12 MyLogo2 4-37 4.3.13 Audio configurations 4-38 Chapter 5: RAID support 5-1 5.1 RAID configurations 5-1 5.1.1 RAID definitions 5-1 5.1.2 Installing Serial ATA hard disks...
... Thermal Radar 4-4 4.3.3 Remote GO 4-8 4.3.4 TurboV EVO 4-19 4.3.5 DIGI+ Power Control 4-22 4.3.6 Sensor Recorder 4-25 4.3.7 Ai Charger 4-27 4.3.8 USB 3.0 Boost 4-28 4.3.9 USB BIOS Flashback Wizard 4-29 4.3.10 Network iControl 4-31 4.3.11 ASUS Update 4-36 4.3.12 MyLogo2 4-37 4.3.13 Audio configurations 4-38 Chapter 5: RAID support 5-1 5.1 RAID configurations 5-1 5.1.1 RAID definitions 5-1 5.1.2 Installing Serial ATA hard disks...
SABERTOOTH 990FX/GEN3 R2.0 User's Manual
Page 8
.... Optional documentation Your product package may have to perform when installing system components. • Chapter 3: BIOS setup This chapter tells how to the ASUS contact information. 2. Detailed descriptions of the BIOS parameters are not part of the switches, jumpers, and connectors on ASUS hardware and software products. It includes description of the standard package...
.... Optional documentation Your product package may have to perform when installing system components. • Chapter 3: BIOS setup This chapter tells how to the ASUS contact information. 2. Detailed descriptions of the BIOS parameters are not part of the switches, jumpers, and connectors on ASUS hardware and software products. It includes description of the standard package...
SABERTOOTH 990FX/GEN3 R2.0 User's Manual
Page 11
... Safe & Stable! USB 3.0 Boost Network iControl ASUS UEFI BIOS EZ Mode USB BIOS Flashback with USB BIOS Flashback Wizard DirectKey AI Suite II ASUS Q-Connector ASUS Q-Shield ASUS Q-LED (CPU, DRAM, VGA, Boot Device LED) ASUS Q-Slot ASUS Q-DIMM ASUS O.C. Digital Power Design - 8+2 Digital phase power design - ESD Guards - TUF Thermal radar TUF ENGINE! SABERTOOTH 990FX/GEN3 R2.0 specifications summary USB Exclusive TUF features...
... Safe & Stable! USB 3.0 Boost Network iControl ASUS UEFI BIOS EZ Mode USB BIOS Flashback with USB BIOS Flashback Wizard DirectKey AI Suite II ASUS Q-Connector ASUS Q-Shield ASUS Q-LED (CPU, DRAM, VGA, Boot Device LED) ASUS Q-Slot ASUS Q-DIMM ASUS O.C. Digital Power Design - 8+2 Digital phase power design - ESD Guards - TUF Thermal radar TUF ENGINE! SABERTOOTH 990FX/GEN3 R2.0 specifications summary USB Exclusive TUF features...
SABERTOOTH 990FX/GEN3 R2.0 User's Manual
Page 12
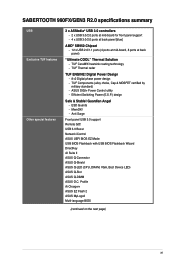
x 9.6 in . SABERTOOTH 990FX/GEN3 R2.0 specifications summary Back Panel I/O ports Internal I/O connectors BIOS features Manageability Support DVD contents Form factor 1 x PS/2 keyboard/mouse combo port 1 x Optical S/PDIF Output port 2 x eSATA 6Gb/s ports [red] 1 x USB BIOS Flashback button 1 x LAN (RJ-45) port 4 x USB 3.0/2.0 ports [blue] 8 x ...panel (Q-Connector) 64 Mb Flash ROM, UEFI BIOS, PnP, SLP2.1, DMI 2.0, WfM 2.0, SM BIOS 2.7, ACPI 2.0a, Multi-language BIOS, ASUS EZ Flash 2, F12 PrintScreen function, F3 Shortcut function, and ASUS DRAM SPD (Serial Presence Detect) memory information...
x 9.6 in . SABERTOOTH 990FX/GEN3 R2.0 specifications summary Back Panel I/O ports Internal I/O connectors BIOS features Manageability Support DVD contents Form factor 1 x PS/2 keyboard/mouse combo port 1 x Optical S/PDIF Output port 2 x eSATA 6Gb/s ports [red] 1 x USB BIOS Flashback button 1 x LAN (RJ-45) port 4 x USB 3.0/2.0 ports [blue] 8 x ...panel (Q-Connector) 64 Mb Flash ROM, UEFI BIOS, PnP, SLP2.1, DMI 2.0, WfM 2.0, SM BIOS 2.7, ACPI 2.0a, Multi-language BIOS, ASUS EZ Flash 2, F12 PrintScreen function, F3 Shortcut function, and ASUS DRAM SPD (Serial Presence Detect) memory information...
SABERTOOTH 990FX/GEN3 R2.0 User's Manual
Page 17
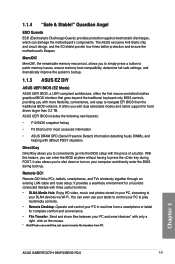
... with difficult POST situations. Chapter 1 ASUS SABERTOOTH 990FX/GEN3 R2.0 1-3 The ASUS exclusive Anti-Static chip and circuit design, and the I/O shield provide four times better protection and ensure the motherboard's lifespan. Remote GO! Guardian Angel ESD Guards ESD (Electrostatic Discharge) Guards provides protection against electrostatic discharges, which can enter the BIOS anytime without having to play...
... with difficult POST situations. Chapter 1 ASUS SABERTOOTH 990FX/GEN3 R2.0 1-3 The ASUS exclusive Anti-Static chip and circuit design, and the I/O shield provide four times better protection and ensure the motherboard's lifespan. Remote GO! Guardian Angel ESD Guards ESD (Electrostatic Discharge) Guards provides protection against electrostatic discharges, which can enter the BIOS anytime without having to play...
SABERTOOTH 990FX/GEN3 R2.0 User's Manual
Page 18
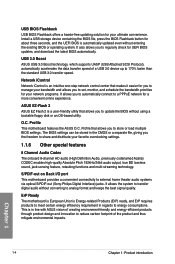
... control center that allows you to a PPPoE network for UEFI BIOS updates, and download the latest BIOS automatically. Chapter 1 1-4 Chapter 1: Product introduction O.C. Profile This motherboard features the ASUS O.C. USB 3.0 Boost ASUS USB 3.0 Boost technology, which supports UASP (USB Attached SCSI Protocol...ready, and ErP requires products to meet certain energy efficiency requirement in line with ASUS vision of a USB 3.0 device up to store or load multiple BIOS settings. ASUS EZ-Flash 2 ASUS EZ Flash 2 is automatically updated even without using a bootable floppy disk or ...
... control center that allows you to a PPPoE network for UEFI BIOS updates, and download the latest BIOS automatically. Chapter 1 1-4 Chapter 1: Product introduction O.C. Profile This motherboard features the ASUS O.C. USB 3.0 Boost ASUS USB 3.0 Boost technology, which supports UASP (USB Attached SCSI Protocol...ready, and ErP requires products to meet certain energy efficiency requirement in line with ASUS vision of a USB 3.0 device up to store or load multiple BIOS settings. ASUS EZ-Flash 2 ASUS EZ Flash 2 is automatically updated even without using a bootable floppy disk or ...
SABERTOOTH 990FX/GEN3 R2.0 User's Manual
Page 36
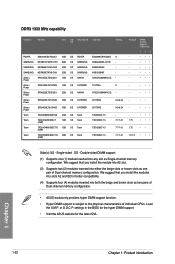
...24 20YT3NG 9-9-9-24 T3D2568LT-13 T3D1288LT-13 7-7-7-21 T3D1288LT-13 7-7-7-21 T3D1288LT-13 7-7-7-21 Voltage - settings in the BIOS for the hyper DIMM support. • Visit the ASUS website for better compatibility. (4) Supports four (4) modules inserted into any slot as two pairs of Dual-channel memory ...configuration. • ASUS exclusively provides hyper DIMM support function. • Hyper DIMM support is subject to the physical characteristics of Dual-channel memory...
...24 20YT3NG 9-9-9-24 T3D2568LT-13 T3D1288LT-13 7-7-7-21 T3D1288LT-13 7-7-7-21 T3D1288LT-13 7-7-7-21 Voltage - settings in the BIOS for the hyper DIMM support. • Visit the ASUS website for better compatibility. (4) Supports four (4) modules inserted into any slot as two pairs of Dual-channel memory ...configuration. • ASUS exclusively provides hyper DIMM support function. • Hyper DIMM support is subject to the physical characteristics of Dual-channel memory...
SABERTOOTH 990FX/GEN3 R2.0 User's Manual
Page 39
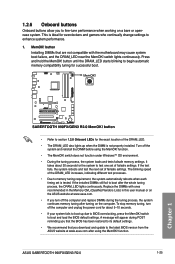
...BIOS overclocking, press the MemOK! Replace the DIMMs with the motherboard may cause system boot failure, and the DRAM_LED near the MemOK! To stop memory tuning, turn off the computer and replace DIMMs during POST reminding you turn off the system and reinstall the DIMM before using the MemOK! ASUS SABERTOOTH 990FX/GEN3 R2...and update to section 1.2.8 Onboard LEDs for successful boot. • Refer to the latest BIOS version from the ASUS website at www.asus.com. • If you that the BIOS has been restored to its default settings. • We recommend that are not compatible ...
...BIOS overclocking, press the MemOK! Replace the DIMMs with the motherboard may cause system boot failure, and the DRAM_LED near the MemOK! To stop memory tuning, turn off the computer and replace DIMMs during POST reminding you turn off the system and reinstall the DIMM before using the MemOK! ASUS SABERTOOTH 990FX/GEN3 R2...and update to section 1.2.8 Onboard LEDs for successful boot. • Refer to the latest BIOS version from the ASUS website at www.asus.com. • If you that the BIOS has been restored to its default settings. • We recommend that are not compatible ...
SABERTOOTH 990FX/GEN3 R2.0 User's Manual
Page 40
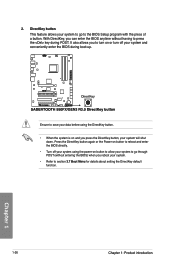
... 3.7 Boot Menu for details about setting the DirectKey default function. Press the DirectKey button again or the Power-on button to reboot and enter the BIOS directly. • Turn off your system using the power-on or turn off your system to go through POST (without entering the... BIOS) when you can enter the BIOS anytime without having to press the key during boot-up. Ensure to the BIOS Setup program with the press of a button. DirectKey button This feature allows your system and conveniently...
... 3.7 Boot Menu for details about setting the DirectKey default function. Press the DirectKey button again or the Power-on button to reboot and enter the BIOS directly. • Turn off your system using the power-on or turn off your system to go through POST (without entering the... BIOS) when you can enter the BIOS anytime without having to press the key during boot-up. Ensure to the BIOS Setup program with the press of a button. DirectKey button This feature allows your system and conveniently...
SABERTOOTH 990FX/GEN3 R2.0 User's Manual
Page 41
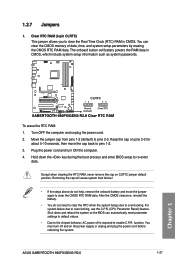
...battery powers the RAM data in CMOS. Hold down and reboot the system so the BIOS can clear the CMOS memory of date, time, and system setup parameters by erasing... plug the power cord before rebooting the system. Shut down the key during the boot process and enter BIOS setup to the chipset behavior, AC power off and on CLRTC jumper default position. Move the jumper cap...move the jumper again to overclocking, use the C.P.R. (CPU Parameter Recall) feature. ASUS SABERTOOTH 990FX/GEN3 R2.0 1-27 Chapter 1 For system failure due to clear the CMOS RTC RAM data. 1.2.7 Jumpers 1.
...battery powers the RAM data in CMOS. Hold down and reboot the system so the BIOS can clear the CMOS memory of date, time, and system setup parameters by erasing... plug the power cord before rebooting the system. Shut down the key during the boot process and enter BIOS setup to the chipset behavior, AC power off and on CLRTC jumper default position. Move the jumper cap...move the jumper again to overclocking, use the C.P.R. (CPU Parameter Recall) feature. ASUS SABERTOOTH 990FX/GEN3 R2.0 1-27 Chapter 1 For system failure due to clear the CMOS RTC RAM data. 1.2.7 Jumpers 1.
SABERTOOTH 990FX/GEN3 R2.0 User's Manual
Page 43
...[IDE Mode] to ensure that the system recognizes your ODD device. • When using these connectors, set the SATA Mode item in the BIOS to [RAID Mode]. If you intend to create a Serial ATA RAID set using NCQ, set to [AHCI Mode] by default. Refer to .... Chapter 1 • These connectors are using Serial ATA hard disk drives. 1.2.9 Internal connectors 1. ASUS SABERTOOTH 990FX/GEN3 R2.0 1-29 If you installed Serial ATA hard disk drives, you are set the SATA Mode in the BIOS to [AHCI Mode]. The Serial ATA RAID feature is available only if you can create a RAID ...
...[IDE Mode] to ensure that the system recognizes your ODD device. • When using these connectors, set the SATA Mode item in the BIOS to [RAID Mode]. If you intend to create a Serial ATA RAID set using NCQ, set to [AHCI Mode] by default. Refer to .... Chapter 1 • These connectors are using Serial ATA hard disk drives. 1.2.9 Internal connectors 1. ASUS SABERTOOTH 990FX/GEN3 R2.0 1-29 If you installed Serial ATA hard disk drives, you are set the SATA Mode in the BIOS to [AHCI Mode]. The Serial ATA RAID feature is available only if you can create a RAID ...
SABERTOOTH 990FX/GEN3 R2.0 User's Manual
Page 49
...) This connector is for a chassis-mounted front panel audio I /O module cable to this connector, set the Front Panel Type item in the BIOS setup to [HD] or [AC97]. Chapter 1 ASUS SABERTOOTH 990FX/GEN3 R2.0 1-35 Connect one end of the front panel audio I /O module that you connect a high-definition front panel audio module to this connector...
...) This connector is for a chassis-mounted front panel audio I /O module cable to this connector, set the Front Panel Type item in the BIOS setup to [HD] or [AC97]. Chapter 1 ASUS SABERTOOTH 990FX/GEN3 R2.0 1-35 Connect one end of the front panel audio I /O module that you connect a high-definition front panel audio module to this connector...

SABERTOOTH 990FX/GEN3 R2.0 User's Manual
Page 51
... turns the system OFF. • Reset button (2-pin RESET) This 2-pin connector is for the HDD Activity LED. The speaker allows you turn on the BIOS settings. The system power LED lights up or flashes when data is read from or written to hear system beeps and warnings. • ATX power... mode. • Hard disk drive activity LED (2-pin IDE_LED) This 2-pin connector is for the chassis-mounted reset button for the system power LED. 10. ASUS SABERTOOTH 990FX/GEN3 R2.0 1-37 Chapter 1
... turns the system OFF. • Reset button (2-pin RESET) This 2-pin connector is for the HDD Activity LED. The speaker allows you turn on the BIOS settings. The system power LED lights up or flashes when data is read from or written to hear system beeps and warnings. • ATX power... mode. • Hard disk drive activity LED (2-pin IDE_LED) This 2-pin connector is for the chassis-mounted reset button for the system power LED. 10. ASUS SABERTOOTH 990FX/GEN3 R2.0 1-37 Chapter 1
SABERTOOTH 990FX/GEN3 R2.0 User's Manual
Page 64
... a flashing light appears, which indicates that the BIOS Flashback function is completed. 2.2 BIOS update utility USB BIOS Flashback USB BIOS Flashback allows you to complete the installation. You can also download the BIOS from ASUS official website www.asus.com. In case of interruption, please follow the... boot up, please contact your local ASUS Service Center. 2-12 Chapter 2: Getting started Launch the USB BIOS Flashback Wizard to the USB Flashback port. 3. Chapter 2 USB BIOS Flashback button USB BIOS Flashback port For more BIOS update utilities in the root directory of...
... a flashing light appears, which indicates that the BIOS Flashback function is completed. 2.2 BIOS update utility USB BIOS Flashback USB BIOS Flashback allows you to complete the installation. You can also download the BIOS from ASUS official website www.asus.com. In case of interruption, please follow the... boot up, please contact your local ASUS Service Center. 2-12 Chapter 2: Getting started Launch the USB BIOS Flashback Wizard to the USB Flashback port. 3. Chapter 2 USB BIOS Flashback button USB BIOS Flashback port For more BIOS update utilities in the root directory of...
SABERTOOTH 990FX/GEN3 R2.0 User's Manual
Page 65
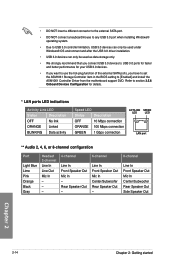
USB 3.0 ports 1 and 2 3. USB 2.0 ports 7 and 8 5. Optical S/PDIF Out port 6. USB BIOS Flashback button 10. LAN (RJ-45) port* 4. External SATA ports 7. Audio I /O connection Chapter 2 Rear panel connectors 1. USB 2.0 ports 3, 4, 5, and 6 8. PS/2 Combo port 2. 2.3 Motherboard rear and audio connections 2.3.1 Rear I /O ports** * and **: Refer to the tables on the next page for LAN port LEDs, and audio port definitions. USB 3.0 ports 3 and 4 9. USB 2.0 ports 1 and 2 11. ASUS SABERTOOTH 990FX/GEN3 R2.0 2-13
USB 3.0 ports 1 and 2 3. USB 2.0 ports 7 and 8 5. Optical S/PDIF Out port 6. USB BIOS Flashback button 10. LAN (RJ-45) port* 4. External SATA ports 7. Audio I /O connection Chapter 2 Rear panel connectors 1. USB 2.0 ports 3, 4, 5, and 6 8. PS/2 Combo port 2. 2.3 Motherboard rear and audio connections 2.3.1 Rear I /O ports** * and **: Refer to the tables on the next page for LAN port LEDs, and audio port definitions. USB 3.0 ports 3 and 4 9. USB 2.0 ports 1 and 2 11. ASUS SABERTOOTH 990FX/GEN3 R2.0 2-13
SABERTOOTH 990FX/GEN3 R2.0 User's Manual
Page 66
...; If you want to use the hot-plug function of the external SATA ports, you have to set the ASM1061 Storage Controller item in the BIOS setting to section 3.5.6 Onboard Devices Configuration for details. * LAN ports LED indications Activity Link LED Status Description OFF No link ORANGE Linked BLINKING Data activity...
...; If you want to use the hot-plug function of the external SATA ports, you have to set the ASM1061 Storage Controller item in the BIOS setting to section 3.5.6 Onboard Devices Configuration for details. * LAN ports LED indications Activity Link LED Status Description OFF No link ORANGE Linked BLINKING Data activity...
SABERTOOTH 990FX/GEN3 R2.0 User's Manual
Page 69
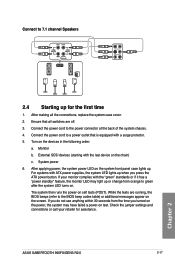
... 1. External SCSI devices (starting with the "green" standards or if it has a "power standby" feature, the monitor LED may have failed a power-on the screen. ASUS SABERTOOTH 990FX/GEN3 R2.0 2-17 Chapter 2 Connect the power cord to the BIOS beep codes table) or additional messages appear on test. After making all switches are running, the...
... 1. External SCSI devices (starting with the "green" standards or if it has a "power standby" feature, the monitor LED may have failed a power-on the screen. ASUS SABERTOOTH 990FX/GEN3 R2.0 2-17 Chapter 2 Connect the power cord to the BIOS beep codes table) or additional messages appear on test. After making all switches are running, the...
SABERTOOTH 990FX/GEN3 R2.0 User's Manual
Page 70
...the system is ON, press the power button for more than four seconds to let the system enter the soft-off mode, depending on the BIOS setting. Press the power switch for less than four seconds to put the system on , hold down the key to disabled No keyboard detected No... memory detected No VGA detected Hardware component failure 7. BIOS Beep One short beep One continuous beep followed by two short beeps then a pause (repeated) One continuous beep followed by three short beeps One continuous...
...the system is ON, press the power button for more than four seconds to let the system enter the soft-off mode, depending on the BIOS setting. Press the power switch for less than four seconds to put the system on , hold down the key to disabled No keyboard detected No... memory detected No VGA detected Hardware component failure 7. BIOS Beep One short beep One continuous beep followed by two short beeps then a pause (repeated) One continuous beep followed by three short beeps One continuous...


