
User Guide
Page 3
... v Care & Cleaning ix 1.1 Welcome 1-3 1.2 Package contents 1-3 1.3 Attaching the Stand 1-4 1.3.1 Cable Management 1-4 1.3.2 Remote Control 1-5 1.4 Connect cables 1-7 1.4.1 Rear of the LCD monitor 1-7 1.5 Monitor introduction 1-8 1.5.1 Front/Side view 1-8 2.1 Adjusting the monitor 2-1 2.2 Outline dimension 2-2 2.3 Turning on the monitor 2-3 2.4 For VESA wall mount 2-3 3.1 OSD (On-Screen Display) menu 3-1 3.1.1 How to reconfigure 3-1 3.1.2 OSD Function Introduction 3-2 5. MyFavorite 3-7 3.3 Specifications 3-11 3.3 Troubleshooting (FAQ 3-13 3.4 Supported Timing List 3-14...
... v Care & Cleaning ix 1.1 Welcome 1-3 1.2 Package contents 1-3 1.3 Attaching the Stand 1-4 1.3.1 Cable Management 1-4 1.3.2 Remote Control 1-5 1.4 Connect cables 1-7 1.4.1 Rear of the LCD monitor 1-7 1.5 Monitor introduction 1-8 1.5.1 Front/Side view 1-8 2.1 Adjusting the monitor 2-1 2.2 Outline dimension 2-2 2.3 Turning on the monitor 2-3 2.4 For VESA wall mount 2-3 3.1 OSD (On-Screen Display) menu 3-1 3.1.1 How to reconfigure 3-1 3.1.2 OSD Function Introduction 3-2 5. MyFavorite 3-7 3.3 Specifications 3-11 3.3 Troubleshooting (FAQ 3-13 3.4 Supported Timing List 3-14...

User Guide
Page 4
...uses and can be determined by the party responsible for compliance could void the user's authority to provide reasonable protection against harmful interference in accordance with the instructions... Part 15 of Conformity This device complies with the requirements set out in a particular installation. The use of shielded cables for connection of the monitor to the graphics card ...digital device, pursuant to comply with the harmonized standards for help. However, there is required to which can radiate radio frequency energy and, if not installed and used in a residential installation...
...uses and can be determined by the party responsible for compliance could void the user's authority to provide reasonable protection against harmful interference in accordance with the instructions... Part 15 of Conformity This device complies with the requirements set out in a particular installation. The use of shielded cables for connection of the monitor to the graphics card ...digital device, pursuant to comply with the harmonized standards for help. However, there is required to which can radiate radio frequency energy and, if not installed and used in a residential installation...
User Guide
Page 6
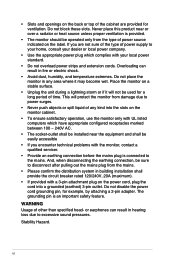
...and openings on the back or top of the cabinet are not sure of the type of power supply to your home, consult your dealer or local power company. • Use the appropriate power plug which complies with your local power standard. • Do not overload power strips and extension cords. ... disconnecting the earthing connection, be sure to excessive sound pressures. Place the monitor on a stable surface. • Unplug the unit during a lightning storm or if it may become wet. If you encounter technical problems with a 3-pin attachment plug on the power cord, plug the cord into the slots ...
...and openings on the back or top of the cabinet are not sure of the type of power supply to your home, consult your dealer or local power company. • Use the appropriate power plug which complies with your local power standard. • Do not overload power strips and extension cords. ... disconnecting the earthing connection, be sure to excessive sound pressures. Place the monitor on a stable surface. • Unplug the unit during a lightning storm or if it may become wet. If you encounter technical problems with a 3-pin attachment plug on the power cord, plug the cord into the slots ...
User Guide
Page 8
... and therefore strains the eyes of disposal will help to a designated collection point for recycling, please contact your local city office, your waste equipment at factory reset/default setting mode. The separate collection and recycling of your household waste disposal service or the shop where you purchased the product. ASUS CONTACT INFORMATION ASUSTeK Computer Inc. TÜV Rheinland Flicker Free Certification.
... and therefore strains the eyes of disposal will help to a designated collection point for recycling, please contact your local city office, your waste equipment at factory reset/default setting mode. The separate collection and recycling of your household waste disposal service or the shop where you purchased the product. ASUS CONTACT INFORMATION ASUSTeK Computer Inc. TÜV Rheinland Flicker Free Certification.

User Guide
Page 9
... display by a qualified technician , and please contact your supplier for more information. • For the Models with ring to the VESA Mount hole, then tie the cord or chain to the wall. Turn your monitor, it is better to disconnect the cables and power cord. Please check local regulations for use with VESA Mount, please use method to tie the cord or chain to the stand and then fix...
... display by a qualified technician , and please contact your supplier for more information. • For the Models with ring to the VESA Mount hole, then tie the cord or chain to the wall. Turn your monitor, it is better to disconnect the cables and power cord. Please check local regulations for use with VESA Mount, please use method to tie the cord or chain to the stand and then fix...
User Guide
Page 10
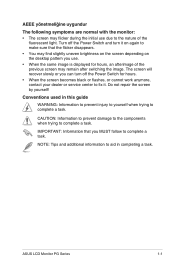
... screen may flicker during the initial use . • When the same image is displayed for hours. • When the screen becomes black or flashes, or cannot work anymore, contact your dealer or service center to fix it on again to make sure that you use due to complete a task. ASUS LCD Monitor PG Series 1-1 Conventions used in completing a task. Turn off the Power Switch for hours, an afterimage of the fluorescent light...
... screen may flicker during the initial use . • When the same image is displayed for hours. • When the screen becomes black or flashes, or cannot work anymore, contact your dealer or service center to fix it on again to make sure that you use due to complete a task. ASUS LCD Monitor PG Series 1-1 Conventions used in completing a task. Turn off the Power Switch for hours, an afterimage of the fluorescent light...

User Guide
Page 12
ASUS LCD Monitor PG Series 1-3 1.1 Welcome Thank you ! 1.2 Package contents Check your package for the following items: LCD Monitor Monitor Base Quick Start Guide Warranty Card Power Cord Ultra High Speed HDMI 2.1 Cable DP Cable USB Cable (Type A to B) Input/Output port cover w/ L shape screw driver Color Calibration Testing Report Remote Control Battery ROG sticker ROG Pouch M6 screws 4 pcs for stand M6 Standoff 4 pcs for VESA mount • If any of features that the monitor brings to you for purchasing the ASUS® LCD Gaming monitor! The latest widescreen...
ASUS LCD Monitor PG Series 1-3 1.1 Welcome Thank you ! 1.2 Package contents Check your package for the following items: LCD Monitor Monitor Base Quick Start Guide Warranty Card Power Cord Ultra High Speed HDMI 2.1 Cable DP Cable USB Cable (Type A to B) Input/Output port cover w/ L shape screw driver Color Calibration Testing Report Remote Control Battery ROG sticker ROG Pouch M6 screws 4 pcs for stand M6 Standoff 4 pcs for VESA mount • If any of features that the monitor brings to you for purchasing the ASUS® LCD Gaming monitor! The latest widescreen...

User Guide
Page 17
... to activate the Input Select hotkey.In the OSD menu,press to exit the OSD menu. • To change the hotkey function,go to turn on the monitor. 3. (5-way) Button: • Press this button to adjust the monitor settings. 3840 x 2160 | 60Hz GameVisual Racing Mode Input Select HDMI-2 RDOisGplSaywPifotrPt G383480HOURxDQFa2RFc1Hi6nD0gR1M2Oo0FHdFez Gaming Image Color Variable OD VRR ELMB/ELMB SYNC GamePlus GameVisual Shadow Boost Input Select PIP/PBP Setup Volume 50 Level 5 Level...
... to activate the Input Select hotkey.In the OSD menu,press to exit the OSD menu. • To change the hotkey function,go to turn on the monitor. 3. (5-way) Button: • Press this button to adjust the monitor settings. 3840 x 2160 | 60Hz GameVisual Racing Mode Input Select HDMI-2 RDOisGplSaywPifotrPt G383480HOURxDQFa2RFc1Hi6nD0gR1M2Oo0FHdFez Gaming Image Color Variable OD VRR ELMB/ELMB SYNC GamePlus GameVisual Shadow Boost Input Select PIP/PBP Setup Volume 50 Level 5 Level...

User Guide
Page 20
... button on the remote control or the on the monitor to indicate that the monitor is turned on VESA holes M6*34.5mm • The VESA wall mount kit ( 100 x 100 mm) is specially designed for around 10 minutes, the monitor automatically enters saving mode. 2.4 For VESA wall mount • Avoid damaging the monitor surface. Disconnect power and signal cables .Carefully put the monitor face-down on the monitor. ASUS LCD Monitor PG Series 2-3 The detachable stand...
... button on the remote control or the on the monitor to indicate that the monitor is turned on VESA holes M6*34.5mm • The VESA wall mount kit ( 100 x 100 mm) is specially designed for around 10 minutes, the monitor automatically enters saving mode. 2.4 For VESA wall mount • Avoid damaging the monitor surface. Disconnect power and signal cables .Carefully put the monitor face-down on the monitor. ASUS LCD Monitor PG Series 2-3 The detachable stand...
User Guide
Page 21
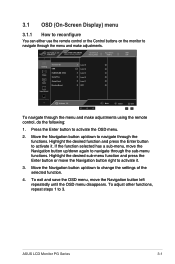
... functions, repeat steps 1 to activate the OSD menu. 2. 3.1 OSD (On-Screen Display) menu 3.1.1 How to reconfigure You can either use the remote control or the Control buttons on the monitor to navigate through the menu and make adjustments. 3840 x 2160 | 144Hz GameVisual Racing Mode Input Select HDMI-2 RDOisGplSaywPifotrPt G383480HOURxDQFa2RFc1Hi6nD0gR1M2Oo0FHdFez Gaming Image Color Variable OD VRR ELMB/ELMB SYNC GamePlus GameVisual Shadow Boost Input Select PIP/PBP Setup Volume 50 Level 5 Level 4 Level 3 Level 2 Level...
... functions, repeat steps 1 to activate the OSD menu. 2. 3.1 OSD (On-Screen Display) menu 3.1.1 How to reconfigure You can either use the remote control or the Control buttons on the monitor to navigate through the menu and make adjustments. 3840 x 2160 | 144Hz GameVisual Racing Mode Input Select HDMI-2 RDOisGplSaywPifotrPt G383480HOURxDQFa2RFc1Hi6nD0gR1M2Oo0FHdFez Gaming Image Color Variable OD VRR ELMB/ELMB SYNC GamePlus GameVisual Shadow Boost Input Select PIP/PBP Setup Volume 50 Level 5 Level 4 Level 3 Level 2 Level...

User Guide
Page 22
...if input V frequency less than 85Hz. Image Configure the image settings. 3-2 Chapter 3: General Instruction 3.1.2 OSD Function Introduction 1. Including OFF,Level 1~Level 5. • VRR: Allow an Adaptive-Sync supported graphics source to dynamically adjust display refresh rate based on typical content frame rates for your gaming preferences. 3840 x 2160 | 144Hz GameVisual Racing Mode Input Select HDMI-2 RDOisGplSaywPifotrPt G383480HOURxDQFa2RFc1Hi6nD0gR1M2Oo0FHdFez Gaming Image Color Variable OD VRR ELMB/ELMB SYNC GamePlus GameVisual Shadow Boost Input Select PIP/PBP Setup Volume...
...if input V frequency less than 85Hz. Image Configure the image settings. 3-2 Chapter 3: General Instruction 3.1.2 OSD Function Introduction 1. Including OFF,Level 1~Level 5. • VRR: Allow an Adaptive-Sync supported graphics source to dynamically adjust display refresh rate based on typical content frame rates for your gaming preferences. 3840 x 2160 | 144Hz GameVisual Racing Mode Input Select HDMI-2 RDOisGplSaywPifotrPt G383480HOURxDQFa2RFc1Hi6nD0gR1M2Oo0FHdFez Gaming Image Color Variable OD VRR ELMB/ELMB SYNC GamePlus GameVisual Shadow Boost Input Select PIP/PBP Setup Volume...
User Guide
Page 23
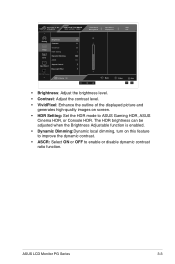
ASUS LCD Monitor PG Series 3-3 3840 x 2160 | 144Hz Brightness 65 Gaming Contrast 80 VividPixel 50 Image HDR Setting Color Dynamic Dimming ASCR Input Select Aspect Control Blue Light Filter PIP/PBP Setup Volume 50 GameVisual Racing Mode 65 Input Select DisplayPort RDOisGplSaywPifotrPt G383480HOURxDQFa2RFc1Hi6nD0gR1M2Oo0FHdFez Back Enter Exit • Brightness: Adjust the brightness level. • Contrast: Adjust the contrast level. • VividPixel: Enhance the outline of the displayed picture and generates high-quality images on screen. • HDR Setting: Set ...
ASUS LCD Monitor PG Series 3-3 3840 x 2160 | 144Hz Brightness 65 Gaming Contrast 80 VividPixel 50 Image HDR Setting Color Dynamic Dimming ASCR Input Select Aspect Control Blue Light Filter PIP/PBP Setup Volume 50 GameVisual Racing Mode 65 Input Select DisplayPort RDOisGplSaywPifotrPt G383480HOURxDQFa2RFc1Hi6nD0gR1M2Oo0FHdFez Back Enter Exit • Brightness: Adjust the brightness level. • Contrast: Adjust the contrast level. • VividPixel: Enhance the outline of the displayed picture and generates high-quality images on screen. • HDR Setting: Set ...

User Guide
Page 24
... TÜV Rheinland Low Blue Light Hardware Solution at factory reset/default setting mode (Brightness: 90%, Contrast: 80%, CCT: 6500K, Preset mode: Racing mode, Power Setting: YES). • When the user adjusts blue light filter bar to simulate 32:9 screen. 3840x2160 or 3840x1080 resolution can be choose under Windows Display setting. Level 4 is optimized setting. The Brightness function is not user-configurable. • The Monitor uses low blue light panel and compliance with different screen sizes, including Full, Equivalent and Pixel by pixel items. 21:9: It...
... TÜV Rheinland Low Blue Light Hardware Solution at factory reset/default setting mode (Brightness: 90%, Contrast: 80%, CCT: 6500K, Preset mode: Racing mode, Power Setting: YES). • When the user adjusts blue light filter bar to simulate 32:9 screen. 3840x2160 or 3840x1080 resolution can be choose under Windows Display setting. Level 4 is optimized setting. The Brightness function is not user-configurable. • The Monitor uses low blue light panel and compliance with different screen sizes, including Full, Equivalent and Pixel by pixel items. 21:9: It...

User Guide
Page 26
...and User Mode. • Saturation: The adjusting range is from 0 to 100. • Gamma: Contains three gamma modes including 1.8, 2.0, 2.2, 2.4, 2.6. • In the User Mode, colors of R (Red), G (Green), and B (Blue) are user-configurable; The monitor input source will not automatically switch when the Auto Input Detection function is from this function. 3840 x 2160 | 144Hz GameVisual Racing Mode Input Select HDMI-2 RDOisGplSaywPifotrPt G383480HOURxDQFa2RFc1Hi6nD0gR1M2Oo0FHdFez Gaming Image Color Display Color Space Color Temp. Input Select Select your desired input source and...
...and User Mode. • Saturation: The adjusting range is from 0 to 100. • Gamma: Contains three gamma modes including 1.8, 2.0, 2.2, 2.4, 2.6. • In the User Mode, colors of R (Red), G (Green), and B (Blue) are user-configurable; The monitor input source will not automatically switch when the Auto Input Detection function is from this function. 3840 x 2160 | 144Hz GameVisual Racing Mode Input Select HDMI-2 RDOisGplSaywPifotrPt G383480HOURxDQFa2RFc1Hi6nD0gR1M2Oo0FHdFez Gaming Image Color Display Color Space Color Temp. Input Select Select your desired input source and...
User Guide
Page 27
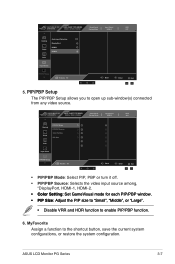
... Exit • PIP/PBP Mode: Select PIP, PBP or turn it off. • PIP/PBP Source: Selects the video input source among, "DisplayPort, HDMI-1, HDMI-2. • Color Setting: Set GameVisual mode for each PIP/PBP window. • PIP Size: Adjust the PIP size to "Small", "Middle", or "Large". • Disable VRR and HDR function to the shortcut button, save the current system configurations, or restore the system configuration. ASUS LCD Monitor PG Series 3-7
... Exit • PIP/PBP Mode: Select PIP, PBP or turn it off. • PIP/PBP Source: Selects the video input source among, "DisplayPort, HDMI-1, HDMI-2. • Color Setting: Set GameVisual mode for each PIP/PBP window. • PIP Size: Adjust the PIP size to "Small", "Middle", or "Large". • Disable VRR and HDR function to the shortcut button, save the current system configurations, or restore the system configuration. ASUS LCD Monitor PG Series 3-7

User Guide
Page 29
... Lock Key Lock Power Setting OSD Setup English Franch Dautsch Espanol Italiano Nederlands Pyccknn Polski Volume 50 Back Enter Exit 3840 x 2160 | 144Hz GameVisual Racing Mode Input Select HDMI-2 RDOisGplSaywPifotrPt G383480HOURxDQFa2RFc1Hi6nD0gR1M2Oo0FHdFez MyFavorite DisplayPort Stream DSC Support System Setup HDMI CEC Information All Reset YES NO Volume 50 Back Enter Exit • Language: Select OSD language. Press the Navigation button down for more than five seconds to disable all function keys. ASUS LCD Monitor PG Series...
... Lock Key Lock Power Setting OSD Setup English Franch Dautsch Espanol Italiano Nederlands Pyccknn Polski Volume 50 Back Enter Exit 3840 x 2160 | 144Hz GameVisual Racing Mode Input Select HDMI-2 RDOisGplSaywPifotrPt G383480HOURxDQFa2RFc1Hi6nD0gR1M2Oo0FHdFez MyFavorite DisplayPort Stream DSC Support System Setup HDMI CEC Information All Reset YES NO Volume 50 Back Enter Exit • Language: Select OSD language. Press the Navigation button down for more than five seconds to disable all function keys. ASUS LCD Monitor PG Series...
User Guide
Page 30
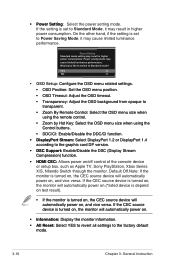
..., Sony PlayStation, Xbox Series X/S, Nitendo Switch through the monitor. Power Setting Standard mode setting may cause limited luminance performance. YES NO • OSD Setup: Configure the OSD menu related settings. • OSD Position: Set the OSD menu position. • OSD Timeout: Adjust the OSD timeout. • Transparency: Adjust the OSD background from opaque to transparent. • Zoom By Remote Control: Select the OSD menu size when using the remote control. • Zoom by Hot Key: Select the OSD menu size when using the Control buttons. • DDC...
..., Sony PlayStation, Xbox Series X/S, Nitendo Switch through the monitor. Power Setting Standard mode setting may cause limited luminance performance. YES NO • OSD Setup: Configure the OSD menu related settings. • OSD Position: Set the OSD menu position. • OSD Timeout: Adjust the OSD timeout. • Transparency: Adjust the OSD background from opaque to transparent. • Zoom By Remote Control: Select the OSD menu size when using the remote control. • Zoom by Hot Key: Select the OSD menu size when using the Control buttons. • DDC...

User Guide
Page 31
3.3 Specifications Panel type Panel Size Max. Resolution Pixel Pitch Brightness Contrast Ratio Viewing Angle (H/V) Display Colors Response Time Color temperature selection Analog input Digital input Earphone jack Speaker (Built-in) USB3.2 Port Colors Tilt Swivel Height adjustment VESA wall mount Kensington lock Voltage rating Power consumption Temperature (Operating) Temperature (Non-operating) Dimensions (W x H x D) LCD 38" W (96.52 cm) 3840 x 2160 @ 144Hz 0.219 mm x 0.219 mm 350 nits(Typ.) 1000:1(Typ.) 178°(V) /178°(H) 16.7M 1 ms (G TO G ) 8 color temperatures No HDMI 2.1 x 2, DP...
3.3 Specifications Panel type Panel Size Max. Resolution Pixel Pitch Brightness Contrast Ratio Viewing Angle (H/V) Display Colors Response Time Color temperature selection Analog input Digital input Earphone jack Speaker (Built-in) USB3.2 Port Colors Tilt Swivel Height adjustment VESA wall mount Kensington lock Voltage rating Power consumption Temperature (Operating) Temperature (Non-operating) Dimensions (W x H x D) LCD 38" W (96.52 cm) 3840 x 2160 @ 144Hz 0.219 mm x 0.219 mm 350 nits(Typ.) 1000:1(Typ.) 178°(V) /178°(H) 16.7M 1 ms (G TO G ) 8 color temperatures No HDMI 2.1 x 2, DP...

User Guide
Page 32
..., German, Spanish, Italian, Dutch, Russian, Poland, Czech, Croacia, Hungary, Romania, Portugal, Turkey, Simplified Chinese, Traditional Chinese, Japanese, Korean, Persian, Thai, Indonesian, Ukrainian Monitor Base,Quick Start Guide,Warranty Card,Power Cord,Ultra High Speed HDMI 2.1 Cable,DP Cable,USB Cable (Type A to B),Input/Output port cover w/ L shape screw driver,Color Calibration Testing Report,Remote Control,Battery ,ROG sticker,ROG Pouch,M6 screws 4 pcs for stand,M6 Standoff 4 pcs for VESA mount *Specifications subject to change without notice. 3-12 Chapter 3: General Instruction
..., German, Spanish, Italian, Dutch, Russian, Poland, Czech, Croacia, Hungary, Romania, Portugal, Turkey, Simplified Chinese, Traditional Chinese, Japanese, Korean, Persian, Thai, Indonesian, Ukrainian Monitor Base,Quick Start Guide,Warranty Card,Power Cord,Ultra High Speed HDMI 2.1 Cable,DP Cable,USB Cable (Type A to B),Input/Output port cover w/ L shape screw driver,Color Calibration Testing Report,Remote Control,Battery ,ROG sticker,ROG Pouch,M6 screws 4 pcs for stand,M6 Standoff 4 pcs for VESA mount *Specifications subject to change without notice. 3-12 Chapter 3: General Instruction

User Guide
Page 33
... the signal cable and make sure that none of the pins are bent. • Perform Reset via OSD. • Adjust the R/G/B color settings or select the Color Temperature via OSD. • Adjust the volume settings of both your monitor and computer. • Make sure the computer sound card driver is properly installed and activated. • Check the audio source. • Please enable CSM function and Gaming Mode. • * Set Power Setting to Standard Mode. • Disable DSC Support, it...
... the signal cable and make sure that none of the pins are bent. • Perform Reset via OSD. • Adjust the R/G/B color settings or select the Color Temperature via OSD. • Adjust the volume settings of both your monitor and computer. • Make sure the computer sound card driver is properly installed and activated. • Check the audio source. • Please enable CSM function and Gaming Mode. • * Set Power Setting to Standard Mode. • Disable DSC Support, it...


