User Guide
Page 3
... Back view 1-3 1.3.3 GamePlus function 1-4 1.3.4 GameVisual function 1-5 1.3.5 G-SYNC HDR 1-6 Chapter 2: Setup 2.1 Assembling the monitor arm/base 2-1 2.2 Cable management 2-1 2.3 Adjusting the monitor 2-2 2.4 Detaching the arm (for VESA wall mount 2-3 2.5 Connecting the cables 2-4 2.6 Turning on the monitor 2-4 Chapter 3: General instructions 3.1 OSD (On-Screen Display) menu 3-1 3.1.1 How to reconfigure 3-1 3.1.2 OSD function introduction 3-2 3.2 Aura 3-9 3.3 Specifications summary 3-10 3.4 Outline dimensions 3-12 3.5 Troubleshooting (FAQ 3-13 3.6 Supported operating mode...
... Back view 1-3 1.3.3 GamePlus function 1-4 1.3.4 GameVisual function 1-5 1.3.5 G-SYNC HDR 1-6 Chapter 2: Setup 2.1 Assembling the monitor arm/base 2-1 2.2 Cable management 2-1 2.3 Adjusting the monitor 2-2 2.4 Detaching the arm (for VESA wall mount 2-3 2.5 Connecting the cables 2-4 2.6 Turning on the monitor 2-4 Chapter 3: General instructions 3.1 OSD (On-Screen Display) menu 3-1 3.1.1 How to reconfigure 3-1 3.1.2 OSD function introduction 3-2 3.2 Aura 3-9 3.3 Specifications summary 3-10 3.4 Outline dimensions 3-12 3.5 Troubleshooting (FAQ 3-13 3.6 Supported operating mode...

User Guide
Page 4
...uses and can be determined by turning the equipment off and on a circuit different from digital apparatus set out in a residential installation. If this equipment. This class B digital apparatus complies with the instructions...digital apparatus meets all requirements of the FCC Rules. These limits are designed to radio communications. However, there is required to which can radiate radio frequency energy and, if not installed and used in a particular installation. iv Causing Equipment Regulations. Changes or modifications to Part...connection of the monitor to the graphics card ...
...uses and can be determined by turning the equipment off and on a circuit different from digital apparatus set out in a residential installation. If this equipment. This class B digital apparatus complies with the instructions...digital apparatus meets all requirements of the FCC Rules. These limits are designed to radio communications. However, there is required to which can radiate radio frequency energy and, if not installed and used in a particular installation. iv Causing Equipment Regulations. Changes or modifications to Part...connection of the monitor to the graphics card ...

User Guide
Page 5
...the slots on the back or top of power supply to fix it for other settings than the center position may increase the ear-/headphones output voltage and therefore the sound pressure level. • The adapter is only used for a long period of electronic products....problems with the package. • To prevent fire or shock hazard, never expose the monitor to rain or moisture. • Never try to your home, consult your local power standard. • Do not overload power strips and extention cords. Your device uses one of the volume control as well as the equalizer to open the monitor...
...the slots on the back or top of power supply to fix it for other settings than the center position may increase the ear-/headphones output voltage and therefore the sound pressure level. • The adapter is only used for a long period of electronic products....problems with the package. • To prevent fire or shock hazard, never expose the monitor to rain or moisture. • Never try to your home, consult your local power standard. • Do not overload power strips and extention cords. Your device uses one of the volume control as well as the equalizer to open the monitor...

User Guide
Page 6
... monitor, it is displayed for use with the monitor. The screen will recover slowly or you can turn off the Power Switch for hours. • When the screen becomes black or flashes, or cannot work anymore, contact your monitor off the Power Switch and turn it on again to aid in this guide WARNING: Information to prevent injury to yourself when trying to complete a task. Do not repair...
... monitor, it is displayed for use with the monitor. The screen will recover slowly or you can turn off the Power Switch for hours. • When the screen becomes black or flashes, or cannot work anymore, contact your monitor off the Power Switch and turn it on again to aid in this guide WARNING: Information to prevent injury to yourself when trying to complete a task. Do not repair...

User Guide
Page 9
.... If you ! 1.2 Package contents Check your package for the following items: LCD monitor Monitor base Quick start guide Warranty card Power adapter Power cord DP cable HDMI cable USB cable Input/Output port cover Color calibration testing report ROG welcome card with envelope ROG sticker If any of features that the monitor brings to you disable this function but later wish to turn on the light on . ASUS PG279QM Series LCD Monitor 1-1 1.1 Welcome! If no signal is damaged or missing, contact your viewing experience. Select "ON" when...
.... If you ! 1.2 Package contents Check your package for the following items: LCD monitor Monitor base Quick start guide Warranty card Power adapter Power cord DP cable HDMI cable USB cable Input/Output port cover Color calibration testing report ROG welcome card with envelope ROG sticker If any of features that the monitor brings to you disable this function but later wish to turn on the light on . ASUS PG279QM Series LCD Monitor 1-1 1.1 Welcome! If no signal is damaged or missing, contact your viewing experience. Select "ON" when...

User Guide
Page 11
... port is for connection with an HDMI compatible device. 4. HDMI port. ASUS PG279QM Series LCD Monitor 1-3 DC IN port. button • Default: GameVisual. • To change the shortcut function, go to the Shortcut > Shortcut 2 menu. • Turns on the OSD menu when the monitor enters standby mode or displays the "NO SIGNAL" message. 5. Status Description White ON OFF OFF Amber flashing Entering standby mode Amber Standby mode/No signal Green Red HDR/HDR+G-SYNC G-SYNC 6. This port is for connection with a USB upstream cable. USB 3.0 upstream port. HDMI...
... port is for connection with an HDMI compatible device. 4. HDMI port. ASUS PG279QM Series LCD Monitor 1-3 DC IN port. button • Default: GameVisual. • To change the shortcut function, go to the Shortcut > Shortcut 2 menu. • Turns on the OSD menu when the monitor enters standby mode or displays the "NO SIGNAL" message. 5. Status Description White ON OFF OFF Amber flashing Entering standby mode Amber Standby mode/No signal Green Red HDR/HDR+G-SYNC G-SYNC 6. This port is for connection with a USB upstream cable. USB 3.0 upstream port. HDMI...

User Guide
Page 12
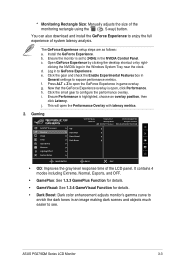
... port is specifically for connection with USB devices, such as USB keyboard/mouse, USB flash drive, etc. 10. These ports are also on screen timer and stopwatch you can keep track of the gaming time; while the FPS (frames per second) counter lets you to navigate through the settings. Press the GamePlus hotkey. 2. Move the ( ) button left of the display so you can position...
... port is specifically for connection with USB devices, such as USB keyboard/mouse, USB flash drive, etc. 10. These ports are also on screen timer and stopwatch you can keep track of the gaming time; while the FPS (frames per second) counter lets you to navigate through the settings. Press the GamePlus hotkey. 2. Move the ( ) button left of the display so you can position...
User Guide
Page 13
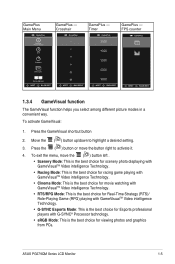
ASUS PG279QM Series LCD Monitor 1-5 Press the ( ) button or move the ( ) button left . • Scenery Mode: This is the best choice for scenery photo displaying with GameVisualTM Video intelligence Technology. • Racing Mode: This is the best choice for racing game playing with GameVisualTM Video intelligence Technology. • Cinema Mode: This is the best choice for movie watching with GameVisualTM Video intelligence Technology. • RTS/RPG Mode: This is...
ASUS PG279QM Series LCD Monitor 1-5 Press the ( ) button or move the ( ) button left . • Scenery Mode: This is the best choice for scenery photo displaying with GameVisualTM Video intelligence Technology. • Racing Mode: This is the best choice for racing game playing with GameVisualTM Video intelligence Technology. • Cinema Mode: This is the best choice for movie watching with GameVisualTM Video intelligence Technology. • RTS/RPG Mode: This is...

User Guide
Page 18
... power adapter securely to work. 2.6 Turning on the monitor Press the power button. That will enable the USB ports on the monitor to the monitor's DC IN input. b. Connect the other end to your computer is ON. 2-4 Chapter 2: Setup 2.5 Connecting the cables Connect the cables as the following instructions: For service only • To connect the power cord: a. Plug one end of the power cord to the power adapter and the other end of the USB upstream cable to the monitor's USB...
... power adapter securely to work. 2.6 Turning on the monitor Press the power button. That will enable the USB ports on the monitor to the monitor's DC IN input. b. Connect the other end to your computer is ON. 2-4 Chapter 2: Setup 2.5 Connecting the cables Connect the cables as the following instructions: For service only • To connect the power cord: a. Plug one end of the power cord to the power adapter and the other end of the USB upstream cable to the monitor's USB...
User Guide
Page 19
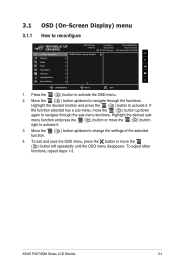
3.1 OSD (On-Screen Display) menu 3.1.1 How to activate the OSD menu. 2. Press the ( ) button to reconfigure G-SYNC® Processor Gaming Image Color Input Select Shortcut Lighting Effect System Setup G-SYNC Mode HDR Off NVIDIA Reflex Latency Analyzer DisplayPort Racing Mode G-SYNC® Processor 2560x1440@240 Hz Analyzer Inactive ROG Swift 240Hz PG279QM MOVE/ENTER BACK EXIT 1. ASUS PG279QM Series LCD Monitor 3-1 To exit and save the OSD menu, press the button or move the ( ) button right to activate it . Move the...
3.1 OSD (On-Screen Display) menu 3.1.1 How to activate the OSD menu. 2. Press the ( ) button to reconfigure G-SYNC® Processor Gaming Image Color Input Select Shortcut Lighting Effect System Setup G-SYNC Mode HDR Off NVIDIA Reflex Latency Analyzer DisplayPort Racing Mode G-SYNC® Processor 2560x1440@240 Hz Analyzer Inactive ROG Swift 240Hz PG279QM MOVE/ENTER BACK EXIT 1. ASUS PG279QM Series LCD Monitor 3-1 To exit and save the OSD menu, press the button or move the ( ) button right to activate it . Move the...
User Guide
Page 20
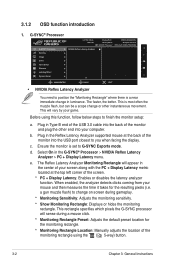
... most often the muzzle flash, but can be a scope change on screen during a mouse click. * Monitoring Rectangle Preset: Adjusts the default preset location for the resulting pixels (i.e. 3.1.2 OSD function introduction 1. G-SYNC® Processor G-SYNC® Processor Gaming Image Color Input Select Shortcut Lighting Effect System Setup G-SYNC Mode HDR Off NVIDIA Reflex Latency Analyzer DisplayPort Racing Mode G-SYNC® Processor 2560x1440@240 Hz Analyzer Inactive ROG Swift 240Hz PG279QM MOVE/ENTER BACK...
... most often the muzzle flash, but can be a scope change on screen during a mouse click. * Monitoring Rectangle Preset: Adjusts the default preset location for the resulting pixels (i.e. 3.1.2 OSD function introduction 1. G-SYNC® Processor G-SYNC® Processor Gaming Image Color Input Select Shortcut Lighting Effect System Setup G-SYNC Mode HDR Off NVIDIA Reflex Latency Analyzer DisplayPort Racing Mode G-SYNC® Processor 2560x1440@240 Hz Analyzer Inactive ROG Swift 240Hz PG279QM MOVE/ENTER BACK...
User Guide
Page 21
... G-SYNC® Processor Gaming Image Color Input Select Shortcut Lighting Effect System Setup G-SYNC Mode HDR Off OD GamePlus GameVisual Dark Boost DisplayPort Racing Mode G-SYNC® Processor 2560x1440@240 Hz Analyzer Inactive ROG Swift 240Hz PG279QM MOVE/ENTER BACK EXIT • OD: Improves the gray level response time of system latency analysis. * Monitoring Rectangle Size: Manually adjusts the size of the monitoring rectangle using the ( 5-way) button. Install the GeForce Experience. Open...
... G-SYNC® Processor Gaming Image Color Input Select Shortcut Lighting Effect System Setup G-SYNC Mode HDR Off OD GamePlus GameVisual Dark Boost DisplayPort Racing Mode G-SYNC® Processor 2560x1440@240 Hz Analyzer Inactive ROG Swift 240Hz PG279QM MOVE/ENTER BACK EXIT • OD: Improves the gray level response time of system latency analysis. * Monitoring Rectangle Size: Manually adjusts the size of the monitoring rectangle using the ( 5-way) button. Install the GeForce Experience. Open...

User Guide
Page 22
... time away from 0 to 100. Image G-SYNC® Processor Gaming Image Color Input Select Shortcut Lighting Effect System Setup G-SYNC Mode HDR Off Brightness Contrast Variable Backlight Aspect Control Blue Light Filter Display SDR Input DisplayPort Racing Mode G-SYNC® Processor 2560x1440@240 Hz Analyzer Inactive ROG Swift 240Hz PG279QM 67 50 MOVE/ENTER BACK EXIT • Brightness: The adjusting range is compliance with variable backlight. It is from the display if working at least 5 mins) after around...
... time away from 0 to 100. Image G-SYNC® Processor Gaming Image Color Input Select Shortcut Lighting Effect System Setup G-SYNC Mode HDR Off Brightness Contrast Variable Backlight Aspect Control Blue Light Filter Display SDR Input DisplayPort Racing Mode G-SYNC® Processor 2560x1440@240 Hz Analyzer Inactive ROG Swift 240Hz PG279QM 67 50 MOVE/ENTER BACK EXIT • Brightness: The adjusting range is compliance with variable backlight. It is from the display if working at least 5 mins) after around...
User Guide
Page 23
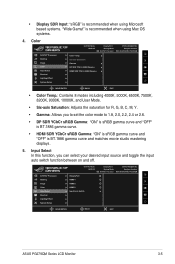
... gamma curve and "OFF" is BT.1886 gamma curve. • HDMI SDR YCbCr sRGB Gamma: "ON" is sRGB gamma curve and "OFF" is recommended when using Mac OS systems. 4. G-SYNC® Processor Gaming Image Color Input Select Shortcut Lighting Effect System Setup G-SYNC Mode HDR Off DisaplyPort HDMI-1 HDMI-2 HDMI-3 Input Auto Switch DisplayPort Racing Mode G-SYNC® Processor 2560x1440@240 Hz Analyzer Inactive ROG Swift 240Hz PG279QM MOVE/ENTER BACK EXIT ASUS PG279QM Series LCD Monitor 3-5
... gamma curve and "OFF" is BT.1886 gamma curve. • HDMI SDR YCbCr sRGB Gamma: "ON" is sRGB gamma curve and "OFF" is recommended when using Mac OS systems. 4. G-SYNC® Processor Gaming Image Color Input Select Shortcut Lighting Effect System Setup G-SYNC Mode HDR Off DisaplyPort HDMI-1 HDMI-2 HDMI-3 Input Auto Switch DisplayPort Racing Mode G-SYNC® Processor 2560x1440@240 Hz Analyzer Inactive ROG Swift 240Hz PG279QM MOVE/ENTER BACK EXIT ASUS PG279QM Series LCD Monitor 3-5

User Guide
Page 24
... is selected or activated, your computer. 3-6 Chapter 3: General Instructions Shortcut G-SYNC® Processor Gaming Image Color Input Select Shortcut Lighting Effect System Setup Shortcut 1 Shortcut 2 G-SYNC Mode HDR Off DisplayPort Racing Mode G-SYNC® Processor 2560x1440@240 Hz Analyzer Inactive ROG Swift 240Hz PG279QM MOVE/ENTER BACK EXIT • Shortcut 1/Shortcut 2: Sets the shortcut functions for shortcut: GamPlus, GameVisual, Brightness, Contrast, Color Temp., Volume. 7. 6. Available function choices for shortcut buttons.
... is selected or activated, your computer. 3-6 Chapter 3: General Instructions Shortcut G-SYNC® Processor Gaming Image Color Input Select Shortcut Lighting Effect System Setup Shortcut 1 Shortcut 2 G-SYNC Mode HDR Off DisplayPort Racing Mode G-SYNC® Processor 2560x1440@240 Hz Analyzer Inactive ROG Swift 240Hz PG279QM MOVE/ENTER BACK EXIT • Shortcut 1/Shortcut 2: Sets the shortcut functions for shortcut: GamPlus, GameVisual, Brightness, Contrast, Color Temp., Volume. 7. 6. Available function choices for shortcut buttons.

User Guide
Page 25
.... * Mute: Toggles the monitor sound between on or off . • Auto SDR Brightness: Synchronizes display brightness with ambient light changes. System Setup Allows you to adjust the system. G-SYNC® Processor Gaming Image Color Input Select Shortcut Lighting Effect System Setup G-SYNC Mode HDR Off Language Sound Auto SDR Brightness ECO Mode Warning Message (HDR) DisplayPort Deep Sleep HDMI Deep Sleep Key Lock DisplayPort Racing Mode G-SYNC® Processor 2560x1440@240 Hz Analyzer Inactive ROG Swift 240Hz PG279QM MOVE/ENTER BACK EXIT...
.... * Mute: Toggles the monitor sound between on or off . • Auto SDR Brightness: Synchronizes display brightness with ambient light changes. System Setup Allows you to adjust the system. G-SYNC® Processor Gaming Image Color Input Select Shortcut Lighting Effect System Setup G-SYNC Mode HDR Off Language Sound Auto SDR Brightness ECO Mode Warning Message (HDR) DisplayPort Deep Sleep HDMI Deep Sleep Key Lock DisplayPort Racing Mode G-SYNC® Processor 2560x1440@240 Hz Analyzer Inactive ROG Swift 240Hz PG279QM MOVE/ENTER BACK EXIT...

User Guide
Page 27
... a software program that controls the colorful LEDs on these devices and select different light effects. Install Armoury Crate and then restart the computer. 4. 3.2 Aura Armoury Crate is disconnected, to resume the Aura function, you to adjust the color of the RGB LEDs on supported devices, such as monitors, motherboards, graphic cards, desktop PCs, etc. ASUS PG279QM Series LCD Monitor 3-9 Aura allows you need to re-connect the USB 3.0 upstream port of the monitor...
... a software program that controls the colorful LEDs on these devices and select different light effects. Install Armoury Crate and then restart the computer. 4. 3.2 Aura Armoury Crate is disconnected, to resume the Aura function, you to adjust the color of the RGB LEDs on supported devices, such as monitors, motherboards, graphic cards, desktop PCs, etc. ASUS PG279QM Series LCD Monitor 3-9 Aura allows you need to re-connect the USB 3.0 upstream port of the monitor...

User Guide
Page 28
3.3 Specifications summary Panel Type Panel size Max. Resolution Pixel pitch Brightness (Typ.) Contrast Ratio (Typ.) Viewing angle(H/V) CR>10 Display colors Response time Color temperature selection Analog input Digital input Earphone jack Audio input Speaker (Built-in) USB 3.0 port Colors Power LED Tilt Swivel Height adjustment VESA wall mount Kensington lock Voltage rating Power consumption Temperature (Operating) Temperature (Non-operating) Dimensions (W x H x D) without stand Dimensions (W x H x D) Weight (Esti.) TFT LCD 27"W (16:9, 68.5cm) wide screen 2560 x 1440 0.2331 mm x 0.2331 mm...
3.3 Specifications summary Panel Type Panel size Max. Resolution Pixel pitch Brightness (Typ.) Contrast Ratio (Typ.) Viewing angle(H/V) CR>10 Display colors Response time Color temperature selection Analog input Digital input Earphone jack Audio input Speaker (Built-in) USB 3.0 port Colors Power LED Tilt Swivel Height adjustment VESA wall mount Kensington lock Voltage rating Power consumption Temperature (Operating) Temperature (Non-operating) Dimensions (W x H x D) without stand Dimensions (W x H x D) Weight (Esti.) TFT LCD 27"W (16:9, 68.5cm) wide screen 2560 x 1440 0.2331 mm x 0.2331 mm...
User Guide
Page 29
..., Indonesian) Quick start guide, warranty card, power adapter, power cord, DP cable, HDMI cable, USB cable, input/output port cover, color calibration testing report ,ROG welcome card with envelope, ROG sticker cTUVus, CB, CE, ErP, FCC, CCC, BSMI, CU, C-Tick, VCCI, PSE, CEL, J-MOSS, RoHS, WEEE, Windows 7 & 10 WHQL, KCC, E-STANDBY, TUV-Flicker Free, TUV Low Blue Light, UkrSEPRO, PSB, MEPS, CEC, ICES-3, PC Recycle. *Specifications are subject to change without notice. **Measuring a screen brightness of 200 nits without audio/USB/Card reader connection.
..., Indonesian) Quick start guide, warranty card, power adapter, power cord, DP cable, HDMI cable, USB cable, input/output port cover, color calibration testing report ,ROG welcome card with envelope, ROG sticker cTUVus, CB, CE, ErP, FCC, CCC, BSMI, CU, C-Tick, VCCI, PSE, CEL, J-MOSS, RoHS, WEEE, Windows 7 & 10 WHQL, KCC, E-STANDBY, TUV-Flicker Free, TUV Low Blue Light, UkrSEPRO, PSB, MEPS, CEC, ICES-3, PC Recycle. *Specifications are subject to change without notice. **Measuring a screen brightness of 200 nits without audio/USB/Card reader connection.
User Guide
Page 31
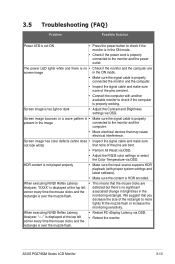
... Reset via OSD. • Adjust the R/G/B color settings or select the Color Temperature via OSD. The power LED lights white and there is no significant associated change in brightness in the ON mode. • Make sure the signal cable is HDR encoded. Screen image is properly working. Screen image has color defects (white does • Inspect the signal cable and make sure none of the rectangle to check if the computer is too light or dark • Adjust the Contrast and Brightness settings...
... Reset via OSD. • Adjust the R/G/B color settings or select the Color Temperature via OSD. The power LED lights white and there is no significant associated change in brightness in the ON mode. • Make sure the signal cable is HDR encoded. Screen image is properly working. Screen image has color defects (white does • Inspect the signal cable and make sure none of the rectangle to check if the computer is too light or dark • Adjust the Contrast and Brightness settings...


