
User Guide
Page 3
......iv Safety information v Care & Cleaning 1-1 1.1 Welcome 1-3 1.2 Package contents 1-3 1.3 Attaching the Stand 1-4 1.3.1 Cable Management 1-4 1.3.2 Remote Control 1-5 1.4 Connect cables 2-1 1.4.1 Rear of the LCD monitor 2-1 1.5 Monitor introduction 2-2 1.5.1 Front/Side view 2-2 2.1 Adjusting the monitor 2-3 2.2 Outline dimension 2-4 2.3 Turning on the monitor 2-5 3.1 OSD (On-Screen Display) menu 2-6 3.1.1 How to reconfigure 2-6 3.1.2 OSD Function Introduction 3-1 5. MyFavorite 3-5 3.3 Specifications 3-10 3.3 Troubleshooting (FAQ 3-12 3.4 Supported Timing List 3-13 iii...
......iv Safety information v Care & Cleaning 1-1 1.1 Welcome 1-3 1.2 Package contents 1-3 1.3 Attaching the Stand 1-4 1.3.1 Cable Management 1-4 1.3.2 Remote Control 1-5 1.4 Connect cables 2-1 1.4.1 Rear of the LCD monitor 2-1 1.5 Monitor introduction 2-2 1.5.1 Front/Side view 2-2 2.1 Adjusting the monitor 2-3 2.2 Outline dimension 2-4 2.3 Turning on the monitor 2-5 3.1 OSD (On-Screen Display) menu 2-6 3.1.1 How to reconfigure 2-6 3.1.2 OSD Function Introduction 3-1 5. MyFavorite 3-5 3.3 Specifications 3-10 3.3 Troubleshooting (FAQ 3-12 3.4 Supported Timing List 3-13 iii...

User Guide
Page 4
... limits are designed to comply with the limits for help. If this equipment does cause harmful interference to radio or television reception, which the receiver is required to Electromagnetic Compatibility (2014/30/EU), Low-voltage Directive (2014/35...monitor to the graphics card is connected. • Consult the dealer or an experienced radio/TV technician for a Class B digital device, pursuant to which can radiate radio frequency energy and, if not installed and used in a residential installation. Notices Federal Communications Commission Statement This device complies with Part...
... limits are designed to comply with the limits for help. If this equipment does cause harmful interference to radio or television reception, which the receiver is required to Electromagnetic Compatibility (2014/30/EU), Low-voltage Directive (2014/35...monitor to the graphics card is connected. • Consult the dealer or an experienced radio/TV technician for a Class B digital device, pursuant to which can radiate radio frequency energy and, if not installed and used in a residential installation. Notices Federal Communications Commission Statement This device complies with Part...
User Guide
Page 5
... OF USED BATTERIES ACCORDING TO THE INSTRUCTIONS Caution Replacement of ... If the power supply is broken, do not try to open the monitor cabinet. Contact a qualified service technician or your dealer immediately. v This Class B digital apparatus meets ...using the product, make sure all the documentation that may result in an explosion or the leakage of flammable liquid or gas A battery subjected to fix it by yourself. Safety information • Before setting up the monitor, carefully read all cables are correctly connected and the power cables are not damaged. This class B digital...
... OF USED BATTERIES ACCORDING TO THE INSTRUCTIONS Caution Replacement of ... If the power supply is broken, do not try to open the monitor cabinet. Contact a qualified service technician or your dealer immediately. v This Class B digital apparatus meets ...using the product, make sure all the documentation that may result in an explosion or the leakage of flammable liquid or gas A battery subjected to fix it by yourself. Safety information • Before setting up the monitor, carefully read all cables are correctly connected and the power cables are not damaged. This class B digital...

User Guide
Page 6
... building installation shall provide the circuit breaker rated 120/240V, 20A (maximum). • If provided with a 3-pin attachment plug on the power cord, plug the cord into the slots on the monitor cabinet. • To ensure satisfactory operation, use the monitor only with UL listed computers which complies with the monitor, contact a qualified servicer. • Provide an earthing connection before the mains plug is connected...
... building installation shall provide the circuit breaker rated 120/240V, 20A (maximum). • If provided with a 3-pin attachment plug on the power cord, plug the cord into the slots on the monitor cabinet. • To ensure satisfactory operation, use the monitor only with UL listed computers which complies with the monitor, contact a qualified servicer. • Provide an earthing connection before the mains plug is connected...

User Guide
Page 7
...of the product set. vii The product may fall , causing serious personal injury or death. Many injuries, particularly to a suitable support. ALWAYS use cabinets or stands or installation methods recommended by taking simple precautions such as toys and remote controls, on the top of the supporting furniture. NEVER... to reach the product or its controls. ALWAYS route cords and cables connected to your product so they cannot be securely attached to climb, such as : ALWAYS use furniture that may be located between the product and supporting furniture. NEVER place items that might...
...of the product set. vii The product may fall , causing serious personal injury or death. Many injuries, particularly to a suitable support. ALWAYS use cabinets or stands or installation methods recommended by taking simple precautions such as toys and remote controls, on the top of the supporting furniture. NEVER... to reach the product or its controls. ALWAYS route cords and cables connected to your product so they cannot be securely attached to climb, such as : ALWAYS use furniture that may be located between the product and supporting furniture. NEVER place items that might...

User Guide
Page 8
The Monitor uses low blue light panel and compliance with your waste equipment at factory reset/default setting mode. This product to ascertain whether the display produces visible and invisible flicker for the human eye and therefore strains the eyes of your household waste disposal service or the shop where...of with TÜV Rheinland Low Blue Light Hardware Solution at the time of your other household waste. viii TÜV Rheinland Flicker Free Certification. The separate collection and recycling of disposal will help to dispose of users. Instead, it is your ...
The Monitor uses low blue light panel and compliance with your waste equipment at factory reset/default setting mode. This product to ascertain whether the display produces visible and invisible flicker for the human eye and therefore strains the eyes of your household waste disposal service or the shop where...of with TÜV Rheinland Low Blue Light Hardware Solution at the time of your other household waste. viii TÜV Rheinland Flicker Free Certification. The separate collection and recycling of disposal will help to dispose of users. Instead, it is your ...

User Guide
Page 9
ix Otherwise, please use method , install the screws with net weight >=7kg. Please select the suitable way to Prevent Tipping. • For the models with VESA Mount, please use method to tie the cord or chain to the stand and then fix it to prevent the monitor from falling. 1 Гвинт M4 або M6 2 • Display design may...
ix Otherwise, please use method , install the screws with net weight >=7kg. Please select the suitable way to Prevent Tipping. • For the models with VESA Mount, please use method to tie the cord or chain to the stand and then fix it to prevent the monitor from falling. 1 Гвинт M4 або M6 2 • Display design may...

User Guide
Page 10
.... Follow the correct lifting techniques when positioning the monitor. Please check local regulations for use . • When the same image is better to disconnect the cables and power cord. Clean the monitor surface with the LCD. Never spray cleaner directly on the desktop pattern you use with a lint-free, non-abrasive cloth. ASUS LCD Monitor PG Series 1-1 Do not lift the display by yourself! When lifting or carrying...
.... Follow the correct lifting techniques when positioning the monitor. Please check local regulations for use . • When the same image is better to disconnect the cables and power cord. Clean the monitor surface with the LCD. Never spray cleaner directly on the desktop pattern you use with a lint-free, non-abrasive cloth. ASUS LCD Monitor PG Series 1-1 Do not lift the display by yourself! When lifting or carrying...
User Guide
Page 12
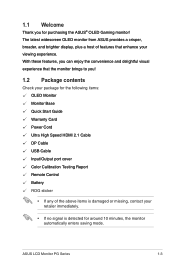
The latest widescreen OLED monitor from ASUS provides a crisper, broader, and brighter display, plus a host of features that the monitor brings to you! 1.2 Package contents Check your package for the following items: OLED Monitor Monitor Base Quick Start Guide Warranty Card Power Cord Ultra High Speed HDMI 2.1 Cable DP Cable USB Cable Input/Output port cover Color Calibration Testing Report Remote Control Battery ROG sticker • If any of the above items is damaged or missing, contact your viewing experience. With...
The latest widescreen OLED monitor from ASUS provides a crisper, broader, and brighter display, plus a host of features that the monitor brings to you! 1.2 Package contents Check your package for the following items: OLED Monitor Monitor Base Quick Start Guide Warranty Card Power Cord Ultra High Speed HDMI 2.1 Cable DP Cable USB Cable Input/Output port cover Color Calibration Testing Report Remote Control Battery ROG sticker • If any of the above items is damaged or missing, contact your viewing experience. With...
User Guide
Page 17
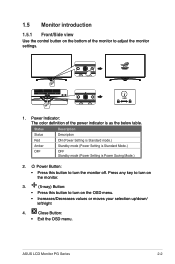
... Button: • Exit the OSD menu. Gaming Image Color Input Select PIP/PBP Setup MyFavorite System Setup Overclocking Adaptive-Sync GamePlus GameVisual Shadow Boost MOVE/ENTER BACK DisplayPort 3840x2160 120Hz Racing Mode ROG Swift PG42UQ HDR OFF EXIT 5 0 10 ≥5S 1. 1.5 Monitor introduction 1.5.1 Front/Side view Use the control button on the bottom of the power indicator is Power Saving Mode.) 2. Power Indicator: The color definition of the monitor to adjust the monitor settings. Status Description Status Description Red ON (Power Setting...
... Button: • Exit the OSD menu. Gaming Image Color Input Select PIP/PBP Setup MyFavorite System Setup Overclocking Adaptive-Sync GamePlus GameVisual Shadow Boost MOVE/ENTER BACK DisplayPort 3840x2160 120Hz Racing Mode ROG Swift PG42UQ HDR OFF EXIT 5 0 10 ≥5S 1. 1.5 Monitor introduction 1.5.1 Front/Side view Use the control button on the bottom of the power indicator is Power Saving Mode.) 2. Power Indicator: The color definition of the monitor to adjust the monitor settings. Status Description Status Description Red ON (Power Setting...

User Guide
Page 21
... /down to activate the OSD menu. 2. Press the Enter button to change the settings of the selected function. 4. monitor to navigate through the sub-menu functions. If the function selected has a sub-menu, move the Navigation button up /down to Gaming Image Color Input Select PIP/PBP Setup MyFavorite System Setup Overclocking Adaptive-Sync GamePlus GameVisual Shadow Boost DisplayPort 3840x2160 120Hz Racing Mode ROG Swift PG42UQ HDR OFF MOVE/ENTER...
... /down to activate the OSD menu. 2. Press the Enter button to change the settings of the selected function. 4. monitor to navigate through the sub-menu functions. If the function selected has a sub-menu, move the Navigation button up /down to Gaming Image Color Input Select PIP/PBP Setup MyFavorite System Setup Overclocking Adaptive-Sync GamePlus GameVisual Shadow Boost DisplayPort 3840x2160 120Hz Racing Mode ROG Swift PG42UQ HDR OFF MOVE/ENTER...
User Guide
Page 22
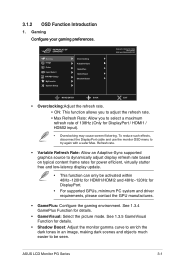
... DisplayPort / HDMI1 / HDMI2 input). • Overclocking may cause screen flickering. Gaming Image Color Input Select PIP/PBP Setup MyFavorite System Setup Overclocking Adaptive-Sync GamePlus GameVisual Shadow Boost DisplayPort 3840x2160 120Hz Racing Mode ROG Swift PG42UQ HDR OFF MOVE/ENTER BACK EXIT • Overclocking:Adjust the refresh rate. • ON: This function allows you to adjust the refresh rate. • Max Refresh Rate: Allow you to try again with a safer Max. ASUS LCD Monitor PG Series 3-1
... DisplayPort / HDMI1 / HDMI2 input). • Overclocking may cause screen flickering. Gaming Image Color Input Select PIP/PBP Setup MyFavorite System Setup Overclocking Adaptive-Sync GamePlus GameVisual Shadow Boost DisplayPort 3840x2160 120Hz Racing Mode ROG Swift PG42UQ HDR OFF MOVE/ENTER BACK EXIT • Overclocking:Adjust the refresh rate. • ON: This function allows you to adjust the refresh rate. • Max Refresh Rate: Allow you to try again with a safer Max. ASUS LCD Monitor PG Series 3-1
User Guide
Page 23
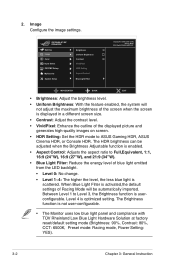
...:9 (34"W). • Blue Light Filter: Reduce the energy level of blue light emitted from the LED backlight. • Level 0: No change. • Level 1~4: The higher the level, the less blue light is not user-configurable. • The Monitor uses low blue light panel and compliance with TÜV Rheinland Low Blue Light Hardware Solution at factory reset/default setting mode (Brightness: 90%, Contrast: 80%, CCT: 6500K, Preset mode: Racing mode, Power Setting: YES). 3-2 Chapter 3: General Instruction Level 4 is optimized setting. 2. Image Configure the image settings.
...:9 (34"W). • Blue Light Filter: Reduce the energy level of blue light emitted from the LED backlight. • Level 0: No change. • Level 1~4: The higher the level, the less blue light is not user-configurable. • The Monitor uses low blue light panel and compliance with TÜV Rheinland Low Blue Light Hardware Solution at factory reset/default setting mode (Brightness: 90%, Contrast: 80%, CCT: 6500K, Preset mode: Racing mode, Power Setting: YES). 3-2 Chapter 3: General Instruction Level 4 is optimized setting. 2. Image Configure the image settings.
User Guide
Page 25
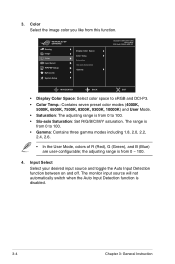
... User Mode. • Saturation: The adjusting range is from this function. Gaming Image Color Input Select PIP/PBP Setup MyFavorite System Setup Display Color Space Color Temp. Color Select the image color you like from 0 ~ 100. 4. Input Select Select your desired input source and toggle the Auto Input Detection function between on and off. the adjusting range is from 0 to 100. • Six-axis Saturation: Set R/G/B/C/M/Y saturation. The range is disabled. 3-4 Chapter 3: General Instruction The monitor input source will...
... User Mode. • Saturation: The adjusting range is from this function. Gaming Image Color Input Select PIP/PBP Setup MyFavorite System Setup Display Color Space Color Temp. Color Select the image color you like from 0 ~ 100. 4. Input Select Select your desired input source and toggle the Auto Input Detection function between on and off. the adjusting range is from 0 to 100. • Six-axis Saturation: Set R/G/B/C/M/Y saturation. The range is disabled. 3-4 Chapter 3: General Instruction The monitor input source will...

User Guide
Page 26
...". • Disable Adaptive-Sync/Variable Refresh Rate and HDR function to open up sub-window(s) connected from any video source. PIP/PBP Setup The PIP/PBP Setting allows you to enable PIP/PBP function. 6. MyFavorite Assign a function to the shortcut button, save the current system configurations, or restore the system configuration. Gaming Image Color Input Select PIP/PBP Setup MyFavorite System Setup Auto input Detection DisplayPort HDMI-1(v 2.1) HDMI-2(v 2.1) HDMI-3(v 2.0) HDMI-4(v 2.0) DisplayPort 3840x2160 120Hz Racing Mode ROG Swift PG42UQ HDR...
...". • Disable Adaptive-Sync/Variable Refresh Rate and HDR function to open up sub-window(s) connected from any video source. PIP/PBP Setup The PIP/PBP Setting allows you to enable PIP/PBP function. 6. MyFavorite Assign a function to the shortcut button, save the current system configurations, or restore the system configuration. Gaming Image Color Input Select PIP/PBP Setup MyFavorite System Setup Auto input Detection DisplayPort HDMI-1(v 2.1) HDMI-2(v 2.1) HDMI-3(v 2.0) HDMI-4(v 2.0) DisplayPort 3840x2160 120Hz Racing Mode ROG Swift PG42UQ HDR...
User Guide
Page 27
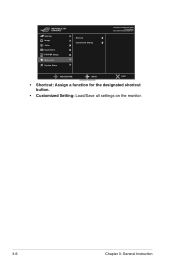
Gaming Image Color Input Select PIP/PBP Setup MyFavorite System Setup Shortcut Customised Setting DisplayPort 3840x2160 120Hz Racing Mode ROG Swift PG42UQ HDR OFF MOVE/ENTER BACK EXIT • Shortcut: Assign a function for the designated shortcut button. • Customized Setting: Load/Save all settings on the monitor. 3-6 Chapter 3: General Instruction
Gaming Image Color Input Select PIP/PBP Setup MyFavorite System Setup Shortcut Customised Setting DisplayPort 3840x2160 120Hz Racing Mode ROG Swift PG42UQ HDR OFF MOVE/ENTER BACK EXIT • Shortcut: Assign a function for the designated shortcut button. • Customized Setting: Load/Save all settings on the monitor. 3-6 Chapter 3: General Instruction
User Guide
Page 28
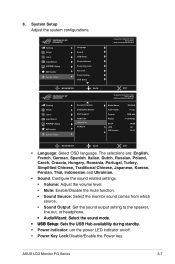
ASUS LCD Monitor PG Series 3-7 Gaming Image Color Input Select PIP/PBP Setup MyFavorite System Setup Language Sound USB Setup Power Indicator Power Key Lock Key Lock Power Setting OSD Setup MOVE/ENTER BACK Gaming Image Color Input Select PIP/PBP Setup MyFavorite System Setup Screen Protection DisplayPort Stream DSC Support HDMI CEC Information All Reset DisplayPort 3840x2160 120Hz Racing Mode ROG Swift PG42UQ HDR OFF EXIT DisplayPort 3840x2160 120Hz Racing Mode ROG Swift PG42UQ HDR OFF Model Name Color Depth Format Range EOTF VRR FW Version PG32UQ 8 bps RGB 444 Full Range sRGB...
ASUS LCD Monitor PG Series 3-7 Gaming Image Color Input Select PIP/PBP Setup MyFavorite System Setup Language Sound USB Setup Power Indicator Power Key Lock Key Lock Power Setting OSD Setup MOVE/ENTER BACK Gaming Image Color Input Select PIP/PBP Setup MyFavorite System Setup Screen Protection DisplayPort Stream DSC Support HDMI CEC Information All Reset DisplayPort 3840x2160 120Hz Racing Mode ROG Swift PG42UQ HDR OFF EXIT DisplayPort 3840x2160 120Hz Racing Mode ROG Swift PG42UQ HDR OFF Model Name Color Depth Format Range EOTF VRR FW Version PG32UQ 8 bps RGB 444 Full Range sRGB...

User Guide
Page 29
.... • Zoom By Remote Control: Select the OSD menu size when using the remote control. • Zoom by Hot Key: Select the OSD menu size when using the Control buttons. • DDC/CI: Enable/Disable the DDC/CI function. • Screen Protection:Configure the screen saver related set to Standard Mode, it may arise on the screen when your monitor has been turned on the display panel. • Adjust Logo Brightness: Enable this function to...
.... • Zoom By Remote Control: Select the OSD menu size when using the remote control. • Zoom by Hot Key: Select the OSD menu size when using the Control buttons. • DDC/CI: Enable/Disable the DDC/CI function. • Screen Protection:Configure the screen saver related set to Standard Mode, it may arise on the screen when your monitor has been turned on the display panel. • Adjust Logo Brightness: Enable this function to...

User Guide
Page 31
Resolution Pixel Pitch Brightness Contrast Ratio Viewing Angle (H/V) Display Colors Response Time Color temperature selection Analog input Digital input Earphone jack Audio output Speaker (Built-in) USB3.0 Port Colors Power LED Tilt Swivel Height adjustment VESA wall mount Kensington lock Voltage rating Power consumption Temperature (Operating) Temperature (Non-operating) Dimensions (W x H x D) OLED 41.5" W (106 cm) 3840x2160 0.2395 mm x 0.2395 mm 135 nits(Type.)(APL 100%) 1500000:1(APL 25%)Type 178°(V) /178°(H) 1.07B 0.1 ms (G TO G ) 8 color temperatures No DisplayPort v1...
Resolution Pixel Pitch Brightness Contrast Ratio Viewing Angle (H/V) Display Colors Response Time Color temperature selection Analog input Digital input Earphone jack Audio output Speaker (Built-in) USB3.0 Port Colors Power LED Tilt Swivel Height adjustment VESA wall mount Kensington lock Voltage rating Power consumption Temperature (Operating) Temperature (Non-operating) Dimensions (W x H x D) OLED 41.5" W (106 cm) 3840x2160 0.2395 mm x 0.2395 mm 135 nits(Type.)(APL 100%) 1500000:1(APL 25%)Type 178°(V) /178°(H) 1.07B 0.1 ms (G TO G ) 8 color temperatures No DisplayPort v1...

User Guide
Page 33
... Color Temperature via OSD. • Adjust the volume settings of both your monitor and computer. • Make sure the computer sound card driver is properly installed and activated. • Check the audio source. • Please enable CSM function and Gaming Mode. • * Set Power Setting to Standard Mode. • After the monitor is properly connected to check if the monitor is in the ON mode. • Check if the power cord is turned off, it will perform the cleaning image...
... Color Temperature via OSD. • Adjust the volume settings of both your monitor and computer. • Make sure the computer sound card driver is properly installed and activated. • Check the audio source. • Please enable CSM function and Gaming Mode. • * Set Power Setting to Standard Mode. • After the monitor is properly connected to check if the monitor is in the ON mode. • Check if the power cord is turned off, it will perform the cleaning image...


