User Manual
Page 5
...FAN Xpert 4-11 4.3.6 Sensor Recorder 4-12 4.3.7 Probe II 4-13 4.3.8 BT GO 4-14 4.3.9 USB 3.0 Boost 4-15 4.3.10 ASUS SSD Caching 4-16 4.3.11 ASUS Update 4-17 4.3.11 MyLogo2 4-18 4.3.12 Audio configurations 4-20 4.4 RAID configurations 4-21 4.4.1 RAID definitions 4-21 4.4.2 Installing Serial... ATA hard disks 4-22 4.4.3 Setting the RAID item in BIOS 4-22 4.4.4 Intel® Rapid Storage Technology Option ROM utility...
...FAN Xpert 4-11 4.3.6 Sensor Recorder 4-12 4.3.7 Probe II 4-13 4.3.8 BT GO 4-14 4.3.9 USB 3.0 Boost 4-15 4.3.10 ASUS SSD Caching 4-16 4.3.11 ASUS Update 4-17 4.3.11 MyLogo2 4-18 4.3.12 Audio configurations 4-20 4.4 RAID configurations 4-21 4.4.1 RAID definitions 4-21 4.4.2 Installing Serial... ATA hard disks 4-22 4.4.3 Setting the RAID item in BIOS 4-22 4.4.4 Intel® Rapid Storage Technology Option ROM utility...
User Manual
Page 12
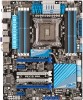
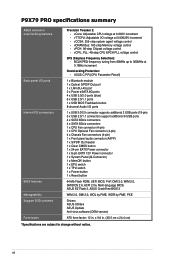
... x Power button 1 x Reset button 64 Mb Flash ROM, UEFI BIOS, PnP, DMI 2.0, WfM 2.0, SM BIOS 2.6, ACPI 2.0a, Multi-language BIOS, ASUS EZ Flash 2, ASUS CrashFree BIOS 3 WfM 2.0, DMI 2.0, WOL by PME, WOR by PME, PXE Drivers ASUS Utilities ASUS Update Anti-virus software (OEM version) ATX form factor... control SFS (Stepless Frequency Selection): - xii vDRAM Bus: 160-step Memory voltage control - P9X79 PRO specifications summary ASUS exclusive overclocking features Back panel I/O ports Internal I/O connectors BIOS features Manageability Support DVD contents Form factor Precision Tweaker 2: -...
... x Power button 1 x Reset button 64 Mb Flash ROM, UEFI BIOS, PnP, DMI 2.0, WfM 2.0, SM BIOS 2.6, ACPI 2.0a, Multi-language BIOS, ASUS EZ Flash 2, ASUS CrashFree BIOS 3 WfM 2.0, DMI 2.0, WOL by PME, WOR by PME, PXE Drivers ASUS Utilities ASUS Update Anti-virus software (OEM version) ATX form factor... control SFS (Stepless Frequency Selection): - xii vDRAM Bus: 160-step Memory voltage control - P9X79 PRO specifications summary ASUS exclusive overclocking features Back panel I/O ports Internal I/O connectors BIOS features Manageability Support DVD contents Form factor Precision Tweaker 2: -...
User Manual
Page 45
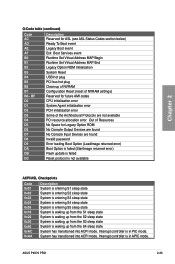
... No Space for future AMI codes CPU initialization error System Agent initialization error PCH initialization error Some of NVRAM settings) Reserved for Legacy Option ROM No Console Output Devices are found Invalid password Error loading Boot Option (LoadImage returned error) Boot Option is failed (StartImage returned error) Flash...System has transitioned into ACPI mode. Q-Code table (continued) Code AC AD AE AF B0 B1 B2 B3 B4 B5 B6 B7 B8- ASUS P9X79 PRO 2-25 Interrupt controller is in APIC mode. System has transitioned into ACPI mode. Interrupt controller is in PIC mode.
... No Space for future AMI codes CPU initialization error System Agent initialization error PCH initialization error Some of NVRAM settings) Reserved for Legacy Option ROM No Console Output Devices are found Invalid password Error loading Boot Option (LoadImage returned error) Boot Option is failed (StartImage returned error) Flash...System has transitioned into ACPI mode. Q-Code table (continued) Code AC AD AE AF B0 B1 B2 B3 B4 B5 B6 B7 B8- ASUS P9X79 PRO 2-25 Interrupt controller is in APIC mode. System has transitioned into ACPI mode. Interrupt controller is in PIC mode.

User Manual
Page 67
Rename it P9X79PRO.ROM, save the program to a USB portable disk, and place it in the root directory. 2 On the rear I/O port, plug the USB disk to the USB ... that the BIOS Flashback is automatically flashed using standby power. Updating BIOS may be interrupted. ASUS P9X79 PRO 2-47 If the light flashes for the ultimate convenience! 1 Download the BIOS Flashback program from the ASUS service website (www.asus.com). It allows overclockers to try new BIOS versions easily without having to complete BIOS update...
Rename it P9X79PRO.ROM, save the program to a USB portable disk, and place it in the root directory. 2 On the rear I/O port, plug the USB disk to the USB ... that the BIOS Flashback is automatically flashed using standby power. Updating BIOS may be interrupted. ASUS P9X79 PRO 2-47 If the light flashes for the ultimate convenience! 1 Download the BIOS Flashback program from the ASUS service website (www.asus.com). It allows overclockers to try new BIOS versions easily without having to complete BIOS update...

User Manual
Page 111
...device to [Off]. Chapter 3 ASUS P9X79 PRO 3-39 Full Screen Logo [Enabled] [Enabled] Enables the full screen logo display feature. [Disabled] Disables the full screen logo display feature. Option ROM Messages [Force BIOS] [Force BIOS] The third-party ROM messages will be forced to ...Boot Option Priorities Boot Option #1 Boot Option #2 Boot Override > P5: xxxxxxxxxxxx > P6: xxxxxxxxxxxx > Hard Drive BBS Priorities > CD/DVD ROM Drive BBS Priorities P3: xxxxxxx P4: xxxxxxx →←: Select Screen ↑↓: Select Item Enter: Select +/-: Change Opt. Copyright ...
...device to [Off]. Chapter 3 ASUS P9X79 PRO 3-39 Full Screen Logo [Enabled] [Enabled] Enables the full screen logo display feature. [Disabled] Disables the full screen logo display feature. Option ROM Messages [Force BIOS] [Force BIOS] The third-party ROM messages will be forced to ...Boot Option Priorities Boot Option #1 Boot Option #2 Boot Override > P5: xxxxxxxxxxxx > P6: xxxxxxxxxxxx > Hard Drive BBS Priorities > CD/DVD ROM Drive BBS Priorities P3: xxxxxxx P4: xxxxxxx →←: Select Screen ↑↓: Select Item Enter: Select +/-: Change Opt. Copyright ...

User Manual
Page 120
...Tool menu to select ASUS EZ Flash Utility and press to find the BIOS file, and then press ��to use a bootable floppy disk or an OS‑based utility. Chapter 3 3-48 Chapter 3: BIOS setup ASUSTek EZ Flash 2 BIOS ROM Utility V00.75 Flash Info MODEL: P9X79 PRO fs0:\ Drive 79 fs0...:\ fs1:\ VER: 0220 Folder Info 08/05/10 10:23p 4194304 Exit DATE: 08/09/2011 P9X79D.ROM File Infor MODEL: Help Info VER: DATE: [Enter] Select or Load ...
...Tool menu to select ASUS EZ Flash Utility and press to find the BIOS file, and then press ��to use a bootable floppy disk or an OS‑based utility. Chapter 3 3-48 Chapter 3: BIOS setup ASUSTek EZ Flash 2 BIOS ROM Utility V00.75 Flash Info MODEL: P9X79 PRO fs0:\ Drive 79 fs0...:\ fs1:\ VER: 0220 Folder Info 08/05/10 10:23p 4194304 Exit DATE: 08/09/2011 P9X79D.ROM File Infor MODEL: Help Info VER: DATE: [Enter] Select or Load ...

User Manual
Page 123
...Saving BIOS: Chapter 3 ASUS P9X79 PRO 3-51 The BIOS Updater backup screen appears indicating the BIOS backup process. When BIOS backup is not write-protected and has enough free space to save the file. 1. ASUSTek BIOS Updater for DOS V1.18 [2011/04/29] Current ROM BOARD: P9X79 PRO VER: 0220 DATE: 08.../09/2011 Update ROM BOARD: Unknown VER: Unknown DATE: Unknown PATH: A:\ BIOS backup is any user-assigned filename with no more than eight...
...Saving BIOS: Chapter 3 ASUS P9X79 PRO 3-51 The BIOS Updater backup screen appears indicating the BIOS backup process. When BIOS backup is not write-protected and has enough free space to save the file. 1. ASUSTek BIOS Updater for DOS V1.18 [2011/04/29] Current ROM BOARD: P9X79 PRO VER: 0220 DATE: 08.../09/2011 Update ROM BOARD: Unknown VER: Unknown DATE: Unknown PATH: A:\ BIOS backup is any user-assigned filename with no more than eight...
User Manual
Page 124
... to confirm BIOS update. Restart your motherboard user manual for DOS V1.18 [2011/04/29] Current ROM BOARD: P9X79 PRO VER: 0220 DATE: 08/09/2011 Update ROM BOARD: Unknown VER: Unknown DATE: Unknown PATH: A:\ A: P8P67D.ROM 4194304 2011-08-05 17:30:48 Chapter 3 Note [Enter] Select or Load [Up/Down/Home/End...
... to confirm BIOS update. Restart your motherboard user manual for DOS V1.18 [2011/04/29] Current ROM BOARD: P9X79 PRO VER: 0220 DATE: 08/09/2011 Update ROM BOARD: Unknown VER: Unknown DATE: Unknown PATH: A:\ A: P8P67D.ROM 4194304 2011-08-05 17:30:48 Chapter 3 Note [Enter] Select or Load [Up/Down/Home/End...
User Manual
Page 146
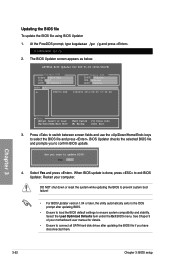
...to RAID mode, all SATA ports run at RAID mode together. 4.4.4 Intel® Rapid Storage Technology Option ROM utility To enter the Intel® Rapid Storage Technology Option ROM utility: 1. Turn on each drive. 4.4.3 Setting the RAID item in BIOS You must enable the RAID ...model and capacity when creating a disk array. Create RAID Volume 2. Enter the BIOS Setup during POST. 2. Intel(R) Rapid Storage Technology - Option ROM - Delete RAID Volume 3. Exit RAID Volumes: None defined. For optimal performance, install identical drives of SATA ports to the power connector on the ...
...to RAID mode, all SATA ports run at RAID mode together. 4.4.4 Intel® Rapid Storage Technology Option ROM utility To enter the Intel® Rapid Storage Technology Option ROM utility: 1. Turn on each drive. 4.4.3 Setting the RAID item in BIOS You must enable the RAID ...model and capacity when creating a disk array. Create RAID Volume 2. Enter the BIOS Setup during POST. 2. Intel(R) Rapid Storage Technology - Option ROM - Delete RAID Volume 3. Exit RAID Volumes: None defined. For optimal performance, install identical drives of SATA ports to the power connector on the ...
User Manual
Page 147
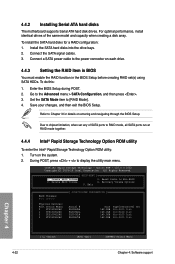
... menu options. The RAID BIOS setup screens shown in creating the volume. [↑↓]-Prev/Next [SPACE]-SelectDisk [ENTER]-Done Chapter 4 ASUS P9X79 PRO 4-23 Create RAID Volume and press . Option ROM - The navigation keys at the bottom of the screen allow you want to include in the RAID set and press . 3. Creating a RAID...
... menu options. The RAID BIOS setup screens shown in creating the volume. [↑↓]-Prev/Next [SPACE]-SelectDisk [ENTER]-Done Chapter 4 ASUS P9X79 PRO 4-23 Create RAID Volume and press . Option ROM - The navigation keys at the bottom of the screen allow you want to include in the RAID set and press . 3. Creating a RAID...
User Manual
Page 149
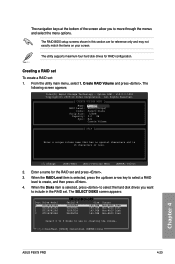
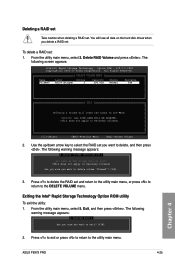
... to delete the RAID set : 1. Deleting a RAID set Take caution when deleting a RAID set you want to delete, and then press . ASUS P9X79 PRO 4-25 Chapter 4 The following warning message appears: [ CONFIRM EXIT ] Are you sure you want to the utility main menu. Use the up/down...(R) Rapid Storage Technology - From the utility main menu, select 5. Exit, and then press . Exiting the Intel® Rapid Storage Technology Option ROM utility To exit the utility: 1. v10.0.0.1032 Copyright(C) 2003-10 Intel Corporation. Press to exit or press to return to exit? (Y/N): 2. ...
... to delete the RAID set : 1. Deleting a RAID set Take caution when deleting a RAID set you want to delete, and then press . ASUS P9X79 PRO 4-25 Chapter 4 The following warning message appears: [ CONFIRM EXIT ] Are you sure you want to the utility main menu. Use the up/down...(R) Rapid Storage Technology - From the utility main menu, select 5. Exit, and then press . Exiting the Intel® Rapid Storage Technology Option ROM utility To exit the utility: 1. v10.0.0.1032 Copyright(C) 2003-10 Intel Corporation. Press to exit or press to return to exit? (Y/N): 2. ...


