User Manual
Page 4
Contents 2.4 Starting up for the first time 2-52 2.5 Turning off the computer 2-52 Chapter 3: BIOS setup 3.1 Knowing BIOS 3-1 3.2 BIOS setup program 3-1 3.2.1 EZ Mode 3-2 3.2.2 Advanced Mode 3-3 3.3 Main menu 3-5 3.4 Ai Tweaker...Boot menu 3-39 3.8 Tools menu 3-40 3.8.1 ASUS EZ Flash 2 Utility 3-40 3.8.2 ASUS DRAM SPD Information 3-41 3.8.3 ASUS O.C. Profile 3-42 3.8.4 ASUS Drive Xpert 3-43 3.9 Exit menu 3-44 3.10 Updating BIOS 3-45 3.10.1 ASUS Update utility 3-45 3.10.2 ASUS EZ Flash 2 utility 3-48 3.10.3 ASUS CrashFree BIOS 3 utility 3-49 3.10.4 ASUS BIOS...
Contents 2.4 Starting up for the first time 2-52 2.5 Turning off the computer 2-52 Chapter 3: BIOS setup 3.1 Knowing BIOS 3-1 3.2 BIOS setup program 3-1 3.2.1 EZ Mode 3-2 3.2.2 Advanced Mode 3-3 3.3 Main menu 3-5 3.4 Ai Tweaker...Boot menu 3-39 3.8 Tools menu 3-40 3.8.1 ASUS EZ Flash 2 Utility 3-40 3.8.2 ASUS DRAM SPD Information 3-41 3.8.3 ASUS O.C. Profile 3-42 3.8.4 ASUS Drive Xpert 3-43 3.9 Exit menu 3-44 3.10 Updating BIOS 3-45 3.10.1 ASUS Update utility 3-45 3.10.2 ASUS EZ Flash 2 utility 3-48 3.10.3 ASUS CrashFree BIOS 3 utility 3-49 3.10.4 ASUS BIOS...
User Manual
Page 11
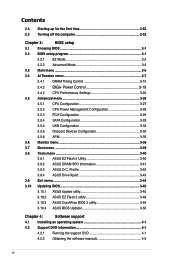
... Flash 2 - MemOK! - AI Charger ASUS Quiet Thermal Solution: - ASUS Fan Xpert+ ASUS EZ DIY: - CPU Power Utility DRAM Power - ASUS Fanless Design: Heat-pipe solution - ASUS CrashFree BIOS 3 - ASUS Q-Code - ASUS Q-DIMM - P9X79 PRO specifications summary ASUS unique features ASUS Dual Intelligent Processors 3 with New DIGI+ Power Control: CPU Power - AI Suite II - ASUS Q-LED (CPU, DRAM, VGA, Boot Device LED) - USB 3.0 Boost - Front...
... Flash 2 - MemOK! - AI Charger ASUS Quiet Thermal Solution: - ASUS Fan Xpert+ ASUS EZ DIY: - CPU Power Utility DRAM Power - ASUS Fanless Design: Heat-pipe solution - ASUS CrashFree BIOS 3 - ASUS Q-Code - ASUS Q-DIMM - P9X79 PRO specifications summary ASUS unique features ASUS Dual Intelligent Processors 3 with New DIGI+ Power Control: CPU Power - AI Suite II - ASUS Q-LED (CPU, DRAM, VGA, Boot Device LED) - USB 3.0 Boost - Front...

User Manual
Page 18
... one at a time and avoiding wrong cable connections. ASUS Q-Connector ASUS Q-Connector allows you to the motherboard. Chapter 1 1.3.5 ASUS EZ DIY ASUS UEFI BIOS ASUS UEFI BIOS offers the first mouse-controlled graphical BIOS designed with difficult POST situations. Users can choose system performance settings and drag and drop boot priorities. ASUS DRAM SPD (Serial Presence Detect) Information for accessing...
... one at a time and avoiding wrong cable connections. ASUS Q-Connector ASUS Q-Connector allows you to the motherboard. Chapter 1 1.3.5 ASUS EZ DIY ASUS UEFI BIOS ASUS UEFI BIOS offers the first mouse-controlled graphical BIOS designed with difficult POST situations. Users can choose system performance settings and drag and drop boot priorities. ASUS DRAM SPD (Serial Presence Detect) Information for accessing...

User Manual
Page 37
... loads and tests failsafe memory settings. It takes about 5-10 seconds. • If your system fail to boot due to boot and load BIOS default settings. ASUS P9X79 PRO 2-17 Turn off the computer and replace DIMMs during POST reminding you download and update to section 2.2.6 Onboard ...LEDs for the system to boot after using the MemOK! The blinking speed of failsafe settings. function. MemOK! ...
... loads and tests failsafe memory settings. It takes about 5-10 seconds. • If your system fail to boot due to boot and load BIOS default settings. ASUS P9X79 PRO 2-17 Turn off the computer and replace DIMMs during POST reminding you download and update to section 2.2.6 Onboard ...LEDs for the system to boot after using the MemOK! The blinking speed of failsafe settings. function. MemOK! ...

User Manual
Page 38
... will be activated after the next system bootup. • You may use the TurboV and Auto Tuning feature in the TurboV EVO application, adjust the BIOS setup program, or enable the TPU switch at the same time. Refer to reenter data. 5. Chapter 2 • The TPU LED (O2LED1) near ...the TPU switch lights when the switch setting is turned to Enable when the system is powered off. Press down the key during the boot process and enter BIOS setup to section 2.2.6 Onboard LEDs for fast, yet stable clock speeds. 4. ���C�le�a�r�R�T�...
... will be activated after the next system bootup. • You may use the TurboV and Auto Tuning feature in the TurboV EVO application, adjust the BIOS setup program, or enable the TPU switch at the same time. Refer to reenter data. 5. Chapter 2 • The TPU LED (O2LED1) near ...the TPU switch lights when the switch setting is turned to Enable when the system is powered off. Press down the key during the boot process and enter BIOS setup to section 2.2.6 Onboard LEDs for fast, yet stable clock speeds. 4. ���C�le�a�r�R�T�...
User Manual
Page 72
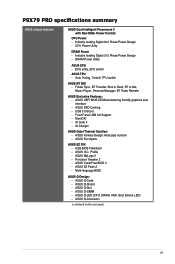
... pause (repeated) One continuous beep followed by three short beeps One continuous beep followed by four short beeps Description VGA detected Quick boot set to enter the BIOS Setup. If you do not see anything within 30 seconds from orange to a power outlet that all the connections, replace the ...system case cover. 2. While the tests are off mode regardless of the system chassis. 4. Connect the power cord to the BIOS beep codes table below) or additional messages appear on the chain) c. Be sure that is ON, pressing the power switch for the first time...
... pause (repeated) One continuous beep followed by three short beeps One continuous beep followed by four short beeps Description VGA detected Quick boot set to enter the BIOS Setup. If you do not see anything within 30 seconds from orange to a power outlet that all the connections, replace the ...system case cover. 2. While the tests are off mode regardless of the system chassis. 4. Connect the power cord to the BIOS beep codes table below) or additional messages appear on the chain) c. Be sure that is ON, pressing the power switch for the first time...
User Manual
Page 73
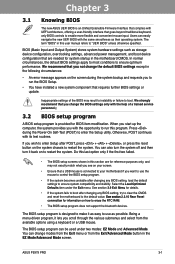
... system fails to boot after POST, press + + , or press the reset button on to restart the system. We strongly recommend that you wish to enter Setup after changing any BIOS setting, load the default settings to ensure system compatibility and stability. Chapter 3 ASUS P9X79 PRO 3-1 Chapter 3 Chapter 3: 3.1 Knowing BIOS BIOS setup The new ASUS UEFI BIOS is connected to...
... system fails to boot after POST, press + + , or press the reset button on to restart the system. We strongly recommend that you wish to enter Setup after changing any BIOS setting, load the default settings to ensure system compatibility and stability. Chapter 3 ASUS P9X79 PRO 3-1 Chapter 3 Chapter 3: 3.1 Knowing BIOS BIOS setup The new ASUS UEFI BIOS is connected to...

User Manual
Page 74
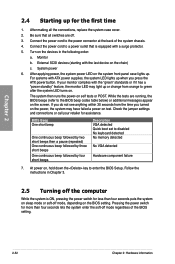
.... • The Boot Menu(F8) button is available only when the boot device is installed to frequently used menus. Selects the boot device priority Power Saving mode Normal mode Loads optimized default ASUS Optimal mode Displays the system properties of the BIOS setup program Clicks to...voltage output, CPU/CPU_OPT/Chassis fan speed Exits the BIOS setup program without saving the changes, saves the changes and resets the system, or enters the Advanced Mode P9X79 PRO Chapter 3 Quick switch to the system. 3-2 Chapter 3: BIOS setup To access the Advanced Mode, click Exit/Advanced...
.... • The Boot Menu(F8) button is available only when the boot device is installed to frequently used menus. Selects the boot device priority Power Saving mode Normal mode Loads optimized default ASUS Optimal mode Displays the system properties of the BIOS setup program Clicks to...voltage output, CPU/CPU_OPT/Chassis fan speed Exits the BIOS setup program without saving the changes, saves the changes and resets the system, or enters the Advanced Mode P9X79 PRO Chapter 3 Quick switch to the system. 3-2 Chapter 3: BIOS setup To access the Advanced Mode, click Exit/Advanced...
User Manual
Page 75
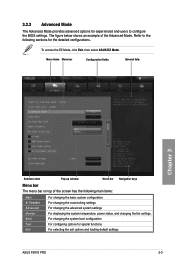
...below shows an example of the screen has the following sections for the detailed configurations. Refer to configure the BIOS settings. For changing the system boot configuration For configuring options for experienced end-users to the following main items: Main Ai Tweaker Advanced Monitor... system temperature, power status, and changing the fan settings. To access the EZ Mode, click Exit, then select ASUS EZ Mode. 3.2.2 Advanced Mode The Advanced Mode provides advanced options for special functions For selecting the exit options and loading default settings ASUS P9X79 PRO 3-3
...below shows an example of the screen has the following sections for the detailed configurations. Refer to configure the BIOS settings. For changing the system boot configuration For configuring options for experienced end-users to the following main items: Main Ai Tweaker Advanced Monitor... system temperature, power status, and changing the fan settings. To access the EZ Mode, click Exit, then select ASUS EZ Mode. 3.2.2 Advanced Mode The Advanced Mode provides advanced options for special functions For selecting the exit options and loading default settings ASUS P9X79 PRO 3-3

User Manual
Page 76
... that is highlighted when selected. Press the Up/Down arrow keys or / keys to display the other items (Ai Tweaker, Advanced, Monitor, Boot, Tool, and Exit) on the menu bar displays the specific items for the menu items. If an item is a brief description of the...configurable field is not user-configurable. Configuration fields These fields show the values for that item. Pop-up window with the configuration options for the BIOS setup program. To change the settings. Navigation keys At the bottom right corner of options. Scroll bar A scroll bar appears on the screen...
... that is highlighted when selected. Press the Up/Down arrow keys or / keys to display the other items (Ai Tweaker, Advanced, Monitor, Boot, Tool, and Exit) on the menu bar displays the specific items for the menu items. If an item is a brief description of the...configurable field is not user-configurable. Configuration fields These fields show the values for that item. Pop-up window with the configuration options for the BIOS setup program. To change the settings. Navigation keys At the bottom right corner of options. Scroll bar A scroll bar appears on the screen...

User Manual
Page 77
... Time Access Level [Tuesday 08/09/2011] [16:46:15] Administrator > Security Boot Tool Choose the system default language Security The Security menu items allow you to boot or enter Setup. Chapter 3 ASUS P9X79 PRO 3-5 UEFI BIOS Utility - After you have forgotten your BIOS password, erase the CMOS Real Time Clock (RTC) RAM to set , then this...
... Time Access Level [Tuesday 08/09/2011] [16:46:15] Administrator > Security Boot Tool Choose the system default language Security The Security menu items allow you to boot or enter Setup. Chapter 3 ASUS P9X79 PRO 3-5 UEFI BIOS Utility - After you have forgotten your BIOS password, erase the CMOS Real Time Clock (RTC) RAM to set , then this...

User Manual
Page 92
...the thermal module while changing the DIGI+ Power Control related parameters . You can also use the and keys to adjust the value. CPU VCORE Boot Up Voltage [Auto] Use the and keys to adjust the value. Setting a higher frequency gets faster transient response. [Auto] [Manual] ... [Disabled] Configuration options: [Disabled�] �[E��n�a��b�le��d�] Chapter 3 3-20 Chapter 3: BIOS setup Some of the DRAM controller is decided by typing the desired values using the keyboard and press the key.
...the thermal module while changing the DIGI+ Power Control related parameters . You can also use the and keys to adjust the value. CPU VCORE Boot Up Voltage [Auto] Use the and keys to adjust the value. Setting a higher frequency gets faster transient response. [Auto] [Manual] ... [Disabled] Configuration options: [Disabled�] �[E��n�a��b�le��d�] Chapter 3 3-20 Chapter 3: BIOS setup Some of the DRAM controller is decided by typing the desired values using the keyboard and press the key.

User Manual
Page 94
... and decreased average heat production. Copyright (C) 2011 American Megatrends, Inc. Configuration options: [Disabled] [Enabled] Chapter 3 3-22 Chapter 3: BIOS setup UEFI BIOS Utility - F1: General Help F2: Previous Values F5: Optimized Defaults F10: Save ESC: Exit Version 2.10.1208. Configuration options: [...Duration Maintained Short Duration Power Limit Additional Turbo Voltage CPU Core Current Limit Auto Auto Auto Auto Auto Exit Boot Tool [X.M.P.] When XMP is ��s�e�t�ti�n�g��f�o�r�C�...
... and decreased average heat production. Copyright (C) 2011 American Megatrends, Inc. Configuration options: [Disabled] [Enabled] Chapter 3 3-22 Chapter 3: BIOS setup UEFI BIOS Utility - F1: General Help F2: Previous Values F5: Optimized Defaults F10: Save ESC: Exit Version 2.10.1208. Configuration options: [...Duration Maintained Short Duration Power Limit Additional Turbo Voltage CPU Core Current Limit Auto Auto Auto Auto Auto Exit Boot Tool [X.M.P.] When XMP is ��s�e�t�ti�n�g��f�o�r�C�...

User Manual
Page 98
...F2: Previous Values F5: Optimized Defaults F10: Save ESC: Exit Version 2.10.1208. Different ratio might enhance DRAM overclocking ability. UEFI BIOS Utility - The values range from 0.3950x to 0.6300x with a 0.005x interval. Copyright (C) 2011 American Megatrends, Inc. Advanced Mode ... SAS Configuration > USB Configuration > Onboard Devices > APM Advanced Monitor Boot Tool CPU Configuration Parameters →←: Select Screen ↑↓: Select Item Enter: Select +/-: Change Opt. Chapter 3 3-26 Chapter 3: BIOS setup DRAM Read REF Voltage on CHD [Auto] Allows you to ...
...F2: Previous Values F5: Optimized Defaults F10: Save ESC: Exit Version 2.10.1208. Different ratio might enhance DRAM overclocking ability. UEFI BIOS Utility - The values range from 0.3950x to 0.6300x with a 0.005x interval. Copyright (C) 2011 American Megatrends, Inc. Advanced Mode ... SAS Configuration > USB Configuration > Onboard Devices > APM Advanced Monitor Boot Tool CPU Configuration Parameters →←: Select Screen ↑↓: Select Item Enter: Select +/-: Change Opt. Chapter 3 3-26 Chapter 3: BIOS setup DRAM Read REF Voltage on CHD [Auto] Allows you to ...

User Manual
Page 99
...ASUS P9X79 PRO 3-27 Hyper-threading [Enabled] The Intel Hyper-Threading Technology allows a hyper-threading processor to appear as two logical processors to the operating system, allowing the operating system to cool down. The items shown in this screen may be different due to the CPU you installed. UEFI BIOS... CPU Speed Min CPU Speed Processor Cores Intel HT Technology Intel VT-x Technology Monitor 206d2 8000020c 2300 MHz 1200 MHz 6 Supported Suppotted Boot Adjust Non-Turbo Ratio L1 Data Cache L1 Code Cache L2 Cache L3 Cache 32 kB x 6 32 kB x 6 256 kB...
...ASUS P9X79 PRO 3-27 Hyper-threading [Enabled] The Intel Hyper-Threading Technology allows a hyper-threading processor to appear as two logical processors to the operating system, allowing the operating system to cool down. The items shown in this screen may be different due to the CPU you installed. UEFI BIOS... CPU Speed Min CPU Speed Processor Cores Intel HT Technology Intel VT-x Technology Monitor 206d2 8000020c 2300 MHz 1200 MHz 6 Supported Suppotted Boot Adjust Non-Turbo Ratio L1 Data Cache L1 Code Cache L2 Cache L3 Cache 32 kB x 6 32 kB x 6 256 kB...

User Manual
Page 100
... zero (0). Turbo Mode [Enabled] [Disabled] Disables this function. [Enabled] Allows processor cores to adjust the ratio. Chapter 3 3-28 Chapter 3: BIOS setup Copyright (C) 2011 American Megatrends, Inc. Use and keys to run multiple operating systems separately and simultaneously, enabling one system to activate in specific ...Auto Version 2.10.1208. Configuration options: [All] [1] [2] [3] [4] [5] Limit CPUID Maximum [Disabled] [Enabled] Allows legacy operating systems to boot even without support for CPUs with extended CPUID functions. [Disabled] Disables this function.
... zero (0). Turbo Mode [Enabled] [Disabled] Disables this function. [Enabled] Allows processor cores to adjust the ratio. Chapter 3 3-28 Chapter 3: BIOS setup Copyright (C) 2011 American Megatrends, Inc. Use and keys to run multiple operating systems separately and simultaneously, enabling one system to activate in specific ...Auto Version 2.10.1208. Configuration options: [All] [1] [2] [3] [4] [5] Limit CPUID Maximum [Disabled] [Enabled] Allows legacy operating systems to boot even without support for CPUs with extended CPUID functions. [Disabled] Disables this function.
User Manual
Page 101
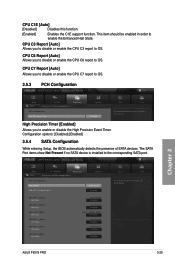
... SATA 3G_6 (Blue) Hot Plug Not Present Disabled Boot Tool (1) IDE Mode. (2) AHCI Mode. (3) RAID Mode. Chapter 3 ASUS P9X79 PRO 3-29 CPU C3 Report [Auto] Allows you to OS. CPU C6 Report [Auto] Allows you to disable or enable the CPU C7 report to OS. UEFI BIOS Utility - Advanced Mode Exit Main Back Ai Tweaker...
... SATA 3G_6 (Blue) Hot Plug Not Present Disabled Boot Tool (1) IDE Mode. (2) AHCI Mode. (3) RAID Mode. Chapter 3 ASUS P9X79 PRO 3-29 CPU C3 Report [Auto] Allows you to OS. CPU C6 Report [Auto] Allows you to disable or enable the CPU C7 report to OS. UEFI BIOS Utility - Advanced Mode Exit Main Back Ai Tweaker...
User Manual
Page 103
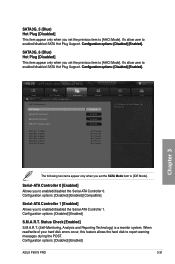
...��d�]�[�E�n��a�b�l�e�d�]�. Configuration options: [Disabled] [Enabled] ASUS P9X79 PRO 3-31 UEFI BIOS Utility - Status Check Enabled SATA 6G_1 (Gray) SATA 6G_2 (Gray) SATA 3G_3 (Blue) SATA 3G_4 (Blue) ...SATA 3G_5 (Blue) SATA 3G_6 (Blue) Not Present Not Present Not Present Not Present Not Present Not Present Exit Boot Tool (1) IDE Mode. (2) AHCI...
...��d�]�[�E�n��a�b�l�e�d�]�. Configuration options: [Disabled] [Enabled] ASUS P9X79 PRO 3-31 UEFI BIOS Utility - Status Check Enabled SATA 6G_1 (Gray) SATA 6G_2 (Gray) SATA 3G_3 (Blue) SATA 3G_4 (Blue) ...SATA 3G_5 (Blue) SATA 3G_6 (Blue) Not Present Not Present Not Present Not Present Not Present Not Present Exit Boot Tool (1) IDE Mode. (2) AHCI...

User Manual
Page 104
...Support [Enabled] [Disabled] The USB devices can be used only for the BIOS setup program. [Enabled] Enables the support for operating systems without an EHCI hand‑off Disabled Boot Tool Enables Legacy USB support. DISABLE option will keep USB devices available only...] [Disabled] Disables the function. [Enabled] Enables the support for USB devices on legacy operating systems (OS). Chapter 3 3-32 Chapter 3: BIOS setup Legacy USB3.0 Support [Enabled] [Disabled] Disables the function. [Enabled] Enables the support for UEFI applications. If no USB device is ...
...Support [Enabled] [Disabled] The USB devices can be used only for the BIOS setup program. [Enabled] Enables the support for operating systems without an EHCI hand‑off Disabled Boot Tool Enables Legacy USB support. DISABLE option will keep USB devices available only...] [Disabled] Disables the function. [Enabled] Enables the support for USB devices on legacy operating systems (OS). Chapter 3 3-32 Chapter 3: BIOS setup Legacy USB3.0 Support [Enabled] [Disabled] Disables the function. [Enabled] Enables the support for UEFI applications. If no USB device is ...

User Manual
Page 105
... AC'97 Chapter 3 ASUS P9X79 PRO 3-33 Advanced Mode Exit Main Back Ai Tweaker Advanced Advanced\ Onboard Devices Configuration > Monitor Azalia HD Audio Enabled Front Panel Type HD SPDIF Out Type SPDIF Boot Tool Enabled/Disabled Azalia ... Item Enter: Select +/-: Change Opt. F1: General Help F2: Previous Values F3: Shortcut F5: Optimized Defaults F6: ASUS Ratio Boost F10: Save ESC: Exit F12: Print Screen Version 2.10.1208. Front Panel Type [HD] Allows you set... connector (AAFP) mode to high definition audio. 3.5.6 Onboard Devices Configuraton UEFI BIOS Utility -
... AC'97 Chapter 3 ASUS P9X79 PRO 3-33 Advanced Mode Exit Main Back Ai Tweaker Advanced Advanced\ Onboard Devices Configuration > Monitor Azalia HD Audio Enabled Front Panel Type HD SPDIF Out Type SPDIF Boot Tool Enabled/Disabled Azalia ... Item Enter: Select +/-: Change Opt. F1: General Help F2: Previous Values F3: Shortcut F5: Optimized Defaults F6: ASUS Ratio Boost F10: Save ESC: Exit F12: Print Screen Version 2.10.1208. Front Panel Type [HD] Allows you set... connector (AAFP) mode to high definition audio. 3.5.6 Onboard Devices Configuraton UEFI BIOS Utility -


