User Manual
Page 5
...Xpert 4-11 4.3.6 Sensor Recorder 4-12 4.3.7 Probe II 4-13 4.3.8 BT GO 4-14 4.3.9 USB 3.0 Boost 4-15 4.3.10 ASUS SSD Caching 4-16 4.3.11 ASUS Update 4-17 4.3.11 MyLogo2 4-18 4.3.12 Audio configurations 4-20 4.4 RAID configurations 4-21 4.4.1 RAID definitions 4-21 4.4.2 Installing Serial...4.4.5 Marvell RAID utility 4-26 4.5 Creating a RAID driver disk 4-30 4.5.1 Creating a RAID driver disk without entering the OS 4-30 4.5.2 Creating a RAID driver disk in Windows 4-30 4.5.3 Installing the RAID driver during Windows® OS installation....... 4-31 4.5.4 Using a USB ...
...Xpert 4-11 4.3.6 Sensor Recorder 4-12 4.3.7 Probe II 4-13 4.3.8 BT GO 4-14 4.3.9 USB 3.0 Boost 4-15 4.3.10 ASUS SSD Caching 4-16 4.3.11 ASUS Update 4-17 4.3.11 MyLogo2 4-18 4.3.12 Audio configurations 4-20 4.4 RAID configurations 4-21 4.4.1 RAID definitions 4-21 4.4.2 Installing Serial...4.4.5 Marvell RAID utility 4-26 4.5 Creating a RAID driver disk 4-30 4.5.1 Creating a RAID driver disk without entering the OS 4-30 4.5.2 Creating a RAID driver disk in Windows 4-30 4.5.3 Installing the RAID driver during Windows® OS installation....... 4-31 4.5.4 Using a USB ...
User Manual
Page 46
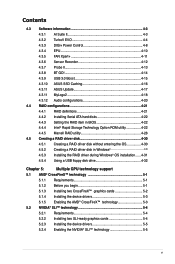
...SP3 or later versions. For details, please refer to the section "4.5 Create a RAID driver disk". • Windows 7 & Vista: When [SATA Mode] is available only if you save the IRST Driver from driver disk during Windows 7 or Vista installation for the system to [AHCI Mode] by default. We strongly ... Technology through the onboard Intel® X79 chipset. Refer to section 3.5.4 SATA Configuration for details. • You must load IRST Driver during OS Windows XP 64 bit installation for the system to detect the Optical Disk Drive (the ODD should be connected to Serial ATA 6.0 Gb...
...SP3 or later versions. For details, please refer to the section "4.5 Create a RAID driver disk". • Windows 7 & Vista: When [SATA Mode] is available only if you save the IRST Driver from driver disk during Windows 7 or Vista installation for the system to [AHCI Mode] by default. We strongly ... Technology through the onboard Intel® X79 chipset. Refer to section 3.5.4 SATA Configuration for details. • You must load IRST Driver during OS Windows XP 64 bit installation for the system to detect the Optical Disk Drive (the ODD should be connected to Serial ATA 6.0 Gb...
User Manual
Page 47
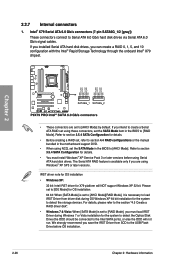
...the section "4.5 Create a RAID driver disk". • Windows 7 & Vista: When [SATA Mode] is available only if you are set the SATA Mode item in the BIOS to the USB Flash Drive before using Windows® XP SP3 or later versions. ASUS P9X79 PRO 2-27 If you installed Serial ...ATA hard disk drives, you save the IRST Driver from driver disk during OS Windows XP 64 bit installation for details. • You must load IRST Driver during Windows 7 or Vista installation for ...
...the section "4.5 Create a RAID driver disk". • Windows 7 & Vista: When [SATA Mode] is available only if you are set the SATA Mode item in the BIOS to the USB Flash Drive before using Windows® XP SP3 or later versions. ASUS P9X79 PRO 2-27 If you installed Serial ...ATA hard disk drives, you save the IRST Driver from driver disk during OS Windows XP 64 bit installation for details. • You must load IRST Driver during Windows 7 or Vista installation for ...

User Manual
Page 48
... disk drives. • When using the motherboard support DVD and load the driver during POST to enter the Marvell RAID utility to create or delete a RAID configuration. • If you want to install a Windows operating system to a RAID configuration created using the Marvell SATA controller, you ...have to create a RAID driver disk using NCQ, set the Marvell Storage Controller item in the BIOS to Serial ATA 6.0 Gb...
... disk drives. • When using the motherboard support DVD and load the driver during POST to enter the Marvell RAID utility to create or delete a RAID configuration. • If you want to install a Windows operating system to a RAID configuration created using the Marvell SATA controller, you ...have to create a RAID driver disk using NCQ, set the Marvell Storage Controller item in the BIOS to Serial ATA 6.0 Gb...
User Manual
Page 69
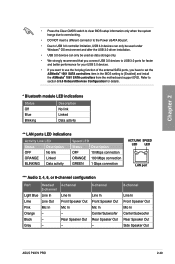
...Out Mic In Center/Subwoofer Rear Speaker Out - 8-channel Line In Front Speaker Out Mic In Center/Subwoofer Rear Speaker Out Side Speaker Out ASUS P9X79 PRO 2-49 Chapter 2 • Press the Clear CMOS switch to clear BIOS setup information only when the system hangs due to overclocking. •... to the Power eSATA 6G port. • Due to USB 3.0 controller limitation, USB 3.0 devices can only be used under Windows® OS environment and after the USB 3.0 driver installation. • USB 3.0 devices can only be used as data storage only. • We strongly recommend that you have ...
...Out Mic In Center/Subwoofer Rear Speaker Out - 8-channel Line In Front Speaker Out Mic In Center/Subwoofer Rear Speaker Out Side Speaker Out ASUS P9X79 PRO 2-49 Chapter 2 • Press the Clear CMOS switch to clear BIOS setup information only when the system hangs due to overclocking. •... to the Power eSATA 6G port. • Due to USB 3.0 controller limitation, USB 3.0 devices can only be used under Windows® OS environment and after the USB 3.0 driver installation. • USB 3.0 devices can only be used as data storage only. • We strongly recommend that you have ...
User Manual
Page 125
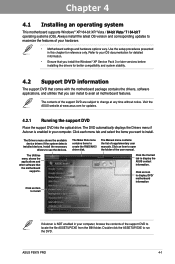
...The DVD automatically displays the Drivers menu if Autorun is ��ta 7 6�4��-b��i�t�7� operating systems (OS). ASUS P9X79 PRO 4-1 The Utilities menu shows... the applications and other software that you want to display the ASUS contact information. Refer to your computer, browse the contents of the support DVD are subject to avail all motherboard features. Chapter 4: Chapter 4 Software support 4.1 Installing an operating system This motherboard supports Windows...
...The DVD automatically displays the Drivers menu if Autorun is ��ta 7 6�4��-b��i�t�7� operating systems (OS). ASUS P9X79 PRO 4-1 The Utilities menu shows... the applications and other software that you want to display the ASUS contact information. Refer to your computer, browse the contents of the support DVD are subject to avail all motherboard features. Chapter 4: Chapter 4 Software support 4.1 Installing an operating system This motherboard supports Windows...
User Manual
Page 127
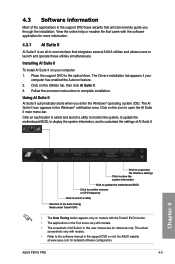
...customize the settings of AI Suite II in the support DVD or visit the ASUS website at www.asus.com for reference only. Using AI Suite II AI Suite II automatically starts when you through the installation. The Drivers installation tab appears if your computer 1. Chapter 4 Click to customize the ... in the Tool menu vary with the software application for more information. 4.3.1 AI Suite II AI Suite II is an all-in the Windows® notification area. ASUS P9X79 PRO 4-3 The actual screenshots vary with models. • Refer to launch and operate these utilities simultaneously.
...customize the settings of AI Suite II in the support DVD or visit the ASUS website at www.asus.com for reference only. Using AI Suite II AI Suite II automatically starts when you through the installation. The Drivers installation tab appears if your computer 1. Chapter 4 Click to customize the ... in the Tool menu vary with the software application for more information. 4.3.1 AI Suite II AI Suite II is an all-in the Windows® notification area. ASUS P9X79 PRO 4-3 The actual screenshots vary with models. • Refer to launch and operate these utilities simultaneously.
User Manual
Page 144
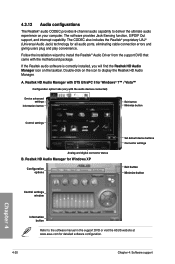
...options Set default device buttons Connector settings Exit button Minimize button Control settings window Chapter 4 Information button Refer to the software manual in the support DVD or visit the ASUS website at www.asus.com for all audio ports, eliminating cable connection errors and giving users ...display the Realtek HD Audio Manager. Double-click on your computer. Follow the installation wizard to install the Realtek® Audio Driver from the support DVD that came with the audio devices connected) Device advanced settings Information button Exit button Minimize button Control ...
...options Set default device buttons Connector settings Exit button Minimize button Control settings window Chapter 4 Information button Refer to the software manual in the support DVD or visit the ASUS website at www.asus.com for all audio ports, eliminating cable connection errors and giving users ...display the Realtek HD Audio Manager. Double-click on your computer. Follow the installation wizard to install the Realtek® Audio Driver from the support DVD that came with the audio devices connected) Device advanced settings Information button Exit button Minimize button Control ...
User Manual
Page 145
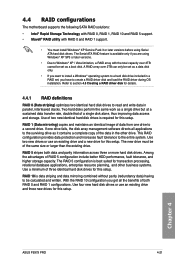
...ASUS P9X79 PRO 4-21 Two hard disks perform the same work as it contains a complete copy of the data in the other business systems. Use a minimum of RAID 5 configuration include better HDD performance, fault tolerance, and higher storage capacity. If one drive to a second drive. The new drive must install Windows.... The RAID 5 configuration is available only if you are using Serial ATA hard disk drives. Refer to section 4.5 Creating a RAID driver disk for this setup. RAID 5 stripes both RAID 0 and RAID 1 configurations. RAID 1 (Data mirroring) copies and maintains an ...
...ASUS P9X79 PRO 4-21 Two hard disks perform the same work as it contains a complete copy of the data in the other business systems. Use a minimum of RAID 5 configuration include better HDD performance, fault tolerance, and higher storage capacity. If one drive to a second drive. The new drive must install Windows.... The RAID 5 configuration is available only if you are using Serial ATA hard disk drives. Refer to section 4.5 Creating a RAID driver disk for this setup. RAID 5 stripes both RAID 0 and RAID 1 configurations. RAID 1 (Data mirroring) copies and maintains an ...

User Manual
Page 154
... Using a USB floppy disk drive. 4.5.1 Creating a RAID driver disk without entering the OS To create a RAID driver disk without entering the OS: 1. 4.5 Creating a RAID driver disk A floppy disk with the RAID driver is required when installing a Windows® operating system on a hard disk drive that is ...use a USB floppy disk drive when creating a SATA RAID driver disk. • Windows® XP may not recognize the USB floppy disk drive due to complete the process. 4.5.2 Creating a RAID driver disk in Windows® To create a RAID driver disk in a RAID set. • The motherboard does ...
... Using a USB floppy disk drive. 4.5.1 Creating a RAID driver disk without entering the OS To create a RAID driver disk without entering the OS: 1. 4.5 Creating a RAID driver disk A floppy disk with the RAID driver is required when installing a Windows® operating system on a hard disk drive that is ...use a USB floppy disk drive when creating a SATA RAID driver disk. • Windows® XP may not recognize the USB floppy disk drive due to complete the process. 4.5.2 Creating a RAID driver disk in Windows® To create a RAID driver disk in a RAID set. • The motherboard does ...
User Manual
Page 155
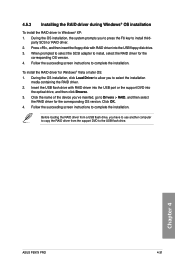
.... 3. When prompted to select the SCSI adapter to Drivers > RAID, and then select the RAID driver for Windows® Vista or later OS: 1. Insert the USB flash drive with RAID driver into the optical drive, and then click Browse. 3. Chapter 4 ASUS P9X79 PRO 4-31 To install the RAID driver for the corresponding OS version. Follow the succeeding screen...
.... 3. When prompted to select the SCSI adapter to Drivers > RAID, and then select the RAID driver for Windows® Vista or later OS: 1. Insert the USB flash drive with RAID driver into the optical drive, and then click Browse. 3. Chapter 4 ASUS P9X79 PRO 4-31 To install the RAID driver for the corresponding OS version. Follow the succeeding screen...
User Manual
Page 156
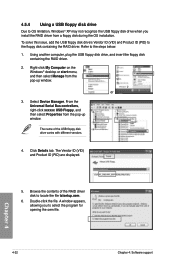
...txtsetup.oem. 6. Click Details tab. Refer to the floppy disk containing the RAID driver. Right-click My Computer on the Windows® desktop or start menu, and then select Manage from the pop-up window. Select Device Manager. From the Universal Serial Bus controllers, right-click xxxxxx USB ...the contents of the USB floppy disk drive varies with different vendors. 4. A window appears, allowing you install the RAID driver from the pop-up window. 4.5.4 Using a USB floppy disk drive Due to OS limitation, Windows® XP may not recognize the USB floppy disk drive when you to ...
...txtsetup.oem. 6. Click Details tab. Refer to the floppy disk containing the RAID driver. Right-click My Computer on the Windows® desktop or start menu, and then select Manage from the pop-up window. Select Device Manager. From the Universal Serial Bus controllers, right-click xxxxxx USB ...the contents of the USB floppy disk drive varies with different vendors. 4. A window appears, allowing you install the RAID driver from the pop-up window. 4.5.4 Using a USB floppy disk drive Due to OS limitation, Windows® XP may not recognize the USB floppy disk drive when you to ...

User Manual
Page 159
... install multi-graphics processing units (GPU) graphics cards. For Windows XP, go to Control Panel > Add/Remove Programs. For Windows Vista, go to your system. For Windows Vista, select Uninstall. 5. Download the latest driver from the AMD website (www.amd.com). • We...begin For AMD CrossFireX to work properly, you to uninstall all current applications. 2. Select your computer. ASUS P9X79 PRO 5-1 Close all existing graphics card drivers before installing AMD CrossFireX graphics cards to Control Panel > Programs and Features. 3. To uninstall existing graphics card...
... install multi-graphics processing units (GPU) graphics cards. For Windows XP, go to Control Panel > Add/Remove Programs. For Windows Vista, go to your system. For Windows Vista, select Uninstall. 5. Download the latest driver from the AMD website (www.amd.com). • We...begin For AMD CrossFireX to work properly, you to uninstall all current applications. 2. Select your computer. ASUS P9X79 PRO 5-1 Close all existing graphics card drivers before installing AMD CrossFireX graphics cards to Control Panel > Programs and Features. 3. To uninstall existing graphics card...
User Manual
Page 161
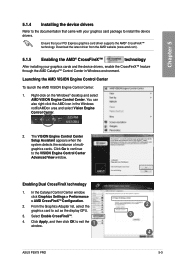
... CrossFireXTM Configuration. 2. Click Apply, and then click OK to install the device drivers. Download the latest driver from the AMD website (www.amd.com). 5.1.5 Enabling the AMD® CrossFireX™ technology After installing your graphics card package to exit the window. 1 ASUS P9X79 PRO 2 3 4 5-3 Launching the AMD VISION Engine Control Center To launch the AMD VISION...
... CrossFireXTM Configuration. 2. Click Apply, and then click OK to install the device drivers. Download the latest driver from the AMD website (www.amd.com). 5.1.5 Enabling the AMD® CrossFireX™ technology After installing your graphics card package to exit the window. 1 ASUS P9X79 PRO 2 3 4 5-3 Launching the AMD VISION Engine Control Center To launch the AMD VISION...
User Manual
Page 163
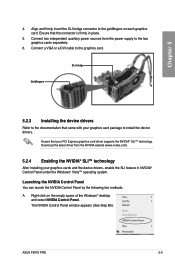
... card package to the goldfingers on the empty space of the Windows® desktop and select NVIDIA Control Panel. Download the latest driver from the power supply to the graphics card. The NVIDIA Control Panel window appears (See Step B5). Chapter 5 4. Align and firmly ...technology After installing your PCI Express graphics card driver supports the NVIDIA® SLI™ technology. Ensure that the connector is firmly in NVIDIA® Control Panel under the Windows® Vista™ operating system. Right click on each graphics card. ASUS P9X79 PRO 5-5 Connect a VGA or a DVI ...
... card package to the goldfingers on the empty space of the Windows® desktop and select NVIDIA Control Panel. Download the latest driver from the power supply to the graphics card. The NVIDIA Control Panel window appears (See Step B5). Chapter 5 4. Align and firmly ...technology After installing your PCI Express graphics card driver supports the NVIDIA® SLI™ technology. Ensure that the connector is firmly in NVIDIA® Control Panel under the Windows® Vista™ operating system. Right click on each graphics card. ASUS P9X79 PRO 5-5 Connect a VGA or a DVI ...


