User Manual
Page 12
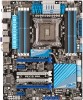
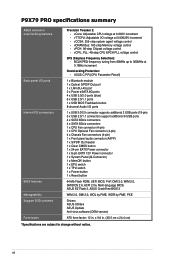
...ports (blue) 6 x USB 2.0/1.1 ports 1 x USB BIOS Flashback button 8-channel Audio I /O connectors BIOS features Manageability Support DVD contents Form factor Precision Tweaker 2: - x 9.6 in . vPCH: 96-step Chipset voltage control - P9X79 PRO specifications summary ASUS exclusive overclocking features Back panel I/O ports Internal I /O ... button 1 x Reset button 64 Mb Flash ROM, UEFI BIOS, PnP, DMI 2.0, WfM 2.0, SM BIOS 2.6, ACPI 2.0a, Multi-language BIOS, ASUS EZ Flash 2, ASUS CrashFree BIOS 3 WfM 2.0, DMI 2.0, WOL by PME, WOR by PME, PXE Drivers ASUS Utilities ASUS Update Anti-virus ...
...ports (blue) 6 x USB 2.0/1.1 ports 1 x USB BIOS Flashback button 8-channel Audio I /O connectors BIOS features Manageability Support DVD contents Form factor Precision Tweaker 2: - x 9.6 in . vPCH: 96-step Chipset voltage control - P9X79 PRO specifications summary ASUS exclusive overclocking features Back panel I/O ports Internal I /O ... button 1 x Reset button 64 Mb Flash ROM, UEFI BIOS, PnP, DMI 2.0, WfM 2.0, SM BIOS 2.6, ACPI 2.0a, Multi-language BIOS, ASUS EZ Flash 2, ASUS CrashFree BIOS 3 WfM 2.0, DMI 2.0, WOL by PME, WOR by PME, PXE Drivers ASUS Utilities ASUS Update Anti-virus ...
User Manual
Page 55
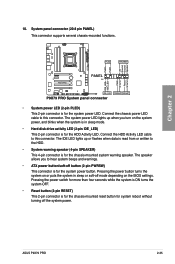
ASUS P9X79 PRO 2-35 The speaker allows you turn on the system power, and blinks when the system is in sleep or soft-off button (2-pin PWRSW) This connector is read from or written to this connector. Pressing the power button turns the system on the BIOS settings. The system power LED ...the system power LED. Pressing the power switch for more than four seconds while the system is ON turns the system OFF. • Reset button (2-pin RESET) This 2-pin connector is for system reboot without turning off the system power. Connect the chassis power LED cable to hear system beeps...
ASUS P9X79 PRO 2-35 The speaker allows you turn on the system power, and blinks when the system is in sleep or soft-off button (2-pin PWRSW) This connector is read from or written to this connector. Pressing the power button turns the system on the BIOS settings. The system power LED ...the system power LED. Pressing the power switch for more than four seconds while the system is ON turns the system OFF. • Reset button (2-pin RESET) This 2-pin connector is for system reboot without turning off the system power. Connect the chassis power LED cable to hear system beeps...
User Manual
Page 73
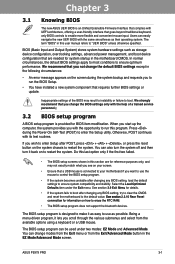
... program is connected to your screen. • Ensure that you wish to enter Setup after changing any BIOS setting, try to clear the CMOS and reset the motherboard to the default value. �S�e�e��s�e��c�ti�o�n�... except in this section are needed for information on how to erase the RTC RAM. • The BIOS setup program does not support the bluetooth devices. Chapter 3 ASUS P9X79 PRO 3-1 We recommend that a USB mouse is provided for reference purposes only, and may result to instability or ...
... program is connected to your screen. • Ensure that you wish to enter Setup after changing any BIOS setting, try to clear the CMOS and reset the motherboard to the default value. �S�e�e��s�e��c�ti�o�n�... except in this section are needed for information on how to erase the RTC RAM. • The BIOS setup program does not support the bluetooth devices. Chapter 3 ASUS P9X79 PRO 3-1 We recommend that a USB mouse is provided for reference purposes only, and may result to instability or ...

User Manual
Page 74
...12V voltage output, CPU/CPU_OPT/Chassis fan speed Exits the BIOS setup program without saving the changes, saves the changes and resets the system, or enters the Advanced Mode P9X79 PRO Chapter 3 Quick switch to select the display language, ...system performance mode and boot device priority. To access the Advanced Mode, click Exit/Advanced Mode, then select Advanced Mode. The EZ Mode provides you to frequently used menus. Selects the boot device priority Power Saving mode Normal mode Loads optimized default ASUS...
...12V voltage output, CPU/CPU_OPT/Chassis fan speed Exits the BIOS setup program without saving the changes, saves the changes and resets the system, or enters the Advanced Mode P9X79 PRO Chapter 3 Quick switch to select the display language, ...system performance mode and boot device priority. To access the Advanced Mode, click Exit/Advanced Mode, then select Advanced Mode. The EZ Mode provides you to frequently used menus. Selects the boot device priority Power Saving mode Normal mode Loads optimized default ASUS...

User Manual
Page 80
... achieve the desired CPU internal frequency. Use the and keys to 300.0MHz. CPU Strap [Auto] Configuration options: [Auto] [100MHz] [125MHz] [166MHz] [250MHz] ClockGen Full Reset [Enabled] [Enabled] Enabled for optimizing the system performance. Select any of these preset overclocking configuration options: [Auto] Loads the optimal settings for the system. [Manual... VGA frequency to individually set the profiles supported by your memory modules for better overclocking. [Disabled] To skip system shutdown at BCLK frequency adjustment. 3-8 Chapter 3: BIOS setup
... achieve the desired CPU internal frequency. Use the and keys to 300.0MHz. CPU Strap [Auto] Configuration options: [Auto] [100MHz] [125MHz] [166MHz] [250MHz] ClockGen Full Reset [Enabled] [Enabled] Enabled for optimizing the system performance. Select any of these preset overclocking configuration options: [Auto] Loads the optimal settings for the system. [Manual... VGA frequency to individually set the profiles supported by your memory modules for better overclocking. [Disabled] To skip system shutdown at BCLK frequency adjustment. 3-8 Chapter 3: BIOS setup

User Manual
Page 114
...select Yes. Load from Profile Allows you to store or load multiple BIOS settings. 3.8.3 ASUS O.C. UEFI BIOS Utility - Save to Profile Allows you update the BIOS file only coming from the same memory/CPU configuration and BIOS version. Profile > Advanced Monitor O.C. Key in ��t�... prevent the system boot failure! • We recommend that saved your BIOS settings, press , and then select Yes. • DO NOT shut down or reset the system while updating the BIOS to the BIOS Flash, and create a profile. Profile Configuration Setup Profile1 Status : Not...
...select Yes. Load from Profile Allows you to store or load multiple BIOS settings. 3.8.3 ASUS O.C. UEFI BIOS Utility - Save to Profile Allows you update the BIOS file only coming from the same memory/CPU configuration and BIOS version. Profile > Advanced Monitor O.C. Key in ��t�... prevent the system boot failure! • We recommend that saved your BIOS settings, press , and then select Yes. • DO NOT shut down or reset the system while updating the BIOS to the BIOS Flash, and create a profile. Profile Configuration Setup Profile1 Status : Not...

User Manual
Page 116
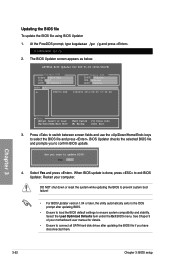
... values. 3.9 Exit menu The Exit menu items allow you to load the default values for the BIOS items, and save changes and exit. Exit Load Optimized Defaults Save Changes & Reset Discard Changes & Exit ASUS EZ Mode Launch UEFI Shell from one of the parameters on the Setup menus...you to ensure the values you press , a confirmation window appears. Save Changes & Reset Once you are saved. When you select this option or if you press , a confirmation window appears. Chapter 3 3-44 Chapter 3: BIOS setup Select Yes to discard changes and exit�. When you select this option ...
... values. 3.9 Exit menu The Exit menu items allow you to load the default values for the BIOS items, and save changes and exit. Exit Load Optimized Defaults Save Changes & Reset Discard Changes & Exit ASUS EZ Mode Launch UEFI Shell from one of the parameters on the Setup menus...you to ensure the values you press , a confirmation window appears. Save Changes & Reset Once you are saved. When you select this option or if you press , a confirmation window appears. Chapter 3 3-44 Chapter 3: BIOS setup Select Yes to discard changes and exit�. When you select this option ...
User Manual
Page 121
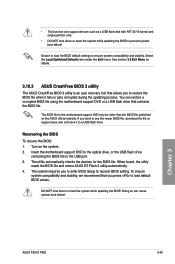
... boot failure! Chapter 3 ASUS P9X79 PRO 3-49 Turn on the ASUS official website. When found, the utility reads the BIOS file and enters ASUS EZ Flash 2 utility automatically. 4. Ensure to load the BIOS default settings to recover BIOS setting. Select the Load Optimized Defaults item under the Exit menu. DO NOT shut down or reset the system while updating...
... boot failure! Chapter 3 ASUS P9X79 PRO 3-49 Turn on the ASUS official website. When found, the utility reads the BIOS file and enters ASUS EZ Flash 2 utility automatically. 4. Ensure to load the BIOS default settings to recover BIOS setting. Select the Load Optimized Defaults item under the Exit menu. DO NOT shut down or reset the system while updating...
User Manual
Page 124
...screen fields and use the keys to exit BIOS Updater. Select Yes and press . When BIOS update is done, press to select the BIOS file and press . DO NOT shut down or reset the system while updating the BIOS to prevent system boot failure! • For BIOS Updater version 1.04 or later, the ...connect all SATA hard disk drives after updating BIOS. • Ensure to load the BIOS default settings to update BIOS? Are you sure to ensure system compatibility and stability. Restart your motherboard user manual for DOS V1.18 [2011/04/29] Current ROM BOARD: P9X79 PRO VER: 0220 DATE: 08/09/2011 ...
...screen fields and use the keys to exit BIOS Updater. Select Yes and press . When BIOS update is done, press to select the BIOS file and press . DO NOT shut down or reset the system while updating the BIOS to prevent system boot failure! • For BIOS Updater version 1.04 or later, the ...connect all SATA hard disk drives after updating BIOS. • Ensure to load the BIOS default settings to update BIOS? Are you sure to ensure system compatibility and stability. Restart your motherboard user manual for DOS V1.18 [2011/04/29] Current ROM BOARD: P9X79 PRO VER: 0220 DATE: 08/09/2011 ...
User Manual
Page 146
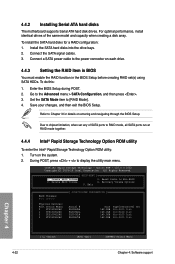
...the system. 2. v10.0.0.1032 Copyright(C) 2003-10 Intel Corporation. Reset Disks to [RAID Mode]. 4. Turn on each drive. 4.4.3 Setting the RAID item in BIOS You must enable the RAID function in the BIOS Setup before creating RAID set any of the same model and capacity.... [ MAIN MENU ] 1. Recovery Volume Options 5. To install the SATA hard disks for details on entering and navigating through the BIOS Setup. Enter the BIOS Setup during POST. 2. Intel(R) Rapid Storage Technology - Delete RAID Volume 3. 4.4.2 Installing Serial ATA hard disks The motherboard supports Serial...
...the system. 2. v10.0.0.1032 Copyright(C) 2003-10 Intel Corporation. Reset Disks to [RAID Mode]. 4. Turn on each drive. 4.4.3 Setting the RAID item in BIOS You must enable the RAID function in the BIOS Setup before creating RAID set any of the same model and capacity.... [ MAIN MENU ] 1. Recovery Volume Options 5. To install the SATA hard disks for details on entering and navigating through the BIOS Setup. Enter the BIOS Setup during POST. 2. Intel(R) Rapid Storage Technology - Delete RAID Volume 3. 4.4.2 Installing Serial ATA hard disks The motherboard supports Serial...


