User Manual
Page 101
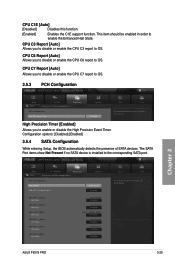
... Hot Plug Not Present Disabled SATA 3G_6 (Blue) Hot Plug Not Present Disabled Boot Tool (1) IDE Mode. (2) AHCI Mode. (3) RAID Mode. Chapter 3 ASUS P9X79 PRO 3-29 CPU C6 Report [Auto] Allows you to OS. CPU C1E [Auto] [Disabled] Disables this function. [Enabled] Enables the... to enable the Enhanced Halt State. UEFI BIOS Utility - Configuration options: [Disabled] [Enabled] 3.5.4 SATA Configuration While entering Setup, the BIOS automatically detects the presence of SATA devices. This item should be enabled in order to the corresponding SATA port....
... Hot Plug Not Present Disabled SATA 3G_6 (Blue) Hot Plug Not Present Disabled Boot Tool (1) IDE Mode. (2) AHCI Mode. (3) RAID Mode. Chapter 3 ASUS P9X79 PRO 3-29 CPU C6 Report [Auto] Allows you to OS. CPU C1E [Auto] [Disabled] Disables this function. [Enabled] Enables the... to enable the Enhanced Halt State. UEFI BIOS Utility - Configuration options: [Disabled] [Enabled] 3.5.4 SATA Configuration While entering Setup, the BIOS automatically detects the presence of SATA devices. This item should be enabled in order to the corresponding SATA port....
User Manual
Page 102
...65533;[�E�n��a�b�l�e�d�]�. It's allow user to [AHCI Mode]. Chapter 3 3-30 Chapter 3: BIOS setup It's allow user to [AHCI Mode]. S.M.A.R.T. SATA3G_3 (Blue) Hot Plug [Disabled] This item appear only when you set the previous ...you set the SATA configuration. [Disabled] [IDE Mode] [AHCI Mode] [RAID Mode] Disables the SATA function. It's allow user to create a RAID configuration from the SATA hard disk drives. Set to [RAID Mode] when you want to enabled/disabled SATA Hot Plug Support. �C�...
...65533;[�E�n��a�b�l�e�d�]�. It's allow user to [AHCI Mode]. Chapter 3 3-30 Chapter 3: BIOS setup It's allow user to [AHCI Mode]. S.M.A.R.T. SATA3G_3 (Blue) Hot Plug [Disabled] This item appear only when you set the previous ...you set the SATA configuration. [Disabled] [IDE Mode] [AHCI Mode] [RAID Mode] Disables the SATA function. It's allow user to create a RAID configuration from the SATA hard disk drives. Set to [RAID Mode] when you want to enabled/disabled SATA Hot Plug Support. �C�...

User Manual
Page 106
...to [Enabled] and allows you to use the function of the Intel LAN controller. is disabled. is enabled. [Disabled] ASUS BT GO! Bluetooth Controller [Enabled] [Enabled] ASUS BT GO! Intel LAN Controller [Enabled] [Disabled] Disables the controller. [Enabled] Enables the Intel LAN controller. Configuration options:... LAN PXE OPROM [Disabled] This item appears only when you set this item to enable or disable the PXE OptionRom of Marvell RAID. AHCI), we recommend that you want use the full functin of the ASM1061 storage controller. SPDIF Out Type [SPDIF] [SPDIF]...
...to [Enabled] and allows you to use the function of the Intel LAN controller. is disabled. is enabled. [Disabled] ASUS BT GO! Bluetooth Controller [Enabled] [Enabled] ASUS BT GO! Intel LAN Controller [Enabled] [Disabled] Disables the controller. [Enabled] Enables the Intel LAN controller. Configuration options:... LAN PXE OPROM [Disabled] This item appears only when you set this item to enable or disable the PXE OptionRom of Marvell RAID. AHCI), we recommend that you want use the full functin of the ASM1061 storage controller. SPDIF Out Type [SPDIF] [SPDIF]...
User Manual
Page 125
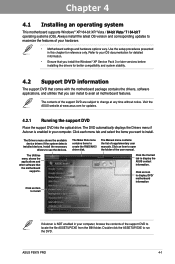
...reference only. Click the Contact tab to run the DVD. Double-click the ASSETUP.EXE to display the ASUS contact information. Install the necessary drivers to create the RAID/AHCI driver disk. The Manual menu contains the list of the user manual. Chapter 4: Chapter 4 ...65533;�is enabled in your computer. The Drivers menu shows the available device drivers if the system detects installed devices. ASUS P9X79 PRO 4-1 Use the setup procedures presented in your computer, browse the contents of your hardware. • Motherboard settings and hardware options vary. Refer...
...reference only. Click the Contact tab to run the DVD. Double-click the ASSETUP.EXE to display the ASUS contact information. Install the necessary drivers to create the RAID/AHCI driver disk. The Manual menu contains the list of the user manual. Chapter 4: Chapter 4 ...65533;�is enabled in your computer. The Drivers menu shows the available device drivers if the system detects installed devices. ASUS P9X79 PRO 4-1 Use the setup procedures presented in your computer, browse the contents of your hardware. • Motherboard settings and hardware options vary. Refer...
User Manual
Page 145
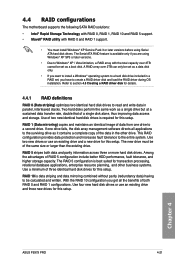
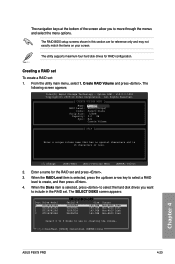
... • Due to the entire system. RAID 5 stripes both RAID 0 and RAID 1 configurations. Among the advantages of both data and parity information across three or more hard disk drives. RAID 10 is best suited for this setup. With the RAID 10 configuration you are using Serial ATA hard... stacks. Use two new drives or use an existing drive and three new drives for details. 4.4.1 RAID definitions RAID 0 (Data striping) optimizes two identical hard disk drives to a second drive. The Serial ATA RAID feature is required for this setup. Chapter 4 ASUS P9X79 PRO 4-21
... • Due to the entire system. RAID 5 stripes both RAID 0 and RAID 1 configurations. Among the advantages of both data and parity information across three or more hard disk drives. RAID 10 is best suited for this setup. With the RAID 10 configuration you are using Serial ATA hard... stacks. Use two new drives or use an existing drive and three new drives for details. 4.4.1 RAID definitions RAID 0 (Data striping) optimizes two identical hard disk drives to a second drive. The Serial ATA RAID feature is required for this setup. Chapter 4 ASUS P9X79 PRO 4-21
User Manual
Page 146
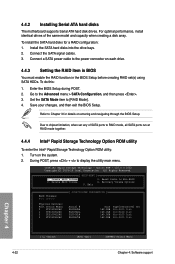
... using SATA HDDs. During POST, press + to the power connector on each drive. 4.4.3 Setting the RAID item in BIOS You must enable the RAID function in the BIOS Setup before creating RAID set any of the same model and capacity when creating a disk array. Turn on entering and navigating ...through the BIOS Setup. Reset Disks to [RAID Mode]. 4. Recovery Volume Options 5. To install the SATA hard disks for details on the system. 2. Set the SATA Mode item to Non-RAID 4. Go to RAID mode, all SATA ports run at RAID mode together. 4.4.4 Intel® Rapid...
... using SATA HDDs. During POST, press + to the power connector on each drive. 4.4.3 Setting the RAID item in BIOS You must enable the RAID function in the BIOS Setup before creating RAID set any of the same model and capacity when creating a disk array. Turn on entering and navigating ...through the BIOS Setup. Reset Disks to [RAID Mode]. 4. Recovery Volume Options 5. To install the SATA hard disks for details on the system. 2. Set the SATA Mode item to Non-RAID 4. Go to RAID mode, all SATA ports run at RAID mode together. 4.4.4 Intel® Rapid...
User Manual
Page 147
...3 ST3160812AS [ SELECT DISKS ] Serial # 9LS0HJA4 9LS0F4HL 3LS0JYL8 9LS0BJ5H Size 149.0GB 149.0GB 149.0GB 149.0GB Status Non-RAID Disk Non-RAID Disk Non-RAID Disk Non-RAID Disk Select 2 to 6 disks to move through the menus and select the menu options. The navigation keys at the bottom of... only and may not exactly match the items on your screen. The RAID BIOS setup screens shown in creating the volume. [↑↓]-Prev/Next [SPACE]-SelectDisk [ENTER]-Done Chapter 4 ASUS P9X79 PRO 4-23 When the RAID Level item is 16 characters or less. [↑↓]Change [TAB]-Next...
...3 ST3160812AS [ SELECT DISKS ] Serial # 9LS0HJA4 9LS0F4HL 3LS0JYL8 9LS0BJ5H Size 149.0GB 149.0GB 149.0GB 149.0GB Status Non-RAID Disk Non-RAID Disk Non-RAID Disk Non-RAID Disk Select 2 to 6 disks to move through the menus and select the menu options. The navigation keys at the bottom of... only and may not exactly match the items on your screen. The RAID BIOS setup screens shown in creating the volume. [↑↓]-Prev/Next [SPACE]-SelectDisk [ENTER]-Done Chapter 4 ASUS P9X79 PRO 4-23 When the RAID Level item is 16 characters or less. [↑↓]Change [TAB]-Next...
User Manual
Page 150
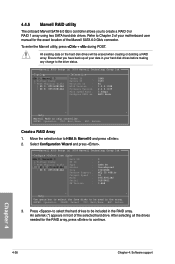
...An asterisk (*) appears in the array. Ensure that you to HBA 0: Marvell 0 and press . 2. Move the selection bar to create a RAID 0 or RAID 1 array using two SATA hard disk drives. ENTER: Operation SPACE: Select F10: Exit/Save ESC: Return 3. To enter the Marvell utility, ...press + during POST. Marvell BIOS Setup (c) 2009 Marvell Technology Group Ltd. Press to select the hard drives to continue. Marvell BIOS Setup (c) 2009 Marvell...
...An asterisk (*) appears in the array. Ensure that you to HBA 0: Marvell 0 and press . 2. Move the selection bar to create a RAID 0 or RAID 1 array using two SATA hard disk drives. ENTER: Operation SPACE: Select F10: Exit/Save ESC: Return 3. To enter the Marvell utility, ...press + during POST. Marvell BIOS Setup (c) 2009 Marvell Technology Group Ltd. Press to select the hard drives to continue. Marvell BIOS Setup (c) 2009 Marvell...
User Manual
Page 151
... Name: Enter a name with content in much smaller size, such as shown in the RAID 1 array. Move the selection bar to configure further RAID settings. Chapter 4 ASUS P9X79 PRO 4-27 Use the up or down arrow key to move the selection bar and press to... Yes Name : Default Threshold(%) : 90 Next ▶ ▶ Help Virtual disk configurations. RAID Level: Select a RAID Level. Marvell BIOS Setup (c) 2009 Marvell Technology Group Ltd. Configuration options: [RAID 0] [RAID 1] Stripe Size: Specifies the size of drive capacity difference. A smaller stripe size is recommended ...
... Name: Enter a name with content in much smaller size, such as shown in the RAID 1 array. Move the selection bar to configure further RAID settings. Chapter 4 ASUS P9X79 PRO 4-27 Use the up or down arrow key to move the selection bar and press to... Yes Name : Default Threshold(%) : 90 Next ▶ ▶ Help Virtual disk configurations. RAID Level: Select a RAID Level. Marvell BIOS Setup (c) 2009 Marvell Technology Group Ltd. Configuration options: [RAID 0] [RAID 1] Stripe Size: Specifies the size of drive capacity difference. A smaller stripe size is recommended ...
User Manual
Page 152
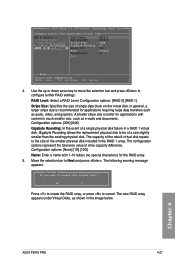
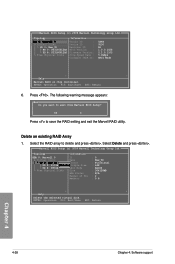
... : RAID0 : 304128MB : N/A : 2 : 0 8 ▶ ▶ Help Delete the selected virtual disk. The following warning message appears: Exit Do you want to save the RAID setting and exit the Marvell RAID utility. Marvell BIOS Setup (c) 2009 Marvell Technology Group Ltd. ENTER: Operation F10: Exit/Save ESC: Return Chapter 4 4-28 Chapter 4: Software support Delete an existing...
... : RAID0 : 304128MB : N/A : 2 : 0 8 ▶ ▶ Help Delete the selected virtual disk. The following warning message appears: Exit Do you want to save the RAID setting and exit the Marvell RAID utility. Marvell BIOS Setup (c) 2009 Marvell Technology Group Ltd. ENTER: Operation F10: Exit/Save ESC: Return Chapter 4 4-28 Chapter 4: Software support Delete an existing...

User Manual
Page 153
The following warning message appears: Exit Do you want to delete the Master Boot Record (MBR) from Marvell BIOS Setup? Yes No Press to delete the selected RAID array. Chapter 4 ASUS P9X79 PRO 4-29 Yes No Press to delete MBR from this virtual disk ? The following warning message appears: Delete MBR Do you want to exit from the selected RAID array. 3. Press . The following warning message appears: Delete Virtual Disk Do you want to delete this virtual disk ? Yes No Press to save the RAID setting and exit the Marvell RAID utility. 2.
The following warning message appears: Exit Do you want to delete the Master Boot Record (MBR) from Marvell BIOS Setup? Yes No Press to delete the selected RAID array. Chapter 4 ASUS P9X79 PRO 4-29 Yes No Press to delete MBR from this virtual disk ? The following warning message appears: Delete MBR Do you want to exit from the selected RAID array. 3. Press . The following warning message appears: Delete Virtual Disk Do you want to delete this virtual disk ? Yes No Press to save the RAID setting and exit the Marvell RAID utility. 2.

User Manual
Page 154
.... • The motherboard does not provide a floppy drive connector. Follow the succeeding screen instructions to create a RAID driver disk. 7. To work around this OS limitation, refer to enter the BIOS setup utility. 3. Insert a formatted floppy disk into the optical drive. 4. Chapter 4 4-30 Chapter 4: Software support Press during POST to section 4.5.4 Using a USB...
.... • The motherboard does not provide a floppy drive connector. Follow the succeeding screen instructions to create a RAID driver disk. 7. To work around this OS limitation, refer to enter the BIOS setup utility. 3. Insert a formatted floppy disk into the optical drive. 4. Chapter 4 4-30 Chapter 4: Software support Press during POST to section 4.5.4 Using a USB...


