User Manual
Page 4
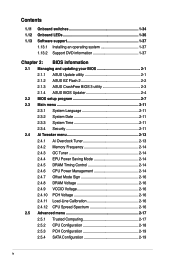
... Onboard LEDs 1-36 1.13 Software support 1-37 1.13.1 Installing an operating system 1-37 1.13.2 Support DVD information 1-37 Chapter 2: BIOS information 2.1 Managing and updating your BIOS 2-1 2.1.1 ASUS Update utility 2-1 2.1.2 ASUS EZ Flash 2 2-2 2.1.3 ASUS CrashFree BIOS 3 utility 2-3 2.1.4 ASUS BIOS Updater 2-4 2.2 BIOS setup program 2-7 2.3 Main menu 2-11 2.3.1 System Language 2-11 2.3.2 System Date 2-11 2.3.3 System Time 2-11 2.3.4 Security 2-11 2.4 Ai Tweaker menu...
... Onboard LEDs 1-36 1.13 Software support 1-37 1.13.1 Installing an operating system 1-37 1.13.2 Support DVD information 1-37 Chapter 2: BIOS information 2.1 Managing and updating your BIOS 2-1 2.1.1 ASUS Update utility 2-1 2.1.2 ASUS EZ Flash 2 2-2 2.1.3 ASUS CrashFree BIOS 3 utility 2-3 2.1.4 ASUS BIOS Updater 2-4 2.2 BIOS setup program 2-7 2.3 Main menu 2-11 2.3.1 System Language 2-11 2.3.2 System Date 2-11 2.3.3 System Time 2-11 2.3.4 Security 2-11 2.4 Ai Tweaker menu...
User Manual
Page 7
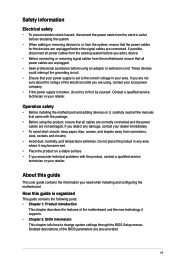
...you are not sure about the voltage of the motherboard and the new technology it supports. • Chapter 2: BIOS information This chapter tells how to change system settings through the BIOS Setup menus. How this guide This user guide contains the information you add a device. • Before connecting...cables are also provided. Contact a qualified service technician or your retailer. Do not place the product in your area. Detailed descriptions of the BIOS parameters are not damaged. If you detect any area where it may become wet. • Place the product on it by yourself. ...
...you are not sure about the voltage of the motherboard and the new technology it supports. • Chapter 2: BIOS information This chapter tells how to change system settings through the BIOS Setup menus. How this guide This user guide contains the information you add a device. • Before connecting...cables are also provided. Contact a qualified service technician or your retailer. Do not place the product in your area. Detailed descriptions of the BIOS parameters are not damaged. If you detect any area where it may become wet. • Place the product on it by yourself. ...
User Manual
Page 10
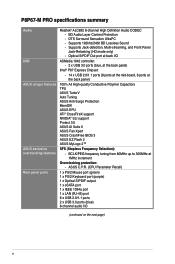
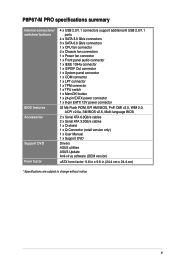
...ASUS AI Suite II ASUS Fan Xpert ASUS CrashFree BIOS 3 ASUS EZ Flash 2 ASUS MyLogo 2™ SFS (Stepless Frequency Selection): - BCLK/PEG frequency tuning from 80MHz up to 300MHz at the back panel) 100% All High-quality Conductive Polymer Capacitors TPU ASUS TurboV Auto Tuning ASUS... USB 2.0/1.1 ports (8 ports at the mid-board, 6 ports at 1MHz increment Overclocking protection: - P8P67-M PRO specifications summary Audio USB ASUS unique features ASUS exclusive overclocking features Rear panel ports Realtek® ALC892 8-channel High Definition Audio CODEC - Supports Jack-...
...ASUS AI Suite II ASUS Fan Xpert ASUS CrashFree BIOS 3 ASUS EZ Flash 2 ASUS MyLogo 2™ SFS (Stepless Frequency Selection): - BCLK/PEG frequency tuning from 80MHz up to 300MHz at the back panel) 100% All High-quality Conductive Polymer Capacitors TPU ASUS TurboV Auto Tuning ASUS... USB 2.0/1.1 ports (8 ports at the mid-board, 6 ports at 1MHz increment Overclocking protection: - P8P67-M PRO specifications summary Audio USB ASUS unique features ASUS exclusive overclocking features Rear panel ports Realtek® ALC892 8-channel High Definition Audio CODEC - Supports Jack-...
User Manual
Page 11
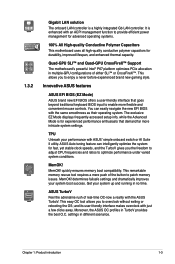
... 1 x Q-shield 1 x Q-Connector (retail version only) 1 x User Manual 1 x Support DVD Drivers ASUS utilities ASUS Update Anti-virus software (OEM version) uATX form factor: 9.6 in x 9.6 in (24.4 cm x 24.4 cm) * Specifications are subject to change without notice. P8P67-M PRO specifications summary Internal connectors/ switches/ buttons BIOS features Accessories Support DVD Form factor 4 x USB 2.0/1.1 connectors support additional 8 USB...
... 1 x Q-shield 1 x Q-Connector (retail version only) 1 x User Manual 1 x Support DVD Drivers ASUS utilities ASUS Update Anti-virus software (OEM version) uATX form factor: 9.6 in x 9.6 in (24.4 cm x 24.4 cm) * Specifications are subject to change without notice. P8P67-M PRO specifications summary Internal connectors/ switches/ buttons BIOS features Accessories Support DVD Form factor 4 x USB 2.0/1.1 connectors support additional 8 USB...
User Manual
Page 15
... a mere push of either SLI™ or CrossFireX™. ASUS Auto tuning feature can easily navigate the new EFI BIOS with the ASUS TurboV. determines failsafe settings and dramatically improves your performance with ASUS' simple onboard switch or AI Suite II utility. Chapter 1: Product... introduction 1-3 MemOK! ASUS TurboV Feel the adrenaline rush of real-time...
... a mere push of either SLI™ or CrossFireX™. ASUS Auto tuning feature can easily navigate the new EFI BIOS with the ASUS TurboV. determines failsafe settings and dramatically improves your performance with ASUS' simple onboard switch or AI Suite II utility. Chapter 1: Product... introduction 1-3 MemOK! ASUS TurboV Feel the adrenaline rush of real-time...

User Manual
Page 16
... consumption in -one simple to achieve a quiet and cool environment. This tool also provides stability testing. ASUS CrashFree BIOS 3 ASUS CrashFree BIOS 3 is a unique power saving technology that contains the latest BIOS file. 1-4 ASUS P8P67-M PRO Combined with usability and aesthetics, the ASUS Wing Heatsink will give users an extremely silent and cooling experience with no need to supervise...
... consumption in -one simple to achieve a quiet and cool environment. This tool also provides stability testing. ASUS CrashFree BIOS 3 ASUS CrashFree BIOS 3 is a unique power saving technology that contains the latest BIOS file. 1-4 ASUS P8P67-M PRO Combined with usability and aesthetics, the ASUS Wing Heatsink will give users an extremely silent and cooling experience with no need to supervise...
User Manual
Page 17
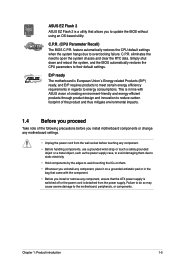
... regards to energy consumptions. Chapter 1: Product introduction 1-5 This is a utility that allows you to update the BIOS without using an OS-based utility. ASUS EZ Flash 2 ASUS EZ Flash 2 is in line with the component. • Before you install or remove any component, ensure...8226; Whenever you uninstall any motherboard settings. • Unplug the power cord from the power supply. C.P.R. (CPU Parameter Recall) The BIOS C.P.R. C.P.R. feature automatically restores the CPU default settings when the system hangs due to their default settings. Simply shut down and reboot the...
... regards to energy consumptions. Chapter 1: Product introduction 1-5 This is a utility that allows you to update the BIOS without using an OS-based utility. ASUS EZ Flash 2 ASUS EZ Flash 2 is in line with the component. • Before you install or remove any component, ensure...8226; Whenever you uninstall any motherboard settings. • Unplug the power cord from the power supply. C.P.R. (CPU Parameter Recall) The BIOS C.P.R. C.P.R. feature automatically restores the CPU default settings when the system hangs due to their default settings. Simply shut down and reboot the...
User Manual
Page 34
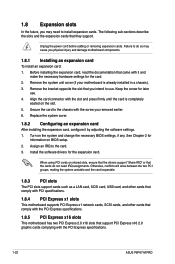
... Installing an expansion card To install an expansion card: 1. Keep the screw for information on the system and change the necessary BIOS settings, if any. See Chapter 2 for later use . Unplug the power cord before adding or removing expansion cards. Turn on...x16 slots This motherboard has two PCI Express 2.0 x16 slots that they support. Align the card connector with the PCI Express specifications. 1-22 ASUS P8P67-M PRO Replace the system cover. 1.8.2 Configuring an expansion card After installing the expansion card, configure it and make the necessary hardware settings for the ...
... Installing an expansion card To install an expansion card: 1. Keep the screw for information on the system and change the necessary BIOS settings, if any. See Chapter 2 for later use . Unplug the power cord before adding or removing expansion cards. Turn on...x16 slots This motherboard has two PCI Express 2.0 x16 slots that they support. Align the card connector with the PCI Express specifications. 1-22 ASUS P8P67-M PRO Replace the system cover. 1.8.2 Configuring an expansion card After installing the expansion card, configure it and make the necessary hardware settings for the ...
User Manual
Page 36
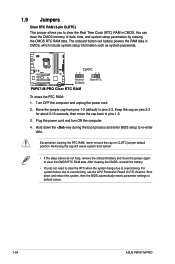
...in CMOS. Keep the cap on CLRTC jumper default position. Hold down and reboot the system, then the BIOS automatically resets parameter settings to default values. 1-24 ASUS P8P67-M PRO After clearing the CMOS, reinstall the battery. • You do not help, remove the onboard battery ...and move the cap back to pins 1-2. 3. P8P67-M PRO CLRTC 12 23 Normal (Default) Clear RTC P8P67-M PRO Clear RTC RAM To erase the RTC ...
...in CMOS. Keep the cap on CLRTC jumper default position. Hold down and reboot the system, then the BIOS automatically resets parameter settings to default values. 1-24 ASUS P8P67-M PRO After clearing the CMOS, reinstall the battery. • You do not help, remove the onboard battery ...and move the cap back to pins 1-2. 3. P8P67-M PRO CLRTC 12 23 Normal (Default) Clear RTC P8P67-M PRO Clear RTC RAM To erase the RTC ...
User Manual
Page 39
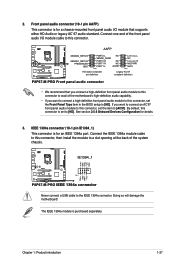
... AC'97 front panel audio module to this connector, set the item to [HD]. AAFP P8P67-M PRO SENSE2_RETUR SENSE1_RETUR PRESENCE# GND PORT2 L NC SENSE_SEND PORT2 R NC PORT1 R NC PORT1 L AGND...Line out_R MICPWR MIC2 PIN 1 HD-audio-compliant pin definition Legacy AC'97 compliant definition P8P67-M PRO Front panel audio connector • We recommend that supports either HD Audio or legacy AC...IEEE 1394a module is for details. 3. IE1394_1 TPA1GND TPB1+12V GND P8P67-M PRO PIN 1 TPA1+ GND TPB1+ +12V P8P67-M PRO IEEE 1394a connector Never connect a USB cable to avail of the...
... AC'97 front panel audio module to this connector, set the item to [HD]. AAFP P8P67-M PRO SENSE2_RETUR SENSE1_RETUR PRESENCE# GND PORT2 L NC SENSE_SEND PORT2 R NC PORT1 R NC PORT1 L AGND...Line out_R MICPWR MIC2 PIN 1 HD-audio-compliant pin definition Legacy AC'97 compliant definition P8P67-M PRO Front panel audio connector • We recommend that supports either HD Audio or legacy AC...IEEE 1394a module is for details. 3. IE1394_1 TPA1GND TPB1+12V GND P8P67-M PRO PIN 1 TPA1+ GND TPB1+ +12V P8P67-M PRO IEEE 1394a connector Never connect a USB cable to avail of the...
User Manual
Page 42
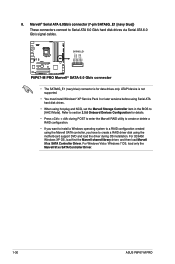
... disk using hot-plug and NCQ, set the Marvell Storage Controller item in the BIOS to [AHCI Mode]. For Windows Vista / Windows 7 OS, load only the Marvell 91xx SATA Controller Driver. 1-30 ASUS P8P67-M PRO Refer to Serial ATA 6.0 Gb/s hard disk drives via Serial ATA 6.0 Gb/s... signal cables. For 32/64bit Windows XP OS, load first the Marvell shared library driver, and then load Marvell 91xx SATA Controller Driver. SATA6G_E1 P8P67-M PRO P8P67-M PRO Marvell® SATA 6.0 ...
... disk using hot-plug and NCQ, set the Marvell Storage Controller item in the BIOS to [AHCI Mode]. For Windows Vista / Windows 7 OS, load only the Marvell 91xx SATA Controller Driver. 1-30 ASUS P8P67-M PRO Refer to Serial ATA 6.0 Gb/s hard disk drives via Serial ATA 6.0 Gb/s... signal cables. For 32/64bit Windows XP OS, load first the Marvell shared library driver, and then load Marvell 91xx SATA Controller Driver. SATA6G_E1 P8P67-M PRO P8P67-M PRO Marvell® SATA 6.0 ...
User Manual
Page 43
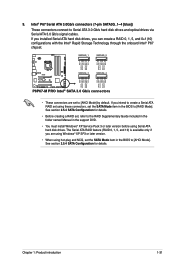
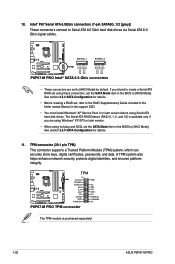
... GND RSATA_TXP1 RSATA_TXN1 GND RSATA_RXP1 RSATA_RXN1 GND GND RSATA_TXP2 RSATA_TXN2 GND RSATA_RXP2 RSATA_RXN2 GND P8P67-M PRO SATA3G_3 SATA3G_4 GND RSATA_TXP3 RSATA_TXN3 GND RSATA_RXP3 RSATA_RXN3 GND GND RSATA_TXP4 RSATA_TXN4 GND RSATA_RXP4 RSATA_RXN4 GND P8P67-M PRO Intel® SATA 3.0 Gb/s connectors • These connectors are using Windows&#... Intel® P67 chipset. If you installed Serial ATA hard disk drives, you are set the SATA Mode item in the BIOS to Serial ATA 3.0 Gb/s hard disk drives and optical drives via Serial ATA 3.0 Gb/s signal cables. See section 2.5.4 SATA...
... GND RSATA_TXP1 RSATA_TXN1 GND RSATA_RXP1 RSATA_RXN1 GND GND RSATA_TXP2 RSATA_TXN2 GND RSATA_RXP2 RSATA_RXN2 GND P8P67-M PRO SATA3G_3 SATA3G_4 GND RSATA_TXP3 RSATA_TXN3 GND RSATA_RXP3 RSATA_RXN3 GND GND RSATA_TXP4 RSATA_TXN4 GND RSATA_RXP4 RSATA_RXN4 GND P8P67-M PRO Intel® SATA 3.0 Gb/s connectors • These connectors are using Windows&#... Intel® P67 chipset. If you installed Serial ATA hard disk drives, you are set the SATA Mode item in the BIOS to Serial ATA 3.0 Gb/s hard disk drives and optical drives via Serial ATA 3.0 Gb/s signal cables. See section 2.5.4 SATA...
User Manual
Page 44
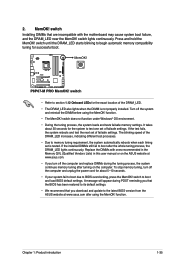
...0, 1, 5, and 10) is purchased separately! 1-32 ASUS P8P67-M PRO TPM connector (20-1 pin TPM) This connector supports a Trusted Platform Module (TPM) system, which can securely store keys, digital certificates, passwords, and data. 10. P8P67-M PRO SATA6G_1 SATA6G_2 GND RSATA_TXP1 RSATA_TXN1 GND RSATA_RXP1 RSATA_RXN1 GND GND ... creating a RAID set the SATA Mode item in the BIOS to [RAID Mode]. If you are set the SATA Mode item in the BIOS to [AHCI Mode]. See section 2.5.4 SATA Configuration for details. 11. TPM P8P67-M PRO PIN 1 PCICLK FRAME# PCIRST# AD3 3.3V AD0 NC...
...0, 1, 5, and 10) is purchased separately! 1-32 ASUS P8P67-M PRO TPM connector (20-1 pin TPM) This connector supports a Trusted Platform Module (TPM) system, which can securely store keys, digital certificates, passwords, and data. 10. P8P67-M PRO SATA6G_1 SATA6G_2 GND RSATA_TXP1 RSATA_TXN1 GND RSATA_RXP1 RSATA_RXN1 GND GND ... creating a RAID set the SATA Mode item in the BIOS to [RAID Mode]. If you are set the SATA Mode item in the BIOS to [AHCI Mode]. See section 2.5.4 SATA Configuration for details. 11. TPM P8P67-M PRO PIN 1 PCICLK FRAME# PCIRST# AD3 3.3V AD0 NC...
User Manual
Page 47
... set of the DRAM_LED increases, indicating different test processes. • Due to the latest BIOS version from the ASUS website at www.asus.com. • If you that the BIOS has been restored to section 1.12 Onboard LEDs for about 30 seconds for successful boot. ...Vendors Lists) in this user manual or on the ASUS website at www.asus.com after using the MemOK! Chapter 1: Product introduction 1-35 2. function. • The MemOK! P8P67-M PRO P8P67-M PRO MemOK! If the installed DIMMs still fail to boot and load BIOS default settings. function. switch to boot after turning...
... set of the DRAM_LED increases, indicating different test processes. • Due to the latest BIOS version from the ASUS website at www.asus.com. • If you that the BIOS has been restored to section 1.12 Onboard LEDs for about 30 seconds for successful boot. ...Vendors Lists) in this user manual or on the ASUS website at www.asus.com after using the MemOK! Chapter 1: Product introduction 1-35 2. function. • The MemOK! P8P67-M PRO P8P67-M PRO MemOK! If the installed DIMMs still fail to boot and load BIOS default settings. function. switch to boot after turning...
User Manual
Page 51
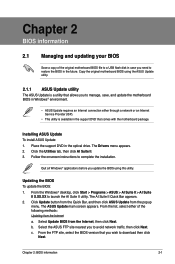
... requires an Internet connection either of the original motherboard BIOS file to a USB flash disk in case you wish to restore the BIOS in the future. Select the ASUS FTP site nearest you update the BIOS using the ASUS Update utility. 2.1.1 ASUS Update utility The ASUS Update is available in the support DVD that you need to...
... requires an Internet connection either of the original motherboard BIOS file to a USB flash disk in case you wish to restore the BIOS in the future. Select the ASUS FTP site nearest you update the BIOS using the ASUS Update utility. 2.1.1 ASUS Update utility The ASUS Update is available in the support DVD that you need to...
User Manual
Page 52
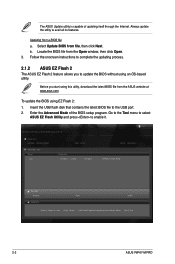
... File Info MODEL: Help Info VER: DATE [Enter] Select or Load [Tab] Switch [Up/Down/PageUp/PageDown/Home/End] Move [Esc] Exit 2-2 ASUS P8P67-M PRO b. To update the BIOS using an OS‑based utility. Enter the Advanced Mode of updating itself through the Internet. Always update the utility to the USB port. 2. Updating...
... File Info MODEL: Help Info VER: DATE [Enter] Select or Load [Tab] Switch [Up/Down/PageUp/PageDown/Home/End] Move [Esc] Exit 2-2 ASUS P8P67-M PRO b. To update the BIOS using an OS‑based utility. Enter the Advanced Mode of updating itself through the Internet. Always update the utility to the USB port. 2. Updating...
User Manual
Page 53
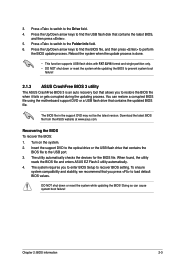
... optical drive or the USB flash drive that allows you to load default BIOS values. Download the latest BIOS file from the ASUS website at www.asus.com. The system requires you press to restore the BIOS file when it fails or gets corrupted during the updating process. Doing so.... Press to switch to the Drive field. 4. DO NOT shut down or reset the system while updating the BIOS to prevent system boot failure! 2.1.3 ASUS CrashFree BIOS 3 utility The ASUS CrashFree BIOS 3 is done. • This function supports USB flash disks with FAT 32/16 format and single partition only. &#...
... optical drive or the USB flash drive that allows you to load default BIOS values. Download the latest BIOS file from the ASUS website at www.asus.com. The system requires you press to restore the BIOS file when it fails or gets corrupted during the updating process. Doing so.... Press to switch to the Drive field. 4. DO NOT shut down or reset the system while updating the BIOS to prevent system boot failure! 2.1.3 ASUS CrashFree BIOS 3 utility The ASUS CrashFree BIOS 3 is done. • This function supports USB flash disks with FAT 32/16 format and single partition only. &#...

User Manual
Page 54
... to a hard disk drive or USB flash drive in DOS environment. Download the latest BIOS file and BIOS Updater from Drive C (optical drive) to update BIOS in NTFS format. 3. Boot your computer. C:\>d: D:\> 2-4 ASUS P8P67-M PRO The succeeding utility screens are for reference only. Prepare the motherboard support DVD and a USB flash drive in DOS environment 1. When...
... to a hard disk drive or USB flash drive in DOS environment. Download the latest BIOS file and BIOS Updater from Drive C (optical drive) to update BIOS in NTFS format. 3. Boot your computer. C:\>d: D:\> 2-4 ASUS P8P67-M PRO The succeeding utility screens are for reference only. Prepare the motherboard support DVD and a USB flash drive in DOS environment 1. When...

User Manual
Page 55
... the filename and three alphanumeric characters for DOS V1.18 Current ROM BOARD: P8P67-M PRO VER: 0202 DATE: 10/18/2010 Update ROM BOARD: Unknown VER: Unknown DATE: Unknown PATH: A:\ BIOS backup is any key to continue. Note Saving BIOS: Chapter 2: BIOS information 2-5 D:\>bupdater /oOLDBIOS1.rom Filename Extension The [filename] is done! At the FreeDOS...
... the filename and three alphanumeric characters for DOS V1.18 Current ROM BOARD: P8P67-M PRO VER: 0202 DATE: 10/18/2010 Update ROM BOARD: Unknown VER: Unknown DATE: Unknown PATH: A:\ BIOS backup is any key to continue. Note Saving BIOS: Chapter 2: BIOS information 2-5 D:\>bupdater /oOLDBIOS1.rom Filename Extension The [filename] is done! At the FreeDOS...
User Manual
Page 56
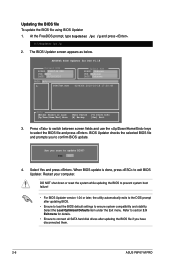
...BIOS file To update the BIOS file using BIOS Updater 1. ASUSTek BIOS Updater for details. • Ensure to connect all SATA hard disk drives after updating BIOS. • Ensure to load the BIOS default settings to the DOS prompt after updating the BIOS file if you have disconnected them. 2-6 ASUS P8P67-M PRO... Press to switch between screen fields and use the keys to exit BIOS Updater. DO NOT...
...BIOS file To update the BIOS file using BIOS Updater 1. ASUSTek BIOS Updater for details. • Ensure to connect all SATA hard disk drives after updating BIOS. • Ensure to load the BIOS default settings to the DOS prompt after updating the BIOS file if you have disconnected them. 2-6 ASUS P8P67-M PRO... Press to switch between screen fields and use the keys to exit BIOS Updater. DO NOT...


