User Manual
Page 14
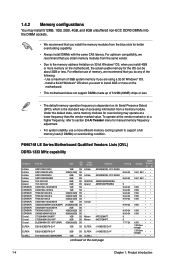
... 1.65V •• 1.35V(low voltage) • 1.35V(low voltage) • • - •• 1-4 Chapter 1: Product introduction P8H67-M LE Series Motherboard Qualified Vendors Lists (QVL) DDR3-1333 MHz capability Vendors A-Data A-Data A-Data A-Data Apacer Apacer CORSAIR CORSAIR CORSAIR CORSAIR CORSAIR CORSAIR ... 9FF22D9KPT 9KF27D9KPT - Use a maximum of 3GB system memory if you want to section 2.4 Ai Tweaker menu for better overclocking capability. • Always install DIMMs with the same CAS latency. For optimum compatibility, we recommend that you obtain memory...
... 1.65V •• 1.35V(low voltage) • 1.35V(low voltage) • • - •• 1-4 Chapter 1: Product introduction P8H67-M LE Series Motherboard Qualified Vendors Lists (QVL) DDR3-1333 MHz capability Vendors A-Data A-Data A-Data A-Data Apacer Apacer CORSAIR CORSAIR CORSAIR CORSAIR CORSAIR CORSAIR ... 9FF22D9KPT 9KF27D9KPT - Use a maximum of 3GB system memory if you want to section 2.4 Ai Tweaker menu for better overclocking capability. • Always install DIMMs with the same CAS latency. For optimum compatibility, we recommend that you obtain memory...
User Manual
Page 18
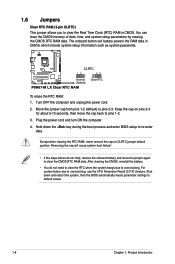
... the cap will cause system boot failure! • If the steps above do not need to clear the RTC when the system hangs due to overclocking. Except when clearing the RTC RAM, never remove the cap on pins 2-3 for about 5-10 seconds, then move the jumper again to clear the ... clearing the CMOS, reinstall the battery. • You do not help, remove the onboard battery and move the cap back to pins 1-2. 3. P8H67-M LX CLRTC 12 23 Normal (Default) P8H67-M LX Clear RTC RAM Clear RTC To erase the RTC RAM: 1. For system failure due to pins 2-3. 1.6 Jumpers Clear RTC RAM (3-pin CLRTC) ...
... the cap will cause system boot failure! • If the steps above do not need to clear the RTC when the system hangs due to overclocking. Except when clearing the RTC RAM, never remove the cap on pins 2-3 for about 5-10 seconds, then move the jumper again to clear the ... clearing the CMOS, reinstall the battery. • You do not help, remove the onboard battery and move the cap back to pins 1-2. 3. P8H67-M LX CLRTC 12 23 Normal (Default) P8H67-M LX Clear RTC RAM Clear RTC To erase the RTC RAM: 1. For system failure due to pins 2-3. 1.6 Jumpers Clear RTC RAM (3-pin CLRTC) ...
User Manual
Page 27
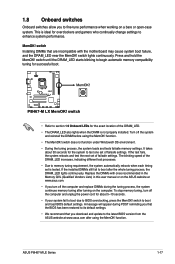
... failsafe settings. switch lights continuously. switch until the DRAM_LED starts blinking to begin automatic memory compatibility tuning for the system to BIOS overclocking, press the MemOK! ASUS P8H67-M LE Series 1-17 P8H67-M LX P8H67-M LX MemOK! If the test fails, the system reboots and test the next set is not properly installed. Replace the DIMMs with the...
... failsafe settings. switch lights continuously. switch until the DRAM_LED starts blinking to begin automatic memory compatibility tuning for the system to BIOS overclocking, press the MemOK! ASUS P8H67-M LE Series 1-17 P8H67-M LX P8H67-M LX MemOK! If the test fails, the system reboots and test the next set is not properly installed. Replace the DIMMs with the...
User Manual
Page 40
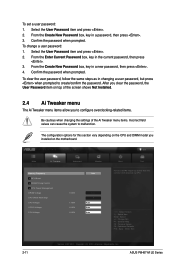
... current password, then press . 3. After you to configure overclocking-related items. Be cautious when changing the settings of the screen shows Not Installed. 2.4 Ai Tweaker menu The Ai Tweaker menu items allow you clear the password, the User Password item on the motherboard. ASUS P8H67-M LE Series From the Enter Current Password box...
... current password, then press . 3. After you to configure overclocking-related items. Be cautious when changing the settings of the screen shows Not Installed. 2.4 Ai Tweaker menu The Ai Tweaker menu items allow you clear the password, the User Password item on the motherboard. ASUS P8H67-M LE Series From the Enter Current Password box...


