User Guide
Page 6
...36 3.7.2 Boot Settings Configuration 3-37 3.7.3 Security 3-38 3.8 Tools menu 3-40 3.8.1 ASUS EZ Flash 2 3-40 3.8.2 Express Gate 3-41 3.8.3 ASUS O.C. Profile 3-42 3.8.4 Ai Net 2 3-43 3.9 Exit menu 3-44 Chapter 4:...Drivers menu 4-2 4.2.3 Utilities menu 4-3 4.2.4 Make disk menu 4-5 4.2.5 Manual menu 4-6 4.2.6 ASUS Contact information 4-6 4.2.7 Other information 4-7 4.3 Software information 4-9 4.3.1 ASUS MyLogo 2 4-9 4.3.2 AI NET2 4-11 4.3.3 ASUS PC Probe II 4-12 4.3.4 ASUS AI Suite 4-18 4.3.5 ASUS AI Nap 4-20 4.3.6 ASUS Fan Xpert 4-21 4.3.7 ASUS EPU-6 Engine 4-23 4.3.8 ASUS...
...36 3.7.2 Boot Settings Configuration 3-37 3.7.3 Security 3-38 3.8 Tools menu 3-40 3.8.1 ASUS EZ Flash 2 3-40 3.8.2 Express Gate 3-41 3.8.3 ASUS O.C. Profile 3-42 3.8.4 Ai Net 2 3-43 3.9 Exit menu 3-44 Chapter 4:...Drivers menu 4-2 4.2.3 Utilities menu 4-3 4.2.4 Make disk menu 4-5 4.2.5 Manual menu 4-6 4.2.6 ASUS Contact information 4-6 4.2.7 Other information 4-7 4.3 Software information 4-9 4.3.1 ASUS MyLogo 2 4-9 4.3.2 AI NET2 4-11 4.3.3 ASUS PC Probe II 4-12 4.3.4 ASUS AI Suite 4-18 4.3.5 ASUS AI Nap 4-20 4.3.6 ASUS Fan Xpert 4-21 4.3.7 ASUS EPU-6 Engine 4-23 4.3.8 ASUS...

User Guide
Page 7
... 5.1 ATI® CrossFireX™ technology 5-1 5.1.1 Requirements 5-1 5.1.2 Before you begin 5-1 5.2 Installing CrossFireX™ graphics cards 5-2 5.2.1 Dual CrossFireX installation 5-2 5.2.2 Triple CrossFireX installation 5-3 5.3 Software information 5-4 5.3.1 Installing the device drivers 5-4 5.3.2 Enabling the ATI® CrossFireX™ technology 5-4 5.4 NVIDIA® SLI™ Technology 5-6 5.4.1 Requirements 5-6 5.4.2 Installing SLI™ graphics cards 5-6 5.4.3 Installing the device...
... 5.1 ATI® CrossFireX™ technology 5-1 5.1.1 Requirements 5-1 5.1.2 Before you begin 5-1 5.2 Installing CrossFireX™ graphics cards 5-2 5.2.1 Dual CrossFireX installation 5-2 5.2.2 Triple CrossFireX installation 5-3 5.3 Software information 5-4 5.3.1 Installing the device drivers 5-4 5.3.2 Enabling the ATI® CrossFireX™ technology 5-4 5.4 NVIDIA® SLI™ Technology 5-6 5.4.1 Requirements 5-6 5.4.2 Installing SLI™ graphics cards 5-6 5.4.3 Installing the device...

User Guide
Page 14
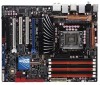
xiv P6T Deluxe V2 specifications summary Back Panel I/O Ports Internal I/O Connectors BIOS Features Manageability Support DVD Contents Form Factor 1 x PS/2 Keyboard / Mouse combo port 1 x S/PDIF Out (Coaxial + Optical) 1 x External ... 1 x Reset switch 16 Mb AMI BIOS, PnP, DMI 2.0, WfM 2.0, SM BIOS 2.4, Multi-language BIOS WOL by PME, WOR by PME, Chassis Intrusion, PXE Drivers ASUS PC Probe II ASUS Update ASUS AI Suite Image-Editing Suite Anti-virus software (OEM version) ATX Form Factor, 12"x 9.6" (30.5cm x 24.4cm) *Specifications are subject to change...
xiv P6T Deluxe V2 specifications summary Back Panel I/O Ports Internal I/O Connectors BIOS Features Manageability Support DVD Contents Form Factor 1 x PS/2 Keyboard / Mouse combo port 1 x S/PDIF Out (Coaxial + Optical) 1 x External ... 1 x Reset switch 16 Mb AMI BIOS, PnP, DMI 2.0, WfM 2.0, SM BIOS 2.4, Multi-language BIOS WOL by PME, WOR by PME, Chassis Intrusion, PXE Drivers ASUS PC Probe II ASUS Update ASUS AI Suite Image-Editing Suite Anti-virus software (OEM version) ATX Form Factor, 12"x 9.6" (30.5cm x 24.4cm) *Specifications are subject to change...

User Guide
Page 46
...the cards do so may need IRQ assignments. Remove the system unit cover (if your motherboard is completely seated on shared slots, ensure that the drivers support "Share IRQ" or that they support. Remove the bracket opposite the slot that came with it by adjusting the software settings. 1. Assign ...next page. 3. Refer to use . 4. Failure to the table on the system and change the necessary BIOS settings, if any. Install the software drivers for later use . Refer to do not need to the chassis with the slot and press firmly until the card is already installed in a chassis...
...the cards do so may need IRQ assignments. Remove the system unit cover (if your motherboard is completely seated on shared slots, ensure that the drivers support "Share IRQ" or that they support. Remove the bracket opposite the slot that came with it by adjusting the software settings. 1. Assign ...next page. 3. Refer to use . 4. Failure to the table on the system and change the necessary BIOS settings, if any. Install the software drivers for later use . Refer to do not need to the chassis with the slot and press firmly until the card is already installed in a chassis...

User Guide
Page 71
... and update the motherboard Basic Input/Output System (BIOS) setup. 1. ASUS P6T Deluxe V2 3-1 3.1 Managing and updating your BIOS The following utilities allow you to your system. ASUS Update requires an Internet connection either through a network or an Internet Service Provider (ISP). The Drivers menu appears. 2. ASUS EZ Flash 2 (Updates the BIOS using a bootable floppy disk) 4. Place...
... and update the motherboard Basic Input/Output System (BIOS) setup. 1. ASUS P6T Deluxe V2 3-1 3.1 Managing and updating your BIOS The following utilities allow you to your system. ASUS Update requires an Internet connection either through a network or an Internet Service Provider (ISP). The Drivers menu appears. 2. ASUS EZ Flash 2 (Updates the BIOS using a bootable floppy disk) 4. Place...

User Guide
Page 84
Configuration options: [Disabled] [Enabled] 3.3.6 Storage Configuration The items in the system. The AHCI allows the onboard storage driver to [RAID]. 3-14 Chapter 3: BIOS setup Configuration options: [Auto] [SWDMA0] [SWDMA1] [SWDMA2] [MWDMA0] [MWDMA1] [MWDMA2] [UDMA0] [UDMA1] [UDMA2] [UDMA3] [UDMA4] [UDMA5] SMART Monitoring [Auto] Sets ...
Configuration options: [Disabled] [Enabled] 3.3.6 Storage Configuration The items in the system. The AHCI allows the onboard storage driver to [RAID]. 3-14 Chapter 3: BIOS setup Configuration options: [Auto] [SWDMA0] [SWDMA1] [SWDMA2] [MWDMA0] [MWDMA1] [MWDMA2] [UDMA0] [UDMA1] [UDMA2] [UDMA3] [UDMA4] [UDMA5] SMART Monitoring [Auto] Sets ...
User Guide
Page 116
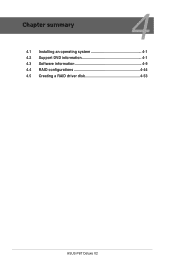
Chapter summary 4 4.1 Installing an operating system 4-1 4.2 Support DVD information 4-1 4.3 Software information 4-9 4.4 RAID configurations 4-44 4.5 Creating a RAID driver disk 4-53 ASUS P6T Deluxe V2
Chapter summary 4 4.1 Installing an operating system 4-1 4.2 Support DVD information 4-1 4.3 Software information 4-9 4.4 RAID configurations 4-44 4.5 Creating a RAID driver disk 4-53 ASUS P6T Deluxe V2
User Guide
Page 117
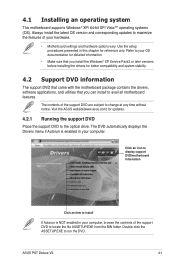
... to display support DVD/motherboard information ASUS TurboV ASUS EPU 6-Engine ASUS Express Gate SSD Click an item to avail all motherboard features. The contents of your computer. Double-click the ASSETUP.EXE to the optical drive. ASUS P6T Deluxe V2 4-1 Use the setup procedures presented ...in your hardware. • Motherboard settings and hardware options vary. Visit the ASUS website(www.asus.com) for reference only. The DVD automatically displays the Drivers menu if Autorun is NOT ...
... to display support DVD/motherboard information ASUS TurboV ASUS EPU 6-Engine ASUS Express Gate SSD Click an item to avail all motherboard features. The contents of your computer. Double-click the ASSETUP.EXE to the optical drive. ASUS P6T Deluxe V2 4-1 Use the setup procedures presented ...in your hardware. • Motherboard settings and hardware options vary. Visit the ASUS website(www.asus.com) for reference only. The DVD automatically displays the Drivers menu if Autorun is NOT ...

User Guide
Page 118
... SoundMAX® AD2000B audio driver and application. 4.2.2 Drivers menu The Drivers menu shows the available device drivers if the system detects installed devices. Marvell 61xx SATA Driver Installs the Marvell® 61xx SATA driver. ASUS TurboV ASUS EPU 6-Engine ASUS Express Gate SSD ASUS InstAll - ASUS TurboV Installs ASUS TurboV, the advanced overclocking tool for Anti-Virus and Drivers Utility Installs all of...
... SoundMAX® AD2000B audio driver and application. 4.2.2 Drivers menu The Drivers menu shows the available device drivers if the system detects installed devices. Marvell 61xx SATA Driver Installs the Marvell® 61xx SATA driver. ASUS TurboV ASUS EPU 6-Engine ASUS Express Gate SSD ASUS InstAll - ASUS TurboV Installs ASUS TurboV, the advanced overclocking tool for Anti-Virus and Drivers Utility Installs all of...
User Guide
Page 119
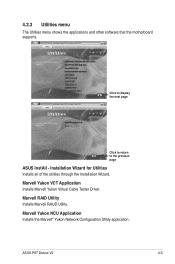
Installation Wizard for Utilities Installs all of the utilities through the Installation Wizard. Marvell RAID Utility Installs Marvell RAUD Utility. Marvell Yukon VCT Application Installs Marvell Yukon Virtual Cable Tester Driver. Marvell Yukon NCU Application Installs the Marvell® Yukon Network Configuration Utility application. 4.2.3 Utilities menu The Utilities menu shows the applications and other software that the motherboard supports. ASUS P6T Deluxe V2 4-3 Click to display the next page WinZip 11 Click to return to the previous page ASUS InstAll -
Installation Wizard for Utilities Installs all of the utilities through the Installation Wizard. Marvell RAID Utility Installs Marvell RAUD Utility. Marvell Yukon VCT Application Installs Marvell Yukon Virtual Cable Tester Driver. Marvell Yukon NCU Application Installs the Marvell® Yukon Network Configuration Utility application. 4.2.3 Utilities menu The Utilities menu shows the applications and other software that the motherboard supports. ASUS P6T Deluxe V2 4-3 Click to display the next page WinZip 11 Click to return to the previous page ASUS InstAll -

User Guide
Page 121
Intel ICH10R 32/64 bit RAID/AHCI Driver Disk Allows you to create the Intel ICH10R or Marvell® 61xx driver disk. 4.2.4 Make disk menu The Make disk menu contains items to create an ICH10R 32/64bit RAID/AHCI driver disk. ASUS P6T Deluxe V2 4-5
Intel ICH10R 32/64 bit RAID/AHCI Driver Disk Allows you to create the Intel ICH10R or Marvell® 61xx driver disk. 4.2.4 Make disk menu The Make disk menu contains items to create an ICH10R 32/64bit RAID/AHCI driver disk. ASUS P6T Deluxe V2 4-5
User Guide
Page 128
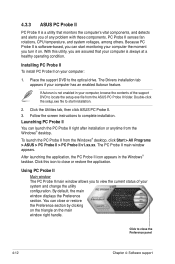
With this icon to close or restore the application. The Drivers installation tab appears if your computer the moment you of any problem with these components. Follow the screen instructions to the optical drive. 4.3.3 ASUS PC Probe II PC Probe II is a utility that your computer is always at ...DVD to complete installation. PC Probe II senses fan rotations, CPU temperature, and system voltages, among others. Click the Utilities tab, then click ASUS PC Probe II. 3. Click to close the Preference panel 4-12 Chapter 4: Software support To launch the PC Probe II from the Windows®...
With this icon to close or restore the application. The Drivers installation tab appears if your computer the moment you of any problem with these components. Follow the screen instructions to the optical drive. 4.3.3 ASUS PC Probe II PC Probe II is a utility that your computer is always at ...DVD to complete installation. PC Probe II senses fan rotations, CPU temperature, and system voltages, among others. Click the Utilities tab, then click ASUS PC Probe II. 3. Click to close the Preference panel 4-12 Chapter 4: Software support To launch the PC Probe II from the Windows®...

User Guide
Page 134
...an enabled Autorun feature. 2. Follow the screen instructions to launch EPU-6 Engine, AI Nap, Fan Xpert, and TurboV utilities easily. 4.3.4 ASUS AI Suite ASUS AI Suite allows you to complete installation. Place the support DVD to close or restore the application. The AI Suite main window appears.... The Drivers installation tab appears if your computer: 1. Click the Utilities tab, then click AI Suite. 3. Click this icon to the optical...
...an enabled Autorun feature. 2. Follow the screen instructions to launch EPU-6 Engine, AI Nap, Fan Xpert, and TurboV utilities easily. 4.3.4 ASUS AI Suite ASUS AI Suite allows you to complete installation. Place the support DVD to close or restore the application. The AI Suite main window appears.... The Drivers installation tab appears if your computer: 1. Click the Utilities tab, then click AI Suite. 3. Click this icon to the optical...

User Guide
Page 139
... support DVD to current system status. The Drivers installation tab appears if your computer: 1. Then, the 6 Engine main menu appears. Click the Drivers tab and then click ASUS EPU-6 Engine. 3. This utility provides four... modes that satisfies different computing needs. Selecting Auto mode will appear, asking you can also customize each mode by double-clicking the 6 Engine icon on your computer has an enabled Autorun feature. 2. Click Run Calibration and wait for a few seconds. ASUS P6T Deluxe V2...
... support DVD to current system status. The Drivers installation tab appears if your computer: 1. Then, the 6 Engine main menu appears. Click the Drivers tab and then click ASUS EPU-6 Engine. 3. This utility provides four... modes that satisfies different computing needs. Selecting Auto mode will appear, asking you can also customize each mode by double-clicking the 6 Engine icon on your computer has an enabled Autorun feature. 2. Click Run Calibration and wait for a few seconds. ASUS P6T Deluxe V2...
User Guide
Page 145
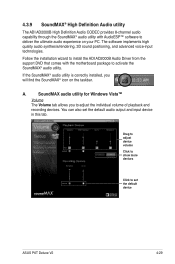
..., you to set the default audio output and input device in this tab. You can also set the default device ASUS P6T Deluxe V2 4-29 A. Follow the installation wizard to install the ADI AD2000B Audio Driver from the support DVD that comes with AudioESP™ software to deliver the ultimate audio experience on the taskbar...
..., you to set the default audio output and input device in this tab. You can also set the default device ASUS P6T Deluxe V2 4-29 A. Follow the installation wizard to install the ADI AD2000B Audio Driver from the support DVD that comes with AudioESP™ software to deliver the ultimate audio experience on the taskbar...

User Guide
Page 160
...combine two RAID sets to the selected hard disk drive. This RAID configuration provides data protection and increases fault tolerance to section 4.5 Creating a RAID driver disk for details. 4-44 Chapter 4: Software support The new drive must be calculated and written. For example, RAID 0 and RAID 1 set ..., copy first the RAID driver from the support DVD to a floppy disk before you install an operating system to get all applications to read and write data in parallel,...
...combine two RAID sets to the selected hard disk drive. This RAID configuration provides data protection and increases fault tolerance to section 4.5 Creating a RAID driver disk for details. 4-44 Chapter 4: Software support The new drive must be calculated and written. For example, RAID 0 and RAID 1 set ..., copy first the RAID driver from the support DVD to a floppy disk before you install an operating system to get all applications to read and write data in parallel,...

User Guide
Page 169
...to the Make disk menu, and then click Intel ICH10R 32/64 bit RAID Driver Disk to enter the BIOS setup utility. 3. ASUS P6T Deluxe V2 4-53 Press during POST to create an Intel® ICH10R RAID driver disk. 4. Save changes and exit BIOS. 6. Follow succeeding screen instructions to create... a RAID driver disk. 8. Set the optical drive as the primary boot device. 4. When the...
...to the Make disk menu, and then click Intel ICH10R 32/64 bit RAID Driver Disk to enter the BIOS setup utility. 3. ASUS P6T Deluxe V2 4-53 Press during POST to create an Intel® ICH10R RAID driver disk. 4. Save changes and exit BIOS. 6. Follow succeeding screen instructions to create... a RAID driver disk. 8. Set the optical drive as the primary boot device. 4. When the...
User Guide
Page 170
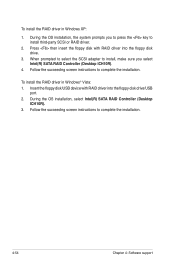
... to install, make sure you to press the key to install third-party SCSI or RAID driver. 2. Follow the succeeding screen instructions to complete the installation. To install the RAID driver in Windows® Vista: 1. During the OS installation, select Intel(R) SATA RAID Controller (...Desktop ICH10R). 3. Press then insert the floppy disk with RAID driver into the floppy disk drive. 3. During the OS installation...
... to install, make sure you to press the key to install third-party SCSI or RAID driver. 2. Follow the succeeding screen instructions to complete the installation. To install the RAID driver in Windows® Vista: 1. During the OS installation, select Intel(R) SATA RAID Controller (...Desktop ICH10R). 3. Press then insert the floppy disk with RAID driver into the floppy disk drive. 3. During the OS installation...

User Guide
Page 173
Download the latest driver from the AMD website (www.amd. For Windows Vista, select Uninstall. 5. See page 2-36 for the latest certified graphics card and the supported 3D application ... graphics cards to install multi-graphics processing units (GPU) graphics cards. To uninstall existing graphics card drivers 1. For Windows XP, select Add/Remove. Turn off your current graphics card driver/s. 4. ASUS P6T Deluxe V2 5-1 com). • Ensure that your graphics card driver supports the ATI CrossFireX technology. For Windows XP, go to Control Panel > Add/Remove Programs...
Download the latest driver from the AMD website (www.amd. For Windows Vista, select Uninstall. 5. See page 2-36 for the latest certified graphics card and the supported 3D application ... graphics cards to install multi-graphics processing units (GPU) graphics cards. To uninstall existing graphics card drivers 1. For Windows XP, select Add/Remove. Turn off your current graphics card driver/s. 4. ASUS P6T Deluxe V2 5-1 com). • Ensure that your graphics card driver supports the ATI CrossFireX technology. For Windows XP, go to Control Panel > Add/Remove Programs...
User Guide
Page 176
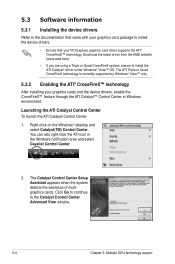
... Catalyst Control Center Advanced View window. 5-4 Chapter 5: Multiple GPU technology support Click Go to continue to install the ATI Catalyst® driver under Windows® Vista™ OS. The ATI Triple or Quad CrossFireX technology is currently supported by Windows® Vista™ only.... 5.3.2 Enabling the ATI® CrossFireX™ technology After installing your PCI Express graphics card driver supports the ATI® CrossFireX™ technology. You can also right-click the ATI icon in Windows environment. The Catalyst Control ...
... Catalyst Control Center Advanced View window. 5-4 Chapter 5: Multiple GPU technology support Click Go to continue to install the ATI Catalyst® driver under Windows® Vista™ OS. The ATI Triple or Quad CrossFireX technology is currently supported by Windows® Vista™ only.... 5.3.2 Enabling the ATI® CrossFireX™ technology After installing your PCI Express graphics card driver supports the ATI® CrossFireX™ technology. You can also right-click the ATI icon in Windows environment. The Catalyst Control ...


