
User Guide
Page 7
... Serial ATA hard disks 4-45 4.4.3 Intel® RAID configurations 4-45 4.5 Creating a RAID driver disk 4-53 4.5.1 Creating a RAID driver disk without entering the OS.... 4-53 4.5.2 Creating a RAID driver disk in Windows 4-53 Chapter 5: Multiple GPU technology support 5.1 ATI® CrossFireX™ technology 5-1 5.1.1 Requirements 5-1 5.1.2 Before you begin 5-1 5.2 Installing CrossFireX™ graphics cards 5-2 5.2.1 Dual CrossFireX installation 5-2 5.2.2 Triple CrossFireX installation 5-3 5.3 Software information 5-4 5.3.1 Installing the device drivers 5-4 5.3.2 Enabling...
... Serial ATA hard disks 4-45 4.4.3 Intel® RAID configurations 4-45 4.5 Creating a RAID driver disk 4-53 4.5.1 Creating a RAID driver disk without entering the OS.... 4-53 4.5.2 Creating a RAID driver disk in Windows 4-53 Chapter 5: Multiple GPU technology support 5.1 ATI® CrossFireX™ technology 5-1 5.1.1 Requirements 5-1 5.1.2 Before you begin 5-1 5.2 Installing CrossFireX™ graphics cards 5-2 5.2.1 Dual CrossFireX installation 5-2 5.2.2 Triple CrossFireX installation 5-3 5.3 Software information 5-4 5.3.1 Installing the device drivers 5-4 5.3.2 Enabling...
User Guide
Page 17
... Documentation ASUS P6T Deluxe V2 1 x 2-port USB 2.0 / 1-port IEEE1394 module 6 x Serial ATA signal cables 1 x Ultra DMA 133/100/66 cable 1 x ASUS Q-Shield (I/O shield) 1 x Optional Fan for buying an ASUS® P6T Deluxe V2 motherboard! Retail version only) 1 x ASUS SLI bridge connector ASUS motherboard support DVD User guide If any of ASUS quality motherboards! Before you for Water-Cooling or Passive-Cooling only 1 x ASUS Q-Connector Kit (USB, system panel; Thank you start installing the motherboard, and hardware devices on it another standout in your package with the list...
... Documentation ASUS P6T Deluxe V2 1 x 2-port USB 2.0 / 1-port IEEE1394 module 6 x Serial ATA signal cables 1 x Ultra DMA 133/100/66 cable 1 x ASUS Q-Shield (I/O shield) 1 x Optional Fan for buying an ASUS® P6T Deluxe V2 motherboard! Retail version only) 1 x ASUS SLI bridge connector ASUS motherboard support DVD User guide If any of ASUS quality motherboards! Before you for Water-Cooling or Passive-Cooling only 1 x ASUS Q-Connector Kit (USB, system panel; Thank you start installing the motherboard, and hardware devices on it another standout in your package with the list...

User Guide
Page 29
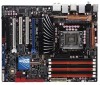
LGA1366 CPU Socket 3. DDR3 DIMM slots 5. IDE connector (40-1 pin PRI_EIDE) 7. Onboard Power-on and Reset switch 12. USB connectors (10-1 pin USB910, USB1112, USB1314) 14. ICH10R Serial ATA connectors [red] (7-pin SATA1-6) 8. IEEE 1394a port connector (10-1 pin IE1394_2) 15. Express_Gate SSD Page 2-36 2-6 2-34 2-12 2-25 2-30 2-31 2-24 2-38 2-29 2-26 2-35 2-32 2-33 2-29 2-37 2-35 2-37 4-35 ASUS P6T Deluxe V2 2-3 CPU / DRAM Bus / QPI DRAM overvoltage settings (3-pin OV_CPU; 3-pin OV_DRAM_BUS; 3-pin OV_QPI_DRAM) 6. Chassis intrusion connector (4-1 pin CHASSIS) 13....
LGA1366 CPU Socket 3. DDR3 DIMM slots 5. IDE connector (40-1 pin PRI_EIDE) 7. Onboard Power-on and Reset switch 12. USB connectors (10-1 pin USB910, USB1112, USB1314) 14. ICH10R Serial ATA connectors [red] (7-pin SATA1-6) 8. IEEE 1394a port connector (10-1 pin IE1394_2) 15. Express_Gate SSD Page 2-36 2-6 2-34 2-12 2-25 2-30 2-31 2-24 2-38 2-29 2-26 2-35 2-32 2-33 2-29 2-37 2-35 2-37 4-35 ASUS P6T Deluxe V2 2-3 CPU / DRAM Bus / QPI DRAM overvoltage settings (3-pin OV_CPU; 3-pin OV_DRAM_BUS; 3-pin OV_QPI_DRAM) 6. Chassis intrusion connector (4-1 pin CHASSIS) 13....
User Guide
Page 39
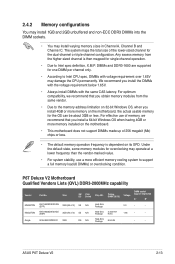
... may install varying memory sizes in Channel A, Channel B and Channel C. DIMM socket Size SS/ Chip DS Brand Chip NO. For optimum compatibility, we recommend that you obtain memory modules from the higher-sized channel is dependent on the motherboard, the actual usable memory for single-channel operation. • Due to support a full memory load (6 DIMMs) or overclocking condition. P6T Deluxe V2 Motherboard Qualified Vendors Lists (QVL) DDR3-2000MHz capability Vendor KINGSTON KINGSTON Gingle Part No. Timing DIMM (BIOS) Voltage support (Optional...
... may install varying memory sizes in Channel A, Channel B and Channel C. DIMM socket Size SS/ Chip DS Brand Chip NO. For optimum compatibility, we recommend that you obtain memory modules from the higher-sized channel is dependent on the motherboard, the actual usable memory for single-channel operation. • Due to support a full memory load (6 DIMMs) or overclocking condition. P6T Deluxe V2 Motherboard Qualified Vendors Lists (QVL) DDR3-2000MHz capability Vendor KINGSTON KINGSTON Gingle Part No. Timing DIMM (BIOS) Voltage support (Optional...
User Guide
Page 49
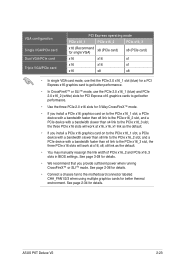
..., x1 link as the default. • You may manually reassign the link width of PCIe x16_2 and PCIe x16_3 slots in BIOS settings. See page 2-36 for details. • Connect a chassis fan to the PCIe x16_3 slot, the three PCIe x16 slots will work at x16, x8, x8 link as the default. • If you provide sufficient power when running CrossFireX™ or SLI™ mode. See page 2-34...
..., x1 link as the default. • You may manually reassign the link width of PCIe x16_2 and PCIe x16_3 slots in BIOS settings. See page 2-36 for details. • Connect a chassis fan to the PCIe x16_3 slot, the three PCIe x16 slots will work at x16, x8, x8 link as the default. • If you provide sufficient power when running CrossFireX™ or SLI™ mode. See page 2-34...
User Guide
Page 51
... a better cooling system (for the first time. For system failure due to the wrong setting of these three jumpers. • DO NOT set the OV_CPU jumper to work stably under the highest BIOS voltage settings before you install a new CPU and have not booted for example, a watercooling system) to pins 2-3 when you change the jumper settings for extra-high overvoltage ability, use the BIOS items first to halt. 2. ASUS P6T Deluxe V2 2-25
... a better cooling system (for the first time. For system failure due to the wrong setting of these three jumpers. • DO NOT set the OV_CPU jumper to work stably under the highest BIOS voltage settings before you install a new CPU and have not booted for example, a watercooling system) to pins 2-3 when you change the jumper settings for extra-high overvoltage ability, use the BIOS items first to halt. 2. ASUS P6T Deluxe V2 2-25

User Guide
Page 53
...). This port connects the tape, CD, DVD player, or other audio sources. 9. This port is for connecting USB 2.0 devices. 5. LAN port LED indications Activity Link LED Speed LED Status Description Status Description OFF No link OFF 10 Mbps connection ORANGE Linked ORANGE 100 Mbps connection BLINKING Data activity GREEN 1 Gbps connection ACT/LINK SPEED LED LED LAN port 6. In 4-channel, 6-channel, and 8-channel configuration, the function of this port becomes Front Speaker Out. Line In port (light blue). LAN 2 (RJ-45) port. ASUS P6T Deluxe V2...
...). This port connects the tape, CD, DVD player, or other audio sources. 9. This port is for connecting USB 2.0 devices. 5. LAN port LED indications Activity Link LED Speed LED Status Description Status Description OFF No link OFF 10 Mbps connection ORANGE Linked ORANGE 100 Mbps connection BLINKING Data activity GREEN 1 Gbps connection ACT/LINK SPEED LED LED LAN port 6. In 4-channel, 6-channel, and 8-channel configuration, the function of this port becomes Front Speaker Out. Line In port (light blue). LAN 2 (RJ-45) port. ASUS P6T Deluxe V2...

User Guide
Page 71
... original motherboard BIOS using a bootable floppy disk, USB flash disk or the motherboard support DVD when the BIOS file fails or gets corrupted.) Refer to manage, save, and update the motherboard BIOS in the future. ASUS Update requires an Internet connection either through a network or an Internet Service Provider (ISP). This utility is a utility that comes with the motherboard package. Place the support DVD in Windows® environment.) 2. Click the Utilities tab, then click Install ASUS Update VX.XX.XX. 3. ASUS P6T Deluxe V2 3-1 Save...
... original motherboard BIOS using a bootable floppy disk, USB flash disk or the motherboard support DVD when the BIOS file fails or gets corrupted.) Refer to manage, save, and update the motherboard BIOS in the future. ASUS Update requires an Internet connection either through a network or an Internet Service Provider (ISP). This utility is a utility that comes with the motherboard package. Place the support DVD in Windows® environment.) 2. Click the Utilities tab, then click Install ASUS Update VX.XX.XX. 3. ASUS P6T Deluxe V2 3-1 Save...

User Guide
Page 78
... USB flash disk containing the updated motherboard BIOS before using the motherboard support DVD, the floppy disk, or the USB flash disk that contains BIOS file to the floppy disk drive or USB port. 2. Recovering the BIOS from the support DVD To recover the BIOS from the floppy disk or USB flash disk: 1. Restart the system after the utility completes the updating process. • Only the USB flash disk with FAT 32/16 format and single partition can cause system boot failure! 3-8 Chapter 3: BIOS setup The utility will automatically checks the devices...
... USB flash disk containing the updated motherboard BIOS before using the motherboard support DVD, the floppy disk, or the USB flash disk that contains BIOS file to the floppy disk drive or USB port. 2. Recovering the BIOS from the support DVD To recover the BIOS from the floppy disk or USB flash disk: 1. Restart the system after the utility completes the updating process. • Only the USB flash disk with FAT 32/16 format and single partition can cause system boot failure! 3-8 Chapter 3: BIOS setup The utility will automatically checks the devices...
User Guide
Page 83
... Mode [Auto] Allows you are not user-configurable. Select a device item then press to the system. 3.3.5 SATA 1-6 While entering Setup, the BIOS automatically detects the presence of device connected to display the SATA device information. There is a separate sub-menu for each SATA device. Main BIOS SETUP UTILITY SATA 1 Device : Hard Disk Vendor : HDT722516DLA380 Size 164.7GB LBA Mode : Supported Block Mode : 16Sectors PIO Mode : 4 Async DMA : MultiWord DMA-2 Ultra DMA : Ultra DMA-5 SMART Monitoring: Supported Select the type of Serial...
... Mode [Auto] Allows you are not user-configurable. Select a device item then press to the system. 3.3.5 SATA 1-6 While entering Setup, the BIOS automatically detects the presence of device connected to display the SATA device information. There is a separate sub-menu for each SATA device. Main BIOS SETUP UTILITY SATA 1 Device : Hard Disk Vendor : HDT722516DLA380 Size 164.7GB LBA Mode : Supported Block Mode : 16Sectors PIO Mode : 4 Async DMA : MultiWord DMA-2 Ultra DMA : Ultra DMA-5 SMART Monitoring: Supported Select the type of Serial...

User Guide
Page 84
... ATA hard disk drives, set or change the configurations for the Serial ATA connectors supported by allowing the drive to internally optimize the order of commands. • If you to set this item to configure the item. The AHCI allows the onboard storage driver to enable advanced Serial ATA features that increases storage performance on random workloads by the Southbridge chip. Main BIOS SETUP UTILITY Storage Configuration SATA Configuraton Configure SATA as [Enhanced] [IDE] Hard Disk Write Protect IDE Detect Time Out (Sec) [Disabled] [35] Options Disabled Compatible...
... ATA hard disk drives, set or change the configurations for the Serial ATA connectors supported by allowing the drive to internally optimize the order of commands. • If you to set this item to configure the item. The AHCI allows the onboard storage driver to enable advanced Serial ATA features that increases storage performance on random workloads by the Southbridge chip. Main BIOS SETUP UTILITY Storage Configuration SATA Configuraton Configure SATA as [Enhanced] [IDE] Hard Disk Write Protect IDE Detect Time Out (Sec) [Disabled] [35] Options Disabled Compatible...
User Guide
Page 87
... When X.M.P. ASUS P6T Deluxe V2 3-17 3.4 Ai Tweaker menu The Ai Tweaker menu items allow you to configure overclocking-related items. Take caution when changing the settings of the Ai Tweaker menu items. Incorrect field values can cause the system to achieve desired CPU internal frequency. BIOS SETUP UTILITY Main Ai Tweaker Advanced Power Boot Tools Exit Configure System Performance Settings Ai Overclock Tuner CPU Ratio Setting Intel(R) SpeedStep(TM) Tech Intel(R) Turbo Mode Tech DRAM Frequency [Auto] [Auto] [Enabled] [Enabled] [Auto] DRAM Timing Control...
... When X.M.P. ASUS P6T Deluxe V2 3-17 3.4 Ai Tweaker menu The Ai Tweaker menu items allow you to configure overclocking-related items. Take caution when changing the settings of the Ai Tweaker menu items. Incorrect field values can cause the system to achieve desired CPU internal frequency. BIOS SETUP UTILITY Main Ai Tweaker Advanced Power Boot Tools Exit Configure System Performance Settings Ai Overclock Tuner CPU Ratio Setting Intel(R) SpeedStep(TM) Tech Intel(R) Turbo Mode Tech DRAM Frequency [Auto] [Auto] [Enabled] [Enabled] [Auto] DRAM Timing Control...

User Guide
Page 95
... Virtualization Tech [Enabled] CPU TM function [Enabled] Sets the ratio between CPU Core Clock and the FSB Frequency. ASUS P6T Deluxe V2 3-25 Change Option F1 General Help F10 Save and Exit ESC Exit v02.61 (C)Copyright 1985-2008, American Megatrends, Inc. Select Screen Select Item +- BIOS SETUP UTILITY Main Ai Tweaker Advanced Power Boot Tools Exit CPU Configuration Chipset Onboard Devices Configuration USB Configuration PCIPnP Configure CPU. NOTE: If an invalid ratio is set in this menu show the CPU-related information that the BIOS...
... Virtualization Tech [Enabled] CPU TM function [Enabled] Sets the ratio between CPU Core Clock and the FSB Frequency. ASUS P6T Deluxe V2 3-25 Change Option F1 General Help F10 Save and Exit ESC Exit v02.61 (C)Copyright 1985-2008, American Megatrends, Inc. Select Screen Select Item +- BIOS SETUP UTILITY Main Ai Tweaker Advanced Power Boot Tools Exit CPU Configuration Chipset Onboard Devices Configuration USB Configuration PCIPnP Configure CPU. NOTE: If an invalid ratio is set in this menu show the CPU-related information that the BIOS...

User Guide
Page 99
... options: [Enabled] [Disabled] LAN Boot ROM [Disabled] This item appears only when you to enable or disable the High Definition Audio Controller. Configuration options: [Enabled] [Disabled] ASUS P6T Deluxe V2 3-29 3.5.3 Onboard Device Configuration BIOS SETUP UTILITY Advanced Onboard Devices Configuration High Definition Audio Front Panel Type Marvell Storage Controller Marvell Storage Boot ROM Marvell LAN1 Marvell LAN2 LAN Boot ROM Onboard 1394 Controller [Enabled] [HD Audio] [Enabled] [Enabled] [Enabled] [Enabled] [Disabled] [Enabled] Options Enabled Disabled High...
... options: [Enabled] [Disabled] LAN Boot ROM [Disabled] This item appears only when you to enable or disable the High Definition Audio Controller. Configuration options: [Enabled] [Disabled] ASUS P6T Deluxe V2 3-29 3.5.3 Onboard Device Configuration BIOS SETUP UTILITY Advanced Onboard Devices Configuration High Definition Audio Front Panel Type Marvell Storage Controller Marvell Storage Boot ROM Marvell LAN1 Marvell LAN2 LAN Boot ROM Onboard 1394 Controller [Enabled] [HD Audio] [Enabled] [Enabled] [Enabled] [Enabled] [Disabled] [Enabled] Options Enabled Disabled High...
User Guide
Page 102
... Controller (APIC). BIOS SETUP UTILITY Main Ai Tweaker Advanced Power Boot Tools Exit Suspend Mode Repost Video on S3/STR resume. Configuration options: [No] [Yes] 3.6.3 ACPI 2.0 Support [Disabled] Add additional tables as per ACPI 2.0 specifications. APM Configuration Hardware Monitor Select Screen Select Item +- Change Option F1 General Help F10 Save and Exit ESC Exit v02.61 (C)Copyright 1985-2008, American Megatrends, Inc. 3.6.1 Suspend Mode [Auto] Allows you to enable or disable the Advanced Configuration and Power Interface (ACPI) support...
... Controller (APIC). BIOS SETUP UTILITY Main Ai Tweaker Advanced Power Boot Tools Exit Suspend Mode Repost Video on S3/STR resume. Configuration options: [No] [Yes] 3.6.3 ACPI 2.0 Support [Disabled] Add additional tables as per ACPI 2.0 specifications. APM Configuration Hardware Monitor Select Screen Select Item +- Change Option F1 General Help F10 Save and Exit ESC Exit v02.61 (C)Copyright 1985-2008, American Megatrends, Inc. 3.6.1 Suspend Mode [Auto] Allows you to enable or disable the Advanced Configuration and Power Interface (ACPI) support...

User Guide
Page 108
... BIOS SETUP UTILITY Boot Security Settings Supervisor Password : Not Installed User Password : Not Installed Change Supervisor Password Change User Password to disabled password. After you can clear it by erasing the CMOS Real Time Clock (RTC) RAM. After you have set a supervisor password, the other items appear to allow you to set a Supervisor Password: 1. The message "Password Installed" appears after you to change the supervisor password, follow the same steps as in setting a user password. To change other security settings. 3-38 Chapter 3: BIOS setup...
... BIOS SETUP UTILITY Boot Security Settings Supervisor Password : Not Installed User Password : Not Installed Change Supervisor Password Change User Password to disabled password. After you can clear it by erasing the CMOS Real Time Clock (RTC) RAM. After you have set a supervisor password, the other items appear to allow you to set a Supervisor Password: 1. The message "Password Installed" appears after you to change the supervisor password, follow the same steps as in setting a user password. To change other security settings. 3-38 Chapter 3: BIOS setup...
User Guide
Page 117
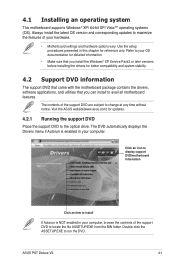
... the drivers, software applications, and utilities that you can install to run the DVD. ASUS P6T Deluxe V2 4-1 4.1 Installing an operating system This motherboard supports Windows® XP/ 64-bit XP/ Vista™ operating systems (OS). The contents of the support DVD to change at any time without notice. Visit the ASUS website(www.asus.com) for reference only. Double-click the ASSETUP.EXE to avail all motherboard features. Use the setup...
... the drivers, software applications, and utilities that you can install to run the DVD. ASUS P6T Deluxe V2 4-1 4.1 Installing an operating system This motherboard supports Windows® XP/ 64-bit XP/ Vista™ operating systems (OS). The contents of the support DVD to change at any time without notice. Visit the ASUS website(www.asus.com) for reference only. Double-click the ASSETUP.EXE to avail all motherboard features. Use the setup...
User Guide
Page 161
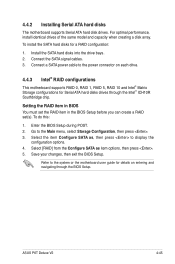
... BIOS Setup. Connect a SATA power cable to the system or the motherboard user guide for details on each drive. 4.4.3 Intel® RAID configurations This motherboard supports RAID 0, RAID 1, RAID 5, RAID 10 and Intel® Matrix Storage configurations for a RAID configuration: 1. Select [RAID] from the Configure SATA as , then press to the Main menu, select Storage Configuration, then press . 3. ASUS P6T Deluxe V2 4-45 Go to display the configuration options. 4. Refer to the power connector on entering and navigating through the Intel® ICH10R Southbridge chip. Install...
... BIOS Setup. Connect a SATA power cable to the system or the motherboard user guide for details on each drive. 4.4.3 Intel® RAID configurations This motherboard supports RAID 0, RAID 1, RAID 5, RAID 10 and Intel® Matrix Storage configurations for a RAID configuration: 1. Select [RAID] from the Configure SATA as , then press to the Main menu, select Storage Configuration, then press . 3. ASUS P6T Deluxe V2 4-45 Go to display the configuration options. 4. Refer to the power connector on entering and navigating through the Intel® ICH10R Southbridge chip. Install...
User Guide
Page 170
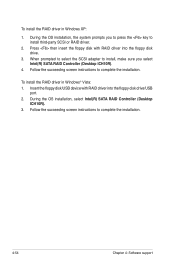
... 4: Software support Follow the succeeding screen instructions to complete the installation. During the OS installation, the system prompts you to press the key to install, make sure you select Intel(R) SATA RAID Controller (Desktop ICH10R). 4. When prompted to select the SCSI adapter to install third-party SCSI or RAID driver. 2. To install the RAID driver in Windows XP: 1. Insert the floppy disk/USB device with RAID driver into the floppy disk drive/USB port. 2. Press then insert the floppy disk with RAID driver into...
... 4: Software support Follow the succeeding screen instructions to complete the installation. During the OS installation, the system prompts you to press the key to install, make sure you select Intel(R) SATA RAID Controller (Desktop ICH10R). 4. When prompted to select the SCSI adapter to install third-party SCSI or RAID driver. 2. To install the RAID driver in Windows XP: 1. Insert the floppy disk/USB device with RAID driver into the floppy disk drive/USB port. 2. Press then insert the floppy disk with RAID driver into...
User Guide
Page 179
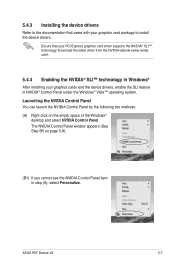
...; Control Panel under the Windows® Vista™ operating system. The NVIDIA Control Panel window appears (See Step B5 on the empty space of the Windows® desktop and select NVIDIA Control Panel. ASUS P6T Deluxe V2 5-7 Download the latest driver from the NVIDIA website (www.nvidia. Ensure that came with your graphics card package to the documentation that your PCI Express graphics card driver supports the NVIDIA® SLI™ technology. 5.4.3 Installing the device drivers Refer to install the device drivers.
...; Control Panel under the Windows® Vista™ operating system. The NVIDIA Control Panel window appears (See Step B5 on the empty space of the Windows® desktop and select NVIDIA Control Panel. ASUS P6T Deluxe V2 5-7 Download the latest driver from the NVIDIA website (www.nvidia. Ensure that came with your graphics card package to the documentation that your PCI Express graphics card driver supports the NVIDIA® SLI™ technology. 5.4.3 Installing the device drivers Refer to install the device drivers.


