User Guide
Page 10
...documents are also provided. • Chapter 4: Software support This chapter describes the contents of the switches, jumpers, and connectors on ASUS hardware and software products. About this guide is organized This guide contains the following sources for additional information and for product and ...multiple ATI® CrossFireX™ and NVIDIA SLI™ graphics cards. Where to find more information Refer to change system settings through the BIOS Setup menus. It includes description of the support DVD that comes with the motherboard package and the software. • Chapter...
...documents are also provided. • Chapter 4: Software support This chapter describes the contents of the switches, jumpers, and connectors on ASUS hardware and software products. About this guide is organized This guide contains the following sources for additional information and for product and ...multiple ATI® CrossFireX™ and NVIDIA SLI™ graphics cards. Where to find more information Refer to change system settings through the BIOS Setup menus. It includes description of the support DVD that comes with the motherboard package and the software. • Chapter...

User Guide
Page 21
...Filter This feature detects repetitive and stationary noises (non-voice signals) like Skype, online game, video conference and recording. ASUS Crystal Sound This feature can enhance speech-centric applications like computer fans, air conditioners, and other background noises then eliminates ... separately. ASUS P6T Deluxe V2 1-5 Fan Xpert ASUS Fan Xpert intelligently allows users to adjust both the CPU and chassis fan speed according to different ambient temperature, which provides you easy ways to install computer components, update the BIOS or back up your favorite settings. See page...
...Filter This feature detects repetitive and stationary noises (non-voice signals) like Skype, online game, video conference and recording. ASUS Crystal Sound This feature can enhance speech-centric applications like computer fans, air conditioners, and other background noises then eliminates ... separately. ASUS P6T Deluxe V2 1-5 Fan Xpert ASUS Fan Xpert intelligently allows users to adjust both the CPU and chassis fan speed according to different ambient temperature, which provides you easy ways to install computer components, update the BIOS or back up your favorite settings. See page...

User Guide
Page 22
...at a time and avoiding wrong cable connections. Profile The motherboard features the ASUS O.C. ASUS EZ Flash 2 EZ Flash 2 is convenient and safe to conveniently store or load multiple BIOS settings. Without the usual "fingers" present, this exclusive onboard switch allows gamer ... Profile that allows users to install. See page 3-4 for details. ASUS Q-Shield The specially designed ASUS Q-Shield provides conductivity to share and distribute their favorite settings. See page 2-39 for details. The BIOS settings can be stored in the CMOS or a separate file, giving users...
...at a time and avoiding wrong cable connections. Profile The motherboard features the ASUS O.C. ASUS EZ Flash 2 EZ Flash 2 is convenient and safe to conveniently store or load multiple BIOS settings. Without the usual "fingers" present, this exclusive onboard switch allows gamer ... Profile that allows users to install. See page 3-4 for details. ASUS Q-Shield The specially designed ASUS Q-Shield provides conductivity to share and distribute their favorite settings. See page 2-39 for details. The BIOS settings can be stored in the CMOS or a separate file, giving users...

User Guide
Page 42
...setting in BIOS for hyper DIMM (DDR3 1800MHz or above) support. • According to Intel spec definition, DDR3-1600 is subject to the physical characteristics of 2) SS N/A Heat-Sink Package (1333-9-9-9-24) 1.65 •••• 2-16 Chapter 2: Hardware information P6T Deluxe V2... Motherboard Qualified Vendors Lists (QVL) DDR3-1333MHz capability Vendor Part No. • Hyper DIMM (DDR3 1800MHz or above) support is supported for each memory channel. ASUS exclusively provides two DDR3-1600 DIMM support...
...setting in BIOS for hyper DIMM (DDR3 1800MHz or above) support. • According to Intel spec definition, DDR3-1600 is subject to the physical characteristics of 2) SS N/A Heat-Sink Package (1333-9-9-9-24) 1.65 •••• 2-16 Chapter 2: Hardware information P6T Deluxe V2... Motherboard Qualified Vendors Lists (QVL) DDR3-1333MHz capability Vendor Part No. • Hyper DIMM (DDR3 1800MHz or above) support is supported for each memory channel. ASUS exclusively provides two DDR3-1600 DIMM support...

User Guide
Page 44
... 2GB (kit of Triple-channel memory configuration. Single-sided DS - Visit the ASUS website for the latest QVL. 2-18 Chapter 2: Hardware information Double-sided DIMM ... set of 2) 1GB 1GB 2GB 2GB 1GB 2GB 1GB 2GB 1GB 1GB 1GB 2GB 2GB 1GB 1GB 2GB 2GB SS/ Chip DS Brand Chip NO. P6T Deluxe V2 ...Motherboard Qualified Vendors Lists (QVL) DDR3-1067MHz capability Vendor Part No. DS N/A SS MICRON SS MICRON DS MICRON SS ELPIDA DS ELPIDA DS ELPIDA DS ELPIDA Heat-Sink Package Z9HWQ D9JNL D9JNL J1108BABG-DJ-E J5308BASE-AC-E (ECC) J5308BASE-AC-E J1108BABG-DJ-E Timing DIMM (BIOS...
... 2GB (kit of Triple-channel memory configuration. Single-sided DS - Visit the ASUS website for the latest QVL. 2-18 Chapter 2: Hardware information Double-sided DIMM ... set of 2) 1GB 1GB 2GB 2GB 1GB 2GB 1GB 2GB 1GB 1GB 1GB 2GB 2GB 1GB 1GB 2GB 2GB SS/ Chip DS Brand Chip NO. P6T Deluxe V2 ...Motherboard Qualified Vendors Lists (QVL) DDR3-1067MHz capability Vendor Part No. DS N/A SS MICRON SS MICRON DS MICRON SS ELPIDA DS ELPIDA DS ELPIDA DS ELPIDA Heat-Sink Package Z9HWQ D9JNL D9JNL J1108BABG-DJ-E J5308BASE-AC-E (ECC) J5308BASE-AC-E J1108BABG-DJ-E Timing DIMM (BIOS...

User Guide
Page 46
...expansion cards. Replace the system cover. 2.5.2 Configuring an expansion card After installing the expansion card, configure it and make the necessary hardware settings for the card. 2. When using PCI cards on the next page. 3. The following sub‑sections describe the slots and the expansion... expansion card, read the documentation that you intend to the card. Keep the screw for information on the system and change the necessary BIOS settings, if any. See Chapter 3 for later use . Otherwise, conflicts will arise between the two PCI groups, making the system unstable and...
...expansion cards. Replace the system cover. 2.5.2 Configuring an expansion card After installing the expansion card, configure it and make the necessary hardware settings for the card. 2. When using PCI cards on the next page. 3. The following sub‑sections describe the slots and the expansion... expansion card, read the documentation that you intend to the card. Keep the screw for information on the system and change the necessary BIOS settings, if any. See Chapter 3 for later use . Otherwise, conflicts will arise between the two PCI groups, making the system unstable and...
User Guide
Page 49
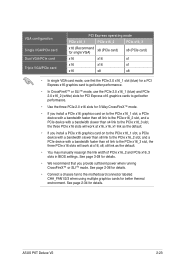
..., x16, x1 link as the default. • You may manually reassign the link width of PCIe x16_2 and PCIe x16_3 slots in BIOS settings. VGA configuration Single VGA/PCIe card Dual VGA/PCIe card Triple VGA/PCIe card PCI Express operating mode PCIe x16_1 PCIe x16_2 PCIe x16_3.... • If you provide sufficient power when running CrossFireX™ or SLI™ mode. See page 2-34 for better thermal environment. ASUS P6T Deluxe V2 2-23 See page 2-36 for details. • Connect a chassis fan to the motherboard connector labeled CHA_FAN1/2/3 when using multiple graphics cards for details.
..., x16, x1 link as the default. • You may manually reassign the link width of PCIe x16_2 and PCIe x16_3 slots in BIOS settings. VGA configuration Single VGA/PCIe card Dual VGA/PCIe card Triple VGA/PCIe card PCI Express operating mode PCIe x16_1 PCIe x16_2 PCIe x16_3.... • If you provide sufficient power when running CrossFireX™ or SLI™ mode. See page 2-34 for better thermal environment. ASUS P6T Deluxe V2 2-23 See page 2-36 for details. • Connect a chassis fan to the motherboard connector labeled CHA_FAN1/2/3 when using multiple graphics cards for details.

User Guide
Page 50
... power cord and turn off is required to enable C.P.R. Hold down and reboot the system so the BIOS can clear the CMOS memory of date, time, and system setup parameters by erasing the CMOS RTC... rebooting the system. 2-24 Chapter 2: Hardware information function. You can automatically reset parameter settings to default values. • Due to clear the CMOS RTC RAM data. Shut down the key during... the boot process and enter BIOS setup to pins 1-2. 3. You must turn ON the computer. 4. Clear RTC RAM (CLRTC) This jumper...
... power cord and turn off is required to enable C.P.R. Hold down and reboot the system so the BIOS can clear the CMOS memory of date, time, and system setup parameters by erasing the CMOS RTC... rebooting the system. 2-24 Chapter 2: Hardware information function. You can automatically reset parameter settings to default values. • Due to clear the CMOS RTC RAM data. Shut down the key during... the boot process and enter BIOS setup to pins 1-2. 3. You must turn ON the computer. 4. Clear RTC RAM (CLRTC) This jumper...
User Guide
Page 51
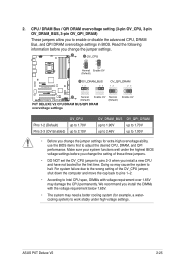
... ability, use the BIOS items first to work stably under the highest BIOS voltage settings before you install a new CPU and have not booted for the first time. 2. ASUS P6T Deluxe V2 2-25 For system failure due to the wrong setting of these three jumpers. • DO NOT set the OV_CPU jumper to... enable or disable the advanced CPU, DRAM Bus, and QPI DRAM overvoltage settings in BIOS. Doing so may cause the system to...
... ability, use the BIOS items first to work stably under the highest BIOS voltage settings before you install a new CPU and have not booted for the first time. 2. ASUS P6T Deluxe V2 2-25 For system failure due to the wrong setting of these three jumpers. • DO NOT set the OV_CPU jumper to... enable or disable the advanced CPU, DRAM Bus, and QPI DRAM overvoltage settings in BIOS. Doing so may cause the system to...

User Guide
Page 57
...connectors (7-pin SATA 1-6 [red]) These connectors are set the Configure SATA as in the BIOS to section 4.4.3 Intel RAID configurations or the manual bundled in the BIOS to create a Serial ATA RAID set using Serial ATA hard disk drives. ASUS P6T Deluxe V2 2-31 In Standard IDE mode, you are using ...Windows® XP or later version. • When using hot-plug and NCQ, set , refer to [AHCI]. The Serial...
...connectors (7-pin SATA 1-6 [red]) These connectors are set the Configure SATA as in the BIOS to section 4.4.3 Intel RAID configurations or the manual bundled in the BIOS to create a Serial ATA RAID set using Serial ATA hard disk drives. ASUS P6T Deluxe V2 2-31 In Standard IDE mode, you are using ...Windows® XP or later version. • When using hot-plug and NCQ, set , refer to [AHCI]. The Serial...

User Guide
Page 61
Connect one end of the front panel audio I /O module that the Front Panel Type item in the BIOS is set the item to this connector when a chassis component is for a chassis-mounted front panel audio I /O module cable to this connector. • We ...intrusion sensor or switch cable to this connector. See page 3-29 or details. The signal is for a chassis-mounted intrusion detection sensor or switch. ASUS P6T Deluxe V2 2-35 If you intend to [HD Audio]. Chassis intrusion connector (4-1 pin CHASSIS) This connector is removed or replaced. Remove the jumper caps only when...
Connect one end of the front panel audio I /O module that the Front Panel Type item in the BIOS is set the item to this connector when a chassis component is for a chassis-mounted front panel audio I /O module cable to this connector. • We ...intrusion sensor or switch cable to this connector. See page 3-29 or details. The signal is for a chassis-mounted intrusion detection sensor or switch. ASUS P6T Deluxe V2 2-35 If you intend to [HD Audio]. Chassis intrusion connector (4-1 pin CHASSIS) This connector is removed or replaced. Remove the jumper caps only when...
User Guide
Page 64
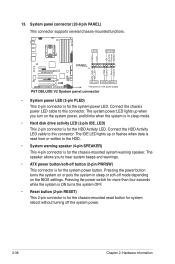
Connect the chassis power LED cable to hear system beeps and warnings. • ATX power button/soft-off mode depending on the BIOS settings. System panel connector (20-8 pin PANEL) This connector supports several chassis-mounted functions. • System power LED (2-pin PLED) This 2-pin connector is for the ...
Connect the chassis power LED cable to hear system beeps and warnings. • ATX power button/soft-off mode depending on the BIOS settings. System panel connector (20-8 pin PANEL) This connector supports several chassis-mounted functions. • System power LED (2-pin PLED) This 2-pin connector is for the ...

User Guide
Page 67
... that all the connections, replace the system case cover. 2. Turn on the system front panel case lights up for assistance. System power 6. ASUS P6T Deluxe V2 2-41 Connect the power cord to the power connector at the back of the system chassis. 4. Follow the instructions in the following order: ...turned on the power, the system may light up when you do not see BIOS beep codes table below) or additional messages appear on test. For systems with a surge protector. 5. Check the jumper settings and connections or call your monitor complies with the last device on .
... that all the connections, replace the system case cover. 2. Turn on the system front panel case lights up for assistance. System power 6. ASUS P6T Deluxe V2 2-41 Connect the power cord to the power connector at the back of the system chassis. 4. Follow the instructions in the following order: ...turned on the power, the system may light up when you do not see BIOS beep codes table below) or additional messages appear on test. For systems with a surge protector. 5. Check the jumper settings and connections or call your monitor complies with the last device on .

User Guide
Page 68
... While the system is ON, pressing the power switch for less than four seconds lets the system enter the soft-off mode, depending on the BIOS setting. The power supply should turn off the computer 2.11.1 Using the OS shut down the computer. 3. Click the Start button then select Turn Off Computer... 2: Hardware information The power supply should turn off after Windows® shuts down. Click the Turn Off button to soft-off mode regardless of the BIOS setting.
... While the system is ON, pressing the power switch for less than four seconds lets the system enter the soft-off mode, depending on the BIOS setting. The power supply should turn off the computer 2.11.1 Using the OS shut down the computer. 3. Click the Start button then select Turn Off Computer... 2: Hardware information The power supply should turn off after Windows® shuts down. Click the Turn Off button to soft-off mode regardless of the BIOS setting.

User Guide
Page 69
Detailed descriptions of the BIOS parameters are also provided. 3 BIOS setup This chapter tells how to change the system settings through the BIOS Setup menus.
Detailed descriptions of the BIOS parameters are also provided. 3 BIOS setup This chapter tells how to change the system settings through the BIOS Setup menus.
User Guide
Page 79
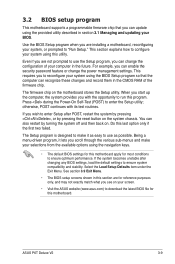
... using the navigation keys. • The default BIOS settings for most conditions to configure your system using this motherboard apply for this utility. Being a menu-driven program, it as possible. Press during the Power-On Self-Test (POST) to ensure system compatibility and stability. ASUS P6T Deluxe V2 3-9 This section explains how to ensure optimum performance...
... using the navigation keys. • The default BIOS settings for most conditions to configure your system using this motherboard apply for this utility. Being a menu-driven program, it as possible. Press during the Power-On Self-Test (POST) to ensure system compatibility and stability. ASUS P6T Deluxe V2 3-9 This section explains how to ensure optimum performance...

User Guide
Page 107
... display feature. Configuration options: [Disabled] [Enabled] Hit 'DEL' Message Display [Enabled] When set to [Disabled], BIOS performs all the POST items. Configuration options: [Disabled] [Enabled] Full Screen Logo [Enabled] This allows you to boot the system. Configuration options: [Disabled] [Enabled] ASUS P6T Deluxe V2 3-37 This will decrease the time needed to select the power-on...
... display feature. Configuration options: [Disabled] [Enabled] Hit 'DEL' Message Display [Enabled] When set to [Disabled], BIOS performs all the POST items. Configuration options: [Disabled] [Enabled] Full Screen Logo [Enabled] This allows you to boot the system. Configuration options: [Disabled] [Enabled] ASUS P6T Deluxe V2 3-37 This will decrease the time needed to select the power-on...

User Guide
Page 112
Allows you to store or load multiple BIOS settings. Chapter 3: BIOS setup Name : Save To : Load CMOS Profile. Profile Utility V1.30 Current CMOS BOARD: P6T Deluxe V2 VER: 0309 DATE: 09/15/2008 PATH: A:\ A: Restore CMOS BOARD: Unknown VER: Unknown ...BIOS settings saved in the Save To sub-item. Profile 2 Status : Default-Profile Save BIOS settings to run the utility to save the current BIOS file to load. Profile Allows you to save and load CMOS. ASUSTek O.C. Allows you to run the utility. Press , and choose a profile to the BIOS Flash. 3.8.3 ASUS O.C. BIOS...
Allows you to store or load multiple BIOS settings. Chapter 3: BIOS setup Name : Save To : Load CMOS Profile. Profile Utility V1.30 Current CMOS BOARD: P6T Deluxe V2 VER: 0309 DATE: 09/15/2008 PATH: A:\ A: Restore CMOS BOARD: Unknown VER: Unknown ...BIOS settings saved in the Save To sub-item. Profile 2 Status : Default-Profile Save BIOS settings to run the utility to save the current BIOS file to load. Profile Allows you to save and load CMOS. ASUSTek O.C. Allows you to run the utility. Press , and choose a profile to the BIOS Flash. 3.8.3 ASUS O.C. BIOS...
User Guide
Page 142
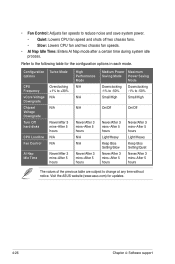
...50% Small/High Small/High On/Off On/Off Never/After 3 mins-After 5 hours Light/Heavy Keep Bios Setting/Slow Never/After 3 mins-After 5 hours Never/After 3 mins-After 5 hours Light/Heavy Keep Bios Setting/Quiet Never/After 3 mins-After 5 hours The values of the previous table are subject to reduce noise ...two chassis fan speeds. • AI Nap Idle Time: Enters AI Nap mode after a certain time during system idle process. Visit the ASUS website (www.asus.com) for the configuration options in each mode. Refer to the following table for updates. 4-26 Chapter 4: Software support
...50% Small/High Small/High On/Off On/Off Never/After 3 mins-After 5 hours Light/Heavy Keep Bios Setting/Slow Never/After 3 mins-After 5 hours Never/After 3 mins-After 5 hours Light/Heavy Keep Bios Setting/Quiet Never/After 3 mins-After 5 hours The values of the previous table are subject to reduce noise ...two chassis fan speeds. • AI Nap Idle Time: Enters AI Nap mode after a certain time during system idle process. Visit the ASUS website (www.asus.com) for the configuration options in each mode. Refer to the following table for updates. 4-26 Chapter 4: Software support
User Guide
Page 143
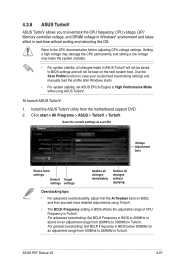
... first the Ai Tweaker items in BIOS, and then proceed more settings Default settings Target settings Applies all changes immediately Undoes all changes made in TurboV. For advanced overclocking: Set BCLK Frequency in BIOS to 200MHz or above for an adjustment range from 200MHz to 500MHz in TurboV. ASUS P6T Deluxe V2 4-27 Refer to BIOS settings and will not be saved...
... first the Ai Tweaker items in BIOS, and then proceed more settings Default settings Target settings Applies all changes immediately Undoes all changes made in TurboV. For advanced overclocking: Set BCLK Frequency in BIOS to 200MHz or above for an adjustment range from 200MHz to 500MHz in TurboV. ASUS P6T Deluxe V2 4-27 Refer to BIOS settings and will not be saved...


