
User Manual
Page 1
Motherboard
Motherboard

User Manual
Page 1
P5QC Motherboard
P5QC Motherboard
User Manual
Page 3
Contents Contents...iii Notices...viii Safety information ix About this guide x P5QC specifications summary xii Chapter 1: Product introduction 1.1 Welcome 1-1 1.2 Package contents 1-1 1.3 Special features 1-2 1.3.1 Product highlights 1-2 1.3.2 ASUS unique features 1-3 1.3.3 ASUS Intelligent Performance and Overclocking features 1-7 Chapter 2: Hardware information 2.1 Before you proceed 2-1 Onboard LED 2-1 2.2 Motherboard overview 2-2 2.2.1 Motherboard layout 2-2 2.2.2 Layout contents 2-3 2.2.3 Placement direction 2-4 2.2.4 Screw holes 2-4 2.3 Central Processing Unit (CPU...
Contents Contents...iii Notices...viii Safety information ix About this guide x P5QC specifications summary xii Chapter 1: Product introduction 1.1 Welcome 1-1 1.2 Package contents 1-1 1.3 Special features 1-2 1.3.1 Product highlights 1-2 1.3.2 ASUS unique features 1-3 1.3.3 ASUS Intelligent Performance and Overclocking features 1-7 Chapter 2: Hardware information 2.1 Before you proceed 2-1 Onboard LED 2-1 2.2 Motherboard overview 2-2 2.2.1 Motherboard layout 2-2 2.2.2 Layout contents 2-3 2.2.3 Placement direction 2-4 2.2.4 Screw holes 2-4 2.3 Central Processing Unit (CPU...
User Manual
Page 9
... you are not sure about the voltage of the electrical outlet you add a device. • Before connecting or removing signal cables from the motherboard, ensure that your power supply is broken, do not try to fix it by yourself. Contact a qualified service technician or your area. Check... contact your local power company. • If the power supply is set to the correct voltage in your retailer. Operation safety • Before installing the motherboard and adding devices on it may become wet. • Place the product on a stable surface. • If you detect any area where it , ...
... you are not sure about the voltage of the electrical outlet you add a device. • Before connecting or removing signal cables from the motherboard, ensure that your power supply is broken, do not try to fix it by yourself. Contact a qualified service technician or your area. Check... contact your local power company. • If the power supply is set to the correct voltage in your retailer. Operation safety • Before installing the motherboard and adding devices on it may become wet. • Place the product on a stable surface. • If you detect any area where it , ...
User Manual
Page 10
... information. 2. About this guide is organized This guide contains the following sources for additional information and for product and software updates. 1. ASUS websites The ASUS website provides updated information on the motherboard. • Chapter 3: BIOS setup This chapter tells how to the following parts: • Chapter 1: Product introduction This chapter describes the features...
... information. 2. About this guide is organized This guide contains the following sources for additional information and for product and software updates. 1. ASUS websites The ASUS website provides updated information on the motherboard. • Chapter 3: BIOS setup This chapter tells how to the following parts: • Chapter 1: Product introduction This chapter describes the features...

User Manual
Page 15
This chapter describes the motherboard features and the new technologies it supports. 1Product introduction
This chapter describes the motherboard features and the new technologies it supports. 1Product introduction
User Manual
Page 17
... standout in your package with the list below. 1.2 Package contents Check your retailer. Retail version only) Application DVD ASUS motherboard support DVD Documentation User guide If any of ASUS quality motherboards! Before you for the following items. Motherboard ASUS P5QC I/O modules 1 x 1-port eSATA and 1-port 1394 (4-pin) module Cables 1 x 2-port Serial ATA power cables 6 x Serial ATA signal...
... standout in your package with the list below. 1.2 Package contents Check your retailer. Retail version only) Application DVD ASUS motherboard support DVD Documentation User guide If any of ASUS quality motherboards! Before you for the following items. Motherboard ASUS P5QC I/O modules 1 x 1-port eSATA and 1-port 1394 (4-pin) module Cables 1 x 2-port Serial ATA power cables 6 x Serial ATA signal...
User Manual
Page 18
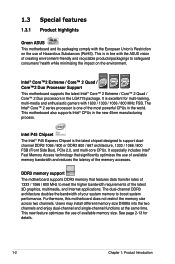
... the memory size across two channels. This new feature optimizes the use of Hazardous Substances (RoHS). 1.3 Special features 1.3.1 Product highlights Green ASUS This motherboard and its packaging comply with the ASUS vision of creating environment-friendly and recyclable products/packagings to safeguard consumers' health while minimizing the impact on the use of the...
... the memory size across two channels. This new feature optimizes the use of Hazardous Substances (RoHS). 1.3 Special features 1.3.1 Product highlights Green ASUS This motherboard and its packaging comply with the ASUS vision of creating environment-friendly and recyclable products/packagings to safeguard consumers' health while minimizing the impact on the use of the...
User Manual
Page 19
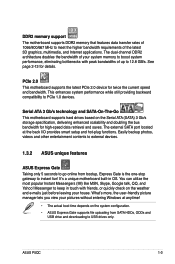
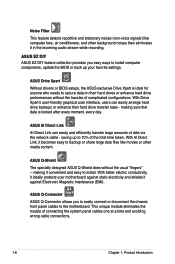
...I/O provides smart setup and hot-plug functions. Serial ATA 3 Gb/s technology and SATA-On-The-Go This motherboard supports hard drives based on the system configuration. • ASUS Express Gate supports file uploading from bootup, Express Gate is the one-stop gateway to USB drives only. It's...data retrieval and saves. What's more, the user-friendly picture manager lets you view your house. DDR2 memory support The motherboard supports DDR2 memory that features data transfer rates of 1066/800/667 MHz to PCIe 1.0 devices. See page 2‑13 for details. ASUS P5QC 1-3
...I/O provides smart setup and hot-plug functions. Serial ATA 3 Gb/s technology and SATA-On-The-Go This motherboard supports hard drives based on the system configuration. • ASUS Express Gate supports file uploading from bootup, Express Gate is the one-stop gateway to USB drives only. It's...data retrieval and saves. What's more, the user-friendly picture manager lets you view your house. DDR2 memory support The motherboard supports DDR2 memory that features data transfer rates of 1066/800/667 MHz to PCIe 1.0 devices. See page 2‑13 for details. ASUS P5QC 1-3
User Manual
Page 21
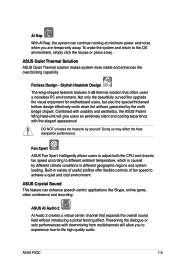
...caused by different climate conditions in variety of useful profiles offer flexible controls of fan speed to achieve a quiet and cool environment. ASUS P5QC 1-5 Stylish Heatsink Design The wing-shaped heatsink features 0-dB thermal solution that expands the overall sound field without introducing a picket fencing...-in different geographic regions and system loading. Not only the beautifully curved fins upgrade the visual enjoyment for motherboard users, but also the special thickened bottom design effectively cools down hot airflows generated by yourself. Combined with usability and aesthetics...
...caused by different climate conditions in variety of useful profiles offer flexible controls of fan speed to achieve a quiet and cool environment. ASUS P5QC 1-5 Stylish Heatsink Design The wing-shaped heatsink features 0-dB thermal solution that expands the overall sound field without introducing a picket fencing...-in different geographic regions and system loading. Not only the beautifully curved fins upgrade the visual enjoyment for motherboard users, but also the special thickened bottom design effectively cools down hot airflows generated by yourself. Combined with usability and aesthetics...
User Manual
Page 22
... one at a time and avoiding wrong cable connections. 1-6 Chapter 1: Product Introduction With better electric conductivity, it ideally protects your favorite settings. ASUS Q-Connector ASUS Q-Connector allows you easy ways to the motherboard. With Drive Xpert's user-friendly graphical user interface, users can easily and efficiently transfer large amounts of the total time taken...
... one at a time and avoiding wrong cable connections. 1-6 Chapter 1: Product Introduction With better electric conductivity, it ideally protects your favorite settings. ASUS Q-Connector ASUS Q-Connector allows you easy ways to the motherboard. With Drive Xpert's user-friendly graphical user interface, users can easily and efficiently transfer large amounts of the total time taken...
User Manual
Page 23
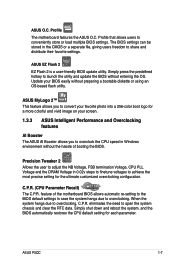
...ASUS P5QC 1-7 Profile that allows users to overclocking, C.P.R. C.P.R. (CPU Parameter Recall) The C.P.R. Update your screen. 1.3.3 ASUS Intelligent Performance and Overclocking features AI Booster The ASUS AI Booster allows you to convert your favorite photo into a 256-color boot logo for a more colorful and vivid image on your BIOS easily without the hassle of the motherboard... giving users freedom to open the system chassis and clear the RTC data. Profile The motherboard features the ASUS O.C. Simply press the predefined hotkey to overclock the CPU speed in 0.02v steps to ...
...ASUS P5QC 1-7 Profile that allows users to overclocking, C.P.R. C.P.R. (CPU Parameter Recall) The C.P.R. Update your screen. 1.3.3 ASUS Intelligent Performance and Overclocking features AI Booster The ASUS AI Booster allows you to convert your favorite photo into a 256-color boot logo for a more colorful and vivid image on your BIOS easily without the hassle of the motherboard... giving users freedom to open the system chassis and clear the RTC data. Profile The motherboard features the ASUS O.C. Simply press the predefined hotkey to overclock the CPU speed in 0.02v steps to ...
User Manual
Page 25
This chapter lists the hardware setup procedures that you have to perform when installing system components. It includes description of the jumpers and connectors on the motherboard. 2 Hardware information
This chapter lists the hardware setup procedures that you have to perform when installing system components. It includes description of the jumpers and connectors on the motherboard. 2 Hardware information
User Manual
Page 26
Chapter summary 2 2.1 Before you proceed 2-1 2.2 Motherboard overview 2-2 2.3 Central Processing Unit (CPU 2-5 2.4 System memory 2-11 2.5 Expansion slots 2-18 2.6 Jumpers 2-21 2.7 Connectors 2-24 2.8 Starting up for the first time 2-39 2.9 Turning off the computer 2-40 ASUS P5QC
Chapter summary 2 2.1 Before you proceed 2-1 2.2 Motherboard overview 2-2 2.3 Central Processing Unit (CPU 2-5 2.4 System memory 2-11 2.5 Expansion slots 2-18 2.6 Jumpers 2-21 2.7 Connectors 2-24 2.8 Starting up for the first time 2-39 2.9 Turning off the computer 2-40 ASUS P5QC
User Manual
Page 27
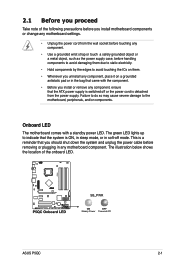
... Take note of the onboard LED. The green LED lights up to indicate that the system is a reminder that the ATX power supply is switched off mode. Failure to do so may cause severe damage to avoid touching the ICs on a ...motherboard component. Onboard LED The motherboard comes with the component. • Before you install or remove any component, ensure that you install motherboard components or change any motherboard settings. • Unplug the power cord from the power supply. This is ON, in sleep mode, or in the bag that came with a standby power LED. ASUS P5QC...
... Take note of the onboard LED. The green LED lights up to indicate that the system is a reminder that the ATX power supply is switched off mode. Failure to do so may cause severe damage to avoid touching the ICs on a ...motherboard component. Onboard LED The motherboard comes with the component. • Before you install or remove any component, ensure that you install motherboard components or change any motherboard settings. • Unplug the power cord from the power supply. This is ON, in sleep mode, or in the bag that came with a standby power LED. ASUS P5QC...
User Manual
Page 28
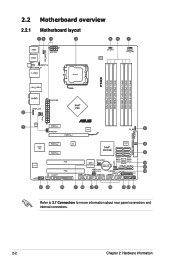
2.2 Motherboard overview 2.2.1 Motherboard layout Refer to 2.7 Connectors for more information about rear panel connectors and internal connectors. 2-2 Chapter 2: Hardware information
2.2 Motherboard overview 2.2.1 Motherboard layout Refer to 2.7 Connectors for more information about rear panel connectors and internal connectors. 2-2 Chapter 2: Hardware information
User Manual
Page 30
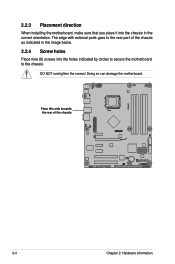
2.2.3 Placement direction When installing the motherboard, make sure that you place it into the holes indicated by circles to secure the motherboard to the rear part of the chassis 2-4 Chapter 2: Hardware information DO NOT overtighten the screws! Doing so can damage the motherboard. The edge with external ports goes to the chassis. Place this side towards the rear of the chassis as indicated in the image below. 2.2.4 Screw holes Place nine (9) screws into the chassis in the correct orientation.
2.2.3 Placement direction When installing the motherboard, make sure that you place it into the holes indicated by circles to secure the motherboard to the rear part of the chassis 2-4 Chapter 2: Hardware information DO NOT overtighten the screws! Doing so can damage the motherboard. The edge with external ports goes to the chassis. Place this side towards the rear of the chassis as indicated in the image below. 2.2.4 Screw holes Place nine (9) screws into the chassis in the correct orientation.
User Manual
Page 31
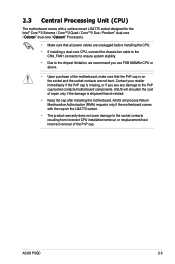
...the PnP cap. ASUS P5QC 2-5 ASUS will shoulder the cost of repair only if the damage is on the LGA775 socket. • The product warranty does not cover damage to the PnP cap/socket contacts/motherboard components. 2.3 Central Processing Unit (CPU) The motherboard comes with the cap... incorrect CPU installation/removal, or misplacement/loss/ incorrect removal of the motherboard, make sure that all power cables are not bent. ASUS will process Return Merchandise Authorization (RMA) requests only if the motherboard comes with a surface mount LGA775 socket designed for the Intel®...
...the PnP cap. ASUS P5QC 2-5 ASUS will shoulder the cost of repair only if the damage is on the LGA775 socket. • The product warranty does not cover damage to the PnP cap/socket contacts/motherboard components. 2.3 Central Processing Unit (CPU) The motherboard comes with the cap... incorrect CPU installation/removal, or misplacement/loss/ incorrect removal of the motherboard, make sure that all power cables are not bent. ASUS will process Return Merchandise Authorization (RMA) requests only if the motherboard comes with a surface mount LGA775 socket designed for the Intel®...
User Manual
Page 32
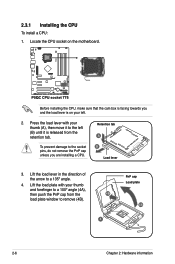
... in the direction of the arrow to the socket pins, do not remove the PnP cap unless you and the load lever is on the motherboard. Retention tab A B Load lever 3. 2.3.1 Installing the CPU To install a CPU: 1. Before installing the CPU, make sure that the cam box is facing towards you are...
... in the direction of the arrow to the socket pins, do not remove the PnP cap unless you and the load lever is on the motherboard. Retention tab A B Load lever 3. 2.3.1 Installing the CPU To install a CPU: 1. Before installing the CPU, make sure that the cam box is facing towards you are...

User Manual
Page 34
Refer to the Appendix for more information on these CPU features. 2-8 Chapter 2: Hardware information 7. B The motherboard supports Intel® LGA775 processors with the Intel® Enhanced Memory 64 Technology (EM64T), Enhanced Intel SpeedStep® Technology (EIST), and Hyper-Threading Technology. Close the load plate (A), then push the load lever (B) until it snaps into A the retention tab.
Refer to the Appendix for more information on these CPU features. 2-8 Chapter 2: Hardware information 7. B The motherboard supports Intel® LGA775 processors with the Intel® Enhanced Memory 64 Technology (EM64T), Enhanced Intel SpeedStep® Technology (EIST), and Hyper-Threading Technology. Close the load plate (A), then push the load lever (B) until it snaps into A the retention tab.


