
User Guide
Page 3
... 2-6 2.7.1 Overview 2-6 2.7.2 Installing CPU 2-6 2.7.3 Installing the heatsink and fan 2-8 2.8 Installing a DIMM 2-8 2.8.1 Memory configurations 2-8 2.8.2 Installing a DDR2 DIMM 2-11 2.8.3 Removing a DDR2 DIMM 2-11 2.9 Expansion slots 2-12 2.9.1 PCI slots 2-12 2.9.2 Installing an expansion card 2-12 2.10 Installing an optical drive 2-14 2.11 Reinstalling the storage drive assembly 2-15 2.12 Installing the foot stand...
... 2-6 2.7.1 Overview 2-6 2.7.2 Installing CPU 2-6 2.7.3 Installing the heatsink and fan 2-8 2.8 Installing a DIMM 2-8 2.8.1 Memory configurations 2-8 2.8.2 Installing a DDR2 DIMM 2-11 2.8.3 Removing a DDR2 DIMM 2-11 2.9 Expansion slots 2-12 2.9.1 PCI slots 2-12 2.9.2 Installing an expansion card 2-12 2.10 Installing an optical drive 2-14 2.11 Reinstalling the storage drive assembly 2-15 2.12 Installing the foot stand...
User Guide
Page 10
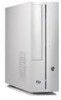
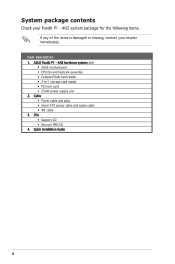
CDs • Support CD • Recover PRO CD 4. ASUS Pundit P1 - AH2 barebone system with • ASUS motherboard • CPU fan and heatsink assembly • CompactFlash card reader • 3-in-1 storage card reader • PCI riser card • 250W power supply unit 2. Quick installation Guide x AH2 system package for the following items. If any of the items is...
CDs • Support CD • Recover PRO CD 4. ASUS Pundit P1 - AH2 barebone system with • ASUS motherboard • CPU fan and heatsink assembly • CompactFlash card reader • 3-in-1 storage card reader • PCI riser card • 250W power supply unit 2. Quick installation Guide x AH2 system package for the following items. If any of the items is...
User Guide
Page 15
...e a k e r Line In Line Out Mic In 4-speaker Surround Out Front Speaker Out Mic 6-speaker Surround Out Front Speaker Out Center/Bass ASUS Pundit P1-AH2 1-5 Power supply air vents. 12. Use this switch to select the correct system input voltage according to the audio configuration table below for... the function of the audio ports in your area. DVI-D Out port. 8. PCI slot mental brackets. 17. Serial port. 10. Refer to the voltage supply in 2, 4, or 6-channel configuration. PS/2 mouse port....
...e a k e r Line In Line Out Mic In 4-speaker Surround Out Front Speaker Out Mic 6-speaker Surround Out Front Speaker Out Center/Bass ASUS Pundit P1-AH2 1-5 Power supply air vents. 12. Use this switch to select the correct system input voltage according to the audio configuration table below for... the function of the audio ports in your area. DVI-D Out port. 8. PCI slot mental brackets. 17. Serial port. 10. Refer to the voltage supply in 2, 4, or 6-channel configuration. PS/2 mouse port....
User Guide
Page 16
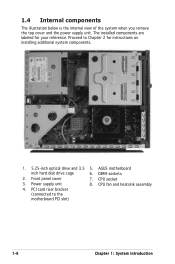
... remove the top cover and the power supply unit. Power supply unit 8. Front penel cover 7. Proceed to the motherboard PCI slot) 1-6 Chapter 1: System introduction ASUS motherboard inch hard disk drive cage 6. CPU socket 3. PCI card riser bracket (connected to Chapter 2 for your reference. DIMM sockets 2. CPU fan and heatsink assembly 4. The installed components...
... remove the top cover and the power supply unit. Power supply unit 8. Front penel cover 7. Proceed to the motherboard PCI slot) 1-6 Chapter 1: System introduction ASUS motherboard inch hard disk drive cage 6. CPU socket 3. PCI card riser bracket (connected to Chapter 2 for your reference. DIMM sockets 2. CPU fan and heatsink assembly 4. The installed components...
User Guide
Page 30
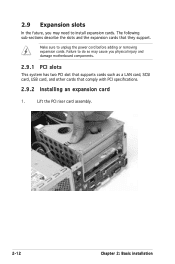
... 1. Failure to unplug the power cord before adding or removing expansion cards. Make sure to do so may need to install expansion cards. Lift the PCI riser card assembly. 2-12 Chapter 2: Basic installation 2.9 Expansion slots In the future, you may cause you physical injury and damage motherboard components...
... 1. Failure to unplug the power cord before adding or removing expansion cards. Make sure to do so may need to install expansion cards. Lift the PCI riser card assembly. 2-12 Chapter 2: Basic installation 2.9 Expansion slots In the future, you may cause you physical injury and damage motherboard components...
User Guide
Page 31
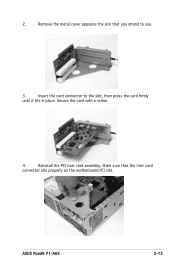
ASUS Pundit P1-AH2 2-13 Secure the card with a screw. 4. Remove the metal cover opposite the slot that the riser card connector sits properly on the motherboard PCI slot. 2. Insert the card connector to use. 3. Reinstall the PCI riser card assembly. Make sure that you intend to the slot, then press the card firmly until it fits in place.
ASUS Pundit P1-AH2 2-13 Secure the card with a screw. 4. Remove the metal cover opposite the slot that the riser card connector sits properly on the motherboard PCI slot. 2. Insert the card connector to use. 3. Reinstall the PCI riser card assembly. Make sure that you intend to the slot, then press the card firmly until it fits in place.

User Guide
Page 44
... in line graph representation. Click a hard disk drive to display available information. Click the plus sign (+) before the PCI Information item to display the information on the right panel. Click to display the PCI (Peripheral Component Interconnect) browser. Hard disk drive space usage The Hard Disk tab displays the used (blue) and... the bottom of the window represents the used and available hard disk drive space. Usage The Usage browser displays real-time information on your system. PCI browser Click to display the Usage browser.
... in line graph representation. Click a hard disk drive to display available information. Click the plus sign (+) before the PCI Information item to display the information on the right panel. Click to display the PCI (Peripheral Component Interconnect) browser. Hard disk drive space usage The Hard Disk tab displays the used (blue) and... the bottom of the window represents the used and available hard disk drive space. Usage The Usage browser displays real-time information on your system. PCI browser Click to display the Usage browser.

User Guide
Page 80
...operating system configures the Plug and Play devices not required for PCI or ISA bus architecture. When set Resources Controlled By to [PCI Device] [PCI Device] [PCI Device] [PCI Device] [PCI Device] [PCI Device] [PCI Device] Select Menu Item Specific Help Legacy ISA for devices compliant...the boot and Plug and Play compatible devices. Configuration options: [No] [Yes] Primary Display Adapter [PCI] Select which graphics controller to [PCI Device], the specific IRQ is reserved for use as the primary boot device. 5.4.3 PCIPnP Advanced Phoenix-Award...
...operating system configures the Plug and Play devices not required for PCI or ISA bus architecture. When set Resources Controlled By to [PCI Device] [PCI Device] [PCI Device] [PCI Device] [PCI Device] [PCI Device] [PCI Device] Select Menu Item Specific Help Legacy ISA for devices compliant...the boot and Plug and Play compatible devices. Configuration options: [No] [Yes] Primary Display Adapter [PCI] Select which graphics controller to [PCI Device], the specific IRQ is reserved for use as the primary boot device. 5.4.3 PCIPnP Advanced Phoenix-Award...
User Guide
Page 85
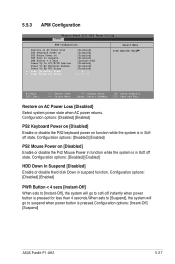
...than 4 seconds.When sets to [Suspend], the system will go to suspend when power button is pressed.Configuration options: [Insant-Off] [Suspend] ASUS Pundit P1-AH2 5-27 Configuration options: [Disabled] [Enabled] HDD Down In Suspend [Disabled] Enable or disable Hard disk Down in suspend function. 5.5.3 APM Con...figuration Restore on AC Power Loss PS2 Keyboard Power on PS2 Mouse Power on HDD Down In Suspend PWR Button < 4 secs Power Up On PCI/PCIE Devices Power On By External Modems Power On By RTC Alarm x Date (of Month) Alarm x Time (hh:mm:ss) Alarm [Disabled] [Disabled...
...than 4 seconds.When sets to [Suspend], the system will go to suspend when power button is pressed.Configuration options: [Insant-Off] [Suspend] ASUS Pundit P1-AH2 5-27 Configuration options: [Disabled] [Enabled] HDD Down In Suspend [Disabled] Enable or disable Hard disk Down in suspend function. 5.5.3 APM Con...figuration Restore on AC Power Loss PS2 Keyboard Power on PS2 Mouse Power on HDD Down In Suspend PWR Button < 4 secs Power Up On PCI/PCIE Devices Power On By External Modems Power On By RTC Alarm x Date (of Month) Alarm x Time (hh:mm:ss) Alarm [Disabled] [Disabled...

User Guide
Page 86
Configuration options: [Disabled] [Enabled] Power On By RTC Alarm [Disabled] Enable or disable the power on by PCI devices & NV onboard LAN. Power Up On PCI/PCIE Devices [Disabled] Disable/Enable PME to wake up by ring function. Configuration options: [Disabled] [Enabled] 5-28 Chapter 5: BIOS setup Configuration options: [Disabled] [Enabled] Power On By External Modems [Disabled] Disable/Enable wake up from S5 by RTC alarm function.
Configuration options: [Disabled] [Enabled] Power On By RTC Alarm [Disabled] Enable or disable the power on by PCI devices & NV onboard LAN. Power Up On PCI/PCIE Devices [Disabled] Disable/Enable PME to wake up by ring function. Configuration options: [Disabled] [Enabled] 5-28 Chapter 5: BIOS setup Configuration options: [Disabled] [Enabled] Power On By External Modems [Disabled] Disable/Enable wake up from S5 by RTC alarm function.
