
User Guide
Page 6
... guarantee that may cause undesired operation. These limits are designed to correct the interference by turning the equipment off and on a circuit different from digital apparatus set out in a particular installation. However, there is connected. • Consult the dealer or an experienced radio/TV technician for connection of the monitor to the graphics card is subject to the following...
... guarantee that may cause undesired operation. These limits are designed to correct the interference by turning the equipment off and on a circuit different from digital apparatus set out in a particular installation. However, there is connected. • Consult the dealer or an experienced radio/TV technician for connection of the monitor to the graphics card is subject to the following...
User Guide
Page 8
... 3: Starting up This chapter helps you power up the system and install drivers and utilities from the support CD. 4. How this guide Audience This guide provides general information and installation instructions about the motherboard that comes with hardware knowledge of the ASUS Pundit P1 - AH2. Chapter 2: Basic installation This chapter provides step-by-step instructions on the front and rear panel, and internal components. 2. About this guide is intended for experienced users and...
... 3: Starting up This chapter helps you power up the system and install drivers and utilities from the support CD. 4. How this guide Audience This guide provides general information and installation instructions about the motherboard that comes with hardware knowledge of the ASUS Pundit P1 - AH2. Chapter 2: Basic installation This chapter provides step-by-step instructions on the front and rear panel, and internal components. 2. About this guide is intended for experienced users and...
User Guide
Page 12
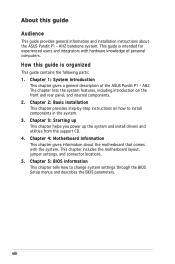
... of system memory using DDR2-800/667/533/400 DIMMs, high-resolution graphics via integrated graphics controller, Serial ATA, USB 2.0, and 6-channel audio. 1.2 Front panel External Internal 1 1 2 3 2 3 4 4 5 6 5 7 6 8 9 10 1-2 Chapter 1: System introduction 1.1 Welcome! The ASUS Pundit P1-AH2 is an all-in a stylish casing and powered by the ASUS motherboard that supports the AMD® Athlon64, AMD® Athlon 64 FX, AMD® Sempron, or AMD® Athlon 64 X2 processor. Thank...
... of system memory using DDR2-800/667/533/400 DIMMs, high-resolution graphics via integrated graphics controller, Serial ATA, USB 2.0, and 6-channel audio. 1.2 Front panel External Internal 1 1 2 3 2 3 4 4 5 6 5 7 6 8 9 10 1-2 Chapter 1: System introduction 1.1 Welcome! The ASUS Pundit P1-AH2 is an all-in a stylish casing and powered by the ASUS motherboard that supports the AMD® Athlon64, AMD® Athlon 64 FX, AMD® Sempron, or AMD® Athlon 64 X2 processor. Thank...
User Guide
Page 15
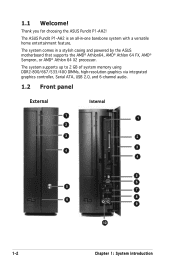
.... Use this switch to select the correct system input voltage according to the audio configuration table below for the function of the audio ports in your area. Audio 2, 4, or 6-channel configuration Port Light Blue Lime Pink Headset 2-s p e a k e r Line In Line Out Mic In 4-speaker Surround Out Front Speaker Out Mic 6-speaker Surround Out Front Speaker Out Center/Bass ASUS Pundit P1-AH2 1-5 Power supply air...
.... Use this switch to select the correct system input voltage according to the audio configuration table below for the function of the audio ports in your area. Audio 2, 4, or 6-channel configuration Port Light Blue Lime Pink Headset 2-s p e a k e r Line In Line Out Mic In 4-speaker Surround Out Front Speaker Out Mic 6-speaker Surround Out Front Speaker Out Center/Bass ASUS Pundit P1-AH2 1-5 Power supply air...
User Guide
Page 18
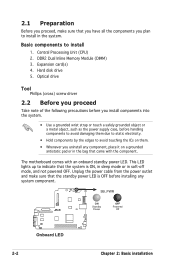
Hard disk drive 5. The motherboard comes with the component. Optical drive Tool Phillips (cross) screw driver 2.2 Before you proceed Take note of the following precautions before you install components into the system. • Use a grounded wrist strap or touch a safely grounded object or a metal object, such as the power supply case, before handling components to avoid damaging them . • Whenever you uninstall any...
Hard disk drive 5. The motherboard comes with the component. Optical drive Tool Phillips (cross) screw driver 2.2 Before you proceed Take note of the following precautions before you install components into the system. • Use a grounded wrist strap or touch a safely grounded object or a metal object, such as the power supply case, before handling components to avoid damaging them . • Whenever you uninstall any...
User Guide
Page 25
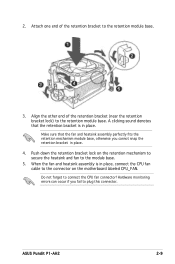
... retention bracket in place, connect the CPU fan cable to the connector on the retention mechanism to secure the heatsink and fan to the module base. 5. 2. Make sure that the retention bracket is in place. 4. Do not forget to the retention module base. Attach one end of the retention bracket (near the retention bracket lock) to connect the CPU fan connector! ASUS Pundit P1-AH2 2-9
... retention bracket in place, connect the CPU fan cable to the connector on the retention mechanism to secure the heatsink and fan to the module base. 5. 2. Make sure that the retention bracket is in place. 4. Do not forget to the retention module base. Attach one end of the retention bracket (near the retention bracket lock) to connect the CPU fan connector! ASUS Pundit P1-AH2 2-9
User Guide
Page 27
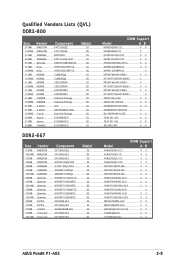
Qualified Vendors Lists (QVL) DDR2-800 Size 512MB 1024MB 512MB 256MB 512MB 512MB 1024MB ...420 V V 78.91091.420 V V 8G-24IK2-EBT V V DIMM Support Model A B KVR667D2N5/512 V V KVR667D2N5/1G V V KVR667D2E5/512 V V KVR667D2N5/256 V V M378T3354CZ0-CE6 V V M378T6553CZ0-CE6 V V M378T2953CZ0-CE6 V V HYS64T32000HU-3S-A V V HYS64T64000HU-3S-A V V HYS64T128020HU-3S-A V V HYS64T32000HU-3S-B V HYS64T64000HU-3S-B V V HYS64T128020HU-3S-B V V EBE25UC8ABFA-6E-E V V EBE51UD8AEFA-6E-E V V M20AD5Q3H3163J1C52 V V TS64MLQ64V6J V V TS128MLQ64V6J V V ASUS Pundit P1-AH2 2-9
Qualified Vendors Lists (QVL) DDR2-800 Size 512MB 1024MB 512MB 256MB 512MB 512MB 1024MB ...420 V V 78.91091.420 V V 8G-24IK2-EBT V V DIMM Support Model A B KVR667D2N5/512 V V KVR667D2N5/1G V V KVR667D2E5/512 V V KVR667D2N5/256 V V M378T3354CZ0-CE6 V V M378T6553CZ0-CE6 V V M378T2953CZ0-CE6 V V HYS64T32000HU-3S-A V V HYS64T64000HU-3S-A V V HYS64T128020HU-3S-A V V HYS64T32000HU-3S-B V HYS64T64000HU-3S-B V V HYS64T128020HU-3S-B V V EBE25UC8ABFA-6E-E V V EBE51UD8AEFA-6E-E V V M20AD5Q3H3163J1C52 V V TS64MLQ64V6J V V TS128MLQ64V6J V V ASUS Pundit P1-AH2 2-9
User Guide
Page 33
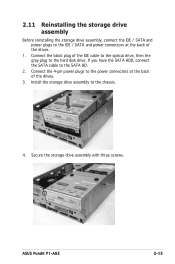
... / SATA and power plugs to the IDE / SATA and power connectors at the back of the drives. 1. Connect the 4-pin power plugs to the chassis. 4. If you have the SATA HDD, connect the SATA cable to the hard disk drive. Secure the storage drive assembly with three screws. Connect the black plug of the IDE cable to the optical drive, then the gray plug to the SATA HD. 2. Install the storage drive assembly to the power connectors at the back of the drives. 3. ASUS Pundit P1-AH2...
... / SATA and power plugs to the IDE / SATA and power connectors at the back of the drives. 1. Connect the 4-pin power plugs to the chassis. 4. If you have the SATA HDD, connect the SATA cable to the hard disk drive. Secure the storage drive assembly with three screws. Connect the black plug of the IDE cable to the optical drive, then the gray plug to the SATA HD. 2. Install the storage drive assembly to the power connectors at the back of the drives. 3. ASUS Pundit P1-AH2...
User Guide
Page 36
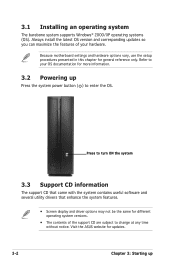
... documentation for more information. 3.2 Powering up Because motherboard settings and hardware options vary, use the setup procedures presented in this chapter for updates. 3-2 Chapter 3: Starting up Press the system power button ( ) to your hardware. Press to change at any time without notice. Visit the ASUS website for general reference only. Refer to enter the OS. 3.1 Installing an operating system The barebone system supports Windows® 2000/XP operating systems (OS).
... documentation for more information. 3.2 Powering up Because motherboard settings and hardware options vary, use the setup procedures presented in this chapter for updates. 3-2 Chapter 3: Starting up Press the system power button ( ) to your hardware. Press to change at any time without notice. Visit the ASUS website for general reference only. Refer to enter the OS. 3.1 Installing an operating system The barebone system supports Windows® 2000/XP operating systems (OS).
User Guide
Page 52
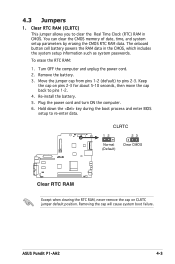
... jumper cap from pins 1-2 (default) to clear the Real Time Clock (RTC) RAM in the CMOS, which includes the system setup information such as system passwords. You can clear the CMOS memory of date, time, and system setup parameters by erasing the CMOS RTC RAM data. Remove the battery. 3. ASUS Pundit P1-AH2 4-3 Plug the power cord and turn ON the computer. 6. Turn OFF the computer and unplug the power cord. 2. 4.3 Jumpers 1. To erase the RTC RAM: 1. Clear...
... jumper cap from pins 1-2 (default) to clear the Real Time Clock (RTC) RAM in the CMOS, which includes the system setup information such as system passwords. You can clear the CMOS memory of date, time, and system setup parameters by erasing the CMOS RTC RAM data. Remove the battery. 3. ASUS Pundit P1-AH2 4-3 Plug the power cord and turn ON the computer. 6. Turn OFF the computer and unplug the power cord. 2. 4.3 Jumpers 1. To erase the RTC RAM: 1. Clear...
User Guide
Page 60
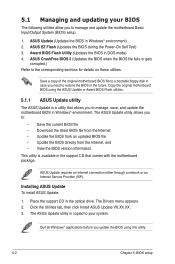
... the Utilities tab, then click Install ASUS Update VX.XX.XX. 3. The ASUS Update utility is copied to your BIOS The following utilities allow you need to a bootable floppy disk in DOS mode) 4. ASUS Update (Updates the BIOS in the optical drive. Save a copy of the original motherboard BIOS file to restore the BIOS in Windows® environment. ASUS EZ Flash (Updates the BIOS during the Power-On Self Test) 3. 5.1 Managing and updating your system. Award BIOS Flash Utility (Updates the BIOS in case you...
... the Utilities tab, then click Install ASUS Update VX.XX.XX. 3. The ASUS Update utility is copied to your BIOS The following utilities allow you need to a bootable floppy disk in DOS mode) 4. ASUS Update (Updates the BIOS in the optical drive. Save a copy of the original motherboard BIOS file to restore the BIOS in Windows® environment. ASUS EZ Flash (Updates the BIOS during the Power-On Self Test) 3. 5.1 Managing and updating your system. Award BIOS Flash Utility (Updates the BIOS in case you...
User Guide
Page 63
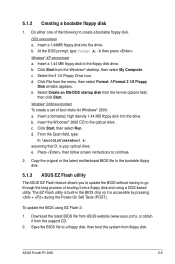
... D: is accessible by pressing + during the Power-On Self Tests (POST). Windows® XP environment a. Windows® 2000 environment To create a set of booting from the menu, then select Format. Click Start from the support CD. 2. Download the latest BIOS file from ASUS website (www.asus.com), or obtain it is your optical drive. At the DOS prompt, type format A:/S then press . ASUS Pundit P1-AH2 5-5 5.1.2 Creating a bootable floppy disk...
... D: is accessible by pressing + during the Power-On Self Tests (POST). Windows® XP environment a. Windows® 2000 environment To create a set of booting from the menu, then select Format. Click Start from the support CD. 2. Download the latest BIOS file from ASUS website (www.asus.com), or obtain it is your optical drive. At the DOS prompt, type format A:/S then press . ASUS Pundit P1-AH2 5-5 5.1.2 Creating a bootable floppy disk...
User Guide
Page 69
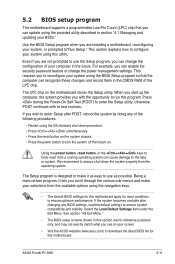
... section "4.1 Managing and updating your system, or prompted to"Run Setup." For example, you can change the power management settings. ASUS Pundit P1-AH2 5-11 This section explains how to download the latest BIOS file for reference purposes only, and may not exactly match what you are for this utility. Use the BIOS Setup program when you see on the motherboard stores the Setup utility. 5.2 BIOS setup program This motherboard supports a programmable Low-Pin Count...
... section "4.1 Managing and updating your system, or prompted to"Run Setup." For example, you can change the power management settings. ASUS Pundit P1-AH2 5-11 This section explains how to download the latest BIOS file for reference purposes only, and may not exactly match what you are for this utility. Use the BIOS Setup program when you see on the motherboard stores the Setup utility. 5.2 BIOS setup program This motherboard supports a programmable Low-Pin Count...
User Guide
Page 77
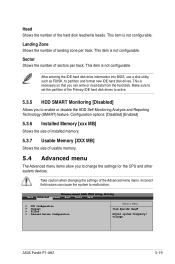
Sector Shows the number of the Primary IDE hard disk drives to active. 5.3.5 HDD SMART Monitoring [Disabled] Allows you to enable or disable the HDD Self-Monitoring Analysis and Reporting Technology (SMART) feature. ASUS Pundit P1-AH2 5-19 This item is not configurable. This is not configurable. This item is not configurable. Make sure to malfunction. Configuration options: [Disabled] [Enabled] 5.3.6 Installed Memory [xxx MB] Shows...
Sector Shows the number of the Primary IDE hard disk drives to active. 5.3.5 HDD SMART Monitoring [Disabled] Allows you to enable or disable the HDD Self-Monitoring Analysis and Reporting Technology (SMART) feature. ASUS Pundit P1-AH2 5-19 This item is not configurable. This is not configurable. This item is not configurable. Make sure to malfunction. Configuration options: [Disabled] [Enabled] 5.3.6 Installed Memory [xxx MB] Shows...
User Guide
Page 78
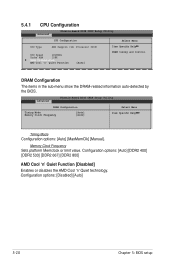
... the BIOS. Memory Clock Frequency Sets platform Memclock or limit value. Configuration options: [Disabled] [Auto] 5-20 Chapter 5: BIOS setup 5.4.1 CPU Configuration Advanced Phoenix-Award BIOS CMOS Setup Utility CPU Configuration Select Menu CPU Type AMD Sempron (tm) Processor 3200+ CPU Speed 1810MHz Cache RAM 128K DRAM Configuration AMD Cool 'n' Quiet Function [Auto] Item Specific Help DRAM timing and control. Advanced Phoenix-Award BIOS CMOS Setup Utility...
... the BIOS. Memory Clock Frequency Sets platform Memclock or limit value. Configuration options: [Disabled] [Auto] 5-20 Chapter 5: BIOS setup 5.4.1 CPU Configuration Advanced Phoenix-Award BIOS CMOS Setup Utility CPU Configuration Select Menu CPU Type AMD Sempron (tm) Processor 3200+ CPU Speed 1810MHz Cache RAM 128K DRAM Configuration AMD Cool 'n' Quiet Function [Auto] Item Specific Help DRAM timing and control. Advanced Phoenix-Award BIOS CMOS Setup Utility...

User Guide
Page 80
Configuration options: [No] [Yes] Primary Display Adapter [PCI] Select which graphics controller to [PCI Device] [PCI Device] [PCI Device] [PCI Device] [PCI Device] [PCI Device] [PCI Device] Select Menu Item Specific Help Legacy ISA for devices compliant with the original PC AT bus specification, PCI/ISA PnP for devices compliant with the Plug and Play standard whether designed for use as the primary boot device. IRQ Resources Advanced Phoenix-Award BIOS CMOS Setup Utility IRQ Resources IRQ-5 assigned...
Configuration options: [No] [Yes] Primary Display Adapter [PCI] Select which graphics controller to [PCI Device] [PCI Device] [PCI Device] [PCI Device] [PCI Device] [PCI Device] [PCI Device] Select Menu Item Specific Help Legacy ISA for devices compliant with the original PC AT bus specification, PCI/ISA PnP for devices compliant with the Plug and Play standard whether designed for use as the primary boot device. IRQ Resources Advanced Phoenix-Award BIOS CMOS Setup Utility IRQ Resources IRQ-5 assigned...
User Guide
Page 81
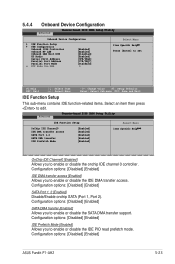
.... Configuration options: [Disabled] [Enabled] SATA Port 1, 2 [Enabled] Disable/Enable onchip SATA (Port 1, Port 2). 5.4.4 Onboard Device Configuration Advanced Phoenix-Award BIOS CMOS Setup Utility Onboard Device Configuration IDE Function Setup USB Configuration Onboard 1394 Controller Onboard NV LAN Onboard LAN Boot ROM HD Audio Serial Port1 Address Parallel Port Address Parallel Port Mode x ECP Mode Use DMA [Enabled] [Enabled] [Disabled] [Enabled] [3F8/IRQ4] [378/IRQ7] [Standard] 3 Select Menu Item Specific Help Press [Enter] to set F1:Help ESC...
.... Configuration options: [Disabled] [Enabled] SATA Port 1, 2 [Enabled] Disable/Enable onchip SATA (Port 1, Port 2). 5.4.4 Onboard Device Configuration Advanced Phoenix-Award BIOS CMOS Setup Utility Onboard Device Configuration IDE Function Setup USB Configuration Onboard 1394 Controller Onboard NV LAN Onboard LAN Boot ROM HD Audio Serial Port1 Address Parallel Port Address Parallel Port Mode x ECP Mode Use DMA [Enabled] [Enabled] [Disabled] [Enabled] [3F8/IRQ4] [378/IRQ7] [Standard] 3 Select Menu Item Specific Help Press [Enter] to set F1:Help ESC...
User Guide
Page 89
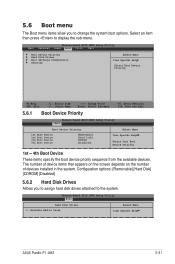
...appears on the screen depends on the number of devices installed in Cards Select Menu Item Specific Help ASUS Pundit P1-AH2 5-31 Configuration options: [Removable] [Hard Disk] [CDROM] [Disabled] 5.6.2 Hard Disk Drives Allows you to change the system boot options. Phoenix-Award BIOS CMOS Setup Utility Boot Hard Disk Drives 1. 5.6 Boot menu The Boot menu items allow you to assign hard disk drives attached to the system. Phoenix-Award BIOS CMOS Setup Utility Main Advanced Power Boot Tools Exit Boot Device Priority Hard Disk Drives Boot Settings Configuration...
...appears on the screen depends on the number of devices installed in Cards Select Menu Item Specific Help ASUS Pundit P1-AH2 5-31 Configuration options: [Removable] [Hard Disk] [CDROM] [Disabled] 5.6.2 Hard Disk Drives Allows you to change the system boot options. Phoenix-Award BIOS CMOS Setup Utility Boot Hard Disk Drives 1. 5.6 Boot menu The Boot menu items allow you to assign hard disk drives attached to the system. Phoenix-Award BIOS CMOS Setup Utility Main Advanced Power Boot Tools Exit Boot Device Priority Hard Disk Drives Boot Settings Configuration...
User Guide
Page 91
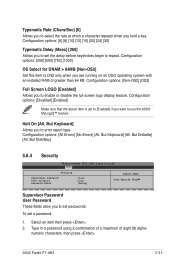
..., But Disk/Key] 5.6.4 Security Phoenix-Award BIOS CMOS Setup Utility Boot Security Supervisor Password User Password Password Check Clear Clear [Setup] Select Menu Item Specific Help Supervisor Password User Password These fields allow you to set passwords: To set to [Enabled] if you want to OS2 only when you are running on an OS/2 operating system with an installed RAM of eight (8) alpha- Type in a password using a combination of a maximum of greater than 64 KB. ASUS Pundit P1-AH2 5-33 Typematic...
..., But Disk/Key] 5.6.4 Security Phoenix-Award BIOS CMOS Setup Utility Boot Security Supervisor Password User Password Password Check Clear Clear [Setup] Select Menu Item Specific Help Supervisor Password User Password These fields allow you to set passwords: To set to [Enabled] if you want to OS2 only when you are running on an OS/2 operating system with an installed RAM of eight (8) alpha- Type in a password using a combination of a maximum of greater than 64 KB. ASUS Pundit P1-AH2 5-33 Typematic...
User Guide
Page 93
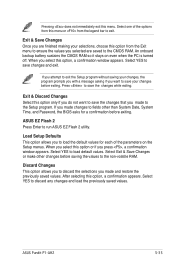
... before exiting. Select YES to run ASUS EZ Flash 2 utility. After selecting this menu. Load Setup Defaults This option allows you select this option from this option or if you selected are saved to the non-volatile RAM. If you attempt to exit the Setup program without saving your changes before saving the values to the CMOS RAM. Discard Changes This option allows you to discard the...
... before exiting. Select YES to run ASUS EZ Flash 2 utility. After selecting this menu. Load Setup Defaults This option allows you select this option from this option or if you selected are saved to the non-volatile RAM. If you attempt to exit the Setup program without saving your changes before saving the values to the CMOS RAM. Discard Changes This option allows you to discard the...


