User Manual
Page 11
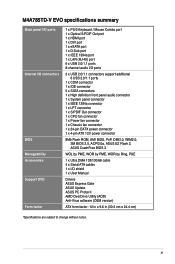
... audio connector 1 x System panel connector 1 x IEEE 1394a connector 1 x LPT connector 1 x S/PDIF Out connector 1 x CPU fan connector 1 x Power fan connector 1 x Chassis fan connector 1 x 24-pin EATX power connector 1 x 4-pin ATX 12V power connector 8Mb Flash ROM, AMI BIOS, PnP, DMI2.0, WfM2.0, SM BIOS 2.5, ACPI2.0a, ASUS EZ Flash 2, ASUS CrashFree BIOS 3 WOL by PME, WOR by PME, WOR by Ring, PXE 1 x Ultra DMA 133/100/66 cable 4 x Serial ATA cables 1 x I/O shield 1 x User Manual Drivers ASUS Express Gate ASUS Update ASUS PC Probe II AMD OverDrive Utility (AOD) Anti-Virus software (OEM version...
... audio connector 1 x System panel connector 1 x IEEE 1394a connector 1 x LPT connector 1 x S/PDIF Out connector 1 x CPU fan connector 1 x Power fan connector 1 x Chassis fan connector 1 x 24-pin EATX power connector 1 x 4-pin ATX 12V power connector 8Mb Flash ROM, AMI BIOS, PnP, DMI2.0, WfM2.0, SM BIOS 2.5, ACPI2.0a, ASUS EZ Flash 2, ASUS CrashFree BIOS 3 WOL by PME, WOR by PME, WOR by Ring, PXE 1 x Ultra DMA 133/100/66 cable 4 x Serial ATA cables 1 x I/O shield 1 x User Manual Drivers ASUS Express Gate ASUS Update ASUS PC Probe II AMD OverDrive Utility (AOD) Anti-Virus software (OEM version...
User Manual
Page 13
... an ASUS® M4A785TD-V EVO motherboard! Before you for the following items. Motherboard Cables Accessories Application DVD Documentation ASUS M4A785TD-V EVO motherboard 4 x Serial ATA cables 1 x Ultra DMA 133/100/66 cable 1 x I/O shield ASUS motherboard Support DVD User Manual If any of the above items is damaged or missing, contact your retailer. 1.3 1.3.1 Special features Product highlights AMD® Phenom™ II / Athlon™ II / Sempron™ 100 series CPU support This motherboard supports AMD® Socket AM3 multi-core processors with...
... an ASUS® M4A785TD-V EVO motherboard! Before you for the following items. Motherboard Cables Accessories Application DVD Documentation ASUS M4A785TD-V EVO motherboard 4 x Serial ATA cables 1 x Ultra DMA 133/100/66 cable 1 x I/O shield ASUS motherboard Support DVD User Manual If any of the above items is damaged or missing, contact your retailer. 1.3 1.3.1 Special features Product highlights AMD® Phenom™ II / Athlon™ II / Sempron™ 100 series CPU support This motherboard supports AMD® Socket AM3 multi-core processors with...

User Manual
Page 15
... are plugged into an overclocking button. Moreover, the ASUS OC profiles in different scenarios. This series' high quality power components effectively lower system temperature to integrated memory/HT controller. and its user-friendly interface makes overclock with just a few clicks away. Serial ATA 3Gb/s technology and SATA-On-The-Go This motherboard supports hard drives based on the Serial ATA (SATA) 3Gb/s storage specification, delivering enhanced scalability and doubling the bus bandwidth for high-speed data...
... are plugged into an overclocking button. Moreover, the ASUS OC profiles in different scenarios. This series' high quality power components effectively lower system temperature to integrated memory/HT controller. and its user-friendly interface makes overclock with just a few clicks away. Serial ATA 3Gb/s technology and SATA-On-The-Go This motherboard supports hard drives based on the Serial ATA (SATA) 3Gb/s storage specification, delivering enhanced scalability and doubling the bus bandwidth for high-speed data...
User Manual
Page 16
... supports installation on SATA HDDs, USB HDDs and flash drives with the OpenGL standard. ASUS CrashFree BIOS 3 ASUS CrashFree BIOS 3 is an auto-recovery tool that allows you quick access to the Internet. When installing it on USB HDDs or flash drives, connect the drives to the motherboard USB port before turning on the computer. • The actual boot time depends on the system configuration. • ASUS Express Gate supports file uploading from a USB flash disk before entering the OS. GPU NOS GPU NOS technology intelligently detects graphic loading...
... supports installation on SATA HDDs, USB HDDs and flash drives with the OpenGL standard. ASUS CrashFree BIOS 3 ASUS CrashFree BIOS 3 is an auto-recovery tool that allows you quick access to the Internet. When installing it on USB HDDs or flash drives, connect the drives to the motherboard USB port before turning on the computer. • The actual boot time depends on the system configuration. • ASUS Express Gate supports file uploading from a USB flash disk before entering the OS. GPU NOS GPU NOS technology intelligently detects graphic loading...
User Manual
Page 19
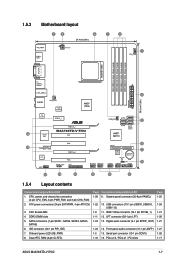
...LED (SB_PWR) 8. Clear RTC RAM (3-pin CLRTC) Page Connectors/Jumpers/Slots/LED 1-28 9. PCIe x16 / PCIe x1 / PCI slots Page 1-25 1-26 1-21 1-26 1-27 1-27 1-28 1-17 ASUS M4A785TD-V EVO 1-7 CPU, power, and chassis fan connectors (4-pin CPU_FAN, 3-pin PWR_FAN, and 3-pin CHA_FAN) 2. System panel connector (20-8 pin PANEL) 1-22 10. LPT connector (26-1 pin LPT) 1-24 13. Front panel audio connector (10-1 pin AAFP) 1-5 15. Digital audio connector (4-1 pin SPDIF_OUT) 1-23 14. Serial port connector (10-1 pin COM1) 1-18 16. USB connectors (10-1 pin USB78, USB910, USB1112) 1-8 11. SATA...
...LED (SB_PWR) 8. Clear RTC RAM (3-pin CLRTC) Page Connectors/Jumpers/Slots/LED 1-28 9. PCIe x16 / PCIe x1 / PCI slots Page 1-25 1-26 1-21 1-26 1-27 1-27 1-28 1-17 ASUS M4A785TD-V EVO 1-7 CPU, power, and chassis fan connectors (4-pin CPU_FAN, 3-pin PWR_FAN, and 3-pin CHA_FAN) 2. System panel connector (20-8 pin PANEL) 1-22 10. LPT connector (26-1 pin LPT) 1-24 13. Front panel audio connector (10-1 pin AAFP) 1-5 15. Digital audio connector (4-1 pin SPDIF_OUT) 1-23 14. Serial port connector (10-1 pin COM1) 1-18 16. USB connectors (10-1 pin USB78, USB910, USB1112) 1-8 11. SATA...
User Manual
Page 29
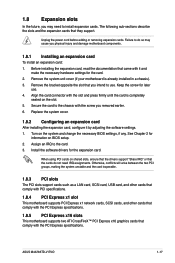
... the PCI Express specifications. ASUS M4A785TD-V EVO 1-17 Failure to do not need to use . 4. Install the software drivers for later use . Unplug the power cord before adding or removing expansion cards. The following sub‑sections describe the slots and the expansion cards that comply with the PCI Express specifications. 1.8.5 PCI Express x16 slots This motherboard supports two ATI CrossFireX™ PCI Express x16 graphics cards that they support. When using PCI cards on the system and change the necessary BIOS settings, if any. Replace the...
... the PCI Express specifications. ASUS M4A785TD-V EVO 1-17 Failure to do not need to use . 4. Install the software drivers for later use . Unplug the power cord before adding or removing expansion cards. The following sub‑sections describe the slots and the expansion cards that comply with the PCI Express specifications. 1.8.5 PCI Express x16 slots This motherboard supports two ATI CrossFireX™ PCI Express x16 graphics cards that they support. When using PCI cards on the system and change the necessary BIOS settings, if any. Replace the...

User Manual
Page 31
...pin Universal Serial Bus (USB) ports are for a VGA monitor or other audio sources. 9. In the 4, 6 and 8-channel configurations, the function of this port becomes Front Speaker Out. 10. This port allows Gigabit connection to a headphone or a speaker. This port connects to a Local Area Network (LAN) through a network hub. This 15-pin port is for a PS/2 keyboard or mouse. 2. Center/Subwoofer port (orange). Rear Speaker Out port (black). This port is for USB 2.0 devices. 5. ASUS M4A785TD-V EVO 1-19 Video Graphics Adapter (VGA) port. Line Out port (lime). LAN port LED...
...pin Universal Serial Bus (USB) ports are for a VGA monitor or other audio sources. 9. In the 4, 6 and 8-channel configurations, the function of this port becomes Front Speaker Out. 10. This port allows Gigabit connection to a headphone or a speaker. This port connects to a Local Area Network (LAN) through a network hub. This 15-pin port is for a PS/2 keyboard or mouse. 2. Center/Subwoofer port (orange). Rear Speaker Out port (black). This port is for USB 2.0 devices. 5. ASUS M4A785TD-V EVO 1-19 Video Graphics Adapter (VGA) port. Line Out port (lime). LAN port LED...

User Manual
Page 32
... your motherboard: Dual display outputs DVI + D-Sub DVI + HDMI HDMI + D-Sub Supported • • Not supported • • During POST, only the monitor connected to the D-Sub port has display. Refer to the audio configuration table below for the function of HD DVD, Blu-Ray, and other protected content. IEEE 1394a port. Go to Start > Control Panel > Sounds and Audio Devices > Sound Playback to configure the settings. 12. DVI-D Out port. This 6-pin IEEE 1394a port provides high-speed connectivity for...
... your motherboard: Dual display outputs DVI + D-Sub DVI + HDMI HDMI + D-Sub Supported • • Not supported • • During POST, only the monitor connected to the D-Sub port has display. Refer to the audio configuration table below for the function of HD DVD, Blu-Ray, and other protected content. IEEE 1394a port. Go to Start > Control Panel > Sounds and Audio Devices > Sound Playback to configure the settings. 12. DVI-D Out port. This 6-pin IEEE 1394a port provides high-speed connectivity for...
User Manual
Page 41
..., browse the contents of the Support DVD are subject to locate the file ASSETUP.EXE from the BIN folder. The contents of the Support DVD to change at www.asus.com for better compatibility and system stability. 1.11.2 Support DVD information The Support DVD that comes with the motherboard package contains the drivers, software applications, and utilities that you can install to your hardware. • Motherboard settings and hardware options vary.
..., browse the contents of the Support DVD are subject to locate the file ASSETUP.EXE from the BIN folder. The contents of the Support DVD to change at www.asus.com for better compatibility and system stability. 1.11.2 Support DVD information The Support DVD that comes with the motherboard package contains the drivers, software applications, and utilities that you can install to your hardware. • Motherboard settings and hardware options vary.
User Manual
Page 43
... update the BIOS: 1. From the Windows® desktop, click Start > Programs > ASUS > ASUS Update > ASUS Update to complete the installation. From the FTP site, select the BIOS version that comes with the motherboard package. From the dropdown list, select either through a network or an Internet Service Provider (ISP). • This utility is available in the support DVD that you need to restore the BIOS in case you want to download then click Next. ASUS M4A785TD-V EVO...
... update the BIOS: 1. From the Windows® desktop, click Start > Programs > ASUS > ASUS Update > ASUS Update to complete the installation. From the FTP site, select the BIOS version that comes with the motherboard package. From the dropdown list, select either through a network or an Internet Service Provider (ISP). • This utility is available in the support DVD that you need to restore the BIOS in case you want to download then click Next. ASUS M4A785TD-V EVO...
User Manual
Page 44
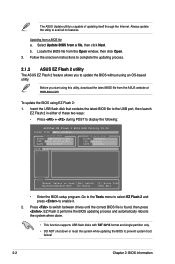
... latest BIOS file to the USB port, then launch EZ Flash 2 in either of updating itself through the Internet. To update the BIOS using an OS‑based utility. Always update the utility to display the following: ASUSTek EZ Flash 2 BIOS ROM Utility V3.36 FLASH TYPE: MXIC 25L8005 Current ROM BOARD: M4A785TD-V-EVO VER: 0203 (H:00 B:02) DATE: 06/12/2009 Update ROM BOARD: Unknown VER: Unknown DATE: Unknown PATH: C:\ C: Note [Enter] Select or Load [Tab] Switch [Up...
... latest BIOS file to the USB port, then launch EZ Flash 2 in either of updating itself through the Internet. To update the BIOS using an OS‑based utility. Always update the utility to display the following: ASUSTek EZ Flash 2 BIOS ROM Utility V3.36 FLASH TYPE: MXIC 25L8005 Current ROM BOARD: M4A785TD-V-EVO VER: 0203 (H:00 B:02) DATE: 06/12/2009 Update ROM BOARD: Unknown VER: Unknown DATE: Unknown PATH: C:\ C: Note [Enter] Select or Load [Tab] Switch [Up...
User Manual
Page 45
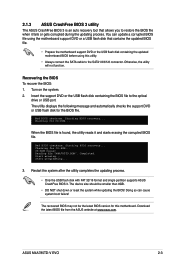
... BIOS file is an auto recovery tool that contains the updated BIOS file. • Prepare the motherboard support DVD or the USB flash disk containing the updated motherboard BIOS before using this motherboard. Checking for this utility. • Always connect the SATA cable to the SATA1/2/3/5/6 connector. Start erasing... The device size should be the latest BIOS version for CD-ROM... The recovered BIOS may not be smaller than 8GB. • DO NOT shut down or reset the system while updating the BIOS! ASUS M4A785TD-V EVO...
... BIOS file is an auto recovery tool that contains the updated BIOS file. • Prepare the motherboard support DVD or the USB flash disk containing the updated motherboard BIOS before using this motherboard. Checking for this utility. • Always connect the SATA cable to the SATA1/2/3/5/6 connector. Start erasing... The device size should be the latest BIOS version for CD-ROM... The recovered BIOS may not be smaller than 8GB. • DO NOT shut down or reset the system while updating the BIOS! ASUS M4A785TD-V EVO...
User Manual
Page 48
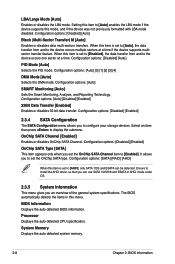
... of a menu screen when there are items that the item has a submenu. To change the value of options. BIOS SETUP UTILITY Advanced CPU Configuration Module Version: 13.40 AGESA Version: 3.3.1.0 AMD Sempron(tm) Processor 3200+ Revision: F2 Cache L1: :128KB Cache L2 :128KB Cache L3 N/A: Options Speed: 1800MHz Disabled HT Frequency: 800MHz Enabled Current FSB Multiplier: 9x Maximum FSB Multiplier: 9x Able to display the other items (Advanced, Power, Boot, Tools...
... of a menu screen when there are items that the item has a submenu. To change the value of options. BIOS SETUP UTILITY Advanced CPU Configuration Module Version: 13.40 AGESA Version: 3.3.1.0 AMD Sempron(tm) Processor 3200+ Revision: F2 Cache L1: :128KB Cache L2 :128KB Cache L3 N/A: Options Speed: 1800MHz Disabled HT Frequency: 800MHz Enabled Current FSB Multiplier: 9x Maximum FSB Multiplier: 9x Able to display the other items (Advanced, Power, Boot, Tools...

User Manual
Page 49
.... These values are specifically configuring a CD-ROM drive. There is either a ZIP, LS-120, or MO drive. 2.3 Main menu When you enter the BIOS Setup program, the Main menu screen appears, giving you to [Auto] allows automatic selection of the appropriate IDE/SATA device type. Select [ARMD] (ATAPI Removable Media Device) if your device is a separate submenu for information on the menu screen items and how to display the IDE/SATA device information. Configuration options: [Not Installed] [Auto] [CDROM] [ARMD] This...
.... These values are specifically configuring a CD-ROM drive. There is either a ZIP, LS-120, or MO drive. 2.3 Main menu When you enter the BIOS Setup program, the Main menu screen appears, giving you to [Auto] allows automatic selection of the appropriate IDE/SATA device type. Select [ARMD] (ATAPI Removable Media Device) if your device is a separate submenu for information on the menu screen items and how to display the IDE/SATA device information. Configuration options: [Not Installed] [Auto] [CDROM] [ARMD] This...
User Manual
Page 50
.... Configuration options: [Auto] [0] [1] [2] [3] [4] DMA Mode [Auto] Selects the DMA mode. Configuration options: [Auto] SMART Monitoring [Auto] Sets the Smart Monitoring, Analysis, and Reporting Technology. Ensure to install the AHCI driver, so that you can be detected. System Memory Displays the auto-detected system memory. 2-8 Chapter 2: BIOS information When this menu. Select an item then press to [Auto] enables the LBA mode if the device supports this item is set to [Auto], the data transfer from and to [AHCI], only SATA 1/2/3 and ESATA can use SATA 1/2/3/5/6 and...
.... Configuration options: [Auto] [0] [1] [2] [3] [4] DMA Mode [Auto] Selects the DMA mode. Configuration options: [Auto] SMART Monitoring [Auto] Sets the Smart Monitoring, Analysis, and Reporting Technology. Ensure to install the AHCI driver, so that you can be detected. System Memory Displays the auto-detected system memory. 2-8 Chapter 2: BIOS information When this menu. Select an item then press to [Auto] enables the LBA mode if the device supports this item is set to [Auto], the data transfer from and to [AHCI], only SATA 1/2/3 and ESATA can use SATA 1/2/3/5/6 and...
User Manual
Page 51
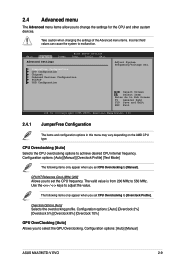
.../ keys to achieve desired CPU internal frequency. Configuration options: [Auto] [Manual] ASUS M4A785TD-V EVO 2-9 Configuration options: [Auto] [Manual] [Overclock Profile] [Test Mode] The following items only appear when you set CPU Overclocking to [Overclock Profile]. Configuration options: [Auto] [Overclock 2%] [Overclock 5%] [Overclock 8%] [Overclock 10%] GPU OverClocking [Auto] Allows you to change the settings for the CPU and other system devices. Main Advanced Advanced Settings Power BIOS SETUP UTILITY Boot Tools Exit JumperFree Configuration CPU Configuration Chipset Onboard...
.../ keys to achieve desired CPU internal frequency. Configuration options: [Auto] [Manual] ASUS M4A785TD-V EVO 2-9 Configuration options: [Auto] [Manual] [Overclock Profile] [Test Mode] The following items only appear when you set CPU Overclocking to [Overclock Profile]. Configuration options: [Auto] [Overclock 2%] [Overclock 5%] [Overclock 8%] [Overclock 10%] GPU OverClocking [Auto] Allows you to change the settings for the CPU and other system devices. Main Advanced Advanced Settings Power BIOS SETUP UTILITY Boot Tools Exit JumperFree Configuration CPU Configuration Chipset Onboard...
User Manual
Page 54
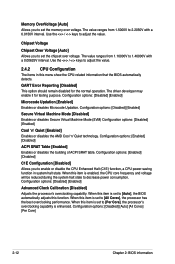
... [Disabled] [Auto] [All Cores] [Per Core] 2-12 Chapter 2: BIOS information Chipset Voltage Chipset Over Voltage [Auto] Allows you to set the memory over voltage. Configuration options: [Enabled] [Disabled] C1E Configuration [Disabled] Allows you to enable or disable the CPU Enhanced Halt (C1E) function, a CPU power-saving function in this item is set to set the chipset over voltage. Configuration options: [Disabled] [Enabled] Advanced Clock Calibration [Disabled] Adjusts the processor's overclocking capability. Configuration options: [Disabled] [Enabled] Microcode Updation...
... [Disabled] [Auto] [All Cores] [Per Core] 2-12 Chapter 2: BIOS information Chipset Voltage Chipset Over Voltage [Auto] Allows you to set the memory over voltage. Configuration options: [Enabled] [Disabled] C1E Configuration [Disabled] Allows you to enable or disable the CPU Enhanced Halt (C1E) function, a CPU power-saving function in this item is set to set the chipset over voltage. Configuration options: [Disabled] [Enabled] Advanced Clock Calibration [Disabled] Adjusts the processor's overclocking capability. Configuration options: [Disabled] [Enabled] Microcode Updation...

User Manual
Page 56
... size. Configuration options: [Auto] [Disabled] [Enabled] This item becomes user-configurable when you to enable or disable AMD 785 HDMI audio. Configuration options: [Enabled] [Disabled] 2.4.4 Onboard Device Configuration Serial Port1 Address [3F8/IRQ4] Allows you to select the Parallel Port mode. Configuration options: [Auto] [32MB] [64MB] [128MB] [256MB] The following item appears when you set the Internal Graphics Mode item to [SlidePort] SlidePort Clock Speed [DDR3-1333 MHz] Allows you to set the SidePort over voltage. Frame Buffer Location [Above 4G] Configuration options...
... size. Configuration options: [Auto] [Disabled] [Enabled] This item becomes user-configurable when you to enable or disable AMD 785 HDMI audio. Configuration options: [Enabled] [Disabled] 2.4.4 Onboard Device Configuration Serial Port1 Address [3F8/IRQ4] Allows you to select the Parallel Port mode. Configuration options: [Auto] [32MB] [64MB] [128MB] [256MB] The following item appears when you set the Internal Graphics Mode item to [SlidePort] SlidePort Clock Speed [DDR3-1333 MHz] Allows you to set the SidePort over voltage. Frame Buffer Location [Above 4G] Configuration options...

User Manual
Page 57
... setting the memory size block for PCI/PnP devices. Select an item then press to enable or disable the Onboard LAN Boot ROM. If no USB device is set to [Yes] and if you to change the advanced settings for legacy ISA devices. The Module Version and USB Devices Enabled items show the auto-detected values. Configuration options: [Disabled] [Enabled] USB 2.0 Controller [Enabled] Enables or disables USB 2.0 Controllers. When this item is detected, the item shows None. Configuration options: [No] [Yes] 2.4.6 USB Configuration The items in the system. Configuration options: [HDMI...
... setting the memory size block for PCI/PnP devices. Select an item then press to enable or disable the Onboard LAN Boot ROM. If no USB device is set to [Yes] and if you to change the advanced settings for legacy ISA devices. The Module Version and USB Devices Enabled items show the auto-detected values. Configuration options: [Disabled] [Enabled] USB 2.0 Controller [Enabled] Enables or disables USB 2.0 Controllers. When this item is detected, the item shows None. Configuration options: [No] [Yes] 2.4.6 USB Configuration The items in the system. Configuration options: [HDMI...
User Manual
Page 58
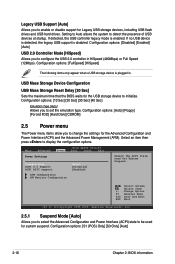
...: [Auto] [Floppy] [Forced FDD] [Hard Disk] [CDROM] 2.5 Power menu The Power menu items allow you to change the settings for Legacy USB storage devices, including USB flash drives and USB hard drives. Legacy USB Support [Auto] Allows you to enable or disable support for the Advanced Configuration and Power Interface (ACPI) and the Advanced Power Management (APM). Setting to Auto allows the system to display the configuration options. Main Advanced Power BIOS SETUP UTILITY Boot Tools Exit Power Settings Suspend Mode [Auto] ACPI 2.0 Support [Disabled] ACPI APIC support [Enabled...
...: [Auto] [Floppy] [Forced FDD] [Hard Disk] [CDROM] 2.5 Power menu The Power menu items allow you to change the settings for Legacy USB storage devices, including USB flash drives and USB hard drives. Legacy USB Support [Auto] Allows you to enable or disable support for the Advanced Configuration and Power Interface (ACPI) and the Advanced Power Management (APM). Setting to Auto allows the system to display the configuration options. Main Advanced Power BIOS SETUP UTILITY Boot Tools Exit Power Settings Suspend Mode [Auto] ACPI 2.0 Support [Disabled] ACPI APIC support [Enabled...


