
User Manual
Page 1
Motherboard M4A785TD-V EVO
Motherboard M4A785TD-V EVO
User Manual
Page 3
Contents Notices...vi Safety information vii About this guide viii M4A785TD-V EVO specifications summary ix Chapter 1: Product introduction 1.1 Welcome 1-1 1.2 Package contents 1-1 1.3 Special features 1-1 1.3.1 Product highlights 1-1 1.3.2 Innovative ASUS features 1-3 1.4 Before you proceed 1-5 1.5 Motherboard overview 1-6 1.5.1 Placement direction 1-6 1.5.2 Screw holes 1-6 1.5.3 Motherboard layout 1-7 1.5.4 Layout contents 1-7 1.6 Central Processing Unit (CPU 1-8 1.6.1 Installing the CPU 1-8 1.6.2 Installing the heatsink and fan 1-10 1.7 System memory...
Contents Notices...vi Safety information vii About this guide viii M4A785TD-V EVO specifications summary ix Chapter 1: Product introduction 1.1 Welcome 1-1 1.2 Package contents 1-1 1.3 Special features 1-1 1.3.1 Product highlights 1-1 1.3.2 Innovative ASUS features 1-3 1.4 Before you proceed 1-5 1.5 Motherboard overview 1-6 1.5.1 Placement direction 1-6 1.5.2 Screw holes 1-6 1.5.3 Motherboard layout 1-7 1.5.4 Layout contents 1-7 1.6 Central Processing Unit (CPU 1-8 1.6.1 Installing the CPU 1-8 1.6.2 Installing the heatsink and fan 1-10 1.7 System memory...
User Manual
Page 6
..., Evaluation, Authorisation, and Restriction of Chemicals) regulatory framework, we published the chemical substances in our products at ASUS REACH website at http://green.asus.com/english/REACH.htm. This equipment has been tested and found to comply with manufacturer's instructions, may cause ...electronic equipment) should not be determined by one or more of parts and recycling. If this equipment. DO NOT throw the motherboard in municipal waste. This symbol of Communications. This class B digital apparatus complies with FCC regulations. vi These limits are designed ...
..., Evaluation, Authorisation, and Restriction of Chemicals) regulatory framework, we published the chemical substances in our products at ASUS REACH website at http://green.asus.com/english/REACH.htm. This equipment has been tested and found to comply with manufacturer's instructions, may cause ...electronic equipment) should not be determined by one or more of parts and recycling. If this equipment. DO NOT throw the motherboard in municipal waste. This symbol of Communications. This class B digital apparatus complies with FCC regulations. vi These limits are designed ...
User Manual
Page 7
...a hazardous material collection point. • Never replace the battery with the package. • Before using an adapter or extension cord. This motherboard should only be included in fire. vii If you encounter technical problems with your regular household waste. Contact a qualified service technician or your ...in any damage, contact your dealer immediately. • To avoid short circuits, keep paper clips, screws, and staples away from the motherboard, ensure that all the manuals that came with an incorrect battery type. • RISK OF EXPLOSION IF BATTERY IS REPLACED BY AN ...
...a hazardous material collection point. • Never replace the battery with the package. • Before using an adapter or extension cord. This motherboard should only be included in fire. vii If you encounter technical problems with your regular household waste. Contact a qualified service technician or your ...in any damage, contact your dealer immediately. • To avoid short circuits, keep paper clips, screws, and staples away from the motherboard, ensure that all the manuals that came with an incorrect battery type. • RISK OF EXPLOSION IF BATTERY IS REPLACED BY AN ...
User Manual
Page 8
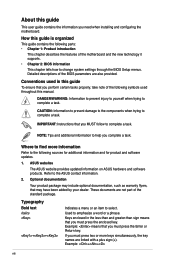
...Example: means that may include optional documentation, such as warranty flyers, that you perform certain tasks properly, take note of the motherboard and the new technology it supports. • Chapter 2: BIOS information This chapter tells how to help you must press the ... a task. If you need when installing and configuring the motherboard. DANGER/WARNING: Information to prevent injury to yourself when trying to complete a task. ASUS websites The ASUS website provides updated information on ASUS hardware and software products. About this guide This user guide ...
...Example: means that may include optional documentation, such as warranty flyers, that you perform certain tasks properly, take note of the motherboard and the new technology it supports. • Chapter 2: BIOS information This chapter tells how to help you must press the ... a task. If you need when installing and configuring the motherboard. DANGER/WARNING: Information to prevent injury to yourself when trying to complete a task. ASUS websites The ASUS website provides updated information on ASUS hardware and software products. About this guide This user guide ...
User Manual
Page 13
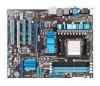
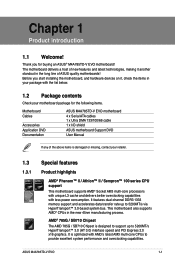
... data transfer rate up to 5200MT/s via HyperTransport™ 3.0-based system bus. ASUS M4A785TD-V EVO 1-1 Chapter 1 Product introduction 1.1 Welcome! Before you for the following items. Motherboard Cables Accessories Application DVD Documentation ASUS M4A785TD-V EVO motherboard 4 x Serial ATA cables 1 x Ultra DMA 133/100/66 cable 1 x I/O shield ASUS motherboard Support DVD User Manual If any of new features and latest technologies, making...
... data transfer rate up to 5200MT/s via HyperTransport™ 3.0-based system bus. ASUS M4A785TD-V EVO 1-1 Chapter 1 Product introduction 1.1 Welcome! Before you for the following items. Motherboard Cables Accessories Application DVD Documentation ASUS M4A785TD-V EVO motherboard 4 x Serial ATA cables 1 x Ultra DMA 133/100/66 cable 1 x I/O shield ASUS motherboard Support DVD User Manual If any of new features and latest technologies, making...
User Manual
Page 14
...-Theater Entertainment High-Definition Multimedia Interface (HDMI) is a highly integrated Gb LAN controller. S/PDIF digital sound ready This motherboard provides convenient connectivity to increase memory computing efficiency, enhancing system performance in 3D graphics and other portable devices. HyperTransport™... home theater audio systems via the optical S/PDIF (SONY-PHILIPS Digital Interface) Out jack. DDR3 1800 (O.C.) support This motherboard supports DDR3 1800 (O.C.) that provides faster data transfer rate and more bandwidth than HT1.0 that delivers multi-channel audio and...
...-Theater Entertainment High-Definition Multimedia Interface (HDMI) is a highly integrated Gb LAN controller. S/PDIF digital sound ready This motherboard provides convenient connectivity to increase memory computing efficiency, enhancing system performance in 3D graphics and other portable devices. HyperTransport™... home theater audio systems via the optical S/PDIF (SONY-PHILIPS Digital Interface) Out jack. DDR3 1800 (O.C.) support This motherboard supports DDR3 1800 (O.C.) that provides faster data transfer rate and more bandwidth than HT1.0 that delivers multi-channel audio and...

User Manual
Page 15
...to integrated memory/HT controller. ASUS M4A785TD-V EVO 1-3 1.3.2 ATI Hybrid CrossFireX™ support ATI Hybrid CrossFireX™ technology greatly boosts graphics performance with just a few clicks away. Serial ATA 3Gb/s technology and SATA-On-The-Go This motherboard supports hard drives based on ... to ensure longer component lifespan. settings in TurboV provides the best O.C. Innovative ASUS features ASUS 8+2 Phase Power Design To fully unleash the AM3 CPU's potential, the ASUS M4 Series motherboards have adopted a brand-new 8-phase VRM power design which means there will ...
...to integrated memory/HT controller. ASUS M4A785TD-V EVO 1-3 1.3.2 ATI Hybrid CrossFireX™ support ATI Hybrid CrossFireX™ technology greatly boosts graphics performance with just a few clicks away. Serial ATA 3Gb/s technology and SATA-On-The-Go This motherboard supports hard drives based on ... to ensure longer component lifespan. settings in TurboV provides the best O.C. Innovative ASUS features ASUS 8+2 Phase Power Design To fully unleash the AM3 CPU's potential, the ASUS M4 Series motherboards have adopted a brand-new 8-phase VRM power design which means there will ...
User Manual
Page 16
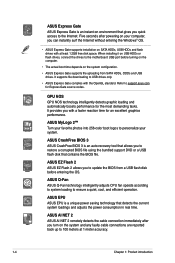
... reported back up to ensure a quiet, cool, and efficient operation. ASUS EZ Flash 2 ASUS EZ Flash 2 allows you quick access to the motherboard USB port before entering the OS. Five seconds after you with the OpenGL standard. ASUS MyLogo 2™ Turn your system. ASUS EPU ASUS EPU is a unique power saving technology that detects the current...
... reported back up to ensure a quiet, cool, and efficient operation. ASUS EZ Flash 2 ASUS EZ Flash 2 allows you quick access to the motherboard USB port before entering the OS. Five seconds after you with the OpenGL standard. ASUS MyLogo 2™ Turn your system. ASUS EPU ASUS EPU is a unique power saving technology that detects the current...

User Manual
Page 17
... RTC data. The illustration below shows the location of the following precautions before you install or remove any motherboard component. ASUS M4A785TD-V EVO 1-5 eliminates the need to the motherboard, peripherals, or components. This is a reminder that you should shut down and reboot the system, and...bag that the system is in soft-off the ATX power supply and detach its power cord. Green ASUS This motherboard and its packaging comply with the component. • Before you install motherboard components or change any motherboard settings. • Unplug the power cord from...
... RTC data. The illustration below shows the location of the following precautions before you install or remove any motherboard component. ASUS M4A785TD-V EVO 1-5 eliminates the need to the motherboard, peripherals, or components. This is a reminder that you should shut down and reboot the system, and...bag that the system is in soft-off the ATX power supply and detach its power cord. Green ASUS This motherboard and its packaging comply with the component. • Before you install motherboard components or change any motherboard settings. • Unplug the power cord from...

User Manual
Page 18
Place this side towards the rear of the chassis as indicated in the image below. 1.5.2 Screw holes Place nine screws into the chassis in the correct orientation. Doing so can damage the motherboard. 1.5 Motherboard overview 1.5.1 Placement direction When installing the motherboard, ensure that you place it into the holes indicated by circles to secure the motherboard to the DO NOT overtighten the screws! The edge with external ports goes to the rear part of the chassis. 1-6 Chapter 1: Product introduction
Place this side towards the rear of the chassis as indicated in the image below. 1.5.2 Screw holes Place nine screws into the chassis in the correct orientation. Doing so can damage the motherboard. 1.5 Motherboard overview 1.5.1 Placement direction When installing the motherboard, ensure that you place it into the holes indicated by circles to secure the motherboard to the DO NOT overtighten the screws! The edge with external ports goes to the rear part of the chassis. 1-6 Chapter 1: Product introduction
User Manual
Page 19
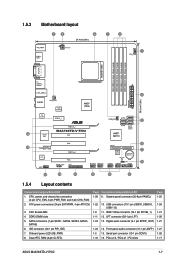
1.5.3 Motherboard layout 1.5.4 Layout contents Connectors/Jumpers/Slots/LED 1. Front panel audio connector (10-1 pin AAFP) 1-5 15. CPU, power, and chassis fan connectors (4-pin CPU_FAN, 3-pin PWR_FAN, ..., SATA5, SATA6) 6. System panel connector (20-8 pin PANEL) 1-22 10. ATX power connectors (24-pin EATXPWR, 4-pin ATX12V) 3. CPU Socket AM3 4. USB connectors (10-1 pin USB78, USB910, USB1112) 1-8 11. Digital audio connector (4-1 pin SPDIF_OUT) 1-23 14. PCIe x16 / PCIe x1 / PCI slots Page 1-25 1-26 1-21 1-26 1-27 1-27 1-28 1-17 ASUS M4A785TD-V EVO 1-7
1.5.3 Motherboard layout 1.5.4 Layout contents Connectors/Jumpers/Slots/LED 1. Front panel audio connector (10-1 pin AAFP) 1-5 15. CPU, power, and chassis fan connectors (4-pin CPU_FAN, 3-pin PWR_FAN, ..., SATA5, SATA6) 6. System panel connector (20-8 pin PANEL) 1-22 10. ATX power connectors (24-pin EATXPWR, 4-pin ATX12V) 3. CPU Socket AM3 4. USB connectors (10-1 pin USB78, USB910, USB1112) 1-8 11. Digital audio connector (4-1 pin SPDIF_OUT) 1-23 14. PCIe x16 / PCIe x1 / PCI slots Page 1-25 1-26 1-21 1-26 1-27 1-27 1-28 1-17 ASUS M4A785TD-V EVO 1-7
User Manual
Page 20
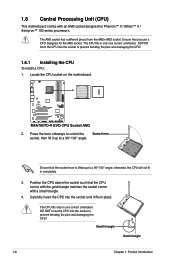
... the pins and damaging the CPU! Carefully insert the CPU into the socket to a 90°-100° angle. Locate the CPU socket on the motherboard. 2. Position the CPU above the socket such that you use a CPU designed for Phenom™ II / Athlon™ II / Sempron™ 100 series processors. 1.6 Central...
... the pins and damaging the CPU! Carefully insert the CPU into the socket to a 90°-100° angle. Locate the CPU socket on the motherboard. 2. Position the CPU above the socket such that you use a CPU designed for Phenom™ II / Athlon™ II / Sempron™ 100 series processors. 1.6 Central...
User Manual
Page 21
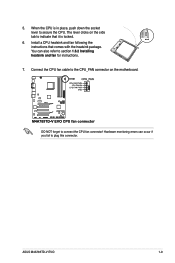
The lever clicks on the motherboard. DO NOT forget to section 1.6.2 Installing heatsink and fan for instructions. 7. Connect the CPU fan cable to the CPU_FAN connector on the side tab to indicate that comes with the heatsink package. Install a CPU heatsink and fan following the instructions that it is in place, push down the socket lever to plug this connector. You can occur if you fail to secure the CPU. Hardware monitoring errors can also refer to connect the CPU fan connector! ASUS M4A785TD-V EVO 1-9 When the CPU is locked. 6. 5.
The lever clicks on the motherboard. DO NOT forget to section 1.6.2 Installing heatsink and fan for instructions. 7. Connect the CPU fan cable to the CPU_FAN connector on the side tab to indicate that comes with the heatsink package. Install a CPU heatsink and fan following the instructions that it is in place, push down the socket lever to plug this connector. You can occur if you fail to secure the CPU. Hardware monitoring errors can also refer to connect the CPU fan connector! ASUS M4A785TD-V EVO 1-9 When the CPU is locked. 6. 5.

User Manual
Page 22
.... • If you purchased a separate CPU heatsink and fan assembly, ensure that a Thermal Interface Material is already installed on the motherboard upon purchase. • You do not match the CPU documentation, follow the latter. 2. Attach one end of the installed CPU, ensuring that the heatsink fits ...
.... • If you purchased a separate CPU heatsink and fan assembly, ensure that a Thermal Interface Material is already installed on the motherboard upon purchase. • You do not match the CPU documentation, follow the latter. 2. Attach one end of the installed CPU, ensuring that the heatsink fits ...

User Manual
Page 23
.... The figure illustrates the location of the retention bracket to plug this connector. 1.7 System memory 1.7.1 Overview This motherboard comes with less power consumption. Push down the retention bracket lock on a DDR2 DIMM socket. Ensure that the ...motherboard labeled CPU_FAN. When the fan and heatsink assembly is notched differently to prevent installation on the retention mechanism to secure the heatsink and fan to the module base. 5. Align the other end of the DDR3 DIMM sockets: Channel Channel A Channel B Sockets DIMM_A1 and DIMM_A2 DIMM_B1 and DIMM_B2 ASUS M4A785TD-V EVO...
.... The figure illustrates the location of the retention bracket to plug this connector. 1.7 System memory 1.7.1 Overview This motherboard comes with less power consumption. Push down the retention bracket lock on a DDR2 DIMM socket. Ensure that the ...motherboard labeled CPU_FAN. When the fan and heatsink assembly is notched differently to prevent installation on the retention mechanism to secure the heatsink and fan to the module base. 5. Align the other end of the DDR3 DIMM sockets: Channel Channel A Channel B Sockets DIMM_A1 and DIMM_A2 DIMM_B1 and DIMM_B2 ASUS M4A785TD-V EVO...

User Manual
Page 24
M4A785TD-V EVO Motherboard Qualified Vendors Lists (QVL) DDR3-1866(O.C.)MHz capability Vendor Part No. Size SS/...the dual-channel configuration. Use a 64-bit Windows® OS if you do any of the following: - The motherboard supports up of 256 megabits (Mb) chips or less. Any excess memory from the same vendor. • Due ...174; OS. - Install a maximum of 3GB system memory if you install 4GB or more memory on the motherboard. • This motherboard does not support DIMMs made up to the memory address limitation on Windows® XP Professional x64 and Vista ...
M4A785TD-V EVO Motherboard Qualified Vendors Lists (QVL) DDR3-1866(O.C.)MHz capability Vendor Part No. Size SS/...the dual-channel configuration. Use a 64-bit Windows® OS if you do any of the following: - The motherboard supports up of 256 megabits (Mb) chips or less. Any excess memory from the same vendor. • Due ...174; OS. - Install a maximum of 3GB system memory if you install 4GB or more memory on the motherboard. • This motherboard does not support DIMMs made up to the memory address limitation on Windows® XP Professional x64 and Vista ...

User Manual
Page 28
... notch 1-16 Chapter 1: Product introduction Failure to do so can cause severe damage to unlock a DIMM socket. 2. Press the retaining clips outward to both the motherboard and the components. 1. Firmly insert the DIMM into a socket to unlock the DIMM. 2 Support the DIMM lightly with extra force. 1 2. 1.7.3 Installing a DIMM Unplug the power...
... notch 1-16 Chapter 1: Product introduction Failure to do so can cause severe damage to unlock a DIMM socket. 2. Press the retaining clips outward to both the motherboard and the components. 1. Firmly insert the DIMM into a socket to unlock the DIMM. 2 Support the DIMM lightly with extra force. 1 2. 1.7.3 Installing a DIMM Unplug the power...
User Manual
Page 29
... Unplug the power cord before adding or removing expansion cards. Align the card connector with the screw you physical injury and damage motherboard components. 1.8.1 Installing an expansion card To install an expansion card: 1. Replace the system cover. 1.8.2 Configuring an expansion card After...card to install expansion cards. Remove the system unit cover (if your motherboard is completely seated on shared slots, ensure that the drivers support "Share IRQ" or that you intend to the card. 3. ASUS M4A785TD-V EVO 1-17 1.8 Expansion slots In the future, you may cause you ...
... Unplug the power cord before adding or removing expansion cards. Align the card connector with the screw you physical injury and damage motherboard components. 1.8.1 Installing an expansion card To install an expansion card: 1. Replace the system cover. 1.8.2 Configuring an expansion card After...card to install expansion cards. Remove the system unit cover (if your motherboard is completely seated on shared slots, ensure that the drivers support "Share IRQ" or that you intend to the card. 3. ASUS M4A785TD-V EVO 1-17 1.8 Expansion slots In the future, you may cause you ...

User Manual
Page 32
... Speaker Out Side Speaker Out Ensure the audio device of sound playback is VIA High Definition Audio (the name may be different based on your motherboard: Dual display outputs DVI + D-Sub DVI + HDMI HDMI + D-Sub Supported • • Not supported • • During POST, only the monitor connected to the D-Sub...
... Speaker Out Side Speaker Out Ensure the audio device of sound playback is VIA High Definition Audio (the name may be different based on your motherboard: Dual display outputs DVI + D-Sub DVI + HDMI HDMI + D-Sub Supported • • Not supported • • During POST, only the monitor connected to the D-Sub...


