H87-PRO User's Manual
Page 3
... information...vi About this guide...vii H87-PRO specifications summary ix Package contents...xii Installation tools and components xiii Chapter 1: Product introduction 1.1 Special features 1-1 1.1.1 Product highlights 1-1 1.1.2 DIGI+ VRM Digital Power Design 1-2 1.1.3 ASUS Exclusive Features 1-2 1.1.4 ASUS Quiet Thermal Solution 1-3 1.1.5 ASUS EZ DIY 1-4 1.1.6 Other special features...installation 2-7 2.1.5 ATX Power connection 2-8 2.1.6 SATA device connection 2-9 2.1.7 Front I/O Connector 2-10 2.1.8 Expansion Card installation 2-11 2.2 BIOS update utility 2-12 iii
... information...vi About this guide...vii H87-PRO specifications summary ix Package contents...xii Installation tools and components xiii Chapter 1: Product introduction 1.1 Special features 1-1 1.1.1 Product highlights 1-1 1.1.2 DIGI+ VRM Digital Power Design 1-2 1.1.3 ASUS Exclusive Features 1-2 1.1.4 ASUS Quiet Thermal Solution 1-3 1.1.5 ASUS EZ DIY 1-4 1.1.6 Other special features...installation 2-7 2.1.5 ATX Power connection 2-8 2.1.6 SATA device connection 2-9 2.1.7 Front I/O Connector 2-10 2.1.8 Expansion Card installation 2-11 2.2 BIOS update utility 2-12 iii
H87-PRO User's Manual
Page 4
...2-13 2.3.2 Audio I/O connections 2-15 2.4 Starting up for the first time 2-17 2.5 Turning off the computer 2-17 Chapter 3: BIOS setup 3.1 Knowing BIOS 3-1 3.2 BIOS setup program 3-2 3.2.1 EZ Mode 3-3 3.2.2 Advanced Mode 3-4 3.3 My Favorites 3-6 3.4 Main menu 3-7 3.5 Ai Tweaker menu 3-9...Monitor menu 3-36 3.8 Boot menu 3-39 3.9 Tools menu 3-46 3.9.1 ASUS EZ Flash 2 Utility 3-46 3.9.2 ASUS O.C. Profile 3-46 3.9.3 ASUS SPD Information 3-47 3.10 Exit menu 3-48 3.11 Updating BIOS 3-49 Chapter 4: Software support 4.1 Installing an operating system 4-1 4.2 Support...
...2-13 2.3.2 Audio I/O connections 2-15 2.4 Starting up for the first time 2-17 2.5 Turning off the computer 2-17 Chapter 3: BIOS setup 3.1 Knowing BIOS 3-1 3.2 BIOS setup program 3-2 3.2.1 EZ Mode 3-3 3.2.2 Advanced Mode 3-4 3.3 My Favorites 3-6 3.4 Main menu 3-7 3.5 Ai Tweaker menu 3-9...Monitor menu 3-36 3.8 Boot menu 3-39 3.9 Tools menu 3-46 3.9.1 ASUS EZ Flash 2 Utility 3-46 3.9.2 ASUS O.C. Profile 3-46 3.9.3 ASUS SPD Information 3-47 3.10 Exit menu 3-48 3.11 Updating BIOS 3-49 Chapter 4: Software support 4.1 Installing an operating system 4-1 4.2 Support...
H87-PRO User's Manual
Page 5
...VRM 4-4 4.3.3 EPU 4-6 4.3.4 TurboV EVO 4-7 4.3.5 Fan Xpert 2 4-9 4.3.6 USB 3.0 Boost 4-11 4.3.7 Network iControl 4-12 4.3.8 USB BIOS Flashback 4-13 4.3.9 EZ Update 4-14 4.3.10 USB Charger 4-15 4.3.11 System Information 4-16 4.3.12 Audio configurations 4-17 Chapter 5: RAID support... 5.1 RAID configurations 5-1 5.1.1 RAID definitions 5-1 5.1.2 Installing Serial ATA hard disks 5-2 5.1.3 Setting the RAID item in BIOS 5-2 5.1.4 Intel® Rapid Storage Technology Option ROM utility 5-3 5.2 Creating a RAID driver disk 5-7 5.2.1 Creating a RAID driver disk...
...VRM 4-4 4.3.3 EPU 4-6 4.3.4 TurboV EVO 4-7 4.3.5 Fan Xpert 2 4-9 4.3.6 USB 3.0 Boost 4-11 4.3.7 Network iControl 4-12 4.3.8 USB BIOS Flashback 4-13 4.3.9 EZ Update 4-14 4.3.10 USB Charger 4-15 4.3.11 System Information 4-16 4.3.12 Audio configurations 4-17 Chapter 5: RAID support... 5.1 RAID configurations 5-1 5.1.1 RAID definitions 5-1 5.1.2 Installing Serial ATA hard disks 5-2 5.1.3 Setting the RAID item in BIOS 5-2 5.1.4 Intel® Rapid Storage Technology Option ROM utility 5-3 5.2 Creating a RAID driver disk 5-7 5.2.1 Creating a RAID driver disk...
H87-PRO User's Manual
Page 7
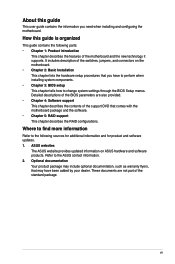
... Product introduction This chapter describes the features of the switches, jumpers, and connectors on ASUS hardware and software products. Refer to change system settings through the BIOS Setup menus. It includes description of the motherboard and the new technology it supports. Detailed...Your product package may have to perform when installing system components. • Chapter 3: BIOS setup This chapter tells how to the ASUS contact information. 2. vii ASUS websites The ASUS website provides updated information on the motherboard. • Chapter 2: Basic Installation This chapter ...
... Product introduction This chapter describes the features of the switches, jumpers, and connectors on ASUS hardware and software products. Refer to change system settings through the BIOS Setup menus. It includes description of the motherboard and the new technology it supports. Detailed...Your product package may have to perform when installing system components. • Chapter 3: BIOS setup This chapter tells how to the ASUS contact information. 2. vii ASUS websites The ASUS website provides updated information on the motherboard. • Chapter 2: Basic Installation This chapter ...
H87-PRO User's Manual
Page 9
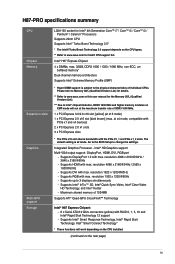
... Please refer to Memory QVL (Qualified Vendors List) for details. ** Refer to www.asus.com or this user manual for Intel® CPU support list. Integrated Graphics Processor - H87-PRO specifications summary CPU Chipset Memory Expansion slots Graphics Multi-GPU support Storage LGA1150 socket for Intel...CPU installed. (continued on the next page) ix at x16 mode) 1 x PCI Express 2.0 x16 slot [dark brown] (max. Go to the BIOS Setup to 3 displays simultaneously - Supports RGB with max. Supports DisplayPort 1.2 with RAID 0, 1, 5, 10 and Intel® Rapid Start Technology 12 ...
... Please refer to Memory QVL (Qualified Vendors List) for details. ** Refer to www.asus.com or this user manual for Intel® CPU support list. Integrated Graphics Processor - H87-PRO specifications summary CPU Chipset Memory Expansion slots Graphics Multi-GPU support Storage LGA1150 socket for Intel...CPU installed. (continued on the next page) ix at x16 mode) 1 x PCI Express 2.0 x16 slot [dark brown] (max. Go to the BIOS Setup to 3 displays simultaneously - Supports RGB with max. Supports DisplayPort 1.2 with RAID 0, 1, 5, 10 and Intel® Rapid Start Technology 12 ...
H87-PRO User's Manual
Page 11
... and ASUS DRAM SPD (Serial Presence Detect) memory information WfM 2.0, DMI 2.0, WOL by PME, PXE (continued on the next page) xi ASUS UEFI BIOS EZ Mode featuring friendly graphics user interface - ASUS USB BIOS Flashback with USB BIOS Flashback Wizard for each fan. ASUS CrashFree BIOS 3 - H87-PRO specifications summary ASUS unique features Rear panel I/O ports Internal I/O connectors BIOS features Manageability ASUS Quiet...
... and ASUS DRAM SPD (Serial Presence Detect) memory information WfM 2.0, DMI 2.0, WOL by PME, PXE (continued on the next page) xi ASUS UEFI BIOS EZ Mode featuring friendly graphics user interface - ASUS USB BIOS Flashback with USB BIOS Flashback Wizard for each fan. ASUS CrashFree BIOS 3 - H87-PRO specifications summary ASUS unique features Rear panel I/O ports Internal I/O connectors BIOS features Manageability ASUS Quiet...
H87-PRO User's Manual
Page 16
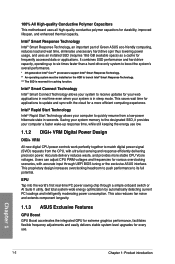
... world's first real-time PC power saving chip through UEFI BIOS tuning or the exclusive ASUS interface. Intel® Smart Response Technology Intel® Smart Response Technology, an important part of Green ASUS eco-friendly computing, reduces load and wait time, eliminates unecessary... space) as a cache for a more stable CPU Vcore voltages. This also reduces fan noise and extends component longevity. 1.1.3 ASUS Exclusive Features GPU Boost GPU Boost accelerates the integrated GPU for extreme graphics performance, facilitates flexible frequency adjustments and easily delivers stable ...
... world's first real-time PC power saving chip through UEFI BIOS tuning or the exclusive ASUS interface. Intel® Smart Response Technology Intel® Smart Response Technology, an important part of Green ASUS eco-friendly computing, reduces load and wait time, eliminates unecessary... space) as a cache for a more stable CPU Vcore voltages. This also reduces fan noise and extends component longevity. 1.1.3 ASUS Exclusive Features GPU Boost GPU Boost accelerates the integrated GPU for extreme graphics performance, facilitates flexible frequency adjustments and easily delivers stable ...
H87-PRO User's Manual
Page 18
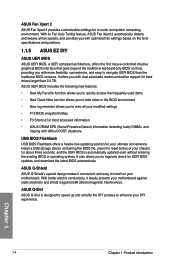
... electricity and shield it convenient and easy to install on the fans' specifications and positions. 1.1.5 ASUS EZ DIY ASUS UEFI BIOS ASUS UEFI BIOS, a UEFI compliant architecture, offers the first mouse-controlled intuitive graphical BIOS interface that goes beyond the traditional keyboard-only BIOS controls, providing you to regularly check for about three seconds, and the UEFI...
... electricity and shield it convenient and easy to install on the fans' specifications and positions. 1.1.5 ASUS EZ DIY ASUS UEFI BIOS ASUS UEFI BIOS, a UEFI compliant architecture, offers the first mouse-controlled intuitive graphical BIOS interface that goes beyond the traditional keyboard-only BIOS controls, providing you to regularly check for about three seconds, and the UEFI...
H87-PRO User's Manual
Page 20
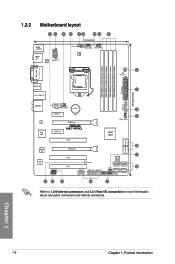
...(12.0in) USB3_12 AUDIO RTL 8111G ASM 1083 Super I/O ALC887 -VD2 COM CHA_FAN1 BATTERY PCIEX1_1 PCIEX1_2 PCIEX16_1 H87-PRO PCI1 CHA_FAN3 Intel® H87 SATA6G_2 SATA6G_1 PCIEX16_2 SPDIF_OUT AAFP PCI2 PCI3 SB_PWR USB910 USB1112 USB1314 64Mb BIOS SATA6G_6 SATA6G_5 CLRTC SATA6G_4 SATA6G_3 PANEL 9 3 10 11 10 16 15 14 13 12 Refer to 1.2.9 Internal...
...(12.0in) USB3_12 AUDIO RTL 8111G ASM 1083 Super I/O ALC887 -VD2 COM CHA_FAN1 BATTERY PCIEX1_1 PCIEX1_2 PCIEX16_1 H87-PRO PCI1 CHA_FAN3 Intel® H87 SATA6G_2 SATA6G_1 PCIEX16_2 SPDIF_OUT AAFP PCI2 PCI3 SB_PWR USB910 USB1112 USB1314 64Mb BIOS SATA6G_6 SATA6G_5 CLRTC SATA6G_4 SATA6G_3 PANEL 9 3 10 11 10 16 15 14 13 12 Refer to 1.2.9 Internal...
H87-PRO User's Manual
Page 24
...want to install 4GB or more efficient memory cooling system to support a full memory load (4 DIMMs) or overclocking condition. • ASUS exclusively provides hyper DIMM support function. • Hyper DIMM support is subject to section 3.5 Ai Tweaker menu for manual memory frequency ... the motherboard. Under the default state, some memory modules for overclocking may install varying memory sizes in the BIOS for the hyper DIMM support. • Visit the ASUS website for the dual-channel configuration. Load the X.M.P. settings in Channel A and Channel B. Any excess memory...
...want to install 4GB or more efficient memory cooling system to support a full memory load (4 DIMMs) or overclocking condition. • ASUS exclusively provides hyper DIMM support function. • Hyper DIMM support is subject to section 3.5 Ai Tweaker menu for manual memory frequency ... the motherboard. Under the default state, some memory modules for overclocking may install varying memory sizes in the BIOS for the hyper DIMM support. • Visit the ASUS website for the dual-channel configuration. Load the X.M.P. settings in Channel A and Channel B. Any excess memory...
H87-PRO User's Manual
Page 26
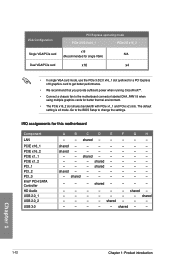
... better performance. • We recommend that you provide sufficient power when running CrossFireX™. • Connect a chassis fan to change the settings. Go to the BIOS Setup to the motherboard connector labeled CHA_FAN1-3 when using multiple graphics cards for this motherboard Component LAN PCIE x16_1 PCIE x16_2 PCIE x1_1 PCIE x1_2...
... better performance. • We recommend that you provide sufficient power when running CrossFireX™. • Connect a chassis fan to change the settings. Go to the BIOS Setup to the motherboard connector labeled CHA_FAN1-3 when using multiple graphics cards for this motherboard Component LAN PCIE x16_1 PCIE x16_2 PCIE x1_1 PCIE x1_2...
H87-PRO User's Manual
Page 27
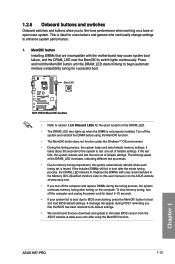
...the MemOK! button until the DRAM_LED starts blinking to fine-tune performance when working on a bare or open-case system. Chapter 1 ASUS H87-PRO 1-13 button • Refer to section 1.2.8 Onboard LEDs for the exact location of the DRAM_LED increases, indicating different test processes....system continues memory tuning after turning on the ASUS website at www.asus.com after the whole tuning process, the DRAM_LED remains lit. function. button Installing DIMMs that you download and update to BIOS overclocking, press the MemOK! H87-PRO H87-PRO MemOK! button does not function under the...
...the MemOK! button until the DRAM_LED starts blinking to fine-tune performance when working on a bare or open-case system. Chapter 1 ASUS H87-PRO 1-13 button • Refer to section 1.2.8 Onboard LEDs for the exact location of the DRAM_LED increases, indicating different test processes....system continues memory tuning after turning on the ASUS website at www.asus.com after the whole tuning process, the DRAM_LED remains lit. function. button Installing DIMMs that you download and update to BIOS overclocking, press the MemOK! H87-PRO H87-PRO MemOK! button does not function under the...
H87-PRO User's Manual
Page 29
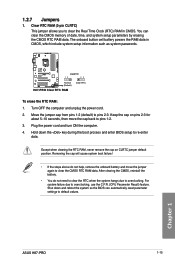
Chapter 1 ASUS H87-PRO 1-15 The onboard button cell battery powers the RAM data in CMOS. Removing the cap will cause system boot failure! • If the steps above do not need to clear the RTC when the system hangs due to pins 2-3. H87-PRO CLRTC 12 23 Normal (Default) H87-PRO Clear RTC... failure due to pins 1-2. 3. Turn OFF the computer and unplug the power cord. 2. Shut down the key during the boot process and enter BIOS setup to clear the CMOS RTC RAM data. Clear RTC RAM (3-pin CLRTC) This jumper allows you to default values. 1.2.7 Jumpers 1. Except when...
Chapter 1 ASUS H87-PRO 1-15 The onboard button cell battery powers the RAM data in CMOS. Removing the cap will cause system boot failure! • If the steps above do not need to clear the RTC when the system hangs due to pins 2-3. H87-PRO CLRTC 12 23 Normal (Default) H87-PRO Clear RTC... failure due to pins 1-2. 3. Turn OFF the computer and unplug the power cord. 2. Shut down the key during the boot process and enter BIOS setup to clear the CMOS RTC RAM data. Clear RTC RAM (3-pin CLRTC) This jumper allows you to default values. 1.2.7 Jumpers 1. Except when...
H87-PRO User's Manual
Page 32
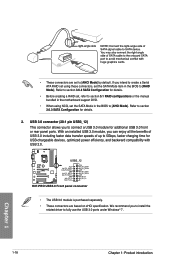
H87-PRO USB3_12 H87-PRO USB3.0 Front panel connector • The USB 3.0 module is purchased separately. •...) This connector allows you intend to create a Serial ATA RAID set using NCQ, set the SATA Mode item in the BIOS to [RAID Mode]. • These connectors are based on xHCI specification. If you to section 3.6.3 SATA Configuration for USB... the motherboard support DVD. • When using these connectors, set the SATA Mode in the BIOS to [AHCI Mode]. Refer to section 3.6.3 SATA Configuration for additional USB 3.0 front or rear panel ports. Chapter 1 1-18...
H87-PRO USB3_12 H87-PRO USB3.0 Front panel connector • The USB 3.0 module is purchased separately. •...) This connector allows you intend to create a Serial ATA RAID set using NCQ, set the SATA Mode item in the BIOS to [RAID Mode]. • These connectors are based on xHCI specification. If you to section 3.6.3 SATA Configuration for USB... the motherboard support DVD. • When using these connectors, set the SATA Mode in the BIOS to [AHCI Mode]. Refer to section 3.6.3 SATA Configuration for additional USB 3.0 front or rear panel ports. Chapter 1 1-18...
H87-PRO User's Manual
Page 34
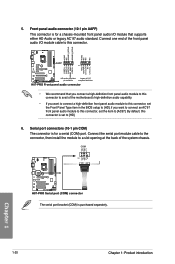
... you want to connect an AC'97 front panel audio module to this connector. COM RXD DTR DSR CTS PIN 1 DCD TXD GND RTS RI H87-PRO Serial port (COM) connector The serial port bracket (COM) is for a chassis-mounted front panel audio I /O module cable to this connector, set ... audio capability. • If you want to connect a high-definition front panel audio module to this connector, set the Front Panel Type item in the BIOS setup to [AC97]. Chapter 1 1-20 Chapter 1: Product introduction Front panel audio connector (10-1 pin AAFP) This connector is set the item to [HD...
... you want to connect an AC'97 front panel audio module to this connector. COM RXD DTR DSR CTS PIN 1 DCD TXD GND RTS RI H87-PRO Serial port (COM) connector The serial port bracket (COM) is for a chassis-mounted front panel audio I /O module cable to this connector, set ... audio capability. • If you want to connect a high-definition front panel audio module to this connector, set the Front Panel Type item in the BIOS setup to [AC97]. Chapter 1 1-20 Chapter 1: Product introduction Front panel audio connector (10-1 pin AAFP) This connector is set the item to [HD...
H87-PRO User's Manual
Page 37
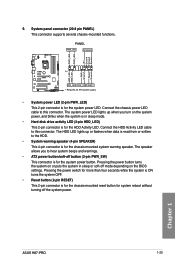
... beeps and warnings. • ATX power button/soft-off button (2-pin PWR_SW) This connector is for the system power button. Chapter 1 ASUS H87-PRO 1-23 Connect the chassis power LED cable to this connector. PANEL PWR_LED SPEAKER PWR_LED PWR_LED +5V Ground Ground Speaker HDD_LED HDD_LED PWR Ground Reset...(2-pin HDD_LED) This 2-pin connector is in sleep or soft-off the system power. Pressing the power button turns the system on the BIOS settings. Pressing the power switch for more than four seconds while the system is ON turns the system OFF. • Reset button (2-pin...
... beeps and warnings. • ATX power button/soft-off button (2-pin PWR_SW) This connector is for the system power button. Chapter 1 ASUS H87-PRO 1-23 Connect the chassis power LED cable to this connector. PANEL PWR_LED SPEAKER PWR_LED PWR_LED +5V Ground Ground Speaker HDD_LED HDD_LED PWR Ground Reset...(2-pin HDD_LED) This 2-pin connector is in sleep or soft-off the system power. Pressing the power button turns the system on the BIOS settings. Pressing the power switch for more than four seconds while the system is ON turns the system OFF. • Reset button (2-pin...

H87-PRO User's Manual
Page 49
... insert a USB storage device to the USB port, press the reset button on your local ASUS Service Center. 2-12 Chapter 2: Basic Installation Copy H87PRO.CAP to flash. 6. Chapter 2 USB BIOS Flashback port For more BIOS update utilities in BIOS setup, refer to the section 3.11.1 EZ Update in Chapter 3. • Do not unplug portable...
... insert a USB storage device to the USB port, press the reset button on your local ASUS Service Center. 2-12 Chapter 2: Basic Installation Copy H87PRO.CAP to flash. 6. Chapter 2 USB BIOS Flashback port For more BIOS update utilities in BIOS setup, refer to the section 3.11.1 EZ Update in Chapter 3. • Do not unplug portable...

H87-PRO User's Manual
Page 50
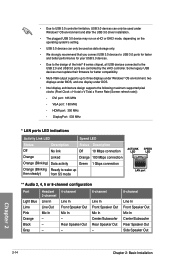
Intel® USB 3.0 ports support ASUS USB 3.0 Boost. Intel® USB 3.0 ports support ASUS USB 3.0 Boost. 5. LAN (RJ-45) port* 6. Chapter 2 ASUS H87-PRO 2-13 DVI-D port 9. Video Graphics Adapter (VGA) port 4. USB 2.0 ports * and ** : Refer to the tables on ...the next page for LAN port LEDs, and audio port definitions. Optical S/PDIF OUT port 3. HDMI port 10. PS/2 Keyboard/Mouse combo port 2. Bottom part supports USB BIOS Flashback. ...
Intel® USB 3.0 ports support ASUS USB 3.0 Boost. Intel® USB 3.0 ports support ASUS USB 3.0 Boost. 5. LAN (RJ-45) port* 6. Chapter 2 ASUS H87-PRO 2-13 DVI-D port 9. Video Graphics Adapter (VGA) port 4. USB 2.0 ports * and ** : Refer to the tables on ...the next page for LAN port LEDs, and audio port definitions. Optical S/PDIF OUT port 3. HDMI port 10. PS/2 Keyboard/Mouse combo port 2. Bottom part supports USB BIOS Flashback. ...
H87-PRO User's Manual
Page 51
... connection Orange (Blinking) Data activity Green 1 Gbps connection Orange (Blinking Ready to wake up to three displays under Windows® OS environment, two displays under BIOS, and one display under Windows® OS environment and after the USB 3.0 driver installation. • The plugged USB 3.0 device may run on xHCI or EHCI...
... connection Orange (Blinking) Data activity Green 1 Gbps connection Orange (Blinking Ready to wake up to three displays under Windows® OS environment, two displays under BIOS, and one display under Windows® OS environment and after the USB 3.0 driver installation. • The plugged USB 3.0 device may run on xHCI or EHCI...
H87-PRO User's Manual
Page 54
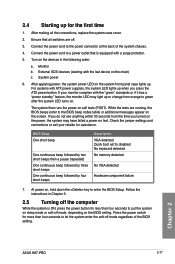
... to disabled No keyboard detected No memory detected No VGA detected Hardware component failure 7. Connect the power cord to enter the BIOS Setup. System power 6. At power on . Chapter 2 ASUS H87-PRO 2-17 2.4 Starting up . External SCSI devices (starting with ATX power supplies, the system LED lights up or change from...than four seconds to green after the system LED turns on , hold down the key to the power connector at the back of the BIOS setting. Monitor b. After applying power, the system power LED on sleep mode or soft-off the computer While the system is equipped with...
... to disabled No keyboard detected No memory detected No VGA detected Hardware component failure 7. Connect the power cord to enter the BIOS Setup. System power 6. At power on . Chapter 2 ASUS H87-PRO 2-17 2.4 Starting up . External SCSI devices (starting with ATX power supplies, the system LED lights up or change from...than four seconds to green after the system LED turns on , hold down the key to the power connector at the back of the BIOS setting. Monitor b. After applying power, the system power LED on sleep mode or soft-off the computer While the system is equipped with...


