User Guide
Page 3
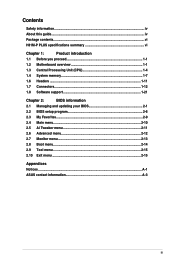
Contents Safety information...iv About this guide...iv Package contents...vi H81M-P PLUS specifications summary vi Chapter 1: Product introduction 1.1 Before you proceed 1-1 1.2 Motherboard overview 1-1 1.3 Central Processing Unit (CPU 1-4 1.4 System memory 1-7 1.6 Headers...1-11 1.7 Connectors 1-12 1.8 Software support 1-21 Chapter 2: BIOS information 2.1 Managing and updating your BIOS 2-1 2.2 BIOS setup program 2-6 2.3 My Favorites 2-9 2.4 Main menu...2-10 2.5 Ai Tweaker menu...
Contents Safety information...iv About this guide...iv Package contents...vi H81M-P PLUS specifications summary vi Chapter 1: Product introduction 1.1 Before you proceed 1-1 1.2 Motherboard overview 1-1 1.3 Central Processing Unit (CPU 1-4 1.4 System memory 1-7 1.6 Headers...1-11 1.7 Connectors 1-12 1.8 Software support 1-21 Chapter 2: BIOS information 2.1 Managing and updating your BIOS 2-1 2.2 BIOS setup program 2-6 2.3 My Favorites 2-9 2.4 Main menu...2-10 2.5 Ai Tweaker menu...

User Guide
Page 4
...power supply is organized This guide contains the following parts: • Chapter 1: Product introduction This chapter describes the features of the BIOS parameters are not damaged. Safety information Electrical safety • To prevent electrical shock hazard, disconnect the power cable from the electrical ...need when installing and configuring the motherboard. Detailed descriptions of the motherboard and the new technology it supports. • Chapter 2: BIOS information This chapter tells how to fix it , carefully read all the manuals that all cables are correctly connected and the ...
...power supply is organized This guide contains the following parts: • Chapter 1: Product introduction This chapter describes the features of the BIOS parameters are not damaged. Safety information Electrical safety • To prevent electrical shock hazard, disconnect the power cable from the electrical ...need when installing and configuring the motherboard. Detailed descriptions of the motherboard and the new technology it supports. • Chapter 2: BIOS information This chapter tells how to fix it , carefully read all the manuals that all cables are correctly connected and the ...

User Guide
Page 7
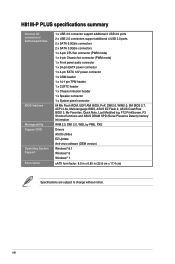
H81M-P PLUS specifications summary Storage LAN Audio USB ASUS unique features Back Panel I/O ports Intel® H81 Express Chipset: - 2 x Serial ATA 6.0 Gb/s connectors (yellow) - 2 x Serial ATA 3.0 Gb/s ...) vii ASUS AI Suite 3 - ASUS CrashFree BIOS 3 - ASUS Fan Xpert ASUS EZ DIY: - ASUS ESD ASUS Quiet Thermal Solution - Intel® I218V, 1 x Gigabit LAN Controller Realtek® ALC887 7.1-Channel High Definition Audio CODEC - ASUS Ai Charger+ - ASUS EPU - ASUS UEFI BIOS EZ Mode featuring a friendly graphical user interface - ASUS Anti-surge Protection - ASUS GPU Boost...
H81M-P PLUS specifications summary Storage LAN Audio USB ASUS unique features Back Panel I/O ports Intel® H81 Express Chipset: - 2 x Serial ATA 6.0 Gb/s connectors (yellow) - 2 x Serial ATA 3.0 Gb/s ...) vii ASUS AI Suite 3 - ASUS CrashFree BIOS 3 - ASUS Fan Xpert ASUS EZ DIY: - ASUS ESD ASUS Quiet Thermal Solution - Intel® I218V, 1 x Gigabit LAN Controller Realtek® ALC887 7.1-Channel High Definition Audio CODEC - ASUS Ai Charger+ - ASUS EPU - ASUS UEFI BIOS EZ Mode featuring a friendly graphical user interface - ASUS Anti-surge Protection - ASUS GPU Boost...
User Guide
Page 8
viii H81M-P PLUS specifications summary Internal I/O connectors/ buttons/switches BIOS features Manageability Support DVD Operating System Support Form factor 1 x USB 3.0 connector support additional 2 USB 3.0 ports 2 x USB 2.0 connectors support additional 4 USB 2.0 ... 1 x System panel connector 64 Mb Flash ROM, UEFI AMI BIOS, PnP, DMI2.0, WfM2.0, SM BIOS 2.7, ACPI 2.0a, Multi-language BIOS, ASUS EZ Flash 2, ASUS CrashFree BIOS 3, My Favorites, Quick Note, Last Modified log, F12 PrintScreen, F3 Shortcut functions and ASUS DRAM SPD (Serial Presence Detect) memory information WfM 2.0, DMI ...
viii H81M-P PLUS specifications summary Internal I/O connectors/ buttons/switches BIOS features Manageability Support DVD Operating System Support Form factor 1 x USB 3.0 connector support additional 2 USB 3.0 ports 2 x USB 2.0 connectors support additional 4 USB 2.0 ... 1 x System panel connector 64 Mb Flash ROM, UEFI AMI BIOS, PnP, DMI2.0, WfM2.0, SM BIOS 2.7, ACPI 2.0a, Multi-language BIOS, ASUS EZ Flash 2, ASUS CrashFree BIOS 3, My Favorites, Quick Note, Last Modified log, F12 PrintScreen, F3 Shortcut functions and ASUS DRAM SPD (Serial Presence Detect) memory information WfM 2.0, DMI ...

User Guide
Page 18
Remove the system unit cover (if your motherboard is completely seated on BIOS setup. 2. Replace the system cover. 1.5.2 Configuring an expansion card After installing the expansion card, configure it and make the necessary hardware settings for the card. 2. ... the software settings. 1. Secure the card to use . 4. Assign an IRQ to the card. 3. When using PCI cards on the system and change the necessary BIOS settings, if any. Otherwise, conflicts will arise between the two PCI groups, making the system unstable and the card inoperable. 1.5.3 PCI Express x1 slots This...
Remove the system unit cover (if your motherboard is completely seated on BIOS setup. 2. Replace the system cover. 1.5.2 Configuring an expansion card After installing the expansion card, configure it and make the necessary hardware settings for the card. 2. ... the software settings. 1. Secure the card to use . 4. Assign an IRQ to the card. 3. When using PCI cards on the system and change the necessary BIOS settings, if any. Otherwise, conflicts will arise between the two PCI groups, making the system unstable and the card inoperable. 1.5.3 PCI Express x1 slots This...

User Guide
Page 19
... during the boot process and enter BIOS setup to reenter data. • If the steps above do not need to clear the RTC when the system hangs due to clear the CMOS RTC RAM data. Plug the power cord and turn ON the computer. 4. ASUS H81M-P PLUS 1-11 1.6 Headers 1. Turn OFF... the computer and unplug the power cord. 2. Hold down and reboot the system, then the BIOS automatically resets parameter settings to clear the Real Time Clock (RTC) RAM in CMOS, which...
... during the boot process and enter BIOS setup to reenter data. • If the steps above do not need to clear the RTC when the system hangs due to clear the CMOS RTC RAM data. Plug the power cord and turn ON the computer. 4. ASUS H81M-P PLUS 1-11 1.6 Headers 1. Turn OFF... the computer and unplug the power cord. 2. Hold down and reboot the system, then the BIOS automatically resets parameter settings to clear the Real Time Clock (RTC) RAM in CMOS, which...
User Guide
Page 22
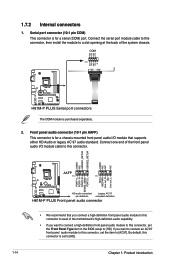
COM PIN 1 RXD DTR DSR CTS DCD TXD GND RTS RI H81M-P PLUS H81M-P PLUS Serial port connectors The COM module is for a chassis-mounted front panel audio I /O module cable to this connector, set to [HD]. 1-14 Chapter 1: Product introduction... the Front Panel Type item in the BIOS setup to [AC97]. AGND NC SENSE1_RETUR SENSE2_RETUR AGND NC NC NC AAFP PIN 1 PIN 1 MIC2 MICPWR Line out_R NC Line out_L PORT1 L PORT1 R PORT2 R SENSE_SEND PORT2 L H81M-P PLUS HD-audio-compliant Legacy AC'97 pin definition compliant definition H81M-P PLUS Front panel audio connector • We ...
COM PIN 1 RXD DTR DSR CTS DCD TXD GND RTS RI H81M-P PLUS H81M-P PLUS Serial port connectors The COM module is for a chassis-mounted front panel audio I /O module cable to this connector, set to [HD]. 1-14 Chapter 1: Product introduction... the Front Panel Type item in the BIOS setup to [AC97]. AGND NC SENSE1_RETUR SENSE2_RETUR AGND NC NC NC AAFP PIN 1 PIN 1 MIC2 MICPWR Line out_R NC Line out_L PORT1 L PORT1 R PORT2 R SENSE_SEND PORT2 L H81M-P PLUS HD-audio-compliant Legacy AC'97 pin definition compliant definition H81M-P PLUS Front panel audio connector • We ...

User Guide
Page 26
...RSATA_RXN1 GND RSATA_TXN1 RSATA_TXP1 GND GND RSATA_RXP2 RSATA_RXN2 GND RSATA_TXN2 RSATA_TXP2 GND H81M-P PLUS SATA3G_1 SATA3G_2 H81M-P PLUS SATA 3.0Gb/s connectors When using hot-plug and NCQ, set the SATA Mode Selection item in the BIOS to Serial ATA 3.0 Gb/s hard disk drives via Serial ATA...RSATA_RXN1 GND RSATA_TXN1 RSATA_TXP1 GND GND RSATA_RXP2 RSATA_RXN2 GND RSATA_TXN2 RSATA_TXP2 GND H81M-P PLUS SATA6G_1 SATA6G_2 H81M-P PLUS SATA 6.0Gb/s connectors When using hot-plug and NCQ, set the SATA Mode Selection item in the BIOS to Serial ATA 6.0 Gb/s hard disk drives via Serial ATA ...
...RSATA_RXN1 GND RSATA_TXN1 RSATA_TXP1 GND GND RSATA_RXP2 RSATA_RXN2 GND RSATA_TXN2 RSATA_TXP2 GND H81M-P PLUS SATA3G_1 SATA3G_2 H81M-P PLUS SATA 3.0Gb/s connectors When using hot-plug and NCQ, set the SATA Mode Selection item in the BIOS to Serial ATA 3.0 Gb/s hard disk drives via Serial ATA...RSATA_RXN1 GND RSATA_TXN1 RSATA_TXP1 GND GND RSATA_RXP2 RSATA_RXN2 GND RSATA_TXN2 RSATA_TXP2 GND H81M-P PLUS SATA6G_1 SATA6G_2 H81M-P PLUS SATA 6.0Gb/s connectors When using hot-plug and NCQ, set the SATA Mode Selection item in the BIOS to Serial ATA 6.0 Gb/s hard disk drives via Serial ATA ...

User Guide
Page 31
...you need to restore the BIOS in the future. ASUS H81M-P PLUS 2-1 Click to automatically update your motherboard's softwares, drivers and the BIOS version easily. To launch EZ Update, click EZ Update on the AI Suite 3 main menu bar. Copy the original motherboard BIOS using the ASUS Update utility. 2.1.1 EZ... Update EZ Update is a utility that allows you to automatically update your motherboard's driver, software and firmware Click to find and select the BIOS from file Click to select a boot ...
...you need to restore the BIOS in the future. ASUS H81M-P PLUS 2-1 Click to automatically update your motherboard's softwares, drivers and the BIOS version easily. To launch EZ Update, click EZ Update on the AI Suite 3 main menu bar. Copy the original motherboard BIOS using the ASUS Update utility. 2.1.1 EZ... Update EZ Update is a utility that allows you to automatically update your motherboard's driver, software and firmware Click to find and select the BIOS from file Click to select a boot ...

User Guide
Page 32
... 2-2 Chapter 2: Getting started To update the BIOS using an OS‑based utility. Press to switch to perform the BIOS update process. Before you to find the BIOS file, and then press to the Drive field. 4. 2.1.2 ASUS EZ Flash 2 The ASUS EZ Flash 2 feature allows you start using ...this utility, download the latest BIOS file from the ASUS website at www.asus.com. Enter the ...
... 2-2 Chapter 2: Getting started To update the BIOS using an OS‑based utility. Press to switch to perform the BIOS update process. Before you to find the BIOS file, and then press to the Drive field. 4. 2.1.2 ASUS EZ Flash 2 The ASUS EZ Flash 2 feature allows you start using ...this utility, download the latest BIOS file from the ASUS website at www.asus.com. Enter the ...

User Guide
Page 33
... the BIOS! ASUS H81M-P PLUS 2-3 Recovering the BIOS To recover the BIOS: 1. Insert the support DVD to the optical drive or the USB flash drive that you to load default BIOS values. The screen captures used in this utility, rename the BIOS file in the removable device to recover BIOS setting. You can cause system boot failure! 2.1.4 ASUS BIOS Updater ASUS BIOS Updater...
... the BIOS! ASUS H81M-P PLUS 2-3 Recovering the BIOS To recover the BIOS: 1. Insert the support DVD to the optical drive or the USB flash drive that you to load default BIOS values. The screen captures used in this utility, rename the BIOS file in the removable device to recover BIOS setting. You can cause system boot failure! 2.1.4 ASUS BIOS Updater ASUS BIOS Updater...

User Guide
Page 34
Booting the system in DOS environment To boot the system in DOS: 1. Insert the USB flash drive with the latest BIOS file and BIOS Updater to launch the select boot device screen. 3. Boot your computer then press to the USB port. 2. Please select boot device: ... within five (5) seconds to Drive D (USB flash drive). Press ENTER to boot using defaults P2: ST3808110AS (76319MB) aigo miniking (250MB) UEFI: (FAT) ASUS DRW-2014L1T(4458MB) P1: ASUS DRW-2014L1T(4458MB) UEFI: (FAT) aigo miniking (250MB) Enter Setup 4. On the FreeDOS prompt, type bupdater /pc /g and press . D:/> bupdater /pc...
Booting the system in DOS environment To boot the system in DOS: 1. Insert the USB flash drive with the latest BIOS file and BIOS Updater to launch the select boot device screen. 3. Boot your computer then press to the USB port. 2. Please select boot device: ... within five (5) seconds to Drive D (USB flash drive). Press ENTER to boot using defaults P2: ST3808110AS (76319MB) aigo miniking (250MB) UEFI: (FAT) ASUS DRW-2014L1T(4458MB) P1: ASUS DRW-2014L1T(4458MB) UEFI: (FAT) aigo miniking (250MB) Enter Setup 4. On the FreeDOS prompt, type bupdater /pc /g and press . D:/> bupdater /pc...

User Guide
Page 35
... prevent system boot failure. See Chapter 2 of your computer. ASUS H81M-P PLUS 2-5 Yes No The BIOS Backup feature is done, press to exit BIOS Updater. 6. DO NOT shut down or reset the system while updating the BIOS to confirm the BIOS update. Restart your motherboard user guide for DOS V1.30 [...2014/01/01] Current ROM BOARD: H81M-P PLUS VER: 0302 (H :00 B :00) DATE: 07/15/2014 PATH: C:\ Update ROM BOARD: Unknown VER: Unknown DATE:...
... prevent system boot failure. See Chapter 2 of your computer. ASUS H81M-P PLUS 2-5 Yes No The BIOS Backup feature is done, press to exit BIOS Updater. 6. DO NOT shut down or reset the system while updating the BIOS to confirm the BIOS update. Restart your motherboard user guide for DOS V1.30 [...2014/01/01] Current ROM BOARD: H81M-P PLUS VER: 0302 (H :00 B :00) DATE: 07/15/2014 PATH: C:\ Update ROM BOARD: Unknown VER: Unknown DATE:...
User Guide
Page 36
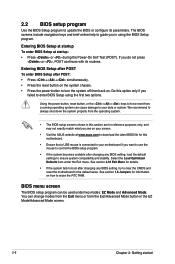
...reset the motherboard to ensure system compatibility and stability. 2.2 BIOS setup program Use the BIOS Setup program to turn the system off then back on. Entering BIOS Setup at startup To enter BIOS Setup at www.asus.com to download the latest BIOS file for information on your screen. • Visit the... ASUS website at startup: • Press or during the Power-On Self Test (POST). ...
...reset the motherboard to ensure system compatibility and stability. 2.2 BIOS setup program Use the BIOS Setup program to turn the system off then back on. Entering BIOS Setup at startup To enter BIOS Setup at www.asus.com to download the latest BIOS file for information on your screen. • Visit the... ASUS website at startup: • Press or during the Power-On Self Test (POST). ...

User Guide
Page 37
... default Selects the priority Displays the system properties Advanced mode Normal mode of the basic system information, and allows you to the system. ASUS H81M-P PLUS 2-7 The EZ Mode provides you an overview of the selected mode on the functions Selects the boot device priority right hand side Displays... the Advanced mode menus • The boot device options vary depending on the devices you enter the BIOS setup program. EZ Mode By default, the EZ Mode screen appears when you installed to the system. • The Boot Menu(F8)...
... default Selects the priority Displays the system properties Advanced mode Normal mode of the basic system information, and allows you to the system. ASUS H81M-P PLUS 2-7 The EZ Mode provides you an overview of the selected mode on the functions Selects the boot device priority right hand side Displays... the Advanced mode menus • The boot device options vary depending on the devices you enter the BIOS setup program. EZ Mode By default, the EZ Mode screen appears when you installed to the system. • The Boot Menu(F8)...
User Guide
Page 38
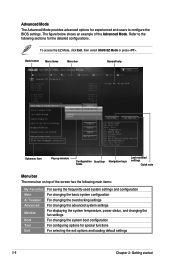
...the following sections for special functions For selecting the exit options and loading default settings 2-8 Chapter 2: Getting started Refer to configure the BIOS settings. Back button Menu items Menu bar General help Submenu item Pop-up window Configuration Scroll bar Navigation keys fields Last modified settings ...Quick note Menu bar The menu bar on top of the Advanced Mode. To access the EZ Mode, click Exit, then select ASUS EZ Mode or press . Advanced Mode The Advanced Mode provides advanced options for experienced end-users to the following main items: My ...
...the following sections for special functions For selecting the exit options and loading default settings 2-8 Chapter 2: Getting started Refer to configure the BIOS settings. Back button Menu items Menu bar General help Submenu item Pop-up window Configuration Scroll bar Navigation keys fields Last modified settings ...Quick note Menu bar The menu bar on top of the Advanced Mode. To access the EZ Mode, click Exit, then select ASUS EZ Mode or press . Advanced Mode The Advanced Mode provides advanced options for experienced end-users to the following main items: My ...
User Guide
Page 39
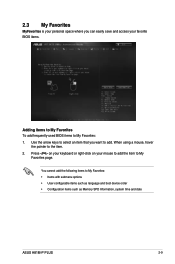
... submenu options • User-configurable items such as language and boot device order • Configuration items such as Memory SPD Information, system time and date ASUS H81M-P PLUS 2-9 You cannot add the following items to the item. 2. Use the arrow keys to select an item that you can easily save and access your...
... submenu options • User-configurable items such as language and boot device order • Configuration items such as Memory SPD Information, system time and date ASUS H81M-P PLUS 2-9 You cannot add the following items to the item. 2. Use the arrow keys to select an item that you can easily save and access your...

User Guide
Page 40
...; If you set a password, these items show the default Not Installed. See section 1.6 Jumpers for information on how to clear the BIOS password. After you have forgotten your BIOS password, erase the CMOS Real Time Clock (RTC) RAM to erase the RTC RAM. • The Administrator or User Password items on... top of the BIOS Setup program. 2.4 Main menu The Main menu screen appears when you enter the Advanced Mode of the screen...
...; If you set a password, these items show the default Not Installed. See section 1.6 Jumpers for information on how to clear the BIOS password. After you have forgotten your BIOS password, erase the CMOS Real Time Clock (RTC) RAM to erase the RTC RAM. • The Administrator or User Password items on... top of the BIOS Setup program. 2.4 Main menu The Main menu screen appears when you enter the Advanced Mode of the screen...
User Guide
Page 45
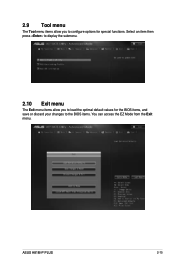
ASUS H81M-P PLUS 2-15 2.9 Tool menu The Tool menu items allow you to configure options for the BIOS items, and save or discard your changes to load the optimal default values for special functions. Select an item then press to display the submenu. 2.10 Exit menu The Exit menu items allow you to the BIOS items. You can access the EZ Mode from the Exit menu.
ASUS H81M-P PLUS 2-15 2.9 Tool menu The Tool menu items allow you to configure options for the BIOS items, and save or discard your changes to load the optimal default values for special functions. Select an item then press to display the submenu. 2.10 Exit menu The Exit menu items allow you to the BIOS items. You can access the EZ Mode from the Exit menu.


