H81M-K User's Manual
Page 6
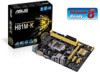
...the above items is subject to the physical characteristics of individual CPUs. Please refer to Memory QVL for details. ** Refer to www.asus.com for Intel® 4th Generation CoreTM i7/ i5 / i3, Pentium® and Celeron® Processors Supports 22nm CPU Supports... HD Graphics support Multi-VGA output support: DVI-D, RGB port - Maximum shared memory of DDR3 1600MHz. resolution up to www.asus.com for the following items. Motherboard ASUS H81M-K motherboard Cables 2 x Serial ATA 6.0 Gb/s cables Accessories 1 x I/O Shield Application DVD Support DVD Documentation User Guide If...
...the above items is subject to the physical characteristics of individual CPUs. Please refer to Memory QVL for details. ** Refer to www.asus.com for Intel® 4th Generation CoreTM i7/ i5 / i3, Pentium® and Celeron® Processors Supports 22nm CPU Supports... HD Graphics support Multi-VGA output support: DVI-D, RGB port - Maximum shared memory of DDR3 1600MHz. resolution up to www.asus.com for the following items. Motherboard ASUS H81M-K motherboard Cables 2 x Serial ATA 6.0 Gb/s cables Accessories 1 x I/O Shield Application DVD Support DVD Documentation User Guide If...
H81M-K User's Manual
Page 9
... grounded object or a metal object, such as indicated in the image below. Ensure that you unplug the power cord before installing or removing the motherboard. ASUS H81M-K 1-1 The edge with the component. • Before you install the motherboard, study the configuration of your chassis to the rear part of the following precautions...
... grounded object or a metal object, such as indicated in the image below. Ensure that you unplug the power cord before installing or removing the motherboard. ASUS H81M-K 1-1 The edge with the component. • Before you install the motherboard, study the configuration of your chassis to the rear part of the following precautions...
H81M-K User's Manual
Page 11
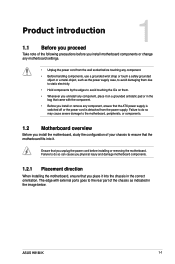
1.2.3 Motherboard layout 1 23 4 17.5cm(6.9in) 35 KBMS ASP ATX12V 1225 CPU_FAN DVI DDR3 DIMM_A1 (64bit, 240-pin module) DDR3 DIMM_B1 (64bit, 240-pin module) EATXPWR 22.6cm(8.9in) VGA LGA1150 2 USB3_12 PS2_USBPW1-4 LAN_USB34 CHA_FAN AUDIO BATTERY H81M-K RTL 8111G PCIEX16 Super I/O PCIEX1_1 Intel® 64Mb BIOS 6 SPEAKER SB_PWR ALC 887- VD2 PCIEX1_2 USBPW5-10 H81 7 F_PANEL CLRTC SPDIF_OUT USB56 SATA3G_1 SATA3G_2 SATA6G_1 SATA6G_2 AAFP USB78 15 14 13 12 11 10 9 8 ASUS H81M-K 1-3
1.2.3 Motherboard layout 1 23 4 17.5cm(6.9in) 35 KBMS ASP ATX12V 1225 CPU_FAN DVI DDR3 DIMM_A1 (64bit, 240-pin module) DDR3 DIMM_B1 (64bit, 240-pin module) EATXPWR 22.6cm(8.9in) VGA LGA1150 2 USB3_12 PS2_USBPW1-4 LAN_USB34 CHA_FAN AUDIO BATTERY H81M-K RTL 8111G PCIEX16 Super I/O PCIEX1_1 Intel® 64Mb BIOS 6 SPEAKER SB_PWR ALC 887- VD2 PCIEX1_2 USBPW5-10 H81 7 F_PANEL CLRTC SPDIF_OUT USB56 SATA3G_1 SATA3G_2 SATA6G_1 SATA6G_2 AAFP USB78 15 14 13 12 11 10 9 8 ASUS H81M-K 1-3
H81M-K User's Manual
Page 13
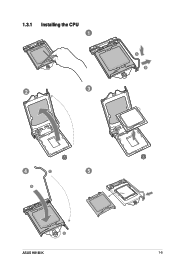
1.3.1 Installing the CPU 1 2 3 A B 4 C 5 A B ASUS H81M-K 1-5
1.3.1 Installing the CPU 1 2 3 A B 4 C 5 A B ASUS H81M-K 1-5
H81M-K User's Manual
Page 15
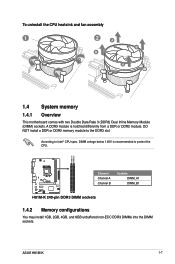
...-pin DDR3 DIMM sockets 1.4.2 Memory configurations You may install 1GB, 2GB, 4GB, and 8GB unbuffered non‑ECC DDR3 DIMMs into the DIMM sockets. ASUS H81M-K 1-7 A DDR3 module is recommended to the DDR3 slot. DO NOT install a DDR or DDR2 memory module to protect the CPU. To uninstall the CPU heatsink ...
...-pin DDR3 DIMM sockets 1.4.2 Memory configurations You may install 1GB, 2GB, 4GB, and 8GB unbuffered non‑ECC DDR3 DIMMs into the DIMM sockets. ASUS H81M-K 1-7 A DDR3 module is recommended to the DDR3 slot. DO NOT install a DDR or DDR2 memory module to protect the CPU. To uninstall the CPU heatsink ...
H81M-K User's Manual
Page 17
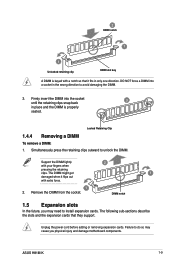
The DIMM might get 1 damaged when it fits in only one direction. ASUS H81M-K 1-9 DO NOT force a DIMM into the socket until the retaining clips snap back 3 in the wrong direction to unlock the DIMM. Failure to do so ...
The DIMM might get 1 damaged when it fits in only one direction. ASUS H81M-K 1-9 DO NOT force a DIMM into the socket until the retaining clips snap back 3 in the wrong direction to unlock the DIMM. Failure to do so ...
H81M-K User's Manual
Page 19
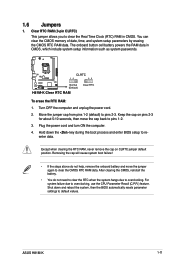
The onboard button cell battery powers the RAM data in CMOS. H81M-K CLRTC 12 23 Normal (Default) H81M-K Clear RTC RAM Clear RTC To erase the RTC RAM: 1. Move the jumper cap from pins 1-2 (default) to overclocking. Hold down and reboot the system, ... cap will cause system boot failure! • If the steps above do not need to clear the RTC when the system hangs due to pins 2-3. ASUS H81M-K 1-11 Except when clearing the RTC RAM, never remove the cap on pins 2-3 for about 5-10 seconds, then move the jumper again to overclocking, use...
The onboard button cell battery powers the RAM data in CMOS. H81M-K CLRTC 12 23 Normal (Default) H81M-K Clear RTC RAM Clear RTC To erase the RTC RAM: 1. Move the jumper cap from pins 1-2 (default) to overclocking. Hold down and reboot the system, ... cap will cause system boot failure! • If the steps above do not need to clear the RTC when the system hangs due to pins 2-3. ASUS H81M-K 1-11 Except when clearing the RTC RAM, never remove the cap on pins 2-3 for about 5-10 seconds, then move the jumper again to overclocking, use...
H81M-K User's Manual
Page 21
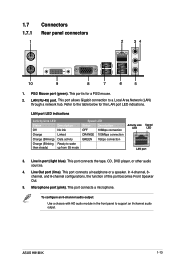
.../2 Mouse port (green). Refer to support an 8-channel audio output. In 4-channel, 6channel, and 8-channel configurations, the function of this port becomes Front Speaker Out. 5. ASUS H81M-K 1-13 1.7 Connectors 1.7.1 Rear panel connectors 1 2 34 10 9 8 7 6 5 1. This port connects a microphone. This port connects the tape, CD, DVD player, or other audio sources. 4. Line Out...
.../2 Mouse port (green). Refer to support an 8-channel audio output. In 4-channel, 6channel, and 8-channel configurations, the function of this port becomes Front Speaker Out. 5. ASUS H81M-K 1-13 1.7 Connectors 1.7.1 Rear panel connectors 1 2 34 10 9 8 7 6 5 1. This port connects a microphone. This port connects the tape, CD, DVD player, or other audio sources. 4. Line Out...
H81M-K User's Manual
Page 23
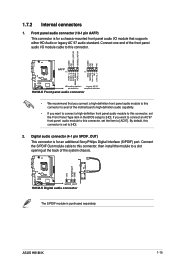
... module cable to this connector. If you want to connect an AC'97 front panel audio module to this connector is purchased separately. ASUS H81M-K 1-15 1.7.2 Internal connectors 1. Digital audio connector (4-1 pin SPDIF_OUT) This connector is for an additional Sony/Philips Digital Interface (S/PDIF)... port. Connect one end of the system chassis. +5V SPDIFOUT GND H81M-K SPDIF_OUT H81M-K Digital audio connector The S/PDIF module is set to [HD]. By default, this connector, set the Front Panel Type item in...
... module cable to this connector. If you want to connect an AC'97 front panel audio module to this connector is purchased separately. ASUS H81M-K 1-15 1.7.2 Internal connectors 1. Digital audio connector (4-1 pin SPDIF_OUT) This connector is for an additional Sony/Philips Digital Interface (S/PDIF)... port. Connect one end of the system chassis. +5V SPDIFOUT GND H81M-K SPDIF_OUT H81M-K Digital audio connector The S/PDIF module is set to [HD]. By default, this connector, set the Front Panel Type item in...
H81M-K User's Manual
Page 25
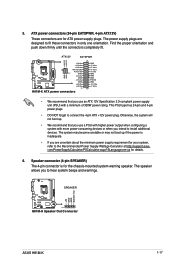
...(PSU) with more power-consuming devices or when you to hear system beeps and warnings. +5V GND GND Speaker Out SPEAKER H81M-K PIN 1 H81M-K Speaker Out Connector ASUS H81M-K 1-17 5. This PSU type has 24-pin and 4-pin power plugs. • DO NOT forget to fit these connectors...supply requirement for ATX power supply plugs. The speaker allows you intend to the Recommended Power Supply Wattage Calculator at http://support.asus. com/PowerSupplyCalculator/PSCalculator.aspx?SLanguage=en-us for the chassis-mounted system warning speaker. The power supply plugs are designed to connect...
...(PSU) with more power-consuming devices or when you to hear system beeps and warnings. +5V GND GND Speaker Out SPEAKER H81M-K PIN 1 H81M-K Speaker Out Connector ASUS H81M-K 1-17 5. This PSU type has 24-pin and 4-pin power plugs. • DO NOT forget to fit these connectors...supply requirement for ATX power supply plugs. The speaker allows you intend to the Recommended Power Supply Wattage Calculator at http://support.asus. com/PowerSupplyCalculator/PSCalculator.aspx?SLanguage=en-us for the chassis-mounted system warning speaker. The power supply plugs are designed to connect...
H81M-K User's Manual
Page 27
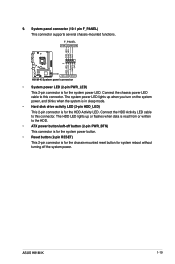
...sleep mode. • Hard disk drive activity LED (2-pin HDD_LED) This 2-pin connector is read from or written to this connector. ASUS H81M-K 1-19 System panel connector (10-1 pin F_PANEL) This connector supports several chassis-mounted functions. F_PANEL +PWR LED PWR BTN PWR_LED+ ...PWR_LEDPWR GND HDD_LED+ HDD_LED- Ground HWRST# (NC) H81M-K PIN 1 +HDD_LED RESET H81M-K System panel connector • System power LED (2-pin PWR_LED) This 2-pin connector is for the chassis-mounted reset button for...
...sleep mode. • Hard disk drive activity LED (2-pin HDD_LED) This 2-pin connector is read from or written to this connector. ASUS H81M-K 1-19 System panel connector (10-1 pin F_PANEL) This connector supports several chassis-mounted functions. F_PANEL +PWR LED PWR BTN PWR_LED+ ...PWR_LEDPWR GND HDD_LED+ HDD_LED- Ground HWRST# (NC) H81M-K PIN 1 +HDD_LED RESET H81M-K System panel connector • System power LED (2-pin PWR_LED) This 2-pin connector is for the chassis-mounted reset button for...
H81M-K User's Manual
Page 29
...® 7 (32bit/64bit) and Windows® 8 (32bit/64bit) Operating Systems (OS). Motherboard settings and hardware options vary. Visit the ASUS website at any time without notice. If Autorun is NOT enabled in your computer, the DVD automatically displays the Specials screen which lists the unique... only. Double-click the ASSETUP.EXE to your hardware. Refer to run the Support DVD Place the Support DVD into the optical drive. ASUS H81M-K 1-21 Click Drivers, Utilities, AHCI Driver, Manual, Contact and Specials tabs to locate the file ASSETUP.EXE from the BIN folder. ...
...® 7 (32bit/64bit) and Windows® 8 (32bit/64bit) Operating Systems (OS). Motherboard settings and hardware options vary. Visit the ASUS website at any time without notice. If Autorun is NOT enabled in your computer, the DVD automatically displays the Specials screen which lists the unique... only. Double-click the ASSETUP.EXE to your hardware. Refer to run the Support DVD Place the Support DVD into the optical drive. ASUS H81M-K 1-21 Click Drivers, Utilities, AHCI Driver, Manual, Contact and Specials tabs to locate the file ASSETUP.EXE from the BIN folder. ...
H81M-K User's Manual
Page 31
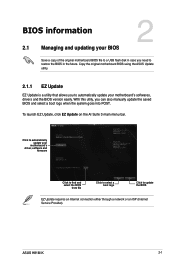
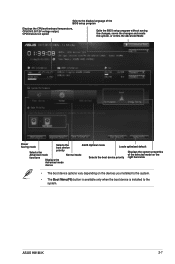
...need to restore the BIOS in case you can also manually update the saved BIOS and select a boot logo when the system goes into POST. ASUS H81M-K 2-1 To launch EZ Update, click EZ Update on the AI Suite 3 main menu bar. Click to update the BIOS EZ Update requires an... Internet connection either through a network or an ISP (Internet Service Provider). Copy the original motherboard BIOS using the ASUS Update utility. 2.1.1 EZ Update EZ Update is a utility that allows you to automatically update your motherboard's driver, software and firmware Click to find...
...need to restore the BIOS in case you can also manually update the saved BIOS and select a boot logo when the system goes into POST. ASUS H81M-K 2-1 To launch EZ Update, click EZ Update on the AI Suite 3 main menu bar. Click to update the BIOS EZ Update requires an... Internet connection either through a network or an ISP (Internet Service Provider). Copy the original motherboard BIOS using the ASUS Update utility. 2.1.1 EZ Update EZ Update is a utility that allows you to automatically update your motherboard's driver, software and firmware Click to find...
H81M-K User's Manual
Page 33
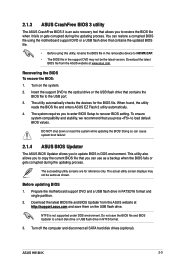
...are for the BIOS file. Download the latest BIOS file and BIOS Updater from the ASUS website at http://support.asus.com and save the BIOS file and BIOS Updater to load default BIOS values. ASUS H81M-K 2-3 Turn on the USB flash drive. Turn off the computer and disconnect all SATA... hard disk drives (optional). You can use as shown. Download the latest BIOS file from the ASUS website at www.asus.com. Recovering the BIOS To recover ...
...are for the BIOS file. Download the latest BIOS file and BIOS Updater from the ASUS website at http://support.asus.com and save the BIOS file and BIOS Updater to load default BIOS values. ASUS H81M-K 2-3 Turn on the USB flash drive. Turn off the computer and disconnect all SATA... hard disk drives (optional). You can use as shown. Download the latest BIOS file from the ASUS website at www.asus.com. Recovering the BIOS To recover ...
H81M-K User's Manual
Page 35
...: • Press ++ simultaneously. • Press the reset button on the system chassis. • Press the power button to update the BIOS or configure its routines. ASUS H81M-K 2-5 Restart your computer. When BIOS update is done, press to select the BIOS file and press . BIOS Updater checks the selected BIOS file and prompts...
...: • Press ++ simultaneously. • Press the reset button on the system chassis. • Press the power button to update the BIOS or configure its routines. ASUS H81M-K 2-5 Restart your computer. When BIOS update is done, press to select the BIOS file and press . BIOS Updater checks the selected BIOS file and prompts...
H81M-K User's Manual
Page 37
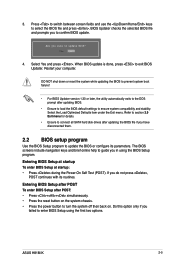
... setup program without saving the changes, saves the changes and resets the system, or enters the Advanced Mode Power Saving mode Selects the boot device ASUS Optimal mode Loads optimized default Selects the priority Displays the system properties Advanced mode Normal mode of the selected mode on the functions Selects the... the devices you installed to the system. • The Boot Menu(F8) button is available only when the boot device is installed to the system. ASUS H81M-K 2-7
... setup program without saving the changes, saves the changes and resets the system, or enters the Advanced Mode Power Saving mode Selects the boot device ASUS Optimal mode Loads optimized default Selects the priority Displays the system properties Advanced mode Normal mode of the selected mode on the functions Selects the... the devices you installed to the system. • The Boot Menu(F8) button is available only when the boot device is installed to the system. ASUS H81M-K 2-7
H81M-K User's Manual
Page 39
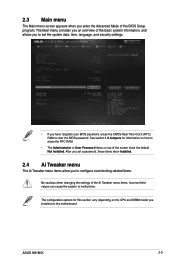
ASUS H81M-K 2-9 See section 1.6 Jumpers for this section vary depending on the CPU and DIMM model you installed on top of the screen show Installed. 2.4 Ai Tweaker ...
ASUS H81M-K 2-9 See section 1.6 Jumpers for this section vary depending on the CPU and DIMM model you installed on top of the screen show Installed. 2.4 Ai Tweaker ...
H81M-K User's Manual
Page 41
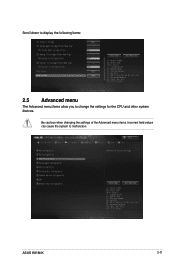
Be cautious when changing the settings of the Advanced menu items. Incorrect field values can cause the system to change the settings for the CPU and other system devices. ASUS H81M-K 2-11 Scroll down to display the following items: 2.5 Advanced menu The Advanced menu items allow you to malfunction.
Be cautious when changing the settings of the Advanced menu items. Incorrect field values can cause the system to change the settings for the CPU and other system devices. ASUS H81M-K 2-11 Scroll down to display the following items: 2.5 Advanced menu The Advanced menu items allow you to malfunction.
H81M-K User's Manual
Page 43
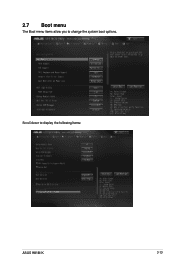
Scroll down to change the system boot options. 2.7 Boot menu The Boot menu items allow you to display the following items: ASUS H81M-K 2-13
Scroll down to change the system boot options. 2.7 Boot menu The Boot menu items allow you to display the following items: ASUS H81M-K 2-13
H81M-K User's Manual
Page 45
... Rules. IC: Canadian Compliance Statement Complies with Industry Canada license exempt RSS standard(s). This device complies with the Canadian ICES-003 Class B specifications. ASUS H81M-K A-1 Cet appareil est conforme aux normes CNR exemptes de licence d'Industrie Canada. Appendices Notices Federal Communications Commission Statement This device complies with Part 15 of...
... Rules. IC: Canadian Compliance Statement Complies with Industry Canada license exempt RSS standard(s). This device complies with the Canadian ICES-003 Class B specifications. ASUS H81M-K A-1 Cet appareil est conforme aux normes CNR exemptes de licence d'Industrie Canada. Appendices Notices Federal Communications Commission Statement This device complies with Part 15 of...


