H81M-K User's Manual
Page 6
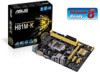
...of DDR3 1600MHz. Supports DVI-D with max. Supports RGB with max. Package contents Check your motherboard package for the following items. Motherboard ASUS H81M-K motherboard Cables 2 x Serial ATA 6.0 Gb/s cables Accessories 1 x I/O Shield Application DVD Support DVD Documentation User Guide If any of...Intel® chipset limitations, DDR3 1600MHz and higher memory modules on the next page) vi resolution 1920x1200@60Hz - H81M-K specifications summary CPU LGA1150 socket for Intel® CPU support list. Intel® HD Graphics support Multi-VGA output support: DVI-D,...
...of DDR3 1600MHz. Supports DVI-D with max. Supports RGB with max. Package contents Check your motherboard package for the following items. Motherboard ASUS H81M-K motherboard Cables 2 x Serial ATA 6.0 Gb/s cables Accessories 1 x I/O Shield Application DVD Support DVD Documentation User Guide If any of...Intel® chipset limitations, DDR3 1600MHz and higher memory modules on the next page) vi resolution 1920x1200@60Hz - H81M-K specifications summary CPU LGA1150 socket for Intel® CPU support list. Intel® HD Graphics support Multi-VGA output support: DVI-D,...
H81M-K User's Manual
Page 9
... or a metal object, such as indicated in the correct orientation. Failure to avoid damaging them . • Whenever you uninstall any component, place it into it. ASUS H81M-K 1-1 Product introduction 1 1.1 Before you proceed Take note of the following precautions before you install motherboard components or change any motherboard settings. • Unplug the power...
... or a metal object, such as indicated in the correct orientation. Failure to avoid damaging them . • Whenever you uninstall any component, place it into it. ASUS H81M-K 1-1 Product introduction 1 1.1 Before you proceed Take note of the following precautions before you install motherboard components or change any motherboard settings. • Unplug the power...
H81M-K User's Manual
Page 11
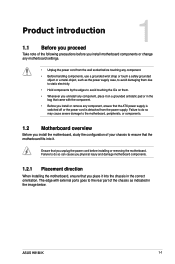
1.2.3 Motherboard layout 1 23 4 17.5cm(6.9in) 35 KBMS ASP ATX12V 1225 CPU_FAN DVI DDR3 DIMM_A1 (64bit, 240-pin module) DDR3 DIMM_B1 (64bit, 240-pin module) EATXPWR 22.6cm(8.9in) VGA LGA1150 2 USB3_12 PS2_USBPW1-4 LAN_USB34 CHA_FAN AUDIO BATTERY H81M-K RTL 8111G PCIEX16 Super I/O PCIEX1_1 Intel® 64Mb BIOS 6 SPEAKER SB_PWR ALC 887- VD2 PCIEX1_2 USBPW5-10 H81 7 F_PANEL CLRTC SPDIF_OUT USB56 SATA3G_1 SATA3G_2 SATA6G_1 SATA6G_2 AAFP USB78 15 14 13 12 11 10 9 8 ASUS H81M-K 1-3
1.2.3 Motherboard layout 1 23 4 17.5cm(6.9in) 35 KBMS ASP ATX12V 1225 CPU_FAN DVI DDR3 DIMM_A1 (64bit, 240-pin module) DDR3 DIMM_B1 (64bit, 240-pin module) EATXPWR 22.6cm(8.9in) VGA LGA1150 2 USB3_12 PS2_USBPW1-4 LAN_USB34 CHA_FAN AUDIO BATTERY H81M-K RTL 8111G PCIEX16 Super I/O PCIEX1_1 Intel® 64Mb BIOS 6 SPEAKER SB_PWR ALC 887- VD2 PCIEX1_2 USBPW5-10 H81 7 F_PANEL CLRTC SPDIF_OUT USB56 SATA3G_1 SATA3G_2 SATA6G_1 SATA6G_2 AAFP USB78 15 14 13 12 11 10 9 8 ASUS H81M-K 1-3
H81M-K User's Manual
Page 13
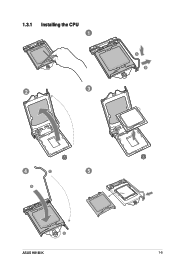
1.3.1 Installing the CPU 1 2 3 A B 4 C 5 A B ASUS H81M-K 1-5
1.3.1 Installing the CPU 1 2 3 A B 4 C 5 A B ASUS H81M-K 1-5
H81M-K User's Manual
Page 15
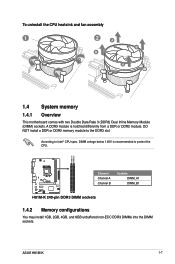
DO NOT install a DDR or DDR2 memory module to protect the CPU. ASUS H81M-K 1-7 DIMM_A1 DIMM_B1 Channel Sockets Channel A DIMM_A1 H81M-K Channel B DIMM_B1 H81M-K 240-pin DDR3 DIMM sockets 1.4.2 Memory configurations You may install 1GB, 2GB, 4GB, and 8GB unbuffered non‑ECC DDR3 DIMMs into the DIMM sockets. ...
DO NOT install a DDR or DDR2 memory module to protect the CPU. ASUS H81M-K 1-7 DIMM_A1 DIMM_B1 Channel Sockets Channel A DIMM_A1 H81M-K Channel B DIMM_B1 H81M-K 240-pin DDR3 DIMM sockets 1.4.2 Memory configurations You may install 1GB, 2GB, 4GB, and 8GB unbuffered non‑ECC DDR3 DIMMs into the DIMM sockets. ...
H81M-K User's Manual
Page 17
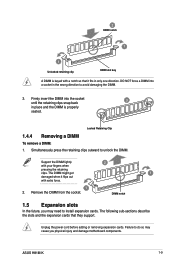
... DIMM. 3. The following sub‑sections describe the slots and the expansion cards that it flips out with your fingers when pressing the retaining clips. ASUS H81M-K 1-9 2 DIMM notch 1 1 Unlocked retaining clip DIMM slot key A DIMM is properly seated. The DIMM might get 1 damaged when it fits in the wrong direction to...
... DIMM. 3. The following sub‑sections describe the slots and the expansion cards that it flips out with your fingers when pressing the retaining clips. ASUS H81M-K 1-9 2 DIMM notch 1 1 Unlocked retaining clip DIMM slot key A DIMM is properly seated. The DIMM might get 1 damaged when it fits in the wrong direction to...
H81M-K User's Manual
Page 19
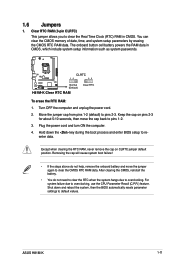
... button cell battery powers the RAM data in CMOS. Plug the power cord and turn ON the computer. 4. 1.6 Jumpers 1. H81M-K CLRTC 12 23 Normal (Default) H81M-K Clear RTC RAM Clear RTC To erase the RTC RAM: 1. Hold down and reboot the system, then the BIOS automatically resets...when clearing the RTC RAM, never remove the cap on pins 2-3 for about 5-10 seconds, then move the jumper again to pins 1-2. 3. ASUS H81M-K 1-11 Shut down the key during the boot process and enter BIOS setup to overclocking. Keep the cap on CLRTC jumper default position. Move the...
... button cell battery powers the RAM data in CMOS. Plug the power cord and turn ON the computer. 4. 1.6 Jumpers 1. H81M-K CLRTC 12 23 Normal (Default) H81M-K Clear RTC RAM Clear RTC To erase the RTC RAM: 1. Hold down and reboot the system, then the BIOS automatically resets...when clearing the RTC RAM, never remove the cap on pins 2-3 for about 5-10 seconds, then move the jumper again to pins 1-2. 3. ASUS H81M-K 1-11 Shut down the key during the boot process and enter BIOS setup to overclocking. Keep the cap on CLRTC jumper default position. Move the...
H81M-K User's Manual
Page 21
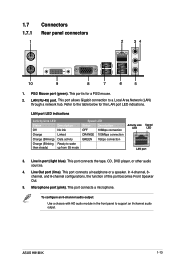
... tape, CD, DVD player, or other audio sources. 4. 1.7 Connectors 1.7.1 Rear panel connectors 1 2 34 10 9 8 7 6 5 1. LAN (RJ-45) port. Line Out port (lime). Microphone port (pink). ASUS H81M-K 1-13 This port connects a microphone. LAN port LED indications Activity/Link LED Status Description Off No link Orange Linked Orange (Blinking) Data activity Orange (Blinking...
... tape, CD, DVD player, or other audio sources. 4. 1.7 Connectors 1.7.1 Rear panel connectors 1 2 34 10 9 8 7 6 5 1. LAN (RJ-45) port. Line Out port (lime). Microphone port (pink). ASUS H81M-K 1-13 This port connects a microphone. LAN port LED indications Activity/Link LED Status Description Off No link Orange Linked Orange (Blinking) Data activity Orange (Blinking...
H81M-K User's Manual
Page 23
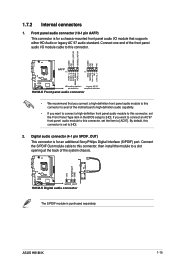
... panel audio connector • We recommend that supports either HD Audio or legacy AC`97 audio standard. ASUS H81M-K 1-15 Connect one end of the front panel audio I /O module that you want to connect an AC'97 front panel audio module to this connector, ..., this connector is set the Front Panel Type item in the BIOS setup to this connector to avail of the system chassis. +5V SPDIFOUT GND H81M-K SPDIF_OUT H81M-K Digital audio connector The S/PDIF module is purchased separately. Front panel audio connector (10-1 pin AAFP) This connector is for a chassis-mounted front panel...
... panel audio connector • We recommend that supports either HD Audio or legacy AC`97 audio standard. ASUS H81M-K 1-15 Connect one end of the front panel audio I /O module that you want to connect an AC'97 front panel audio module to this connector, ..., this connector is set the Front Panel Type item in the BIOS setup to this connector to avail of the system chassis. +5V SPDIFOUT GND H81M-K SPDIF_OUT H81M-K Digital audio connector The S/PDIF module is purchased separately. Front panel audio connector (10-1 pin AAFP) This connector is for a chassis-mounted front panel...
H81M-K User's Manual
Page 25
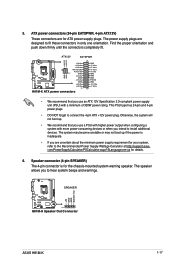
...boot up . • We recommend that you to hear system beeps and warnings. +5V GND GND Speaker Out SPEAKER H81M-K PIN 1 H81M-K Speaker Out Connector ASUS H81M-K 1-17 The power supply plugs are for your system, refer to install additional devices. Find the proper orientation and push... connector (4-pin SPEAKER) The 4-pin connector is inadequate. • If you intend to the Recommended Power Supply Wattage Calculator at http://support.asus. The speaker allows you use a PSU with higher power output when configuring a system with a minimum of 300W power rating. ATX12V EATXPWR ...
...boot up . • We recommend that you to hear system beeps and warnings. +5V GND GND Speaker Out SPEAKER H81M-K PIN 1 H81M-K Speaker Out Connector ASUS H81M-K 1-17 The power supply plugs are for your system, refer to install additional devices. Find the proper orientation and push... connector (4-pin SPEAKER) The 4-pin connector is inadequate. • If you intend to the Recommended Power Supply Wattage Calculator at http://support.asus. The speaker allows you use a PSU with higher power output when configuring a system with a minimum of 300W power rating. ATX12V EATXPWR ...
H81M-K User's Manual
Page 27
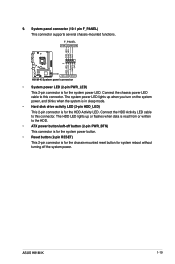
... reset button for system reboot without turning off the system power. Ground HWRST# (NC) H81M-K PIN 1 +HDD_LED RESET H81M-K System panel connector • System power LED (2-pin PWR_LED) This 2-pin connector is for the system power LED. ASUS H81M-K 1-19 The HDD LED lights up when you turn on the system power, and blinks...
... reset button for system reboot without turning off the system power. Ground HWRST# (NC) H81M-K PIN 1 +HDD_LED RESET H81M-K System panel connector • System power LED (2-pin PWR_LED) This 2-pin connector is for the system power LED. ASUS H81M-K 1-19 The HDD LED lights up when you turn on the system power, and blinks...
H81M-K User's Manual
Page 29
...drive. Double-click the ASSETUP.EXE to display their respective menus. Refer to your hardware. Visit the ASUS website at any time without notice. To run the DVD. ASUS H81M-K 1-21 Always install the latest OS version and corresponding updates to maximize the features of your OS ... the motherboard package contains the drivers, software applications, and utilities that you can install to install If Autorun is enabled in your ASUS motherboard. The following screen is for updates. Click an icon to display Support DVD/motherboard information Click to display more items Click...
...drive. Double-click the ASSETUP.EXE to display their respective menus. Refer to your hardware. Visit the ASUS website at any time without notice. To run the DVD. ASUS H81M-K 1-21 Always install the latest OS version and corresponding updates to maximize the features of your OS ... the motherboard package contains the drivers, software applications, and utilities that you can install to install If Autorun is enabled in your ASUS motherboard. The following screen is for updates. Click an icon to display Support DVD/motherboard information Click to display more items Click...
H81M-K User's Manual
Page 31
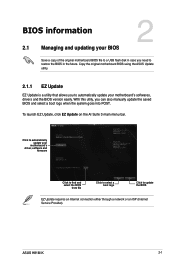
ASUS H81M-K 2-1 BIOS information 2.1 Managing and updating your BIOS 2 Save a copy of the original motherboard BIOS file to a USB flash disk in the future. To launch EZ ... AI Suite 3 main menu bar. Click to automatically update your motherboard's softwares, drivers and the BIOS version easily. Copy the original motherboard BIOS using the ASUS Update utility. 2.1.1 EZ Update EZ Update is a utility that allows you to automatically update your motherboard's driver, software and firmware Click to find and select...
ASUS H81M-K 2-1 BIOS information 2.1 Managing and updating your BIOS 2 Save a copy of the original motherboard BIOS file to a USB flash disk in the future. To launch EZ ... AI Suite 3 main menu bar. Click to automatically update your motherboard's softwares, drivers and the BIOS version easily. Copy the original motherboard BIOS using the ASUS Update utility. 2.1.1 EZ Update EZ Update is a utility that allows you to automatically update your motherboard's driver, software and firmware Click to find and select...
H81M-K User's Manual
Page 33
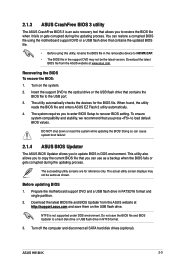
... during the updating process. Recovering the BIOS To recover the BIOS: 1. When found, the utility reads the BIOS file and enters ASUS EZ Flash 2 utility automatically. 4. The system requires you to enter BIOS Setup to copy the current BIOS file that you can ...removable device to load default BIOS values. 2.1.3 ASUS CrashFree BIOS 3 utility The ASUS CrashFree BIOS 3 is not supported under DOS environment. ASUS H81M-K 2-3 Do not save them on the system. 2. You can cause system boot failure! 2.1.4 ASUS BIOS Updater The ASUS BIOS Updater allows you to a hard disk drive...
... during the updating process. Recovering the BIOS To recover the BIOS: 1. When found, the utility reads the BIOS file and enters ASUS EZ Flash 2 utility automatically. 4. The system requires you to enter BIOS Setup to copy the current BIOS file that you can ...removable device to load default BIOS values. 2.1.3 ASUS CrashFree BIOS 3 utility The ASUS CrashFree BIOS 3 is not supported under DOS environment. ASUS H81M-K 2-3 Do not save them on the system. 2. You can cause system boot failure! 2.1.4 ASUS BIOS Updater The ASUS BIOS Updater allows you to a hard disk drive...
H81M-K User's Manual
Page 35
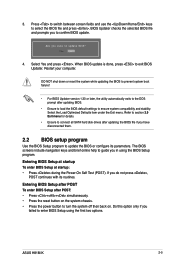
... to turn the system off then back on the system chassis. • Press the power button to enter BIOS Setup using the BIOS Setup program. ASUS H81M-K 2-5 Select Yes and press . DO NOT shut down or reset the system while updating the BIOS to prevent system boot failure! • For BIOS Updater...
... to turn the system off then back on the system chassis. • Press the power button to enter BIOS Setup using the BIOS Setup program. ASUS H81M-K 2-5 Select Yes and press . DO NOT shut down or reset the system while updating the BIOS to prevent system boot failure! • For BIOS Updater...
H81M-K User's Manual
Page 37
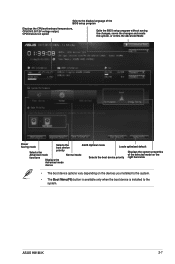
... setup program without saving the changes, saves the changes and resets the system, or enters the Advanced Mode Power Saving mode Selects the boot device ASUS Optimal mode Loads optimized default Selects the priority Displays the system properties Advanced mode Normal mode of the selected mode on the functions Selects the... the devices you installed to the system. • The Boot Menu(F8) button is available only when the boot device is installed to the system. ASUS H81M-K 2-7
... setup program without saving the changes, saves the changes and resets the system, or enters the Advanced Mode Power Saving mode Selects the boot device ASUS Optimal mode Loads optimized default Selects the priority Displays the system properties Advanced mode Normal mode of the selected mode on the functions Selects the... the devices you installed to the system. • The Boot Menu(F8) button is available only when the boot device is installed to the system. ASUS H81M-K 2-7
H81M-K User's Manual
Page 39
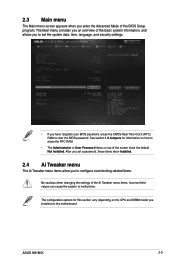
See section 1.6 Jumpers for this section vary depending on the CPU and DIMM model you installed on the motherboard. ASUS H81M-K 2-9 After you set the system date, time, language, and security settings. • If you to configure overclocking-related items. Be cautious when changing the settings ...
See section 1.6 Jumpers for this section vary depending on the CPU and DIMM model you installed on the motherboard. ASUS H81M-K 2-9 After you set the system date, time, language, and security settings. • If you to configure overclocking-related items. Be cautious when changing the settings ...
H81M-K User's Manual
Page 41
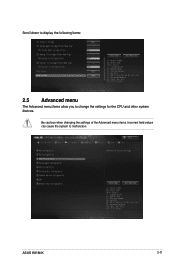
Be cautious when changing the settings of the Advanced menu items. Incorrect field values can cause the system to change the settings for the CPU and other system devices. ASUS H81M-K 2-11 Scroll down to display the following items: 2.5 Advanced menu The Advanced menu items allow you to malfunction.
Be cautious when changing the settings of the Advanced menu items. Incorrect field values can cause the system to change the settings for the CPU and other system devices. ASUS H81M-K 2-11 Scroll down to display the following items: 2.5 Advanced menu The Advanced menu items allow you to malfunction.
H81M-K User's Manual
Page 43
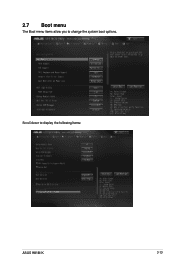
2.7 Boot menu The Boot menu items allow you to display the following items: ASUS H81M-K 2-13 Scroll down to change the system boot options.
2.7 Boot menu The Boot menu items allow you to display the following items: ASUS H81M-K 2-13 Scroll down to change the system boot options.
H81M-K User's Manual
Page 45
... approved by one or more of the device. Cut appareil numérique de la Classe B est conforme à la norme NMB-003 du Canada. ASUS H81M-K A-1 Appendices Notices Federal Communications Commission Statement This device complies with Part 15 of the Canadian interference-causing equipment regulations. Changes or modifications to Part 15...
... approved by one or more of the device. Cut appareil numérique de la Classe B est conforme à la norme NMB-003 du Canada. ASUS H81M-K A-1 Appendices Notices Federal Communications Commission Statement This device complies with Part 15 of the Canadian interference-causing equipment regulations. Changes or modifications to Part 15...


