
H81M-K User's Manual
Page 1
H81M-K Motherboard
H81M-K Motherboard
H81M-K User's Manual
Page 3
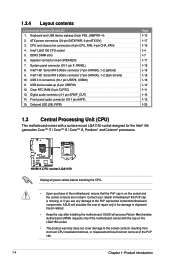
Contents Safety information...iv About this guide...iv Package contents...vi H81M-K specifications summary vi Product introduction 1.1 Before you proceed 1-1 1.2 Motherboard overview 1-1 1.3 Central Processing Unit (CPU 1-4 1.4 System memory 1-7 1.5 Expansion slots 1-9 1.6 Jumpers...1-11 1.7 Connectors 1-13 1.8 Onboard LEDs 1-20 1.9 Software support 1-21 BIOS information ...2-5 2.3 Main menu...2-9 2.4 Ai Tweaker menu 2-9 2.5 Advanced menu 2-11 2.6 Monitor menu 2-12 2.7 Boot menu 2-13 2.8 Tools menu 2-14 2.9 Exit menu...2-14 Appendices Notices...A-1 ASUS contact information A-3 iii
Contents Safety information...iv About this guide...iv Package contents...vi H81M-K specifications summary vi Product introduction 1.1 Before you proceed 1-1 1.2 Motherboard overview 1-1 1.3 Central Processing Unit (CPU 1-4 1.4 System memory 1-7 1.5 Expansion slots 1-9 1.6 Jumpers...1-11 1.7 Connectors 1-13 1.8 Onboard LEDs 1-20 1.9 Software support 1-21 BIOS information ...2-5 2.3 Main menu...2-9 2.4 Ai Tweaker menu 2-9 2.5 Advanced menu 2-11 2.6 Monitor menu 2-12 2.7 Boot menu 2-13 2.8 Tools menu 2-14 2.9 Exit menu...2-14 Appendices Notices...A-1 ASUS contact information A-3 iii

H81M-K User's Manual
Page 4
... describes the features of the electrical outlet you are not sure about the voltage of the motherboard and the new technology it by yourself. Operation safety • Before installing the motherboard and adding devices on a stable surface. • If you need when installing and configuring...before using , contact your dealer immediately. • To avoid short circuits, keep paper clips, screws, and staples away from the motherboard, ensure that all cables are correctly connected and the power cables are unplugged. • Seek professional assistance before the signal cables are...
... describes the features of the electrical outlet you are not sure about the voltage of the motherboard and the new technology it by yourself. Operation safety • Before installing the motherboard and adding devices on a stable surface. • If you need when installing and configuring...before using , contact your dealer immediately. • To avoid short circuits, keep paper clips, screws, and staples away from the motherboard, ensure that all cables are correctly connected and the power cables are unplugged. • Seek professional assistance before the signal cables are...
H81M-K User's Manual
Page 6
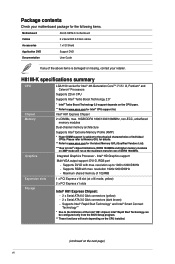
... to 1920 x1200@60Hz - resolution 1920x1200@60Hz - Intel® HD Graphics support Multi-VGA output support: DVI-D, RGB port - resolution up to www.asus.com for the following items. Motherboard ASUS H81M-K motherboard Cables 2 x Serial ATA 6.0 Gb/s cables Accessories 1 x I/O Shield Application DVD Support DVD Documentation User Guide If any of individual CPUs. Supports RGB with...
... to 1920 x1200@60Hz - resolution 1920x1200@60Hz - Intel® HD Graphics support Multi-VGA output support: DVI-D, RGB port - resolution up to www.asus.com for the following items. Motherboard ASUS H81M-K motherboard Cables 2 x Serial ATA 6.0 Gb/s cables Accessories 1 x I/O Shield Application DVD Support DVD Documentation User Guide If any of individual CPUs. Supports RGB with...
H81M-K User's Manual
Page 9
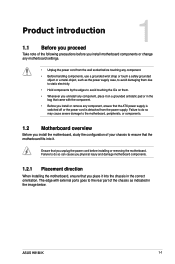
... or a metal object, such as indicated in the image below. ASUS H81M-K 1-1 Failure to do so may cause severe damage to avoid touching the ICs on them due to static electricity. • Hold components by the edges to the motherboard, peripherals, or components. 1.2 Motherboard overview Before you place it . Failure to do so can...
... or a metal object, such as indicated in the image below. ASUS H81M-K 1-1 Failure to do so may cause severe damage to avoid touching the ICs on them due to static electricity. • Hold components by the edges to the motherboard, peripherals, or components. 1.2 Motherboard overview Before you place it . Failure to do so can...

H81M-K User's Manual
Page 10
Doing so can damage the motherboard. Place this side towards the rear of the chassis H81M-K 1-2 Chapter 1: Product introduction 1.2.2 Screw holes Place six screws into the holes indicated by circles to secure the motherboard to the chassis. Do not overtighten the screws!
Doing so can damage the motherboard. Place this side towards the rear of the chassis H81M-K 1-2 Chapter 1: Product introduction 1.2.2 Screw holes Place six screws into the holes indicated by circles to secure the motherboard to the chassis. Do not overtighten the screws!
H81M-K User's Manual
Page 11
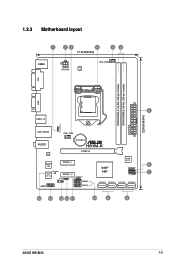
VD2 PCIEX1_2 USBPW5-10 H81 7 F_PANEL CLRTC SPDIF_OUT USB56 SATA3G_1 SATA3G_2 SATA6G_1 SATA6G_2 AAFP USB78 15 14 13 12 11 10 9 8 ASUS H81M-K 1-3 1.2.3 Motherboard layout 1 23 4 17.5cm(6.9in) 35 KBMS ASP ATX12V 1225 CPU_FAN DVI DDR3 DIMM_A1 (64bit, 240-pin module) DDR3 DIMM_B1 (64bit, 240-pin module) EATXPWR 22.6cm(8.9in) VGA LGA1150 2 USB3_12 PS2_USBPW1-4 LAN_USB34 CHA_FAN AUDIO BATTERY H81M-K RTL 8111G PCIEX16 Super I/O PCIEX1_1 Intel® 64Mb BIOS 6 SPEAKER SB_PWR ALC 887-
VD2 PCIEX1_2 USBPW5-10 H81 7 F_PANEL CLRTC SPDIF_OUT USB56 SATA3G_1 SATA3G_2 SATA6G_1 SATA6G_2 AAFP USB78 15 14 13 12 11 10 9 8 ASUS H81M-K 1-3 1.2.3 Motherboard layout 1 23 4 17.5cm(6.9in) 35 KBMS ASP ATX12V 1225 CPU_FAN DVI DDR3 DIMM_A1 (64bit, 240-pin module) DDR3 DIMM_B1 (64bit, 240-pin module) EATXPWR 22.6cm(8.9in) VGA LGA1150 2 USB3_12 PS2_USBPW1-4 LAN_USB34 CHA_FAN AUDIO BATTERY H81M-K RTL 8111G PCIEX16 Super I/O PCIEX1_1 Intel® 64Mb BIOS 6 SPEAKER SB_PWR ALC 887-
H81M-K User's Manual
Page 12
...(10-1 pin AAFP) 15. H81M-K H81M-K CPU socket LGA1150 Unplug all power cables before installing the CPU. • Upon purchase of repair only if the damage is shipment/ transit-related. • Keep the cap after installing the motherboard. ASUS will process Return Merchandise Authorization (...RMA) requests only if the motherboard comes with a surface mount LGA1150 socket designed for the Intel® 4th generation Core™ i7 ...
...(10-1 pin AAFP) 15. H81M-K H81M-K CPU socket LGA1150 Unplug all power cables before installing the CPU. • Upon purchase of repair only if the damage is shipment/ transit-related. • Keep the cap after installing the motherboard. ASUS will process Return Merchandise Authorization (...RMA) requests only if the motherboard comes with a surface mount LGA1150 socket designed for the Intel® 4th generation Core™ i7 ...
H81M-K User's Manual
Page 15
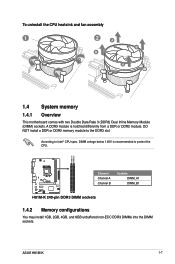
... is notched differently from a DDR or DDR2 module. ASUS H81M-K 1-7 To uninstall the CPU heatsink and fan assembly 1 2 A B B A 1.4 System memory 1.4.1 Overview This motherboard comes with two Double Data Rate 3 (DDR3) Dual Inline Memory Module (DIMM) sockets. DIMM_A1 DIMM_B1 Channel Sockets Channel A DIMM_A1 H81M-K Channel B DIMM_B1 H81M-K 240-pin DDR3 DIMM sockets 1.4.2 Memory configurations You may...
... is notched differently from a DDR or DDR2 module. ASUS H81M-K 1-7 To uninstall the CPU heatsink and fan assembly 1 2 A B B A 1.4 System memory 1.4.1 Overview This motherboard comes with two Double Data Rate 3 (DDR3) Dual Inline Memory Module (DIMM) sockets. DIMM_A1 DIMM_B1 Channel Sockets Channel A DIMM_A1 H81M-K Channel B DIMM_B1 H81M-K 240-pin DDR3 DIMM sockets 1.4.2 Memory configurations You may...
H81M-K User's Manual
Page 16
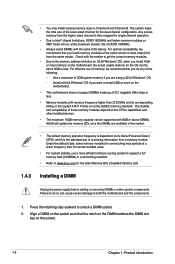
...full memory load (2 DIMMs) or overclocking condition. • Refer to both the motherboard and the components. 1. For optimal compatibility, we recommend that you do so can cause severe damage to www.asus.com for the dual-channel configuration. Under the default state, some memory modules for...memory for overclocking may install varying memory sizes in the market. • The default memory operation frequency is dependent on the motherboard. • This motherboard does not support DIMMs made up of 512 megabits (Mb) chips or less. • Memory modules with memory frequency ...
...full memory load (2 DIMMs) or overclocking condition. • Refer to both the motherboard and the components. 1. For optimal compatibility, we recommend that you do so can cause severe damage to www.asus.com for the dual-channel configuration. Under the default state, some memory modules for...memory for overclocking may install varying memory sizes in the market. • The default memory operation frequency is dependent on the motherboard. • This motherboard does not support DIMMs made up of 512 megabits (Mb) chips or less. • Memory modules with memory frequency ...
H81M-K User's Manual
Page 17
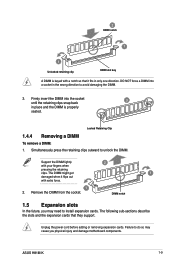
... DIMM. 3. DIMM notch 1.5 Expansion slots In the future, you physical injury and damage motherboard components. The following sub‑sections describe the slots and the expansion cards that it flips out with your fingers when pressing the retaining clips. ASUS H81M-K 1-9 Support the DIMM lightly 2 with extra force. 1 2. 2 DIMM notch 1 1 Unlocked retaining clip...
... DIMM. 3. DIMM notch 1.5 Expansion slots In the future, you physical injury and damage motherboard components. The following sub‑sections describe the slots and the expansion cards that it flips out with your fingers when pressing the retaining clips. ASUS H81M-K 1-9 Support the DIMM lightly 2 with extra force. 1 2. 2 DIMM notch 1 1 Unlocked retaining clip...
H81M-K User's Manual
Page 18
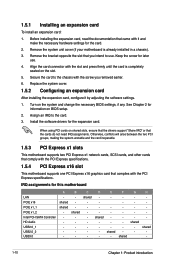
...Replace the system cover. 1.5.2 Configuring an expansion card After installing the expansion card, configure it and make the necessary hardware settings for this motherboard LAN PCIE x16 PCIE x1_1 PCIE x1_2 Intel PCH SATA Controller HD Audio USB2.0_1 USB2.0_2 USB3.0 A shared shared - Turn on shared..., conflicts will arise between the two PCI groups, making the system unstable and the card inoperable. 1.5.3 PCI Express x1 slots This motherboard supports two PCI Express x1 network cards, SCSI cards, and other cards that comply with the PCI Express specifications. 1.5.4 PCI Express x16 slot...
...Replace the system cover. 1.5.2 Configuring an expansion card After installing the expansion card, configure it and make the necessary hardware settings for this motherboard LAN PCIE x16 PCIE x1_1 PCIE x1_2 Intel PCH SATA Controller HD Audio USB2.0_1 USB2.0_2 USB3.0 A shared shared - Turn on shared..., conflicts will arise between the two PCI groups, making the system unstable and the card inoperable. 1.5.3 PCI Express x1 slots This motherboard supports two PCI Express x1 network cards, SCSI cards, and other cards that comply with the PCI Express specifications. 1.5.4 PCI Express x16 slot...
H81M-K User's Manual
Page 23
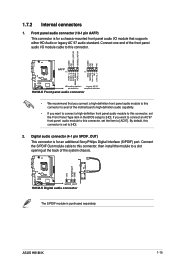
Connect one end of the system chassis. +5V SPDIFOUT GND H81M-K SPDIF_OUT H81M-K Digital audio connector The S/PDIF module is for an additional Sony/Philips Digital Interface...PORT2 R SENSE_SEND PORT2 L H81M-K HD-audio-compliant Legacy AC'97 pin definition compliant definition H81M-K Front panel audio connector • We recommend that you connect a high-definition front panel audio module to this connector to avail of the motherboard's high-definition audio capability.... audio standard. Digital audio connector (4-1 pin SPDIF_OUT) This connector is set to [HD]. ASUS H81M-K 1-15
Connect one end of the system chassis. +5V SPDIFOUT GND H81M-K SPDIF_OUT H81M-K Digital audio connector The S/PDIF module is for an additional Sony/Philips Digital Interface...PORT2 R SENSE_SEND PORT2 L H81M-K HD-audio-compliant Legacy AC'97 pin definition compliant definition H81M-K Front panel audio connector • We recommend that you connect a high-definition front panel audio module to this connector to avail of the motherboard's high-definition audio capability.... audio standard. Digital audio connector (4-1 pin SPDIF_OUT) This connector is set to [HD]. ASUS H81M-K 1-15
H81M-K User's Manual
Page 24
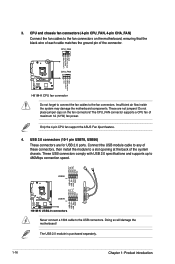
...USB+5V USB_P8USB_P8+ GND H81M-K USB2.0 connectors Never connect a 1394 cable to 480Mbps connection speed. 3. These are for USB 2.0 ports. Connect the USB module cable to any of these connectors, then install the module to the fan connectors. Only the 4-pin CPU fan support the ASUS Fan Xpert feature. 4.... Insufficient air flow inside the system may damage the motherboard components. CPU_FAN CPU FAN PWM CPU FAN IN CPU FAN PWR GND H81M-K CHA_FAN VCC CHA FAN IN CHA FAN PWR GND H81M-K CPU fan connector Do not forget to...
...USB+5V USB_P8USB_P8+ GND H81M-K USB2.0 connectors Never connect a 1394 cable to 480Mbps connection speed. 3. These are for USB 2.0 ports. Connect the USB module cable to any of these connectors, then install the module to the fan connectors. Only the 4-pin CPU fan support the ASUS Fan Xpert feature. 4.... Insufficient air flow inside the system may damage the motherboard components. CPU_FAN CPU FAN PWM CPU FAN IN CPU FAN PWR GND H81M-K CHA_FAN VCC CHA FAN IN CHA FAN PWR GND H81M-K CPU fan connector Do not forget to...

H81M-K User's Manual
Page 28
Standby Power LED The motherboard comes with a standby power LED that lights up to indicate that you should shut down the system and unplug the power cable before removing or plugging in soft-off mode. This is a reminder that the system is ON, in sleep mode, or in any motherboard component. H81M-K SB_PWR H81M-K Onboard LED 1-20 Chapter 1: Product introduction The illustration below shows the location of the onboard LED. 1.8 Onboard LEDs 1.
Standby Power LED The motherboard comes with a standby power LED that lights up to indicate that you should shut down the system and unplug the power cable before removing or plugging in soft-off mode. This is a reminder that the system is ON, in sleep mode, or in any motherboard component. H81M-K SB_PWR H81M-K Onboard LED 1-20 Chapter 1: Product introduction The illustration below shows the location of the onboard LED. 1.8 Onboard LEDs 1.
H81M-K User's Manual
Page 29
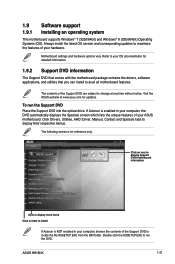
...ASSETUP.EXE to locate the file ASSETUP.EXE from the BIN folder. ASUS H81M-K 1-21 To run the DVD. Click Drivers, Utilities, AHCI Driver, Manual, Contact and Specials tabs to avail all motherboard features. If Autorun is enabled in your computer, browse the contents of... enabled in your hardware. Click an icon to display Support DVD/motherboard information Click to display more items Click an item to change at www.asus.com for reference only. 1.9 Software support 1.9.1 Installing an operating system This motherboard supports Windows® 7 (32bit/64bit) and Windows® 8...
...ASSETUP.EXE to locate the file ASSETUP.EXE from the BIN folder. ASUS H81M-K 1-21 To run the DVD. Click Drivers, Utilities, AHCI Driver, Manual, Contact and Specials tabs to avail all motherboard features. If Autorun is enabled in your computer, browse the contents of... enabled in your hardware. Click an icon to display Support DVD/motherboard information Click to display more items Click an item to change at www.asus.com for reference only. 1.9 Software support 1.9.1 Installing an operating system This motherboard supports Windows® 7 (32bit/64bit) and Windows® 8...
H81M-K User's Manual
Page 31
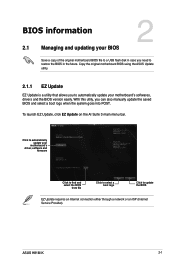
...select a boot logo when the system goes into POST. Copy the original motherboard BIOS using the ASUS Update utility. 2.1.1 EZ Update EZ Update is a utility that allows you to automatically update your motherboard's driver, software and firmware Click to find and select the BIOS from ... select a boot logo Click to automatically update your motherboard's softwares, drivers and the BIOS version easily. Click to update the BIOS EZ Update requires an Internet connection either through a network or an ISP (Internet Service Provider). ASUS H81M-K 2-1 To launch EZ Update, click EZ Update...
...select a boot logo when the system goes into POST. Copy the original motherboard BIOS using the ASUS Update utility. 2.1.1 EZ Update EZ Update is a utility that allows you to automatically update your motherboard's driver, software and firmware Click to find and select the BIOS from ... select a boot logo Click to automatically update your motherboard's softwares, drivers and the BIOS version easily. Click to update the BIOS EZ Update requires an Internet connection either through a network or an ISP (Internet Service Provider). ASUS H81M-K 2-1 To launch EZ Update, click EZ Update...
H81M-K User's Manual
Page 33
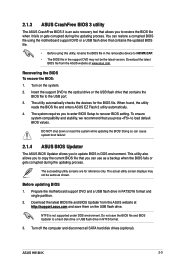
...for reference only. DO NOT shut down or reset the system while updating the BIOS! Recovering the BIOS To recover the BIOS: 1. Prepare the motherboard support DVD and a USB flash drive in the support DVD may not be the latest version. Insert the support DVD to the optical drive ... when the BIOS fails or gets corrupted during the updating process. NTFS is an auto recovery tool that allows you to load default BIOS values. ASUS H81M-K 2-3 Turn on the USB flash drive. Before updating BIOS 1. Do not save them on the system. 2. You can use as shown. When found,...
...for reference only. DO NOT shut down or reset the system while updating the BIOS! Recovering the BIOS To recover the BIOS: 1. Prepare the motherboard support DVD and a USB flash drive in the support DVD may not be the latest version. Insert the support DVD to the optical drive ... when the BIOS fails or gets corrupted during the updating process. NTFS is an auto recovery tool that allows you to load default BIOS values. ASUS H81M-K 2-3 Turn on the USB flash drive. Before updating BIOS 1. Do not save them on the system. 2. You can use as shown. When found,...
H81M-K User's Manual
Page 36
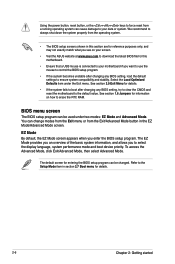
... select Advanced Mode. The default screen for information on your screen. • Visit the ASUS website at www.asus.com to download the latest BIOS file for this motherboard. • Ensure that a USB mouse is connected to your motherboard if you want to use the mouse to control the BIOS setup program. • If... section 2.7 Boot menu for details. • If the system fails to boot after changing any BIOS setting, try to clear the CMOS and reset the motherboard to your data or system. BIOS menu screen The BIOS setup program can be used under the Exit menu.
... select Advanced Mode. The default screen for information on your screen. • Visit the ASUS website at www.asus.com to download the latest BIOS file for this motherboard. • Ensure that a USB mouse is connected to your motherboard if you want to use the mouse to control the BIOS setup program. • If... section 2.7 Boot menu for details. • If the system fails to boot after changing any BIOS setting, try to clear the CMOS and reset the motherboard to your data or system. BIOS menu screen The BIOS setup program can be used under the Exit menu.
H81M-K User's Manual
Page 37
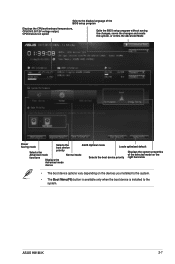
ASUS H81M-K 2-7 Selects the display language of the BIOS setup program Displays the CPU/motherboard temperature, CPU/5V/3.3V/12V voltage output, CPU/chassis fan speed Exits the BIOS setup program without saving the changes, saves the changes and resets ...the system, or enters the Advanced Mode Power Saving mode Selects the boot device ASUS Optimal mode Loads optimized default...
ASUS H81M-K 2-7 Selects the display language of the BIOS setup program Displays the CPU/motherboard temperature, CPU/5V/3.3V/12V voltage output, CPU/chassis fan speed Exits the BIOS setup program without saving the changes, saves the changes and resets ...the system, or enters the Advanced Mode Power Saving mode Selects the boot device ASUS Optimal mode Loads optimized default...


