
User Manual
Page 2
...the name, model number and version, as the corresponding binary/object code. This offer is defaced or missing. Product warranty or service will be much obliged if you . SPECIFICATIONS AND INFORMATION CONTAINED IN THIS MANUAL ARE FURNISHED FOR INFORMATIONAL USE ONLY, AND ARE SUBJECT TO CHANGE AT ANY ...carrier and the location where you wish to duly provide complete source code as required under the same license as stated in receipt of the product including the GPL Software and/or LGPL Software, which you want to have it from http://support.asus.com/download; E6728 Second...
...the name, model number and version, as the corresponding binary/object code. This offer is defaced or missing. Product warranty or service will be much obliged if you . SPECIFICATIONS AND INFORMATION CONTAINED IN THIS MANUAL ARE FURNISHED FOR INFORMATIONAL USE ONLY, AND ARE SUBJECT TO CHANGE AT ANY ...carrier and the location where you wish to duly provide complete source code as required under the same license as stated in receipt of the product including the GPL Software and/or LGPL Software, which you want to have it from http://support.asus.com/download; E6728 Second...
User Manual
Page 27
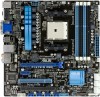
... a LAN card, SCSI card, USB card, and other cards that comply with PCI specifications. 1.8.4 PCI Express x1 slot This motherboard supports PCI Express x1 network cards, SCSI cards, and other cards that comply with the PCI Express specifications. 1.8.5 PCI Express x16 slots This motherboard supports two PCI Express x16 graphics cards that comply with the screw you removed earlier. 6. Unplug the power cord before adding or removing expansion cards. See Chapter 2 for later use . Install the software drivers for the card. 2. Secure the card to use . 4. Align the card connector with...
... a LAN card, SCSI card, USB card, and other cards that comply with PCI specifications. 1.8.4 PCI Express x1 slot This motherboard supports PCI Express x1 network cards, SCSI cards, and other cards that comply with the PCI Express specifications. 1.8.5 PCI Express x16 slots This motherboard supports two PCI Express x16 graphics cards that comply with the screw you removed earlier. 6. Unplug the power cord before adding or removing expansion cards. See Chapter 2 for later use . Install the software drivers for the card. 2. Secure the card to use . 4. Align the card connector with...

User Manual
Page 28
... RAM, never remove the cap on pins 2-3 for better thermal environment. 1.9 Jumpers Clear RTC RAM (CLRTC) This jumper allows you provide sufficient power when running CrossFireX™ mode. See page 1-20 for details. • Connect a chassis fan to the motherboard connector labeled CHA_FAN1/2 when using multiple graphics cards for about 5~10 seconds, then move the jumper again to overclocking. The onboard button cell battery powers the RAM data in CMOS. F1A75-M PRO CLRTC 12 23 Normal (Default) F1A75-M PRO Clear RTC RAM Clear...
... RAM, never remove the cap on pins 2-3 for better thermal environment. 1.9 Jumpers Clear RTC RAM (CLRTC) This jumper allows you provide sufficient power when running CrossFireX™ mode. See page 1-20 for details. • Connect a chassis fan to the motherboard connector labeled CHA_FAN1/2 when using multiple graphics cards for about 5~10 seconds, then move the jumper again to overclocking. The onboard button cell battery powers the RAM data in CMOS. F1A75-M PRO CLRTC 12 23 Normal (Default) F1A75-M PRO Clear RTC RAM Clear...

User Manual
Page 29
This port connects an external audio output device via an optical S/PDIF cable. 3. This 15-pin port is for a VGA monitor or other audio sources. 8. Center/Subwoofer port (orange). This port connects to a microphone. 10. This port connects to the rear speakers in the 8-channel audio configuration. ASUS F1A75-M PRO 1-17 This port is for a PS/2 keyboard or PS/2 mouse. 2. This port connects to the center/subwoofer speakers. 6. This port allows Gigabit connection to a headphone or a speaker. LAN port LED indications Activity/Link LED Status...
This port connects an external audio output device via an optical S/PDIF cable. 3. This 15-pin port is for a VGA monitor or other audio sources. 8. Center/Subwoofer port (orange). This port connects to a microphone. 10. This port connects to the rear speakers in the 8-channel audio configuration. ASUS F1A75-M PRO 1-17 This port is for a PS/2 keyboard or PS/2 mouse. 2. This port connects to the center/subwoofer speakers. 6. This port allows Gigabit connection to a headphone or a speaker. LAN port LED indications Activity/Link LED Status...
User Manual
Page 33
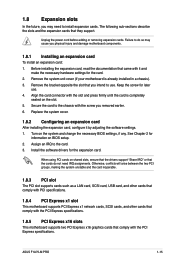
.../s connectors • These connectors are using Windows® XP SP3 or later version. • When using Serial ATA hard disk drives. In IDE mode, you are set the type of the system chassis. Serial port connector (10-1 pin COM1) This connector is available only if you can create a RAID 0, RAID 1, or RAID 10 configuration through the onboard controller. Connect the serial port module cable to this connector, then install the module to a slot opening at the back of the SATA connectors in the BIOS to [RAID]. COM1 PIN 1 F1A75-M PRO F1A75-M PRO Serial port...
.../s connectors • These connectors are using Windows® XP SP3 or later version. • When using Serial ATA hard disk drives. In IDE mode, you are set the type of the system chassis. Serial port connector (10-1 pin COM1) This connector is available only if you can create a RAID 0, RAID 1, or RAID 10 configuration through the onboard controller. Connect the serial port module cable to this connector, then install the module to a slot opening at the back of the SATA connectors in the BIOS to [RAID]. COM1 PIN 1 F1A75-M PRO F1A75-M PRO Serial port...
User Manual
Page 35
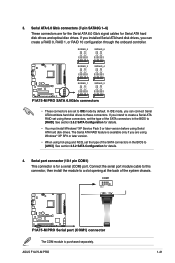
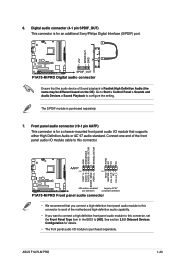
... connect a high definition front panel audio module to this connector. ASUS F1A75-M PRO 1-23 See section 2.5.5 Onboard Devices Configuration for an additional Sony/Philips Digital Interface (S/PDIF) port. +5V SPDIFOUT GND F1A75-M PRO SPDIF_OUT F1A75-M PRO Digital audio connector Ensure that the audio device of the motherboard high-definition audio capability. • If you connect a high-definition front panel audio module to this connector to [HD]. Go to Start > Control Panel > Sounds and Audio Devices > Sound Playback to this connector, set the Front Panel Type item in the BIOS...
... connect a high definition front panel audio module to this connector. ASUS F1A75-M PRO 1-23 See section 2.5.5 Onboard Devices Configuration for an additional Sony/Philips Digital Interface (S/PDIF) port. +5V SPDIFOUT GND F1A75-M PRO SPDIF_OUT F1A75-M PRO Digital audio connector Ensure that the audio device of the motherboard high-definition audio capability. • If you connect a high-definition front panel audio module to this connector to [HD]. Go to Start > Control Panel > Sounds and Audio Devices > Sound Playback to this connector, set the Front Panel Type item in the BIOS...

User Manual
Page 37
....asus.com after using the MemOK! MemOK! switch lights continuously. switch until the DRAM_LED starts blinking to begin automatic memory compatibility tuning for overclockers and gamers who continually change settings to enhance system performance. 1. F1A75-M PRO F1A75-M PRO MemOK! Turn off the computer and unplug the power cord for about 30 seconds for the exact location of failsafe settings. Press and hold the MemOK! switch Installing DIMMs that you that the BIOS...
....asus.com after using the MemOK! MemOK! switch lights continuously. switch until the DRAM_LED starts blinking to begin automatic memory compatibility tuning for overclockers and gamers who continually change settings to enhance system performance. 1. F1A75-M PRO F1A75-M PRO MemOK! Turn off the computer and unplug the power cord for about 30 seconds for the exact location of failsafe settings. Press and hold the MemOK! switch Installing DIMMs that you that the BIOS...
User Manual
Page 41
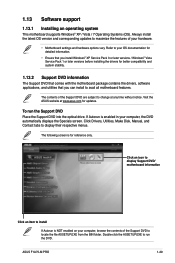
Click Drivers, Utilities, Make Disk, Manual, and Contact tabs to locate the file ASSETUP.EXE from the BIN folder. ASUS F1A75-M PRO 1-29 The contents of the Support DVD are subject to change at www.asus.com for reference only. Visit the ASUS website at any time without notice. To run the DVD. The following screen is NOT enabled on your computer, browse the contents of your hardware...
Click Drivers, Utilities, Make Disk, Manual, and Contact tabs to locate the file ASSETUP.EXE from the BIN folder. ASUS F1A75-M PRO 1-29 The contents of the Support DVD are subject to change at www.asus.com for reference only. Visit the ASUS website at any time without notice. To run the DVD. The following screen is NOT enabled on your computer, browse the contents of your hardware...

User Manual
Page 43
... Suite II. 3. The ASUS Update main screen appears. From the list, select either through a network or an Internet Service Provider (ISP). • This utility is a utility that allows you to manage, save, and update the motherboard BIOS in Windows® environment. • ASUS Update requires an Internet connection either of the original motherboard BIOS file to a USB flash disk in case you wish to download then click Next. The Drivers menu appears. 2. b. c. Select Update BIOS from the Internet...
... Suite II. 3. The ASUS Update main screen appears. From the list, select either through a network or an Internet Service Provider (ISP). • This utility is a utility that allows you to manage, save, and update the motherboard BIOS in Windows® environment. • ASUS Update requires an Internet connection either of the original motherboard BIOS file to a USB flash disk in case you wish to download then click Next. The Drivers menu appears. 2. b. c. Select Update BIOS from the Internet...

User Manual
Page 45
... system boot failure! Turn on the system. 2. Insert the support DVD to the optical drive or the USB flash drive that contains the BIOS file to find the BIOS file, and then press to the Folder Info field. 6. Doing so can restore a corrupted BIOS file using the motherboard support DVD or a USB flash drive that contains the latest BIOS, and then press . 5. The utility automatically checks the devices for the BIOS file. DO NOT shut down or reset...
... system boot failure! Turn on the system. 2. Insert the support DVD to the optical drive or the USB flash drive that contains the BIOS file to find the BIOS file, and then press to the Folder Info field. 6. Doing so can restore a corrupted BIOS file using the motherboard support DVD or a USB flash drive that contains the latest BIOS, and then press . 5. The utility automatically checks the devices for the BIOS file. DO NOT shut down or reset...

User Manual
Page 46
... Enter Setup ↑ and ↓ to move selection ENTER to select boot device ESC to show the BIOS Boot Device Select Menu. At the FreeDOS prompt, type d: and press to switch the disk from the ASUS website at http://support.asus.com and save the BIOS file and BIOS Updater to Drive D (USB flash drive). Download the latest BIOS file and BIOS Updater from Drive C (optical drive) to a hard disk drive or USB flash drive in DOS environment. Turn off the computer and disconnect all SATA hard disk drives (optional). The succeeding utility screens...
... Enter Setup ↑ and ↓ to move selection ENTER to select boot device ESC to show the BIOS Boot Device Select Menu. At the FreeDOS prompt, type d: and press to switch the disk from the ASUS website at http://support.asus.com and save the BIOS file and BIOS Updater to Drive D (USB flash drive). Download the latest BIOS file and BIOS Updater from Drive C (optical drive) to a hard disk drive or USB flash drive in DOS environment. Turn off the computer and disconnect all SATA hard disk drives (optional). The succeeding utility screens...

User Manual
Page 61
... driver installed. Configuration options: [Disabled] [Enabled] OnChip SATA Type [IDE] Allows you want the SATA hard disk drives to report warning messages during the POST. If Port 5-6 are configured as Parallel ATA physical storage devices. [RAID] Set to [RAID] when you want to use the Serial ATA hard disk drives as [AHCI or RAID], the ports can be used only for the BIOS setup program. [Auto] Allows the system to [RAID] or [AHCI]. 2.5.2 SATA Configuration While entering Setup, the BIOS automatically detects the presence of USB devices at startup. OnChip SATA MAX...
... driver installed. Configuration options: [Disabled] [Enabled] OnChip SATA Type [IDE] Allows you want the SATA hard disk drives to report warning messages during the POST. If Port 5-6 are configured as Parallel ATA physical storage devices. [RAID] Set to [RAID] when you want to use the Serial ATA hard disk drives as [AHCI or RAID], the ports can be used only for the BIOS setup program. [Auto] Allows the system to [RAID] or [AHCI]. 2.5.2 SATA Configuration While entering Setup, the BIOS automatically detects the presence of USB devices at startup. OnChip SATA MAX...

User Manual
Page 62
... This item appears only when you set the front panel audio connector (AAFP) mode to legacy AC'97 or highdefinition audio depending on the audio standard that the front panel audio module supports. [HD] Sets the front panel audio connector (AAFP) mode to high definition audio. [AC97] Sets the front panel audio connector (AAFP) mode to [HDMI] for HDMI audio output. 2-20 ASUS F1A75-M PRO And the memory size of Internal Graphics Device will keep memory reserved. Configuration options: [IGFX Video] [PCIE / PCI Video] Integrated Graphics [Auto] Enables the integrated graphics controller.
... This item appears only when you set the front panel audio connector (AAFP) mode to legacy AC'97 or highdefinition audio depending on the audio standard that the front panel audio module supports. [HD] Sets the front panel audio connector (AAFP) mode to high definition audio. [AC97] Sets the front panel audio connector (AAFP) mode to [HDMI] for HDMI audio output. 2-20 ASUS F1A75-M PRO And the memory size of Internal Graphics Device will keep memory reserved. Configuration options: [IGFX Video] [PCIE / PCI Video] Integrated Graphics [Auto] Enables the integrated graphics controller.

User Manual
Page 27
... as a LAN card, SCSI card, USB card, and other cards that comply with PCI specifications. 1.8.4 PCI Express x1 slot This motherboard supports PCI Express x1 network cards, SCSI cards, and other cards that comply with the PCI Express specifications. 1.8.5 PCI Express x16 slots This motherboard supports two PCI Express x16 graphics cards that comply with it by adjusting the software settings. 1. Remove the system unit cover (if your motherboard is completely seated on the system and change the necessary BIOS settings, if any. ASUS F1A75-M PRO 1-15 Assign an IRQ to use . 4.
... as a LAN card, SCSI card, USB card, and other cards that comply with PCI specifications. 1.8.4 PCI Express x1 slot This motherboard supports PCI Express x1 network cards, SCSI cards, and other cards that comply with the PCI Express specifications. 1.8.5 PCI Express x16 slots This motherboard supports two PCI Express x16 graphics cards that comply with it by adjusting the software settings. 1. Remove the system unit cover (if your motherboard is completely seated on the system and change the necessary BIOS settings, if any. ASUS F1A75-M PRO 1-15 Assign an IRQ to use . 4.

User Manual
Page 28
... to overclocking. See page 1-20 for details. • Connect a chassis fan to the motherboard connector labeled CHA_FAN1/2 when using multiple graphics cards for better thermal environment. 1.9 Jumpers Clear RTC RAM (CLRTC) This jumper allows you provide sufficient power when running CrossFireX™ mode. For system failure due to default values. 1-16 Chapter 1: Product introduction Shut down the key during the boot process and enter BIOS setup to clear the Real Time Clock (RTC) RAM in CMOS...
... to overclocking. See page 1-20 for details. • Connect a chassis fan to the motherboard connector labeled CHA_FAN1/2 when using multiple graphics cards for better thermal environment. 1.9 Jumpers Clear RTC RAM (CLRTC) This jumper allows you provide sufficient power when running CrossFireX™ mode. For system failure due to default values. 1-16 Chapter 1: Product introduction Shut down the key during the boot process and enter BIOS setup to clear the Real Time Clock (RTC) RAM in CMOS...

User Manual
Page 41
... display their respective menus. ASUS F1A75-M PRO 1-29 The following screen is for better compatibility and system stability. 1.13.2 Support DVD information The Support DVD that comes with the motherboard package contains the drivers, software applications, and utilities that you can install to locate the file ASSETUP.EXE from the BIN folder. Always install the latest OS version and corresponding updates to maximize the features of the Support DVD to avail all motherboard...
... display their respective menus. ASUS F1A75-M PRO 1-29 The following screen is for better compatibility and system stability. 1.13.2 Support DVD information The Support DVD that comes with the motherboard package contains the drivers, software applications, and utilities that you can install to locate the file ASSETUP.EXE from the BIN folder. Always install the latest OS version and corresponding updates to maximize the features of the Support DVD to avail all motherboard...

User Manual
Page 43
... motherboard BIOS file to a USB flash disk in case you need to manage, save, and update the motherboard BIOS in Windows® environment. • ASUS Update requires an Internet connection either of the following methods: Updating from the Internet a. Copy the original motherboard BIOS using this utility. Place the support DVD in the future. Follow the onscreen instructions to download then click Next. From the FTP site, select the BIOS version that allows you update the BIOS using...
... motherboard BIOS file to a USB flash disk in case you need to manage, save, and update the motherboard BIOS in Windows® environment. • ASUS Update requires an Internet connection either of the following methods: Updating from the Internet a. Copy the original motherboard BIOS using this utility. Place the support DVD in the future. Follow the onscreen instructions to download then click Next. From the FTP site, select the BIOS version that allows you update the BIOS using...

User Manual
Page 45
... to enter BIOS Setup to load default BIOS values. Doing so can restore a corrupted BIOS file using this utility, rename the BIOS file in the removable device into F1A75MP.ROM. • The BIOS file in the support DVD may not be the latest version. Press the Up/Down arrow keys to the Folder Info field. 6. The utility automatically checks the devices for the BIOS file. DO NOT shut down or reset the system while updating the BIOS to...
... to enter BIOS Setup to load default BIOS values. Doing so can restore a corrupted BIOS file using this utility, rename the BIOS file in the removable device into F1A75MP.ROM. • The BIOS file in the support DVD may not be the latest version. Press the Up/Down arrow keys to the Folder Info field. 6. The utility automatically checks the devices for the BIOS file. DO NOT shut down or reset the system while updating the BIOS to...

User Manual
Page 46
... boot using defaults 3. Booting the system in DOS environment. Insert the support DVD into the optical drive and select the optical drive as shown. This utility also allows you to copy the current BIOS file that you to Drive D (USB flash drive). Prepare the motherboard support DVD and a USB flash drive in NTFS format. 3. C:\>d: D:\> 2-4 ASUS F1A75-M PRO Turn off the computer and disconnect all SATA hard disk drives (optional). NTFS is not supported under DOS environment. Please select boot device: SATA: XXXXXXXXXXXXXXXX USB XXXXXXXXXXXXXXXXX UEFI: XXXXXXXXXXXXXXXX Enter Setup...
... boot using defaults 3. Booting the system in DOS environment. Insert the support DVD into the optical drive and select the optical drive as shown. This utility also allows you to copy the current BIOS file that you to Drive D (USB flash drive). Prepare the motherboard support DVD and a USB flash drive in NTFS format. 3. C:\>d: D:\> 2-4 ASUS F1A75-M PRO Turn off the computer and disconnect all SATA hard disk drives (optional). NTFS is not supported under DOS environment. Please select boot device: SATA: XXXXXXXXXXXXXXXX USB XXXXXXXXXXXXXXXXX UEFI: XXXXXXXXXXXXXXXX Enter Setup...

User Manual
Page 61
... Setup, the BIOS automatically detects the presence of [AHCI or RAID] to access devices on legacy operating systems (OS). [Disabled] The USB devices can only be used under OS with driver installed. If detected, the USB controller legacy mode is a monitor system. Set to [RAID] or [AHCI]. Configuration options: [Disabled] [Enabled] OnChip SATA Type [IDE] Allows you to set to [IDE] instead of SATA devices. The AHCI allows the onboard storage driver to enable advanced Serial ATA features that increases storage performance on random workloads by allowing the drive...
... Setup, the BIOS automatically detects the presence of [AHCI or RAID] to access devices on legacy operating systems (OS). [Disabled] The USB devices can only be used under OS with driver installed. If detected, the USB controller legacy mode is a monitor system. Set to [RAID] or [AHCI]. Configuration options: [Disabled] [Enabled] OnChip SATA Type [IDE] Allows you to set to [IDE] instead of SATA devices. The AHCI allows the onboard storage driver to enable advanced Serial ATA features that increases storage performance on random workloads by allowing the drive...


