
User Manual
Page 1
E4361 Eee PC User Manual Windows® XP Edition Eee PC 1004DN
E4361 Eee PC User Manual Windows® XP Edition Eee PC 1004DN
User Manual
Page 19
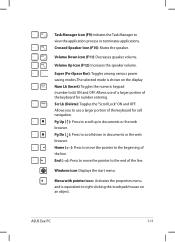
... the line. Volume Down Icon (F11): Decreases speaker volume. Scr Lk (Delete): Toggles the "Scroll Lock" ON and OFF. Windows icon: Displays the start menu. Crossed Speaker Icon (F10): Mutes the speaker. ASUS Eee PC 1-11 Allows you to the end of the keyboard for cell navigation. Pg Up (↑): Press to view the...
... the line. Volume Down Icon (F11): Decreases speaker volume. Scr Lk (Delete): Toggles the "Scroll Lock" ON and OFF. Windows icon: Displays the start menu. Crossed Speaker Icon (F10): Mutes the speaker. ASUS Eee PC 1-11 Allows you to the end of the keyboard for cell navigation. Pg Up (↑): Press to view the...
User Manual
Page 23
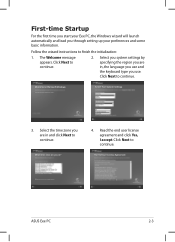
... language you use . Click Next to continue. 3. First-time Startup For the first time you start your Eee PC, the Windows wizard will launch automatically and lead you through setting up your preferences and some basic information. ASUS Eee PC 2-3 The Welcome message appears. Click Next to finish the initialization: 1. Follow the wizard instructions to continue...
... language you use . Click Next to continue. 3. First-time Startup For the first time you start your Eee PC, the Windows wizard will launch automatically and lead you through setting up your preferences and some basic information. ASUS Eee PC 2-3 The Welcome message appears. Click Next to finish the initialization: 1. Follow the wizard instructions to continue...
User Manual
Page 28
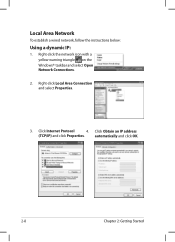
Click Obtain an IP address (TCP/IP) and click Properties. Click Internet Protocol 4. Right-click Local Area Connection and select Properties. 3. Local Area Network To establish a wired network, follow the instructions below: Using a dynamic IP: 1. automatically and click OK. 2-8 Chapter 2: Getting Started Right-click the network icon with a yellow warning triangle on the Windows® taskbar and select Open Network Connections. 2.
Click Obtain an IP address (TCP/IP) and click Properties. Click Internet Protocol 4. Right-click Local Area Connection and select Properties. 3. Local Area Network To establish a wired network, follow the instructions below: Using a dynamic IP: 1. automatically and click OK. 2-8 Chapter 2: Getting Started Right-click the network icon with a yellow warning triangle on the Windows® taskbar and select Open Network Connections. 2.
User Manual
Page 35
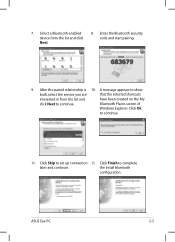
Select a Bluetooth-enabled device from the list and have been created on the My click Next to set up connection 11. After the paired relationship is 10. Click Ok to complete later and continue. Enter the Bluetooth security code and start pairing. 9. Click Finish to continue. 11. A message appears to show built, select the service you are that the selected shortcuts interested in from the list and click Next. 8. the initial bluetooth configuration. ASUS Eee PC 3-3 Click Skip to continue. Bluetooth Places screen of Windows Explorer. 7.
Select a Bluetooth-enabled device from the list and have been created on the My click Next to set up connection 11. After the paired relationship is 10. Click Ok to complete later and continue. Enter the Bluetooth security code and start pairing. 9. Click Finish to continue. 11. A message appears to show built, select the service you are that the selected shortcuts interested in from the list and click Next. 8. the initial bluetooth configuration. ASUS Eee PC 3-3 Click Skip to continue. Bluetooth Places screen of Windows Explorer. 7.

User Manual
Page 36
Right-click the ADSM icon in the Notification area and select Fingerprint Enrollment. 2. These instructions will show you how to start fingerprint enrollment. 3. Swipe the select finger on the fingerprint scanner to setup the fingerprint registration. 1. In the Enroll User Fingerprint window, click a finger to start fingerprint enrollment. 3-4 Chapter 3: Using the Eee PC Fingerprint Registration The fingerprint scanner can be used for instant and secure user authentication.
Right-click the ADSM icon in the Notification area and select Fingerprint Enrollment. 2. These instructions will show you how to start fingerprint enrollment. 3. Swipe the select finger on the fingerprint scanner to setup the fingerprint registration. 1. In the Enroll User Fingerprint window, click a finger to start fingerprint enrollment. 3-4 Chapter 3: Using the Eee PC Fingerprint Registration The fingerprint scanner can be used for instant and secure user authentication.
User Manual
Page 37
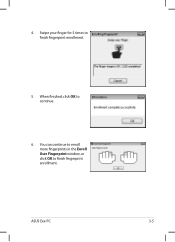
Swipe your finger for 5 times to continue. 6. When finished, click OK to finish fingerprint enrollment. 5. ASUS Eee PC 3-5 4. You can continue to enroll more fingerprints in the Enroll User Fingerprint window, or click OK to finish fingerprint enrollment.
Swipe your finger for 5 times to continue. 6. When finished, click OK to finish fingerprint enrollment. 5. ASUS Eee PC 3-5 4. You can continue to enroll more fingerprints in the Enroll User Fingerprint window, or click OK to finish fingerprint enrollment.
User Manual
Page 45
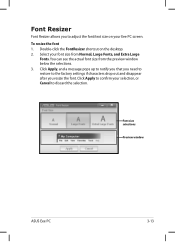
... your selection, or Cancel to adjust the font/text size on the desktop. 2. Double-click the FontResizer shortcut on your font size from the preview window below the selections. 3. Font size selections Preview window ASUS Eee PC 3-13 Select your Eee PC screen. Font Resizer Font Resizer allows you resize the font.
... your selection, or Cancel to adjust the font/text size on the desktop. 2. Double-click the FontResizer shortcut on your font size from the preview window below the selections. 3. Font size selections Preview window ASUS Eee PC 3-13 Select your Eee PC screen. Font Resizer Font Resizer allows you resize the font.
User Manual
Page 46
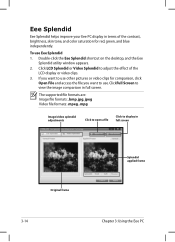
... the Eee Splendid utility window appears. 2. The supported file formats are: Image file formats: .bmp, jpg, jpeg Video file formats: .mpeg, .mpg Image/video splendid adjustments Click to open a file Click to view the image comparison in full screen. Eee Splendid Eee Splendid helps improve your Eee PC display ... Screen to display in full screen Original frame 3-14 Splendid applied frame Chapter 3: Using the Eee PC Click LCD Splendid or Video Splendid to use. If you want to use Eee Splendid 1. To use other pictures or video clips for comparison, click Open File and access the...
... the Eee Splendid utility window appears. 2. The supported file formats are: Image file formats: .bmp, jpg, jpeg Video file formats: .mpeg, .mpg Image/video splendid adjustments Click to open a file Click to view the image comparison in full screen. Eee Splendid Eee Splendid helps improve your Eee PC display ... Screen to display in full screen Original frame 3-14 Splendid applied frame Chapter 3: Using the Eee PC Click LCD Splendid or Video Splendid to use. If you want to use Eee Splendid 1. To use other pictures or video clips for comparison, click Open File and access the...
User Manual
Page 47
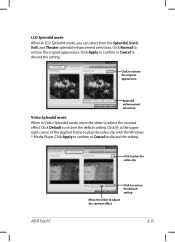
.... Click to play the video clip with the Windows ® Media Player. LCD Splendid mode When in Video Splendid mode, move the slider to discard the setting. Click at the upper right corner of the Applied Frame to play the video clip ASUS Eee PC Click to restore the default setting Move the slider...
.... Click to play the video clip with the Windows ® Media Player. LCD Splendid mode When in Video Splendid mode, move the slider to discard the setting. Click at the upper right corner of the Applied Frame to play the video clip ASUS Eee PC Click to restore the default setting Move the slider...

User Manual
Page 48
... blocked; To get more detailed support, click Help & Support on the desktop, and the utility window appears. • From the Computer area, you are blocked and removed. • From the Identity area, your Eee PC from the Setting window. To use NIS Double-click the Norton Internet Security shortcut on the upper right corner... scanning of files on your computer To change or customize your entire computer, or run a custom scan of the utility panel. 3-16 Chapter 3: Using the Eee PC
... blocked; To get more detailed support, click Help & Support on the desktop, and the utility window appears. • From the Computer area, you are blocked and removed. • From the Identity area, your Eee PC from the Setting window. To use NIS Double-click the Norton Internet Security shortcut on the upper right corner... scanning of files on your computer To change or customize your entire computer, or run a custom scan of the utility panel. 3-16 Chapter 3: Using the Eee PC


