User Manual
Page 10
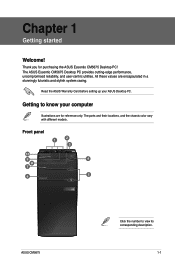
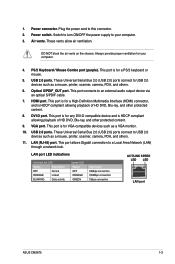
... and their locations, and the chassis color vary with different models. All these values are for purchasing the ASUS Essentio CM5675 Desktop PC! The ASUS Essentio CM5675 Desktop PC provides cutting-edge performance, uncompromised reliability, and user-centric utilities. Front panel 1 2 3 10 9 4 8 7 6 5 ASUS CM5675 Click the number to know your ASUS Desktop PC. Chapter 1 Getting started Welcome!
... and their locations, and the chassis color vary with different models. All these values are for purchasing the ASUS Essentio CM5675 Desktop PC! The ASUS Essentio CM5675 Desktop PC provides cutting-edge performance, uncompromised reliability, and user-centric utilities. Front panel 1 2 3 10 9 4 8 7 6 5 ASUS CM5675 Click the number to know your ASUS Desktop PC. Chapter 1 Getting started Welcome!
User Manual
Page 12
... ORANGE Linked BLINKING Data activity Speed LED Status OFF ORANGE GREEN Description 10Mbps connection 100Mbps connection 1Gbps connection ACT/LINK SPEED LED LED LAN port ASUS CM5675 1-3 This port is for a High-Definition Multimedia Interface (HDMI) connector, and is for VGA-compatible devices such as a VGA monitor. 10. PS/2 Keyboard / Mouse Combo...
... ORANGE Linked BLINKING Data activity Speed LED Status OFF ORANGE GREEN Description 10Mbps connection 100Mbps connection 1Gbps connection ACT/LINK SPEED LED LED LAN port ASUS CM5675 1-3 This port is for a High-Definition Multimedia Interface (HDMI) connector, and is for VGA-compatible devices such as a VGA monitor. 10. PS/2 Keyboard / Mouse Combo...
User Manual
Page 14
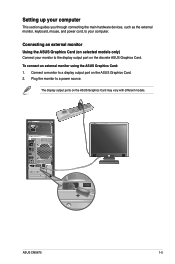
... Card (on selected models only) Connect your monitor to a display output port on the ASUS Graphics Card may vary with different models. To connect an external monitor using the ASUS Graphics Card: 1. ASUS CM5675 1-5 Setting up your computer This section guides you through connecting the main hardware devices, such as the external monitor, keyboard...
... Card (on selected models only) Connect your monitor to a display output port on the ASUS Graphics Card may vary with different models. To connect an external monitor using the ASUS Graphics Card: 1. ASUS CM5675 1-5 Setting up your computer This section guides you through connecting the main hardware devices, such as the external monitor, keyboard...
User Manual
Page 16
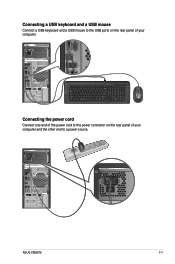
ASUS CM5675 1-7 C Connecting the power cord Connect one end of the power cord to a power source. Connecting a USB keyboard and a USB mouse Connect a USB keyboard and a USB mouse to the USB ports on the rear panel of your computer and the other end to the power connector on the rear panel of your computer.
ASUS CM5675 1-7 C Connecting the power cord Connect one end of the power cord to a power source. Connecting a USB keyboard and a USB mouse Connect a USB keyboard and a USB mouse to the USB ports on the rear panel of your computer and the other end to the power connector on the rear panel of your computer.
User Manual
Page 18
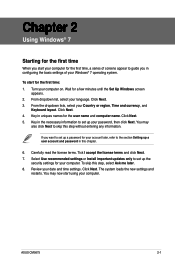
... Setting up a user account and password in the necessary information to set up a password for your computer. Click Next. Key in this chapter. 6. Click Next. 4. ASUS CM5675 2-1 To start for a few minutes until the Set Up Windows screen appears. 2. Click Next. 3. Click Next. 5. From dropdown list, select your date and time settings...
... Setting up a user account and password in the necessary information to set up a password for your computer. Click Next. Key in this chapter. 6. Click Next. 4. ASUS CM5675 2-1 To start for a few minutes until the Set Up Windows screen appears. 2. Click Next. 3. Click Next. 5. From dropdown list, select your date and time settings...
User Manual
Page 20
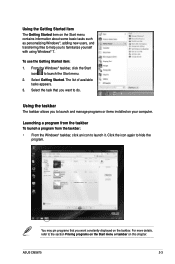
... the task that you want to the section Pinning programs on the Start menu or taskbar on the taskbar. The list of available tasks appears. 3. ASUS CM5675 2-3 Using the taskbar The taskbar allows you to launch and manage programs or items installed on the Start menu contains information about some basic tasks...
... the task that you want to the section Pinning programs on the Start menu or taskbar on the taskbar. The list of available tasks appears. 3. ASUS CM5675 2-3 Using the taskbar The taskbar allows you to launch and manage programs or items installed on the Start menu contains information about some basic tasks...
User Manual
Page 22
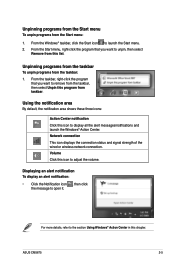
... Click this chapter. For more details, refer to the section Using Windows® Action Center in this icon to unpin, then select Remove from taskbar. ASUS CM5675 2-5 Displaying an alert notification To display an alert notification: • Click the Notification icon , then click the message to launch the Start menu. 2. From the...
... Click this chapter. For more details, refer to the section Using Windows® Action Center in this icon to unpin, then select Remove from taskbar. ASUS CM5675 2-5 Displaying an alert notification To display an alert notification: • Click the Notification icon , then click the message to launch the Start menu. 2. From the...
User Manual
Page 24
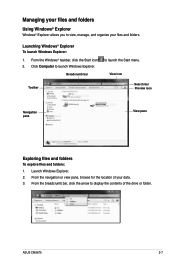
...; Explorer To launch Windows Explorer: 1. View icon Toolbar Search bar Preview icon Navigation pane View pane Exploring files and folders To explore files and folders: 1. ASUS CM5675 2-7 Managing your files and folders Using Windows® Explorer Windows® Explorer allows you to launch Windows Explorer.
...; Explorer To launch Windows Explorer: 1. View icon Toolbar Search bar Preview icon Navigation pane View pane Exploring files and folders To explore files and folders: 1. ASUS CM5675 2-7 Managing your files and folders Using Windows® Explorer Windows® Explorer allows you to launch Windows Explorer.
User Manual
Page 26
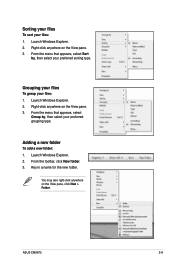
... new folder. Launch Windows Explorer. 2. Right-click anywhere on the View pane. 3. Right-click anywhere on the View pane. 3. From the toolbar, click New folder. 3. ASUS CM5675 2-9 Sorting your files To sort your files: 1. From the menu that appears, select Group by , then select your preferred grouping type. You may also right...
... new folder. Launch Windows Explorer. 2. Right-click anywhere on the View pane. 3. Right-click anywhere on the View pane. 3. From the toolbar, click New folder. 3. ASUS CM5675 2-9 Sorting your files To sort your files: 1. From the menu that appears, select Group by , then select your preferred grouping type. You may also right...
User Manual
Page 28
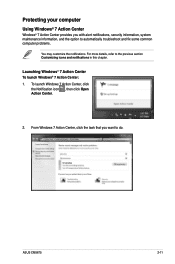
ASUS CM5675 2-11 To launch Windows 7 Action Center, click the Notification icon , then click Open Action Center. 2. Launching Windows® 7 Action Center To launch Windows® 7 Action ...
ASUS CM5675 2-11 To launch Windows 7 Action Center, click the Notification icon , then click Open Action Center. 2. Launching Windows® 7 Action Center To launch Windows® 7 Action ...
User Manual
Page 30
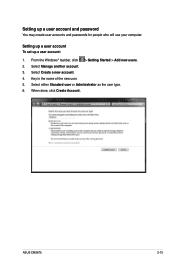
Select Manage another account. 3. Select either Standard user or Administrator as the user type. 6. ASUS CM5675 2-13 Setting up a user account To set up a user account and password You may create user accounts and passwords for people who will use your computer. Select Create a new account. 4. Key in the name of the new user. 5. When done, click Create Account. Setting up a user account: 1. From the Windows® taskbar, click > Getting Started > Add new users. 2.
Select Manage another account. 3. Select either Standard user or Administrator as the user type. 6. ASUS CM5675 2-13 Setting up a user account To set up a user account and password You may create user accounts and passwords for people who will use your computer. Select Create a new account. 4. Key in the name of the new user. 5. When done, click Create Account. Setting up a user account: 1. From the Windows® taskbar, click > Getting Started > Add new users. 2.
User Manual
Page 32
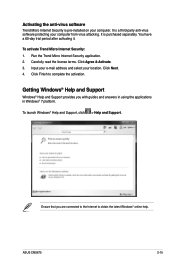
... the activation. To launch Windows® Help and Support, click > Help and Support. It is a third-party anti-virus software protecting your location. Click Next. 4. ASUS CM5675 2-15 Click Finish to obtain the latest Windows® online help. Carefully read the license terms. Click Agree & Activate. 3. Input your e-mail address and select...
... the activation. To launch Windows® Help and Support, click > Help and Support. It is a third-party anti-virus software protecting your location. Click Next. 4. ASUS CM5675 2-15 Click Finish to obtain the latest Windows® online help. Carefully read the license terms. Click Agree & Activate. 3. Input your e-mail address and select...
User Manual
Page 33
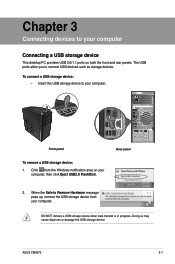
ASUS CM5675 3-1 The USB ports allow you to your computer Connecting a USB storage device This desktop PC provides USB 2.0/1.1 ports on your computer. Rear panel 2. When the ...
ASUS CM5675 3-1 The USB ports allow you to your computer Connecting a USB storage device This desktop PC provides USB 2.0/1.1 ports on your computer. Rear panel 2. When the ...
User Manual
Page 35
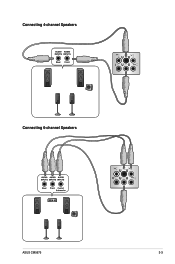
Connecting 4-channel Speakers Connecting 6-channel Speakers ASUS CM5675 3-3
Connecting 4-channel Speakers Connecting 6-channel Speakers ASUS CM5675 3-3
User Manual
Page 37
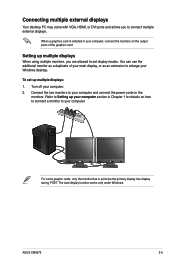
... the monitor that is installed in Chapter 1 for details on the output ports of your main display, or as an extension to enlarge your computer. ASUS CM5675 3-5 Turn off your computer and connect the power cords to be the primary display has display during POST. When a graphics card is set to the...
... the monitor that is installed in Chapter 1 for details on the output ports of your main display, or as an extension to enlarge your computer. ASUS CM5675 3-5 Turn off your computer and connect the power cords to be the primary display has display during POST. When a graphics card is set to the...

User Manual
Page 39
ASUS CM5675 3-7 Connecting an HDTV Connect a High Definition TV (HDTV) to connect the HDTV and the computer. The HDMI cable is purchased separately. • To get the best display performance, ensure that your computer. • You need an HDMI cable to the HDMI port of your HDMI cable is less than 15 meters.
ASUS CM5675 3-7 Connecting an HDTV Connect a High Definition TV (HDTV) to connect the HDTV and the computer. The HDMI cable is purchased separately. • To get the best display performance, ensure that your computer. • You need an HDMI cable to the HDMI port of your HDMI cable is less than 15 meters.
User Manual
Page 40
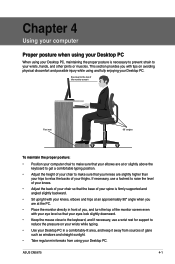
... necessary, use a wrist rest for support to reduce the pressure on avoiding physical discomfort and possible injury while using and fully enjoying your Desktop PC. ASUS CM5675 4-1 This section provides you with your eye level so that your knees are slightly higher than your hips to relax the backs of glare such...
... necessary, use a wrist rest for support to reduce the pressure on avoiding physical discomfort and possible injury while using and fully enjoying your Desktop PC. ASUS CM5675 4-1 This section provides you with your eye level so that your knees are slightly higher than your hips to relax the backs of glare such...

User Manual
Page 42
... of the following to open the tray. 2. Select a program from the disc tray. While the system is on it . 4. Place the disc to close it . ASUS CM5675 4-3 Remove the disc from the AutoPlay window to access your computer, click Windows® 7 Start button on the taskbar, click Computer, and then double-click...
... of the following to open the tray. 2. Select a program from the disc tray. While the system is on it . 4. Place the disc to close it . ASUS CM5675 4-3 Remove the disc from the AutoPlay window to access your computer, click Windows® 7 Start button on the taskbar, click Computer, and then double-click...
User Manual
Page 44
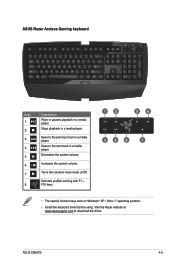
.... 12 56 34 8 7 • The special function keys work on /off. Goes to download the driver. Increases the system volume. Stops playback in a media player. ASUS CM5675 4-5 ASUS-Razer Arctosa Gaming keyboard Keys 1. 2. 3. 4. 5. 6. 7. 8.
.... 12 56 34 8 7 • The special function keys work on /off. Goes to download the driver. Increases the system volume. Stops playback in a media player. ASUS CM5675 4-5 ASUS-Razer Arctosa Gaming keyboard Keys 1. 2. 3. 4. 5. 6. 7. 8.
User Manual
Page 46
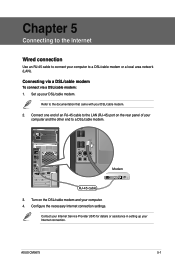
... computer to a DSL/cable modem or a local area network (LAN). Contact your Internet Service Provider (ISP) for details or assistance in setting up your computer. 4. ASUS CM5675 5-1 Connecting via a DSL/cable modem To connect via a DSL/cable modem: 1. Modem RJ-45 cable 3. Configure the necessary Internet connection settings. Chapter 5 Connecting to the...
... computer to a DSL/cable modem or a local area network (LAN). Contact your Internet Service Provider (ISP) for details or assistance in setting up your computer. 4. ASUS CM5675 5-1 Connecting via a DSL/cable modem To connect via a DSL/cable modem: 1. Modem RJ-45 cable 3. Configure the necessary Internet connection settings. Chapter 5 Connecting to the...


