
A8V-MX User''s Manual for English Edition
Page 8
A8V-MX specifications summary CPU Chipset System Bus Memory Expansion slots Graphics ... VT8251 Southbridge supports: - 2 x UltraDMA 133/100/66/33 IDE slots - 4 x Serial ATA I/Serial ATA II hard disk drives with RAID 0, RAID 1, RAID 0+1, and JBOD configuration Realtek® ALC653 6-channel CODEC S/PDIF out interface Realtek® RTL8201CL 10/...100 LAN PHY Supports up to 8 USB 2.0 ports ASUS Q-Fan ASUS MyLogo™ 4 Mb Flash ROM, AMI BIOS, PnP, DMI, WfM2.0, ACPI 2.0a, SM BIOS 2.3, PXE flash utility ASUS EZ Flash ASUS CrashFree BIOS 2 ASUS C.P.R. (CPU Parameter Recall) (continued on the next ...
A8V-MX specifications summary CPU Chipset System Bus Memory Expansion slots Graphics ... VT8251 Southbridge supports: - 2 x UltraDMA 133/100/66/33 IDE slots - 4 x Serial ATA I/Serial ATA II hard disk drives with RAID 0, RAID 1, RAID 0+1, and JBOD configuration Realtek® ALC653 6-channel CODEC S/PDIF out interface Realtek® RTL8201CL 10/...100 LAN PHY Supports up to 8 USB 2.0 ports ASUS Q-Fan ASUS MyLogo™ 4 Mb Flash ROM, AMI BIOS, PnP, DMI, WfM2.0, ACPI 2.0a, SM BIOS 2.3, PXE flash utility ASUS EZ Flash ASUS CrashFree BIOS 2 ASUS C.P.R. (CPU Parameter Recall) (continued on the next ...

A8V-MX User''s Manual for English Edition
Page 9
ix A8V-MX specifications summary Rear panel Internal connectors Power Requirement Form Factor Manageability Support CD contents 1 x Parallel port 1 x LAN (RJ-45) port 4 x USB 2.0 ports 1 x Serial port (COM) 1 x PS/2 keyboard port 1 x PS/2 mouse port 6-channel audio ports 1 x Floppy disk drive connector 1 x Primary IDE connector 1 x Secondary IDE connector 4 x ...9.6 in . (24.5cm x 21.8cm) WOR by Ring, WOL/WOR by PME, WO USB, WO KB/MS Device drivers ASUS PC Probe II ASUS Live Update utility Anti-virus software (OEM version) *Specifications are subject to change without notice. x 8.6 in .
ix A8V-MX specifications summary Rear panel Internal connectors Power Requirement Form Factor Manageability Support CD contents 1 x Parallel port 1 x LAN (RJ-45) port 4 x USB 2.0 ports 1 x Serial port (COM) 1 x PS/2 keyboard port 1 x PS/2 mouse port 6-channel audio ports 1 x Floppy disk drive connector 1 x Primary IDE connector 1 x Secondary IDE connector 4 x ...9.6 in . (24.5cm x 21.8cm) WOR by Ring, WOL/WOR by PME, WO USB, WO KB/MS Device drivers ASUS PC Probe II ASUS Live Update utility Anti-virus software (OEM version) *Specifications are subject to change without notice. x 8.6 in .

A8V-MX User''s Manual for English Edition
Page 12
... items. Motherboard ASUS A8V-MX motherboard Cables 1 x Serial ATA signal cable 1 x Serial ATA power cable 1 x Ultra DMA 133/100/66 cable 1 x Floppy disk drive cable Accessories I/O shield A p p l i c a t i o n C D s ASUS motherboard support CD D o c u m e n t a t i o n User guide If any of ASUS quality motherboards!...8482; technology-based system bus, the motherboard provides a powerful platform for your motherboard package for buying an ASUS® A8V-MX motherboard! See page 1-8. 1-2 Chapter 1: Product introduction Thank you start installing the motherboard, and hardware ...
... items. Motherboard ASUS A8V-MX motherboard Cables 1 x Serial ATA signal cable 1 x Serial ATA power cable 1 x Ultra DMA 133/100/66 cable 1 x Floppy disk drive cable Accessories I/O shield A p p l i c a t i o n C D s ASUS motherboard support CD D o c u m e n t a t i o n User guide If any of ASUS quality motherboards!...8482; technology-based system bus, the motherboard provides a powerful platform for your motherboard package for buying an ASUS® A8V-MX motherboard! See page 1-8. 1-2 Chapter 1: Product introduction Thank you start installing the motherboard, and hardware ...

A8V-MX User''s Manual for English Edition
Page 34
... is removed to the signal connector at the back of the chassis intrusion sensor or switch cable to PIN 1. ® A8V-MX PIN 1 A8V-MX Floppy disk drive connector 2 . Insert one end of the floppy disk drive. Pin 5 on the floppy ribbon cable to this connector when a chassis component is removed or replaced. Chassis intrusion connector...
... is removed to the signal connector at the back of the chassis intrusion sensor or switch cable to PIN 1. ® A8V-MX PIN 1 A8V-MX Floppy disk drive connector 2 . Insert one end of the floppy disk drive. Pin 5 on the floppy ribbon cable to this connector when a chassis component is removed or replaced. Chassis intrusion connector...

A8V-MX User''s Manual for English Edition
Page 35
...(40-1 pin PRI_IDE, 40-1 pin SECI_IDE) These connectors are for an Ultra DMA 100/66 IDE master device (hard disk drive). If you install two hard disk drives, you connect the IDE cable. • Use the 80-conductor IDE cable for the jumper settings. • Pin 20 .... PRI_IDE SEC_IDE ® A8V-MX A8V-MX IDE connectors PIN 1 PIN 1 ASUS A8V-MX 1-25 The Ultra DMA 100/66 signal cable has three connectors: a blue connector for the primary IDE connector on the motherboard, a black connector for an Ultra DMA 100/66 IDE slave device (optical drive/hard disk drive), and a gray connector...
...(40-1 pin PRI_IDE, 40-1 pin SECI_IDE) These connectors are for an Ultra DMA 100/66 IDE master device (hard disk drive). If you install two hard disk drives, you connect the IDE cable. • Use the 80-conductor IDE cable for the jumper settings. • Pin 20 .... PRI_IDE SEC_IDE ® A8V-MX A8V-MX IDE connectors PIN 1 PIN 1 ASUS A8V-MX 1-25 The Ultra DMA 100/66 signal cable has three connectors: a blue connector for the primary IDE connector on the motherboard, a black connector for an Ultra DMA 100/66 IDE slave device (optical drive/hard disk drive), and a gray connector...

A8V-MX User''s Manual for English Edition
Page 36
...allows up to 150 MB/s data transfer rate while Serial ATA II allows up to the table below for Serial ATA hard disk drives. Serial ATA Master/Slave connectors Connector SATA1, SATA3 SATA2, SATA4 Setting Master Slave Use Boot disk Data disk 1-26 Chapter 1:... RSATA_TXN2 GND RSATA_RXP2 RSATA_RXN2 GND SATA1 GND RSATA_TXP1 RSATA_TXN1 GND RSATA_RXP1 RSATA_RXN1 GND GND RSATA_TXP4 RSATA_TXN4 GND RSATA_RXP4 RSATA_RXN4 GND ® A8V-MX A8V-MX SATA connectors SATA4 SATA3 GND RSATA_TXP3 RSATA_TXN3 GND RSATA_RXP3 RSATA_RXN3 GND Important notes on Serial ATA • Install the Windows®...
...allows up to 150 MB/s data transfer rate while Serial ATA II allows up to the table below for Serial ATA hard disk drives. Serial ATA Master/Slave connectors Connector SATA1, SATA3 SATA2, SATA4 Setting Master Slave Use Boot disk Data disk 1-26 Chapter 1:... RSATA_TXN2 GND RSATA_RXP2 RSATA_RXN2 GND SATA1 GND RSATA_TXP1 RSATA_TXN1 GND RSATA_RXP1 RSATA_RXN1 GND GND RSATA_TXP4 RSATA_TXN4 GND RSATA_RXP4 RSATA_RXN4 GND ® A8V-MX A8V-MX SATA connectors SATA4 SATA3 GND RSATA_TXP3 RSATA_TXN3 GND RSATA_RXP3 RSATA_RXN3 GND Important notes on Serial ATA • Install the Windows®...

A8V-MX User''s Manual for English Edition
Page 41
...is for the chassis-mounted reset button for easy connection. The speaker allows you turn on the BIOS settings. ASUS A8V-MX 1-31 11. Refer to this connector. PWR Ground Reset Ground A8V-MX System panel connector IDE_LED RESET PWRSW * Requires an ATX power supply. The IDE LED lights up when you ... system in SLEEP or SOFT-OFF mode depending on the system power, and blinks when the system is in sleep mode. • Hard disk drive activity (Red 2-pin IDE_LED) This 2-pin connector is color-coded for system reboot without turning off button (Yellow 2-pin PWRSW) This connector is...
...is for the chassis-mounted reset button for easy connection. The speaker allows you turn on the BIOS settings. ASUS A8V-MX 1-31 11. Refer to this connector. PWR Ground Reset Ground A8V-MX System panel connector IDE_LED RESET PWRSW * Requires an ATX power supply. The IDE LED lights up when you ... system in SLEEP or SOFT-OFF mode depending on the system power, and blinks when the system is in sleep mode. • Hard disk drive activity (Red 2-pin IDE_LED) This 2-pin connector is color-coded for system reboot without turning off button (Yellow 2-pin PWRSW) This connector is...

A8V-MX User''s Manual for English Edition
Page 44
... R u n. 2-2 Chapter 2: BIOS setup DOS environment a. At the DOS prompt, type format A:/S then press . Click S t a r t from the menu, then select F o r m a t. c. Insert a 1.44MB floppy disk into the drive. d. A F o r m a t 3 1 / 2 F l o p p y D i s k window appears. D O S s t a r t u p d i s k from the format options field, then click S t a r t. 2.1... 1/2 Floppy Drive icon. Insert a 1.44 MB floppy disk to the optical drive. Insert the Windows® 2000 CD to the floppy disk drive. e. A S U S U p d a t e (Updates the BIOS in DOS mode using the ASUS Update or ...
... R u n. 2-2 Chapter 2: BIOS setup DOS environment a. At the DOS prompt, type format A:/S then press . Click S t a r t from the menu, then select F o r m a t. c. Insert a 1.44MB floppy disk into the drive. d. A F o r m a t 3 1 / 2 F l o p p y D i s k window appears. D O S s t a r t u p d i s k from the format options field, then click S t a r t. 2.1... 1/2 Floppy Drive icon. Insert a 1.44 MB floppy disk to the optical drive. Insert the Windows® 2000 CD to the floppy disk drive. e. A S U S U p d a t e (Updates the BIOS in DOS mode using the ASUS Update or ...

A8V-MX User''s Manual for English Edition
Page 45
...of booting from a floppy disk and using EZ Flash: 1. error message appears if there is your optical drive. Make sure that D: is no floppy disk in the floppy disk. ASUS A8V-MX 2-3 e. M X . To update the BIOS using a DOS-based utility. Floppy found !" Completed....to update the BIOS without having to A8V-MX.ROM. R O M. 2. When the correct BIOS file is accessible by pressing + during POST to the floppy disk drive. A A8V-MX.ROM not found ! EZFlash starting BIOS update Checking for floppy... 4. d. Reading file "A8V-MX.ROM". Rebooting. • Do not...
...of booting from a floppy disk and using EZ Flash: 1. error message appears if there is your optical drive. Make sure that D: is no floppy disk in the floppy disk. ASUS A8V-MX 2-3 e. M X . To update the BIOS using a DOS-based utility. Floppy found !" Completed....to update the BIOS without having to A8V-MX.ROM. R O M. 2. When the correct BIOS file is accessible by pressing + during POST to the floppy disk drive. A A8V-MX.ROM not found ! EZFlash starting BIOS update Checking for floppy... 4. d. Reading file "A8V-MX.ROM". Rebooting. • Do not...

A8V-MX User''s Manual for English Edition
Page 47
Copy the AFUDOS utility (afudos.exe) from the hard disk drive. A:\>afudos /iA8V-MX.ROM AMI Firmware Update Utility - All rights reserved. done A:\> ASUS A8V-MX 2-5 You need to type the exact BIOS filename at the prompt type: afudos /i[filename] where [filename] is completed. Version 1.10 Copyright (C)... latest or the original BIOS file on a piece of paper. Write the BIOS filename on the bootable floppy disk. Visit the ASUS website (www.asus.com) and download the latest BIOS file for the motherboard. Updating the BIOS file To update the BIOS file using the AFUDOS ...
Copy the AFUDOS utility (afudos.exe) from the hard disk drive. A:\>afudos /iA8V-MX.ROM AMI Firmware Update Utility - All rights reserved. done A:\> ASUS A8V-MX 2-5 You need to type the exact BIOS filename at the prompt type: afudos /i[filename] where [filename] is completed. Version 1.10 Copyright (C)... latest or the original BIOS file on a piece of paper. Write the BIOS filename on the bootable floppy disk. Visit the ASUS website (www.asus.com) and download the latest BIOS file for the motherboard. Updating the BIOS file To update the BIOS file using the AFUDOS ...

A8V-MX User''s Manual for English Edition
Page 48
Insert the floppy disk with the original or updated BIOS file to the floppy disk drive. 3. Reading file "A8V-MX.ROM". Doing so can update a corrupted BIOS file using the motherboard support CD or the floppy disk that contains the updated BIOS file. • Prepare... or updated BIOS file in the floppy disk to A 8 V - Restart the system after the utility completes the updating process. 2-6 Chapter 2: BIOS setup 2.1.4 ASUS CrashFree BIOS 2 utility The ASUS CrashFree BIOS 2 is an auto recovery tool that you to restore the BIOS file when it fails or gets corrupted during the updating...
Insert the floppy disk with the original or updated BIOS file to the floppy disk drive. 3. Reading file "A8V-MX.ROM". Doing so can update a corrupted BIOS file using the motherboard support CD or the floppy disk that contains the updated BIOS file. • Prepare... or updated BIOS file in the floppy disk to A 8 V - Restart the system after the utility completes the updating process. 2-6 Chapter 2: BIOS setup 2.1.4 ASUS CrashFree BIOS 2 utility The ASUS CrashFree BIOS 2 is an auto recovery tool that you to restore the BIOS file when it fails or gets corrupted during the updating...

A8V-MX User''s Manual for English Edition
Page 49
...BIOS from the support CD To recover the BIOS from the floppy disk drive, then turn on the system. 2. Remove any floppy disk from the support CD: 1. Checking for this motherboard. Reading file "A8V-MX.ROM". The recovered BIOS may not be the latest BIOS version for floppy...! 4. CD-ROM found ! Insert the support CD to download the latest BIOS file. Bad BIOS checksum. Visit the ASUS website (www.asus.com) to the optical drive. 3. ASUS A8V-MX 2-7 The utility displays the following message and automatically checks the floppy disk for CD-ROM... Floppy not found ! DO ...
...BIOS from the support CD To recover the BIOS from the floppy disk drive, then turn on the system. 2. Remove any floppy disk from the support CD: 1. Checking for this motherboard. Reading file "A8V-MX.ROM". The recovered BIOS may not be the latest BIOS version for floppy...! 4. CD-ROM found ! Insert the support CD to download the latest BIOS file. Bad BIOS checksum. Visit the ASUS website (www.asus.com) to the optical drive. 3. ASUS A8V-MX 2-7 The utility displays the following message and automatically checks the floppy disk for CD-ROM... Floppy not found ! DO ...

A8V-MX User''s Manual for English Edition
Page 50
... utility is available in the support CD that allows you to your system. Installing ASUS Update To install ASUS Update: 1. X X . This utility is copied to manage, save, and update the motherboard BIOS in the optical drive. Place the support CD in Windows® environment. See page 3-3 for the U t i l i t i e s screen menu. 3. Click the U t i l i t i e s tab...
... utility is available in the support CD that allows you to your system. Installing ASUS Update To install ASUS Update: 1. X X . This utility is copied to manage, save, and update the motherboard BIOS in the optical drive. Place the support CD in Windows® environment. See page 3-3 for the U t i l i t i e s screen menu. 3. Click the U t i l i t i e s tab...

A8V-MX User''s Manual for English Edition
Page 56
..., Inc. 2.3.1 System Time [xx:xx:xx] Allows you to set the system time. 2.3.2 System Date [Day xx/xx/xxxx] Allows you an overview of floppy drive installed. Configuration options: [Disabled] [360K, 5.25 in.] [1.2M , 5.25 in.] [720K , 3.5 in.] [1.44M, 3.5 in.] [2.88M, 3.5 in.] 2-14 Chapter 2: BIOS...you enter the BIOS Setup program, the Main menu screen appears, giving you to set the system date. 2.3.3 Legacy Diskette A [1.44M, 3.5 in ] [ST320410A] [ASUS CD-S520/A] [Not Detected] [Not Detected] [Not Detected] [Not Detected] [Not Detected] [Not Detected] Use [ENTER], [TAB] or [SHIFT-TAB] to ...
..., Inc. 2.3.1 System Time [xx:xx:xx] Allows you to set the system time. 2.3.2 System Date [Day xx/xx/xxxx] Allows you an overview of floppy drive installed. Configuration options: [Disabled] [360K, 5.25 in.] [1.2M , 5.25 in.] [720K , 3.5 in.] [1.44M, 3.5 in.] [2.88M, 3.5 in.] 2-14 Chapter 2: BIOS...you enter the BIOS Setup program, the Main menu screen appears, giving you to set the system date. 2.3.3 Legacy Diskette A [1.44M, 3.5 in ] [ST320410A] [ASUS CD-S520/A] [Not Detected] [Not Detected] [Not Detected] [Not Detected] [Not Detected] [Not Detected] Use [ENTER], [TAB] or [SHIFT-TAB] to ...

A8V-MX User''s Manual for English Edition
Page 57
... General Help F10 Save and Exit ESC Exit v02.58 (C)Copyright 1985-2004, American Megatrends, Inc. Configuration options: [Disabled] [Auto] ASUS A8V-MX 2-15 2.3.4 Primary, Secondary, Third, and Fourth IDE Master/Slave While entering Setup, the BIOS automatically detects the presence of device connected to...device occurs multiple sectors at a time. Select ARMD (ATAPI Removable Media Device) if your device is either a ZIP, LS-120, or MO drive. Main BIOS SETUP UTILITY Primary IDE Master Device : Hard Disk Vendor : ST320410A Size : 20.0GB LBA Mode : Supported Block Mode : 16...
... General Help F10 Save and Exit ESC Exit v02.58 (C)Copyright 1985-2004, American Megatrends, Inc. Configuration options: [Disabled] [Auto] ASUS A8V-MX 2-15 2.3.4 Primary, Secondary, Third, and Fourth IDE Master/Slave While entering Setup, the BIOS automatically detects the presence of device connected to...device occurs multiple sectors at a time. Select ARMD (ATAPI Removable Media Device) if your device is either a ZIP, LS-120, or MO drive. Main BIOS SETUP UTILITY Primary IDE Master Device : Hard Disk Vendor : ST320410A Size : 20.0GB LBA Mode : Supported Block Mode : 16...

A8V-MX User''s Manual for English Edition
Page 77
... Boot Device 3rd Boot Device BIOS SETUP UTILITY Boot [1st FLOPPY DRIVE] [PM-ST320410A] [PS-ASUS CD-S520/A] Specifies the boot sequence from the available devices. Configuration options: [xxxxx Drive] [Disabled] ASUS A8V-MX 2-35 Change Option F1 General Help F10 Save and Exit ESC Exit... v02.58 (C)Copyright 1985-2004, American Megatrends, Inc. 1st ~ xxth Boot Device [1st Floppy Drive] These items specify the boot device priority ...
... Boot Device 3rd Boot Device BIOS SETUP UTILITY Boot [1st FLOPPY DRIVE] [PM-ST320410A] [PS-ASUS CD-S520/A] Specifies the boot sequence from the available devices. Configuration options: [xxxxx Drive] [Disabled] ASUS A8V-MX 2-35 Change Option F1 General Help F10 Save and Exit ESC Exit... v02.58 (C)Copyright 1985-2004, American Megatrends, Inc. 1st ~ xxth Boot Device [1st Floppy Drive] These items specify the boot device priority ...
A8V-MX User''s Manual for English Edition
Page 84
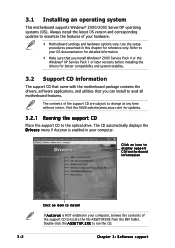
... CD information The support CD that came with the motherboard package contains the drivers, software applications, and utilities that you can install to the optical drive. The CD automatically displays the D r i v e r s menu if Autorun is NOT enabled in your computer. Double-click the A S S E T U P . E X .... 3.1 Installing an operating system This motherboard supports Windows® 2000/2003 Server/XP operating systems (OS). Visit the ASUS website(www.asus.com) for reference only. Always install the latest OS version and corresponding updates to maximize the features of the support ...
... CD information The support CD that came with the motherboard package contains the drivers, software applications, and utilities that you can install to the optical drive. The CD automatically displays the D r i v e r s menu if Autorun is NOT enabled in your computer. Double-click the A S S E T U P . E X .... 3.1 Installing an operating system This motherboard supports Windows® 2000/2003 Server/XP operating systems (OS). Visit the ASUS website(www.asus.com) for reference only. Always install the latest OS version and corresponding updates to maximize the features of the support ...


