
A8V-MX User''s Manual for English Edition
Page 12
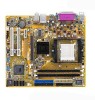
.... See page 1-8. 1-2 Chapter 1: Product introduction Before you for the following items. Motherboard ASUS A8V-MX motherboard Cables 1 x Serial ATA signal cable 1 x Serial ATA power cable 1 x Ultra DMA 133/100/66 cable 1 x Floppy disk drive cable Accessories I/O shield A p p l i c a t i o n C D s ASUS motherboard support CD D o c u m e n t a t i o n User guide If any of ASUS quality motherboards! With an integrated low-latency high-bandwidth memory controller and a highly...
.... See page 1-8. 1-2 Chapter 1: Product introduction Before you for the following items. Motherboard ASUS A8V-MX motherboard Cables 1 x Serial ATA signal cable 1 x Serial ATA power cable 1 x Ultra DMA 133/100/66 cable 1 x Floppy disk drive cable Accessories I/O shield A p p l i c a t i o n C D s ASUS motherboard support CD D o c u m e n t a t i o n User guide If any of ASUS quality motherboards! With an integrated low-latency high-bandwidth memory controller and a highly...

A8V-MX User''s Manual for English Edition
Page 13
... high-end entertainment system with high bandwidth speeds up to a fast 480 Mbps on USB 2.0. ASUS A8V-MX 1-3 Dual-channel DDR memory support Employing the Double Data Rate (DDR) memory technology, the motherboard supports up to powerful audio and speaker systems. See page 1-27 for details. PCI Express™ ...bandwidth on the rear panel and at midboard. See page 1-10 for details. See page 1-17 for details. Serial ATA technology The motherboard supports the Serial ATA technology through the S/PDIF interfaces on USB 1.1 to 2.12 GB/s. PCI Express features point-to 150 MB/s for ...
... high-end entertainment system with high bandwidth speeds up to a fast 480 Mbps on USB 2.0. ASUS A8V-MX 1-3 Dual-channel DDR memory support Employing the Double Data Rate (DDR) memory technology, the motherboard supports up to powerful audio and speaker systems. See page 1-27 for details. PCI Express™ ...bandwidth on the rear panel and at midboard. See page 1-10 for details. See page 1-17 for details. Serial ATA technology The motherboard supports the Serial ATA technology through the S/PDIF interfaces on USB 1.1 to 2.12 GB/s. PCI Express features point-to 150 MB/s for ...

A8V-MX User''s Manual for English Edition
Page 20
Use any of the sockets: ® A8V-MX A8V-MX 184-pin DDR DIMM sockets 1.7.2 Memory configurations You may cause memory sizing error or system boot failure. For optimum compatibility, we recommend that you obtain ... install 128 MB, 256 MB, 512 MB, and 1 GB unbuffered ECC/ non-ECC DDR DIMMs into the DIMM sockets using the memory configurations in this motherboard does not support DIMM modules with less than or equal to 128 Mb memory chips. 1-10 Chapter 1: Product introduction DIMM_A1 DIMM_B1 1.7 System memory 1.7.1 Overview The...
Use any of the sockets: ® A8V-MX A8V-MX 184-pin DDR DIMM sockets 1.7.2 Memory configurations You may cause memory sizing error or system boot failure. For optimum compatibility, we recommend that you obtain ... install 128 MB, 256 MB, 512 MB, and 1 GB unbuffered ECC/ non-ECC DDR DIMMs into the DIMM sockets using the memory configurations in this motherboard does not support DIMM modules with less than or equal to 128 Mb memory chips. 1-10 Chapter 1: Product introduction DIMM_A1 DIMM_B1 1.7 System memory 1.7.1 Overview The...

A8V-MX User''s Manual for English Edition
Page 25
... use . 1.8 Expansion slots In the future, you may cause you physical injury and damage motherboard components. 1.8.1 Installing an expansion card To install an expansion card: 1. ASUS A8V-MX 1-15 The following sub-sections describe the slots and the expansion cards that you intend to ...install expansion cards. Remove the bracket opposite the slot that they support. Replace the system cover. 1.8.2 Configuring an ...
... use . 1.8 Expansion slots In the future, you may cause you physical injury and damage motherboard components. 1.8.1 Installing an expansion card To install an expansion card: 1. ASUS A8V-MX 1-15 The following sub-sections describe the slots and the expansion cards that you intend to ...install expansion cards. Remove the bracket opposite the slot that they support. Replace the system cover. 1.8.2 Configuring an ...

A8V-MX User''s Manual for English Edition
Page 27
The following figure shows a network card installed on a PCI slot. 1.8.4 PCI Express x1 slot This motherboard supports PCI Express x1 network cards, SCSI cards and other cards that comply with PCI specifications. ASUS A8V-MX 1-17 1.8.3 PCI slots The PCI slots support cards such as a LAN card, SCSI card, USB card, and other cards that comply with the PCI Express specifications. The figure shows a LAN card installed on the PCI Express x1 slot.
The following figure shows a network card installed on a PCI slot. 1.8.4 PCI Express x1 slot This motherboard supports PCI Express x1 network cards, SCSI cards and other cards that comply with PCI specifications. ASUS A8V-MX 1-17 1.8.3 PCI slots The PCI slots support cards such as a LAN card, SCSI card, USB card, and other cards that comply with the PCI Express specifications. The figure shows a LAN card installed on the PCI Express x1 slot.

A8V-MX User''s Manual for English Edition
Page 28
1.8.5 AGP 8X slot This motherboard has an Accelerated Graphics Port (AGP) slot that you ask for 1.5v A8V-MX Accelerated Graphics Port (AGP) 1-18 Chapter 1: Product introduction This motherboardboard does not support +3.3V AGP cards. Install only +0.8V or +1.5V AGP cards. Failure to do so can cause you buy an AGP card, make sure that supports AGP 8X (+0.8V) and AGP 4X (+1.5V) cards. When you physical injury and damage the motherboard. ® A8V-MX Keyed for one with +0.8V or +1.5V specification. Unplug the power cord before adding or removing expansion cards.
1.8.5 AGP 8X slot This motherboard has an Accelerated Graphics Port (AGP) slot that you ask for 1.5v A8V-MX Accelerated Graphics Port (AGP) 1-18 Chapter 1: Product introduction This motherboardboard does not support +3.3V AGP cards. Install only +0.8V or +1.5V AGP cards. Failure to do so can cause you buy an AGP card, make sure that supports AGP 8X (+0.8V) and AGP 4X (+1.5V) cards. When you physical injury and damage the motherboard. ® A8V-MX Keyed for one with +0.8V or +1.5V specification. Unplug the power cord before adding or removing expansion cards.

A8V-MX User''s Manual for English Edition
Page 37
... (3-pin CPU_FAN, 3-pin CHA_FAN) The fan connectors support cooling fans of 350mA~740mA (8.88W max.) or a total of 1A~2.22A (26.64W max.) at the back of the connector. DO NOT place jumper caps on the motherboard, making sure that the black wire of each cable... the fan cables to the fan connectors on the fan connectors. Insufficient air flow inside the system may damage the motherboard components. 5. Digital audio connector (4-1 pin SPDIF_OUT) This connector is purchased separately. ® A8V-MX SPDIF A8V-MX Digital audio connector ASUS A8V-MX +5V SPDIFOUT GND 1-27
... (3-pin CPU_FAN, 3-pin CHA_FAN) The fan connectors support cooling fans of 350mA~740mA (8.88W max.) or a total of 1A~2.22A (26.64W max.) at the back of the connector. DO NOT place jumper caps on the motherboard, making sure that the black wire of each cable... the fan cables to the fan connectors on the fan connectors. Insufficient air flow inside the system may damage the motherboard components. 5. Digital audio connector (4-1 pin SPDIF_OUT) This connector is purchased separately. ® A8V-MX SPDIF A8V-MX Digital audio connector ASUS A8V-MX +5V SPDIFOUT GND 1-27

A8V-MX User''s Manual for English Edition
Page 38
...module is purchased separately. 8 . Connect the USB/GAME module cable to any of the system chassis. These USB connectors comply with USB 2.0 specification that supports up to a slot opening at the back of these connectors, then install the module to 480 Mbps connection speed. USB connectors (10-1 pin USB56, ... 2.0 ports. 7 . AUX (White) CD (Black) Left Audio Channel Ground Ground Right Audio Channel Left Audio Channel Ground Ground Right Audio Channel ® A8V-MX A8V-MX Internal audio connectors 1-28 Chapter 1: Product introduction Doing so will damage the motherboard!
...module is purchased separately. 8 . Connect the USB/GAME module cable to any of the system chassis. These USB connectors comply with USB 2.0 specification that supports up to a slot opening at the back of these connectors, then install the module to 480 Mbps connection speed. USB connectors (10-1 pin USB56, ... 2.0 ports. 7 . AUX (White) CD (Black) Left Audio Channel Ground Ground Right Audio Channel Left Audio Channel Ground Ground Right Audio Channel ® A8V-MX A8V-MX Internal audio connectors 1-28 Chapter 1: Product introduction Doing so will damage the motherboard!

A8V-MX User''s Manual for English Edition
Page 40
10. Doing so will damage the motherboard. 1-30 Chapter 1: Product introduction Connect one end of the front panel audio I /O module that supports AC '97 audio standard. AGND +5VA BLINE_OUT_R BLINE_OUT_L ® A8V-MX AC `97 audio pin definition FP_AUDIO A8V-MX Front audio connector MIC2 MICPWR Line out_R NC Line out_L Do not plug HD Audio cables into this connector. Front panel audio connector (10-1 pin FP_AUDIO) This connector is for a chassis-mounted front panel audio I /O module cable to this connector.
10. Doing so will damage the motherboard. 1-30 Chapter 1: Product introduction Connect one end of the front panel audio I /O module that supports AC '97 audio standard. AGND +5VA BLINE_OUT_R BLINE_OUT_L ® A8V-MX AC `97 audio pin definition FP_AUDIO A8V-MX Front audio connector MIC2 MICPWR Line out_R NC Line out_L Do not plug HD Audio cables into this connector. Front panel audio connector (10-1 pin FP_AUDIO) This connector is for a chassis-mounted front panel audio I /O module cable to this connector.

A8V-MX User''s Manual for English Edition
Page 47
... the motherboard support CD to the bootable floppy disk you created earlier. 3. done Erasing flash .... Write the BIOS filename on the bootable floppy disk. A:\>afudos /iA8V-MX.ROM AMI Firmware Update Utility - done Writing flash .... 0x0008CC00 (9%) Verifying flash .. The utility verifies the file and starts updating the BIOS. All rights reserved. done A:\> ASUS A8V-MX 2-5 All...
... the motherboard support CD to the bootable floppy disk you created earlier. 3. done Erasing flash .... Write the BIOS filename on the bootable floppy disk. A:\>afudos /iA8V-MX.ROM AMI Firmware Update Utility - done Writing flash .... 0x0008CC00 (9%) Verifying flash .. The utility verifies the file and starts updating the BIOS. All rights reserved. done A:\> ASUS A8V-MX 2-5 All...

A8V-MX User''s Manual for English Edition
Page 48
...the updated BIOS file. • Prepare the motherboard support CD or the floppy disk containing the updated motherboard BIOS before using this utility. • Make sure that allows you rename the original or updated BIOS file in the floppy disk to A 8 V - Reading file "A8V-MX.ROM". R O M. When found ! ...3. Recovering the BIOS from a floppy disk To recover the BIOS from a floppy disk: 1. Bad BIOS checksum. Completed. 2.1.4 ASUS CrashFree BIOS 2 utility The ASUS CrashFree BIOS 2 is an auto recovery tool that you to restore the BIOS file when it fails or gets corrupted during the ...
...the updated BIOS file. • Prepare the motherboard support CD or the floppy disk containing the updated motherboard BIOS before using this utility. • Make sure that allows you rename the original or updated BIOS file in the floppy disk to A 8 V - Reading file "A8V-MX.ROM". R O M. When found ! ...3. Recovering the BIOS from a floppy disk To recover the BIOS from a floppy disk: 1. Bad BIOS checksum. Completed. 2.1.4 ASUS CrashFree BIOS 2 utility The ASUS CrashFree BIOS 2 is an auto recovery tool that you to restore the BIOS file when it fails or gets corrupted during the ...

A8V-MX User''s Manual for English Edition
Page 49
... for this motherboard. Completed. Doing so can cause system boot failure! 4. CD-ROM found ! Visit the ASUS website (www.asus.com) to the optical drive. 3. Bad BIOS checksum. Floppy not found ! Start flashing... The recovered BIOS may not be the latest BIOS version for floppy... ASUS A8V-MX 2-7 Recovering the BIOS from the support CD To recover...
... for this motherboard. Completed. Doing so can cause system boot failure! 4. CD-ROM found ! Visit the ASUS website (www.asus.com) to the optical drive. 3. Bad BIOS checksum. Floppy not found ! Start flashing... The recovered BIOS may not be the latest BIOS version for floppy... ASUS A8V-MX 2-7 Recovering the BIOS from the support CD To recover...

A8V-MX User''s Manual for English Edition
Page 53
...; Visit the ASUS website (www.asus.com) to ensure optimum performance. The firmware hub on . You can update using the provided utility described in the future. This requires you are for this motherboard and . Being a menu-driven program, it as easy to ensure system compatibility and stability. 2.2 BIOS setup program This motherboard supports a programmable firmware... test routines. If the system becomes unstable after POST, restart the system by pressing , or by turning the system off and then back on the motherboard stores the Setup utility. ASUS A8V-MX 2-11
...; Visit the ASUS website (www.asus.com) to ensure optimum performance. The firmware hub on . You can update using the provided utility described in the future. This requires you are for this motherboard and . Being a menu-driven program, it as easy to ensure system compatibility and stability. 2.2 BIOS setup program This motherboard supports a programmable firmware... test routines. If the system becomes unstable after POST, restart the system by pressing , or by turning the system off and then back on the motherboard stores the Setup utility. ASUS A8V-MX 2-11


