User Manual
Page 2
......1-6 Right Side...1-7 Left Side...1-8 Keyboard Usage...1-9 Special Function Keys 1-9 Touchpad Usage...1-11 Multi-finger gesture input (on selected models 1-11 Chapter 2: Getting Started Powering on your Eee PC...2-2 First-time Startup...2-3 Desktop...2-5 Network Connection...2-6 Configuring a wireless network connection 2-6 Local Area Network 2-7 Browsing web pages 2-10 Chapter 3: Using the Eee PC ASUS Update...3-2 Updating the BIOS through...
......1-6 Right Side...1-7 Left Side...1-8 Keyboard Usage...1-9 Special Function Keys 1-9 Touchpad Usage...1-11 Multi-finger gesture input (on selected models 1-11 Chapter 2: Getting Started Powering on your Eee PC...2-2 First-time Startup...2-3 Desktop...2-5 Network Connection...2-6 Configuring a wireless network connection 2-6 Local Area Network 2-7 Browsing web pages 2-10 Chapter 3: Using the Eee PC ASUS Update...3-2 Updating the BIOS through...
User Manual
Page 6
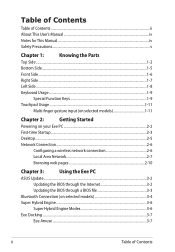
...drive's head retracts when the power is still ON. The Eee PC's surface is easily dulled if not properly cared for transport, you should not transport your Eee PC while the power is turned OFF to protect the keyboard and display panel. This product has been designed to enable ... of battery may cause explosion and damage the Eee PC. Transportation Precautions To prepare your Eee PC for . DO NOT throw the Eee PC in municipal waste. Be careful not to rub or scrape surfaces when transporting your Eee PC.You can put your Eee PC in municipal waste. Close the display panel to...
...drive's head retracts when the power is still ON. The Eee PC's surface is easily dulled if not properly cared for transport, you should not transport your Eee PC while the power is turned OFF to protect the keyboard and display panel. This product has been designed to enable ... of battery may cause explosion and damage the Eee PC. Transportation Precautions To prepare your Eee PC for . DO NOT throw the Eee PC in municipal waste. Be careful not to rub or scrape surfaces when transporting your Eee PC.You can put your Eee PC in municipal waste. Close the display panel to...
User Manual
Page 10
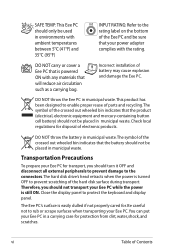
The top side may vary in appearance depending on this side of the Eee PC. Top Side Refer to the illustration below to identify the components on models. 1 2 3 4 5 6 7 8 The keyboard differs for each territory. 1-2 Chapter 1: Knowing the Parts
The top side may vary in appearance depending on this side of the Eee PC. Top Side Refer to the illustration below to identify the components on models. 1 2 3 4 5 6 7 8 The keyboard differs for each territory. 1-2 Chapter 1: Knowing the Parts

User Manual
Page 11
...indicator lights when the Eee PC is turned ON and blinks slowly when the Eee PC is turned OFF. 6 Keyboard The keyboard provides keys with comfortable travel (depth at which the keys can also turn OFF the Eee PC. This indicator is OFF when the Eee PC is opened. ASUS Eee PC 1-3 The power ...switch only works when the display panel is turned OFF. The keyboard differs depending on /off the function by pressing + . 5 ...
...indicator lights when the Eee PC is turned ON and blinks slowly when the Eee PC is turned OFF. 6 Keyboard The keyboard provides keys with comfortable travel (depth at which the keys can also turn OFF the Eee PC. This indicator is OFF when the Eee PC is opened. ASUS Eee PC 1-3 The power ...switch only works when the display panel is turned OFF. The keyboard differs depending on /off the function by pressing + . 5 ...

User Manual
Page 15
... speakers. 3 Microphone Jack The microphone jack is designed to connect the microphone used for connection to amplified speakers or headphones. ASUS Eee PC 1-7 Using this side of the Eee PC. 1 23 4 5 1 Memory Card Slot The built-in connector allows convenient use without additional adapters. The built-in ... recordings. 4 USB Port (2.0/1.1) The USB (Universal Serial Bus) port is compatible with USB 2.0 or USB 1.1 devices such as keyboards, pointing devices, cameras, and storage devices, connected in a series up to 12Mbits/sec (USB 1.1) and 480Mbits/sec (USB 2.0).
... speakers. 3 Microphone Jack The microphone jack is designed to connect the microphone used for connection to amplified speakers or headphones. ASUS Eee PC 1-7 Using this side of the Eee PC. 1 23 4 5 1 Memory Card Slot The built-in connector allows convenient use without additional adapters. The built-in ... recordings. 4 USB Port (2.0/1.1) The USB (Universal Serial Bus) port is compatible with USB 2.0 or USB 1.1 devices such as keyboards, pointing devices, cameras, and storage devices, connected in a series up to 12Mbits/sec (USB 1.1) and 480Mbits/sec (USB 2.0).
User Manual
Page 17
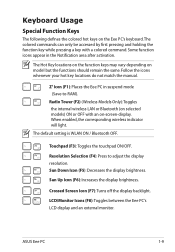
Radio Tower (F2) (Wireless Models Only):Toggles the internal wireless LAN or Bluetooth (on -screen-display. ASUS Eee PC 1-9 Follow the icons whenever your hot key locations do not match the manual. Touchpad (F3): Toggles the touchpad ON/OFF. Sun ... enabled, the corresponding wireless indicator will light. Keyboard Usage Special Function Keys The following defines the colored hot keys on model but the functions should remain the same. The Hot Key locations on the function keys may vary depending on the Eee PC's keyboard. Resolution Selection (F4): Press to -RAM)....
Radio Tower (F2) (Wireless Models Only):Toggles the internal wireless LAN or Bluetooth (on -screen-display. ASUS Eee PC 1-9 Follow the icons whenever your hot key locations do not match the manual. Touchpad (F3): Toggles the touchpad ON/OFF. Sun ... enabled, the corresponding wireless indicator will light. Keyboard Usage Special Function Keys The following defines the colored hot keys on model but the functions should remain the same. The Hot Key locations on the function keys may vary depending on the Eee PC's keyboard. Resolution Selection (F4): Press to -RAM)....
User Manual
Page 23
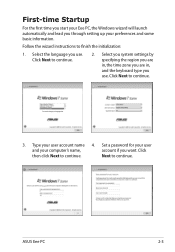
Select you system settings by specifying the region you are in, the time zone you are in, and the keyboard type you use . Select the language you use . ASUS Eee PC 2-3 Set a password for your user and your computer's name, account if you through setting up your preferences and some basic information. Follow the ... the initialization: 1. Next to continue. 2. Click Next to continue. Type your user account name 4. First-time Startup For the first time you start your Eee PC, the Windows wizard will launch automatically and lead you want. Click Next to continue. 3.
Select you system settings by specifying the region you are in, the time zone you are in, and the keyboard type you use . Select the language you use . ASUS Eee PC 2-3 Set a password for your user and your computer's name, account if you through setting up your preferences and some basic information. Follow the ... the initialization: 1. Next to continue. 2. Click Next to continue. Type your user account name 4. First-time Startup For the first time you start your Eee PC, the Windows wizard will launch automatically and lead you want. Click Next to continue. 3.
User Manual
Page 45
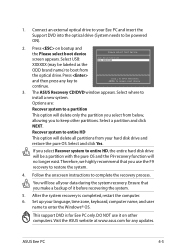
... pure OS. Press on other partitions. Therefore, we highly recommend that you use it before recovering the system. 5. Set up your Eee PC and insert the Support DVD into the optical drive (System needs to be labeled as the Please select boot device: HDD:PM-ST9160310AS ... a backup of it on bootup and the Please select boot device screen appears. Visit the ASUS website at www.asus.com for Eee PC only. Connect an external optical drive to your language, time zone, keyboard, computer name, and user name to boot from your data during the system recovery. Select...
... pure OS. Press on other partitions. Therefore, we highly recommend that you use it before recovering the system. 5. Set up your Eee PC and insert the Support DVD into the optical drive (System needs to be labeled as the Please select boot device: HDD:PM-ST9160310AS ... a backup of it on bootup and the Please select boot device screen appears. Visit the ASUS website at www.asus.com for Eee PC only. Connect an external optical drive to your language, time zone, keyboard, computer name, and user name to boot from your data during the system recovery. Select...


