User Manual
Page 2
... Batteries 1-6 Airplane Precautions 1-6 Preparing your Eee PC 1-7 Chapter 2: Knowing the Parts Top Side...2-2 Bottom Side...2-6 Right Side...2-8 Left Side...2-10 Rear Side...2-11 Chapter 3: Getting Started Power System 3-2 Using AC Power 3-2 Using Battery Power 3-3 Battery Care...3-4 Power Mode...3-4 Emergency Shutdown & Reset 3-5 Touchpad Usage 3-6 Single-finger gesture input 3-6 Multi-finger gesture input 3-8 Keyboard Usage 3-9 Special Function Keys 3-9 First-time Startup 3-14 Desktop...3-17 ASUS EeePC Tray Utility 3-18 Enabling and Disabling Devices 3-18 Adjusting the display...
... Batteries 1-6 Airplane Precautions 1-6 Preparing your Eee PC 1-7 Chapter 2: Knowing the Parts Top Side...2-2 Bottom Side...2-6 Right Side...2-8 Left Side...2-10 Rear Side...2-11 Chapter 3: Getting Started Power System 3-2 Using AC Power 3-2 Using Battery Power 3-3 Battery Care...3-4 Power Mode...3-4 Emergency Shutdown & Reset 3-5 Touchpad Usage 3-6 Single-finger gesture input 3-6 Multi-finger gesture input 3-8 Keyboard Usage 3-9 Special Function Keys 3-9 First-time Startup 3-14 Desktop...3-17 ASUS EeePC Tray Utility 3-18 Enabling and Disabling Devices 3-18 Adjusting the display...
User Manual
Page 3
... Using the Eee PC Network Connection 4-2 Configuring a wireless network connection 4-2 Configuring a network connection 4-4 Browsing web pages 4-10 ASUS Update 4-11 Updating the BIOS through the Internet 4-11 Updating the BIOS through a BIOS file 4-13 Bluetooth Connection (on selected models 4-14 ASUS Instant Key 4-16 Super Hybrid Engine 4-17 Eee Storage...4-18 Video Conferencing 4-20 Chapter 5: Support DVD & System Recovery Support DVD information 5-2 Running the support DVD 5-2 Drivers menu 5-2 Utilities menu 5-3 Contact ...5-4 Other information 5-4 System Recovery 5-5 Using...
... Using the Eee PC Network Connection 4-2 Configuring a wireless network connection 4-2 Configuring a network connection 4-4 Browsing web pages 4-10 ASUS Update 4-11 Updating the BIOS through the Internet 4-11 Updating the BIOS through a BIOS file 4-13 Bluetooth Connection (on selected models 4-14 ASUS Instant Key 4-16 Super Hybrid Engine 4-17 Eee Storage...4-18 Video Conferencing 4-20 Chapter 5: Support DVD & System Recovery Support DVD information 5-2 Running the support DVD 5-2 Drivers menu 5-2 Utilities menu 5-3 Contact ...5-4 Other information 5-4 System Recovery 5-5 Using...
User Manual
Page 7
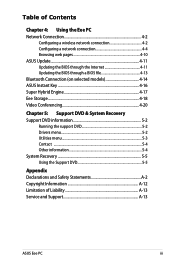
TIP: Tips for safe operation. Important information that must be followed to prevent damage to complete certain tasks safely and effectively.These notes have different degrees of importance as follows: WARNING! IMPORTANT! Vital information that must be followed for completing tasks. ASUS Eee PC 1-3 Notes for special situations. NOTE: Information for This Manual A few notes and warnings are used throughout this guide, allowing you to data, components, or persons.
TIP: Tips for safe operation. Important information that must be followed to prevent damage to complete certain tasks safely and effectively.These notes have different degrees of importance as follows: WARNING! IMPORTANT! Vital information that must be followed for completing tasks. ASUS Eee PC 1-3 Notes for special situations. NOTE: Information for This Manual A few notes and warnings are used throughout this guide, allowing you to data, components, or persons.

User Manual
Page 8
... manual, refer all precautions and instructions. DO NOT short circuit the contacts. Seek servicing if the casing has been damaged. DO NOT operate during electrical storms. DO NOT leave the Eee PC on or near liquids, rain, or moisture. Disconnect the AC power and remove the battery pack(s) before cleaning. Except as thinners, benzene, or other peripherals. Do not use...
... manual, refer all precautions and instructions. DO NOT short circuit the contacts. Seek servicing if the casing has been damaged. DO NOT operate during electrical storms. DO NOT leave the Eee PC on or near liquids, rain, or moisture. Disconnect the AC power and remove the battery pack(s) before cleaning. Except as thinners, benzene, or other peripherals. Do not use...

User Manual
Page 9
.... SAFE TEMP: This Eee PC should not be sure that your power adapter complies with any materials that will reduce air circulation such as a carrying bag. Incorrect installation of electronic products. The symbol of the crossed out wheeled bin indicates that the product (electrical, electronic equipment and mercury-containing button cell battery) should only be used in environments with...
.... SAFE TEMP: This Eee PC should not be sure that your power adapter complies with any materials that will reduce air circulation such as a carrying bag. Incorrect installation of electronic products. The symbol of the crossed out wheeled bin indicates that the product (electrical, electronic equipment and mercury-containing button cell battery) should only be used in environments with...

User Manual
Page 10
... use battery power, be sure to use the Eee PC on people or individual items). Airplane Precautions Contact your airline if you want to fully charge your Eee PC in use only between and not during transport. You can send your Eee PC and diskettes through security checks), and magnetic wands (hand-held devices used on long trips. There are three main types of the hard disk...
... use battery power, be sure to use the Eee PC on people or individual items). Airplane Precautions Contact your airline if you want to fully charge your Eee PC in use only between and not during transport. You can send your Eee PC and diskettes through security checks), and magnetic wands (hand-held devices used on long trips. There are three main types of the hard disk...
User Manual
Page 11
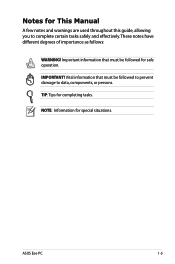
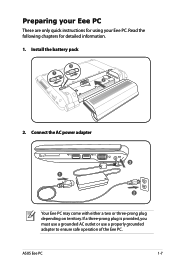
If a three-prong plug is provided, you must use a grounded AC outlet or use a properly grounded adapter to ensure safe operation of the Eee PC. ASUS Eee PC 1-7 1 3 Preparing your Eee PC These are only quick instructions for detailed information. 1. Connect the AC power adapter Your Eee PC may come with either a two or three-prong plug depending on territory. Read the following chapters for using your Eee PC. Install the battery pack 3 1 2 2.
If a three-prong plug is provided, you must use a grounded AC outlet or use a properly grounded adapter to ensure safe operation of the Eee PC. ASUS Eee PC 1-7 1 3 Preparing your Eee PC These are only quick instructions for detailed information. 1. Connect the AC power adapter Your Eee PC may come with either a two or three-prong plug depending on territory. Read the following chapters for using your Eee PC. Install the battery pack 3 1 2 2.

User Manual
Page 15
... easier on the keyboard, mouse or touchpad will activate monitor again. Any action on the eyes. Press this key turns off the LCD monitor backlight. User-defined Key This key is reserved for customized definition.The default definition is more clear and echo-free compared with one push of desktop monitors. ASUS Eee PC 2-3 Resolution Key The Resolution key allows you to launch frequently used applications with traditional single microphones and can be...
... easier on the keyboard, mouse or touchpad will activate monitor again. Any action on the eyes. Press this key turns off the LCD monitor backlight. User-defined Key This key is reserved for customized definition.The default definition is more clear and echo-free compared with one push of desktop monitors. ASUS Eee PC 2-3 Resolution Key The Resolution key allows you to launch frequently used applications with traditional single microphones and can be...

User Manual
Page 16
... Indicators (front) Power Indicator The power indicator lights when the Eee PC is turned ON and blinks slowly when the Eee PC is opened. 6 Keyboard The keyboard provides keys with built-in the Saveto-RAM (Suspend) mode. Only models with comfortable travel (depth at which the keys can be depressed) and palm rest for both hands. 7 Touchpad and Buttons The touchpad and its buttons comprises a pointing device that provides the same functions as a desktop mouse. The power switch only works...
... Indicators (front) Power Indicator The power indicator lights when the Eee PC is turned ON and blinks slowly when the Eee PC is opened. 6 Keyboard The keyboard provides keys with built-in the Saveto-RAM (Suspend) mode. Only models with comfortable travel (depth at which the keys can be depressed) and palm rest for both hands. 7 Touchpad and Buttons The touchpad and its buttons comprises a pointing device that provides the same functions as a desktop mouse. The power switch only works...

User Manual
Page 17
... Blinking Quickly Green Blinking Quickly Standby Mode / Powered OFF AC Mode Battery Mode Battery charge is between 100%-80% Orange ON Off Battery charge is between 80%-10% Orange Blinking Slowly Off Battery charge is less than 10% Orange Blinking Quickly Off The Battery Charge Indicator will not light when the battery is removed from the disk drive. ASUS Eee PC 2-5 Wireless/Bluetooth Indicator This is only applicable on models with built-in wireless LAN/Bluetooth is enabled, this indicator lights. When the built-in wireless LAN/Bluetooth...
... Blinking Quickly Green Blinking Quickly Standby Mode / Powered OFF AC Mode Battery Mode Battery charge is between 100%-80% Orange ON Off Battery charge is between 80%-10% Orange Blinking Slowly Off Battery charge is less than 10% Orange Blinking Quickly Off The Battery Charge Indicator will not light when the battery is removed from the disk drive. ASUS Eee PC 2-5 Wireless/Bluetooth Indicator This is only applicable on models with built-in wireless LAN/Bluetooth is enabled, this indicator lights. When the built-in wireless LAN/Bluetooth...
User Manual
Page 19
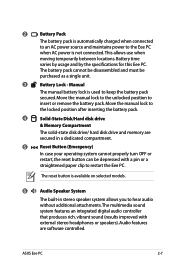
... audio controller that produces rich, vibrant sound (results improved with a pin or a straightened paper clip to the locked position after inserting the battery pack. 4 Solid-State Disk/Hard disk drive & Memory Compartment The solid-state disk drive/ hard disk drive and memory are software controlled. The battery pack cannot be disassembled and must be depressed with external stereo headphones or speakers). Move the manual lock to restart the Eee PC. The reset button is available on selected models. 6 Audio...
... audio controller that produces rich, vibrant sound (results improved with a pin or a straightened paper clip to the locked position after inserting the battery pack. 4 Solid-State Disk/Hard disk drive & Memory Compartment The solid-state disk drive/ hard disk drive and memory are software controlled. The battery pack cannot be disassembled and must be depressed with external stereo headphones or speakers). Move the manual lock to restart the Eee PC. The reset button is available on selected models. 6 Audio...

User Manual
Page 22
... keyboards, pointing devices, cameras, and storage devices, connected in connector allows convenient use without additional adapters. 3 2.0 USB Port (2.0/1.1) The USB (Universal Serial Bus) port is designed to run simultaneously on this side of the Eee PC. 1 2 3 45 1 Kensington® Lock Port The Kensington® lock port allows the Eee PC to be removed from a fixed object. 2 LAN Port The eight-pin RJ-45 LAN port (10/100M bit) supports a standard Ethernet cable for Skype, voice narrations, or simple audio...
... keyboards, pointing devices, cameras, and storage devices, connected in connector allows convenient use without additional adapters. 3 2.0 USB Port (2.0/1.1) The USB (Universal Serial Bus) port is designed to run simultaneously on this side of the Eee PC. 1 2 3 45 1 Kensington® Lock Port The Kensington® lock port allows the Eee PC to be removed from a fixed object. 2 LAN Port The eight-pin RJ-45 LAN port (10/100M bit) supports a standard Ethernet cable for Skype, voice narrations, or simple audio...
User Manual
Page 27
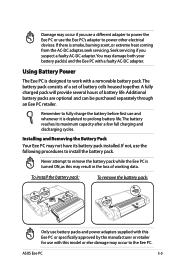
... cycles. ASUS Eee PC 3-3 Installing and Removing the Battery Pack Your Eee PC may occur to work with a faulty AC-DC adapter. To install the battery pack: To remove the battery pack: 3 1 2 2 1 3 Only use battery packs and power adapters3 supplied with this Eee PC or specifically approved by the1 manufacturer or retailer for use the Eee PC's adapter to prolong battery life.The battery reaches its battery pack installed. Seek servicing if you use a different adapter to power the Eee PC or use with this...
... cycles. ASUS Eee PC 3-3 Installing and Removing the Battery Pack Your Eee PC may occur to work with a faulty AC-DC adapter. To install the battery pack: To remove the battery pack: 3 1 2 2 1 3 Only use battery packs and power adapters3 supplied with this Eee PC or specifically approved by the1 manufacturer or retailer for use the Eee PC's adapter to prolong battery life.The battery reaches its battery pack installed. Seek servicing if you use a different adapter to power the Eee PC or use with this...
User Manual
Page 33
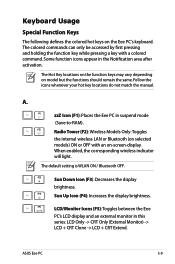
... suspend mode (Save-to-RAM). zzZ Icon (F1): Places the Eee PC in the Notification area after activation. The default setting is WLAN ON / Bluetooth OFF. Keyboard Usage Special Function Keys The following defines the colored hot keys on model but the functions should remain the same. When enabled, the corresponding wireless indicator will light. Sun Down Icon (F3): Decreases the display brightness. LCD/Monitor Icons (F5): Toggles between the Eee PC's LCD display and an external monitor...
... suspend mode (Save-to-RAM). zzZ Icon (F1): Places the Eee PC in the Notification area after activation. The default setting is WLAN ON / Bluetooth OFF. Keyboard Usage Special Function Keys The following defines the colored hot keys on model but the functions should remain the same. When enabled, the corresponding wireless indicator will light. Sun Down Icon (F3): Decreases the display brightness. LCD/Monitor Icons (F5): Toggles between the Eee PC's LCD display and an external monitor...

User Manual
Page 34
... web browser. 3-10 Chapter 3: Getting Started Speaker Down Icon (F8): Decreases speaker volume. Allows use a larger portion of entire desktop. Prt Sc (Ins): Toggles the "Print Screen" key to initiate screen capture utility to scroll up the Eee PC. Crossed Speaker Icon (F7): Mutes the speaker. Pg Up (↑): Press to capture, save, or print the contents of the keyboard for number entering...
... web browser. 3-10 Chapter 3: Getting Started Speaker Down Icon (F8): Decreases speaker volume. Allows use a larger portion of entire desktop. Prt Sc (Ins): Toggles the "Print Screen" key to initiate screen capture utility to scroll up the Eee PC. Crossed Speaker Icon (F7): Mutes the speaker. Pg Up (↑): Press to capture, save, or print the contents of the keyboard for number entering...

User Manual
Page 35
...): Wireless Models Only:Toggles the internal wireless LAN or Bluetooth (on selected models) ON or OFF with pointer icon : Activates the properties menu and is WLAN ON / Bluetooth OFF. Sun Up Icon (F6): Increases the display brightness. 3-11 Menu with an on an object. B. When enabled, the corresponding wireless indicator will light. ASUS Eee PC Sun Down Icon (F5): Decreases the display brightness. The default setting is equivalent to right-clicking the touchpad/mouse on -screen-display. End...
...): Wireless Models Only:Toggles the internal wireless LAN or Bluetooth (on selected models) ON or OFF with pointer icon : Activates the properties menu and is WLAN ON / Bluetooth OFF. Sun Up Icon (F6): Increases the display brightness. 3-11 Menu with an on an object. B. When enabled, the corresponding wireless indicator will light. ASUS Eee PC Sun Down Icon (F5): Decreases the display brightness. The default setting is equivalent to right-clicking the touchpad/mouse on -screen-display. End...

User Manual
Page 36
... use a higher resolution with a connected external monitor. Crossed Screen Icon (F7): Turns off the display backlight. Volume Down Icon (F11): Decreases speaker volume. LCD/Monitor Icons (F8): Toggles between the Eee PC's LCD display and an external monitor in this series: LCD Only -> CRT Only (External Monitor) -> LCD + CRT Clone -> LCD + CRT Extend. Crossed Speaker Icon (F10): Mutes the speaker. Num Lk (Insert): Toggles the numeric keypad (number lock) ON and OFF. LCD + CRT Clone mode only supports...
... use a higher resolution with a connected external monitor. Crossed Screen Icon (F7): Turns off the display backlight. Volume Down Icon (F11): Decreases speaker volume. LCD/Monitor Icons (F8): Toggles between the Eee PC's LCD display and an external monitor in this series: LCD Only -> CRT Only (External Monitor) -> LCD + CRT Clone -> LCD + CRT Extend. Crossed Speaker Icon (F10): Mutes the speaker. Num Lk (Insert): Toggles the numeric keypad (number lock) ON and OFF. LCD + CRT Clone mode only supports...

User Manual
Page 37
ASUS Eee PC 3-13 Allows you to scroll down in documents or the web browser. Windows icon: Displays the start menu. Pg Dn (↓): Press to use a larger portion of the line. Menu with pointer icon : Activates the properties menu and is equivalent to scroll up in documents or the web browser. Home (←): Press to move the pointer to the beginning of the...
ASUS Eee PC 3-13 Allows you to scroll down in documents or the web browser. Windows icon: Displays the start menu. Pg Dn (↓): Press to use a larger portion of the line. Menu with pointer icon : Activates the properties menu and is equivalent to scroll up in documents or the web browser. Home (←): Press to move the pointer to the beginning of the...
User Manual
Page 66
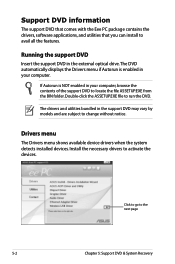
... with the Eee PC package contains the drivers, software applications, and utilities that you can install to run the DVD. Running the support DVD Insert the support DVD in the external optical drive.The DVD automatically displays the Drivers menu if Autorun is NOT enabled in your computer. Install the necessary drivers to the next page 5-2 Chapter 5: Support DVD & System Recovery Click to go to activate the devices. If Autorun...
... with the Eee PC package contains the drivers, software applications, and utilities that you can install to run the DVD. Running the support DVD Insert the support DVD in the external optical drive.The DVD automatically displays the Drivers menu if Autorun is NOT enabled in your computer. Install the necessary drivers to the next page 5-2 Chapter 5: Support DVD & System Recovery Click to go to activate the devices. If Autorun...

User Manual
Page 69
... insert the Support DVD into the optical drive (System needs to be labeled as network settings). 1. Please select boot device: HDD:SM-ASUS-PHISON SSD HDD:SS-ASUS-PHISON SSD USB:XXXXXXXX ↑ and ↓ to move selection ENTER to a network drive and make note of the operating system, installed on bootup and the Please select boot device screen appears. Connect an external optical drive to your data files to floppy disks or to select boot device 3. ASUS Eee PC 5-5
... insert the Support DVD into the optical drive (System needs to be labeled as network settings). 1. Please select boot device: HDD:SM-ASUS-PHISON SSD HDD:SS-ASUS-PHISON SSD USB:XXXXXXXX ↑ and ↓ to move selection ENTER to a network drive and make note of the operating system, installed on bootup and the Please select boot device screen appears. Connect an external optical drive to your data files to floppy disks or to select boot device 3. ASUS Eee PC 5-5


